EventBus发布-订阅模式 ( Android 中使用 发布-订阅模式 进行通信 )
Posted 韩曙亮
tags:
篇首语:本文由小常识网(cha138.com)小编为大家整理,主要介绍了EventBus发布-订阅模式 ( Android 中使用 发布-订阅模式 进行通信 )相关的知识,希望对你有一定的参考价值。
一、拷贝 发布-订阅模式 相关类
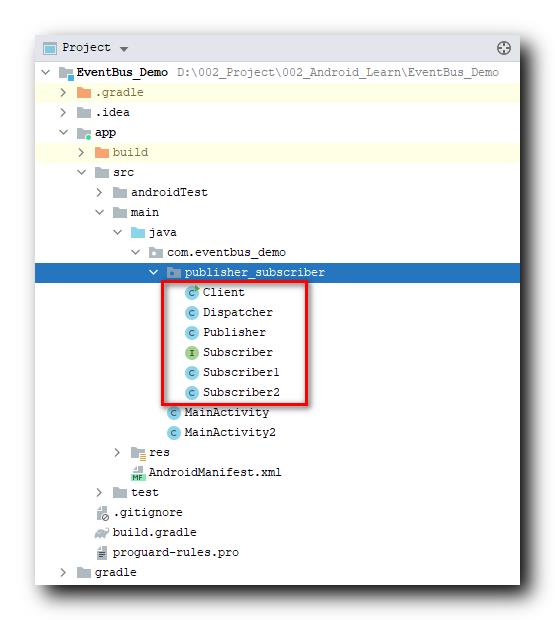
将上一篇博客 【EventBus】发布-订阅模式 ( 使用代码实现发布-订阅模式 ) 写的 发布-订阅模式 相关代码拷贝到android Studio 工程中 ,

在 Android 中 , 将 Activity 定义成订阅者 , 订阅者需要实现 Subscriber 接口 , 实现 public void onEvent(String msg) 接口方法 , 接收到消息后 , Toast 消息即可 ;
public class MainActivity2 extends AppCompatActivity implements Subscriber {
    @Override
    public void onEvent(String msg) {
        Toast.makeText(
                this,
                "订阅者 Activity 接收到消息 : " + msg,
                Toast.LENGTH_LONG).show();
    }
}
在 Activity 的 onCreate 方法中 , 将订阅者 Subscriber 注册到 调度中心 Dispatcher ;
    @Override
    protected void onCreate(Bundle savedInstanceState) {
        // 注册订阅者
        Dispatcher.getInstance().register(this);
    }
在 Activity 的 onDestory 方法中 , 将订阅者 Subscriber 从 调度中心 Dispatcher 中取消注册 ;
    @Override
    protected void onDestroy() {
        // 取消注册订阅者
        Dispatcher.getInstance().unregister(this);
    }
使用 Activity 中的按钮点击事件触发 发布者 Publisher 向调度中心发布消息 ;
        textView = findViewById(R.id.textView);
        // 设置点击事件, 点击后发送消息
        textView.setOnClickListener((View view)->{
            // 发布者发布消息
            new Publisher().post("Hello");
        });
订阅者 Activity 接收到消息后 , 将消息 Toast 出来 ;
EventBus 也是以该 发布-订阅模式 为核心开发的 ;
二、完整代码示例
发布者 , 订阅者 , 调度中心 的 代码 , 与 【EventBus】发布-订阅模式 ( 使用代码实现发布-订阅模式 ) 博客中的一致 , 直接将这些代码拷贝到 Android Studio 工程中 , 这里就不再重复粘贴了 ;
Activity 作为订阅者完整代码 :
package com.eventbus_demo;

import android.os.Bundle;
import android.view.View;
import android.widget.TextView;
import android.widget.Toast;

import androidx.appcompat.app.AppCompatActivity;

import com.eventbus_demo.publisher_subscriber.Dispatcher;
import com.eventbus_demo.publisher_subscriber.Publisher;
import com.eventbus_demo.publisher_subscriber.Subscriber;

public class MainActivity2 extends AppCompatActivity implements Subscriber {

    private TextView textView;

    @Override
    protected void onCreate(Bundle savedInstanceState) {
        super.onCreate(savedInstanceState);
        setContentView(R.layout.activity_main);

        textView = findViewById(R.id.textView);
        // 设置点击事件, 点击后发送消息
        textView.setOnClickListener((View view)->{
            // 发布者发布消息
            new Publisher().post("Hello");
        });

        // 注册订阅者
        Dispatcher.getInstance().register(this);
    }

    @Override
    protected void onDestroy() {
        super.onDestroy();

        // 取消注册订阅者
        Dispatcher.getInstance().unregister(this);
    }

    @Override
    public void onEvent(String msg) {
        Toast.makeText(
                this,
                "订阅者 Activity 接收到消息 : " + msg,
                Toast.LENGTH_LONG).show();
    }
}
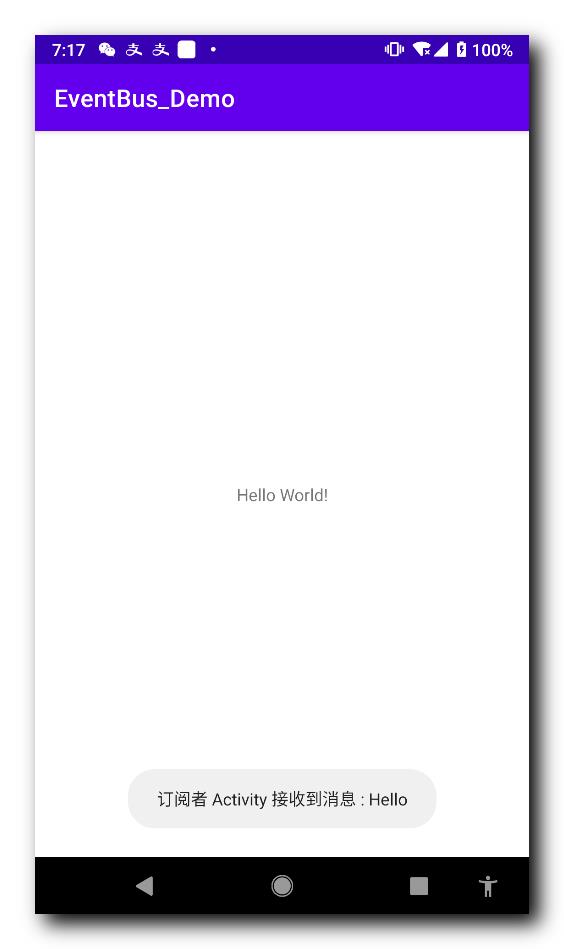
执行结果 : 点击按钮 , 发布者发送 “Hello” 消息给订阅者 MainActivity2 , 订阅者收到消息后 , Toast 消息内容 ;

以上是关于EventBus发布-订阅模式 ( Android 中使用 发布-订阅模式 进行通信 )的主要内容,如果未能解决你的问题,请参考以下文章