Day398&399.三级分类 -谷粒商城
Posted 阿昌喜欢吃黄桃
tags:
篇首语:本文由小常识网(cha138.com)小编为大家整理,主要介绍了Day398&399.三级分类 -谷粒商城相关的知识,希望对你有一定的参考价值。
三级分类
0、表结构

1、sql脚本
根据老师提供的sql
2、查找所有分类以及子分类
- 在achangmall-product的com.achang.achangmall.product.controller.CategoryController添加如下方法
/**
     * 查出所有分类以及子分类,以树形结构组装
     */
@RequestMapping("/list/tree")
public R list(){
    List<CategoryEntity> treeList = categoryService.listTree();
    return R.ok().put("list", treeList);
}
- com.achang.achangmall.product.service.impl.CategoryServiceImpl
//查出所有分类以及子分类,以树形结构组装
@Override
public List<CategoryEntity> listTree() {
    List<CategoryEntity> allList = baseMapper.selectList(null);

    List<CategoryEntity> parentList = allList.stream()
        .filter(item -> item.getParentCid() == 0)
        .map(item -> {
            item.setChildren(getChildren(item, allList));
            return item;
        }).sorted((item1, item2) -> {
        return item1.getSort() - item2.getSort();
    })
        .collect(Collectors.toList());
    return parentList ;
}

//递归查找所有菜单的子菜单
private List<CategoryEntity> getChildren(CategoryEntity root, List<CategoryEntity> allList) {
    List<CategoryEntity> lastList = allList.stream()
        .filter(item -> {return root.getCatId().equals(item.getParentCid());})
        .map(item -> {
            item.setChildren(getChildren(item, allList));
            return item;
        })
        .sorted(
        (item1, item2) -> {
            return (item1.getSort()==null?0:item1.getSort()) - (item2.getSort()==null?0:item2.getSort());
        })
        .collect(Collectors.toList());

    return lastList;
}
- 请求JSON结果
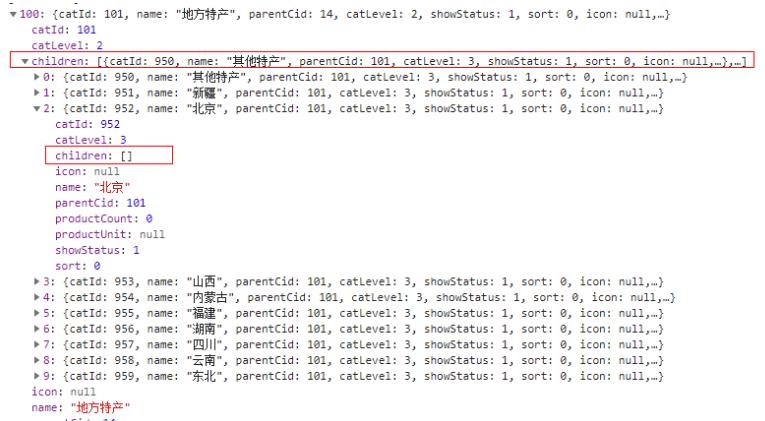
3、配置网关路由与路径重写
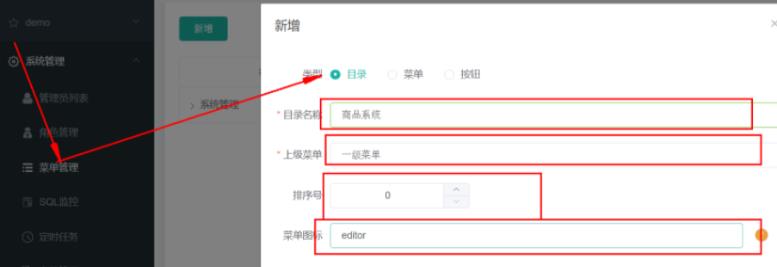
- 接着操作后台 localhost:8001 , 点击系统管理,菜单管理,新增 目录 商品系统 一级菜单

- 继续新增: 菜单 分类维护 商品系统 product/category
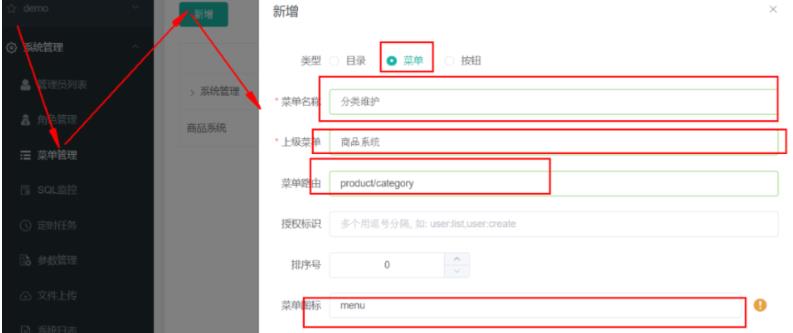
在左侧点击【分类维护】,希望在此展示3级分类 注意地址栏http://localhost:8001/#/product-category 可以注意到product-category我们的/被替换为了-
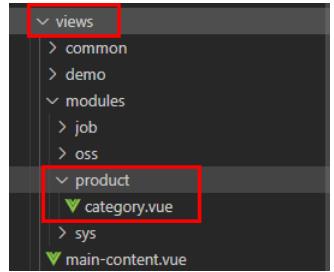
- 比如sys-role具体的视图在renren-fast-vue/views/modules/sys/role.vue

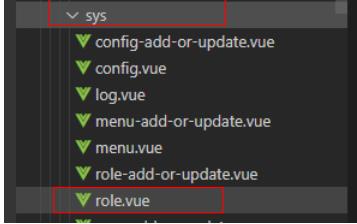
- 所以要自定义我们的product/category视图的话,就是创建mudules/product/category.vue
- 此时我们使用elementui的树形结构组件

- 他要给8080发请求读取数据,但是数据是在10000端口上,如果找到了这个请求改端口那改起来很麻烦。方法1是改vue项目里的全局配置,方法2是搭建个网关,让网关路由到10000
Ctrl+Shift+F全局搜索
在static/config/index.js里 window.SITE_CONFIG[‘baseUrl’] = ‘http://localhost:88/api’;

接着让重新登录http://localhost:8001/#/login,验证码是请求88的,所以不显示。而验证码是来源于fast后台的

现在的验证码请求路径为,http://localhost:88/api/captcha.jpg?uuid=69c79f02-d15b-478a-8465-a07fd09001e6原始的验证码请求路径:http://localhost:8001/renren-fast/captcha.jpg?uuid=69c79f02-d15b-478a-8465-a07fd09001e6
- 88是gateway的端口
spring.cloud.nacos.discovery.server-addr=127.0.0.1:8848
spring.application.name=achangmall-gateway
server.port=88
- 他要去nacos中查找api服务,但是nacos里是fast服务,就通过把api改成fast服务 ;需要将它交给nacos注册中心,所以给他加入achangmall-common的依赖
<dependency>
    <groupId>com.achang.achangmall</groupId>
    <artifactId>achangmall-common</artifactId>
    <version>0.0.1-SNAPSHOT</version>
</dependency>
- 在fast中添加如下配置,指定nacos地址和此服务名
spring:
  cloud:
    nacos:
      discovery:
        server-addr: localhost:8848
  application:
    name: renren-fast
如果报错gson依赖,就导入google的gson依赖
- 这里阿昌出现了错误
Could not find class [org.springframework.cloud.client.loadbalancer.reactive.OnNoRibbonDefaultCondit发现是阿昌这里所使用的依赖版本是有误的,服务模块的项目使用的是2020.1.X的springcloud,所以需要修改:
- springcloud的版本:Hoxton.RELEASE
- springboot的版本:2.2.1.RELEASE
- springcloud alibaba的版本:2.2.1.RELEASE
- 在gateway中按格式加入
spring:
  cloud:
    gateway:
      routes:
        - id: renren_route
          uri: lb://renren-fast
          predicates:
            - Path=/api/**
          filters:
          		#将/api/的路径重写成/renren-fast/
            - RewritePath=/api/(?<segment>.*),/renren-fast/$\\{segment}
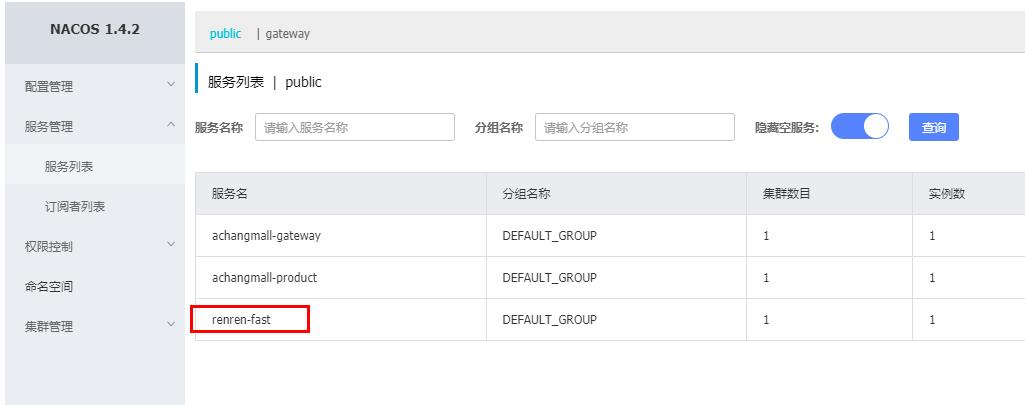
- 然后在nacos的服务列表里看到了renren-fast
- 登录,还是报错!!!

- 这里可知为
跨域问题
那我们就在Gateway网关里写一个配置类去过来请求让他不跨域
package com.achang.achangmall.gateway.conf;

import org.springframework.context.annotation.Bean;
import org.springframework.context.annotation.Configuration;
import org.springframework.web.cors.CorsConfiguration;
import org.springframework.web.cors.reactive.CorsWebFilter;
import org.springframework.web.cors.reactive.UrlBasedCorsConfigurationSource;

/******
 @author 阿昌
 @create 2021-09-22 22:41
 *******
 */
@Configuration
public class CorsConfig {

    @Bean
    public CorsWebFilter corsWebFilter(){
        // 基于url跨域,选择reactive包下的
        UrlBasedCorsConfigurationSource source=new UrlBasedCorsConfigurationSource();
        // 跨域配置信息
        CorsConfiguration corsConfiguration = new CorsConfiguration();
        // 允许跨域的头
        corsConfiguration.addAllowedHeader("*");
        // 允许跨域的请求方式
        corsConfiguration.addAllowedMethod("*");
        // 允许跨域的请求来源
        corsConfiguration.addAllowedOrigin("*");
        // 是否允许携带cookie跨域
        corsConfiguration.setAllowCredentials(true);

        // 任意url都要进行跨域配置
        source.registerCorsConfiguration("/**",corsConfiguration);
        return new CorsWebFilter(source);
    }
}
- 再次访问:http://localhost:8001/#/login,发现还是跨域,

- 此时这里还跨域的问题是
人人开源的服务里面他自己也配置了跨域,这里把他注释掉

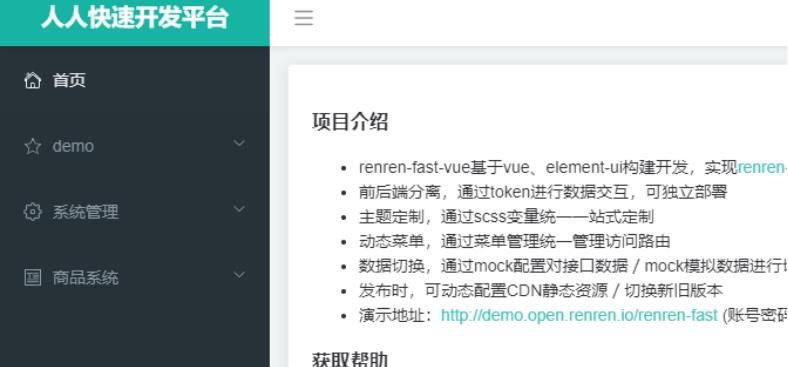
- 此时再次登录,成功!!!
4、树形展示三级分类数据
在显示商品系统/分类信息的时候,出现了404异常,请求的http://localhost:88/api/product/category/list/tree不存在
这是因为网关上所做的路径映射不正确,映射后的路径为http://localhost:8001/renren-fast/product/category/list/tree
但是只有通过http://localhost:10000/product/category/list/tree路径才能够正常访问,所以会报404异常。
- 解决方法就是定义一个product路由规则,进行
路径重写: 在网关增加三级分类的路由
        - id: product_route
          uri: lb://achangmall-product
          predicates:
            - Path=/api/product/**
          filters:
            - RewritePath=/api/(?<segment>.*),/$\\{segment}
- 在nacos中新建命名空间,用
命名空间隔离项目,(可以在其中新建achangmall-product.yml)

spring:
  datasource:
    password: root
    username: root
    url: jdbc:mysql://192.168.109.101:3306/achangmall-pms?useUnicode=true&characterEncoding=UTF-8&serverTimezone=Asia/Shanghai
    driver-class-name: com.mysql.jdbc.Driver

  application:
    name: achangmall-product
  cloud:
    nacos:
      discovery:
        server-addr: localhost:8848

mybatis-plus:
  mapper-locations: classpath:/mapper/**/*.xml
  global-config:
    db-config:
      id-type: auto

server:
  port: 10000
- 在product项目中
新建bootstrap.properties
spring.application.name=gulimall-product
spring.cloud.nacos.config.server-addr=127.0.0.1:8848
spring.cloud.nacos.config.namespace=07a0c61b-ea34-4c89-9d7e-17a050124943
-
主类上加上注解
@EnableDiscoveryClient -
访问 localhost:88/api/product/category/list/tree invalid token,非法令牌,后台管理系统中没有登录,所以没有带令牌
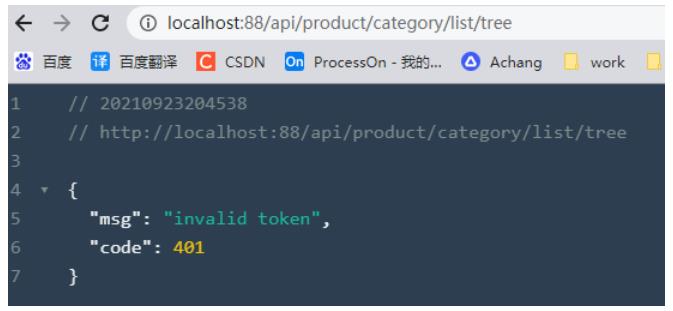
- 这里就需要调整网格Gateway里面的路由顺序,让
越模糊的路由越在后面
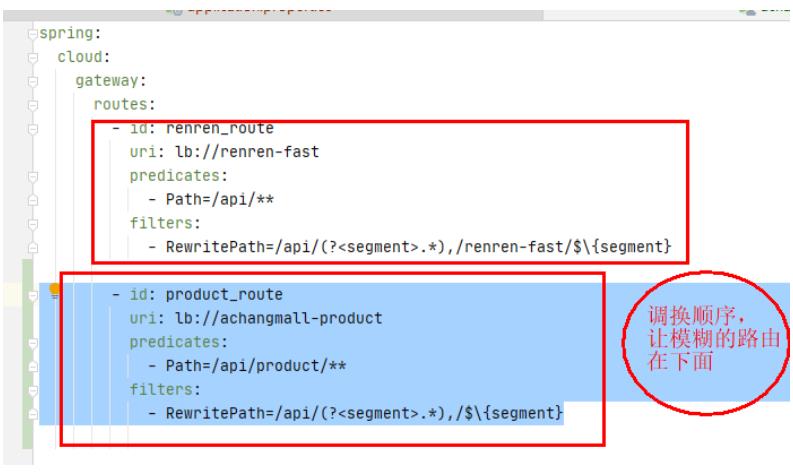
再次访问!!!成功!

- 接着修改前端部分,data解构,获取到后端传来的数据,并赋值给data
.<template>
    <el-tree
             :data="data"
             :props="defaultProps"
             @node-click="handleNodeClick"
             ></el-tree>
</template>

<script>
    export default {
        data() {
            return {
                data: [],//获取到后端来的数据,并赋值
                defaultProps: {
                    children: "children",
                    label: "name",
                },
            };
        },
        methods: {
            //获取所有菜单
            getMenus() {
                this.$http({
                    url: this.$http.adornUrl(`/product/category/list/tree`),
                    method: "get",
                }).then((resp) => {
                    this.data = resp.data.list;
                });
            },
            handleNodeClick(data) {
                console.log(data);
            },
        },
        created() {
            this.getMenus();
        },
    };
</script>
- 前端效果图

5、删除数据
-
scoped slot(插槽):在el-tree标签里把内容写到span标签栏里即可
-
修改category.vue的代码
.<template>
<el-tree
         :data="data"
         :props="defaultProps"
         show-checkbox
         @node-click="handleNodeClick"
         :expand-on-click-node="false"
         node-key="catId"
         >
    <span class="custom-tree-node" slot-scope="{ node, data }">
        <span>{{ node.label }}</span>
        <span>
            <el-button
                       v-if="node.level != 3"
                       type="text"
                       size="mini"
                       @click="() => append(data)"
                       >
                Append
    </el-button>
            <el-button
                       v-if="node.childNodes <= 0"
                       type="text"
                       size="mini"
                       @click="() => remove(node, data)"
                       >
                Delete
    </el-button>
    </span>
    </span></el-tree
    >
</template>

<script>
    export default {
        data() {
            return {
                data: [],
                defaultProps: {
                    children: "children",
                    label: "name",
                },
            };
        },
        methods: {
            //添加节点
            append(data) {},
            //删除节点
            remove(node, data) {
                console.log(node);
            },
            //获取所有菜单
            getMenus() {
                this.$http({
                    url: this.$http.adornUrl(`/product/category/list/tree`),
                    method: "get",
                }).then((resp) => {
                    this.data = resp.data.list;
                });
            },
            handleNodeClick(data) {
                console.log(data);
            },
        },
        created() {
            this.getMenus();
        },
    };
</script>
- 编写后台的删除接口
/**
* 删除
*/
@RequestMapping("/delete")
public R delete(@RequestBody Long[] catIds){
    categoryService.removeCategory(catIds);
    return R.ok();
}

@Override
public void removeCategory(Long[] catIds) {
    baseMapper.deleteBatchIds(Arrays.asList(catIds));
}
- 编写后台的删除接口,这里采用
逻辑删除,那么首先我们就需要通过MybaitsPlus配置逻辑删除
在achangmall-product的application.yaml配置如下
mybatis-plus:
  mapper-locations: classpath:/mapper/**/*.xml
  global-config:
    db-config:
      id-type: auto
      logic-delete-value: 1 #逻辑删除的值为1
      logic-not-delete-value: 0 #无逻辑删除的值0
在CategoryEntity中指定字段指定逻辑删除
public class CategoryEntity implements Serializable {

	/**
	 * 是否显示[0-不显示,1显示]
	 */
	@TableLogic(value = "1",delval = "0")
	private Integer showStatus;

    //省略其他属性.........
}
- 另外在“src/main/resources/application.yml”文件中,设置日志级别,打印出SQL语句:
logging:
  level: debug
- 前端代码
.<template>
<el-tree
         :data="data"
         :props="defaultProps"
         show-checkbox
         @node-click="handleNodeClick"
         以上是关于Day398&399.三级分类 -谷粒商城的主要内容,如果未能解决你的问题,请参考以下文章