Monodepth2单目深度模型的训练————(训练方式一:单目帧序列训练)
Posted 乘风破浪的混子
tags:
篇首语:本文由小常识网(cha138.com)小编为大家整理,主要介绍了Monodepth2单目深度模型的训练————(训练方式一:单目帧序列训练)相关的知识,希望对你有一定的参考价值。
笔者从事于cv视觉深度的相关研究,在cv的单目视觉深度模型中,monodepth2有一个相对较好的深度效果,但是论文作者就提供了关于KITTI的预训练模型,没有提供如何就自定义的数据集进行训练的详细细节。所以,在阅读了monodepth2源码的基础上,给大家讲讲如何用自己的数据集把monodepth2跑起来。
我使用的是超算的linux操作系统,训练平台为Tesla_V100。由于我采集1920*1080单目帧序列作为数据集,按照模型默认batchsize=12往超算里面送的时候提示显存不够,所以这里我还是建议采集自己的数据集的时候还是用较小的分辨率,比如640*480,在确认了分辨率之后,先把源代码中的对应尺寸都改为640+480,其中options.py里的self.height和self.width也要分别改成480和640。而且原模型还要求这俩参数是32的倍数,刚好640+480就符合。

所以我们采用640+480作为单目帧序列的分辨率,我大概采集了90秒的视频,场景为我们学院的走廊,每一秒30帧,所以转换为图片序列最终是2580张图片。视频转图片序列的源代码如下所示:
import os
import cv2  ##加载OpenCV模块


def video2frames(pathIn='',
                 pathOut='',
                 only_output_video_info=False,
                 extract_time_points=None,
                 initial_extract_time=0,
                 end_extract_time=None,
                 extract_time_interval=-1,
                 output_prefix='frame',
                 jpg_quality=100,
                 isColor=True):
    '''
    pathIn:视频的路径,比如:F:\\python_tutorials\\test.mp4
    pathOut:设定提取的图片保存在哪个文件夹下,比如:F:\\python_tutorials\\frames1\\。如果该文件夹不存在,函数将自动创建它
    only_output_video_info:如果为True,只输出视频信息(长度、帧数和帧率),不提取图片
    extract_time_points:提取的时间点,单位为秒,为元组数据,比如,(2, 3, 5)表示只提取视频第2秒, 第3秒,第5秒图片
    initial_extract_time:提取的起始时刻,单位为秒,默认为0(即从视频最开始提取)
    end_extract_time:提取的终止时刻,单位为秒,默认为None(即视频终点)
    extract_time_interval:提取的时间间隔,单位为秒,默认为-1(即输出时间范围内的所有帧)
    output_prefix:图片的前缀名,默认为frame,图片的名称将为frame_000001.jpg、frame_000002.jpg、frame_000003.jpg......
    jpg_quality:设置图片质量,范围为0到100,默认为100(质量最佳)
    isColor:如果为False,输出的将是黑白图片
    '''

    cap = cv2.VideoCapture(pathIn)  ##打开视频文件
    n_frames = int(cap.get(cv2.CAP_PROP_FRAME_COUNT))  ##视频的帧数
    fps = cap.get(cv2.CAP_PROP_FPS)  ##视频的帧率
    dur = n_frames / fps  ##视频的时间

    ##如果only_output_video_info=True, 只输出视频信息,不提取图片
    if only_output_video_info:
        print('only output the video information (without extract frames)::::::')
        print("Duration of the video: {} seconds".format(dur))
        print("Number of frames: {}".format(n_frames))
        print("Frames per second (FPS): {}".format(fps))

        ##提取特定时间点图片
    elif extract_time_points is not None:
        if max(extract_time_points) > dur:  ##判断时间点是否符合要求
            raise NameError('the max time point is larger than the video duration....')
        try:
            os.mkdir(pathOut)
        except OSError:
            pass
        success = True
        count = 0
        while success and count < len(extract_time_points):
            cap.set(cv2.CAP_PROP_POS_MSEC, (1000 * extract_time_points[count]))
            success, image = cap.read()
            if success:
                if not isColor:
                    image = cv2.cvtColor(image, cv2.COLOR_BGR2GRAY)  ##转化为黑白图片
                print('Write a new frame: {}, {}th'.format(success, count + 1))
                cv2.imwrite(os.path.join(pathOut, "{}_{:06d}.jpg".format(output_prefix, count + 1)), image,
                            [int(cv2.IMWRITE_JPEG_QUALITY), jpg_quality])  # save frame as JPEG file
                count = count + 1

    else:
        ##判断起始时间、终止时间参数是否符合要求
        if initial_extract_time > dur:
            raise NameError('initial extract time is larger than the video duration....')
        if end_extract_time is not None:
            if end_extract_time > dur:
                raise NameError('end extract time is larger than the video duration....')
            if initial_extract_time > end_extract_time:
                raise NameError('end extract time is less than the initial extract time....')

        ##时间范围内的每帧图片都输出
        if extract_time_interval == -1:
            if initial_extract_time > 0:
                cap.set(cv2.CAP_PROP_POS_MSEC, (1000 * initial_extract_time))
            try:
                os.mkdir(pathOut)
            except OSError:
                pass
            print('Converting a video into frames......')
            if end_extract_time is not None:
                N = (end_extract_time - initial_extract_time) * fps + 1
                success = True
                count = 0
                while success and count < N:
                    success, image = cap.read()
                    if success:
                        if not isColor:
                            image = cv2.cvtColor(image, cv2.COLOR_BGR2GRAY)
                        print('Write a new frame1: {}, {}/{}'.format(success, count + 1, n_frames))
                        cv2.imwrite(os.path.join(pathOut, "{:010d}.jpg".format(count + 1)), image,
                                    [int(cv2.IMWRITE_JPEG_QUALITY), jpg_quality])  # save frame as JPEG file
                        count = count + 1
            else:
                success = True
                count = 0
                while success:
                    success, image = cap.read()
                    if success:
                        if not isColor:
                            image = cv2.cvtColor(image, cv2.COLOR_BGR2GRAY)
                        print('Write a new frame: {}, {}/{}'.format(success, count + 1, n_frames))
                        cv2.imwrite(os.path.join(pathOut, "{:010d}.jpg".format(count + 1)), image,
                                    [int(cv2.IMWRITE_JPEG_QUALITY), jpg_quality])  # save frame as JPEG file
                        count = count + 1

        ##判断提取时间间隔设置是否符合要求
        elif extract_time_interval > 0 and extract_time_interval < 1 / fps:
            raise NameError('extract_time_interval is less than the frame time interval....')
        elif extract_time_interval > (n_frames / fps):
            raise NameError('extract_time_interval is larger than the duration of the video....')

        ##时间范围内每隔一段时间输出一张图片
        else:
            try:
                os.mkdir(pathOut)
            except OSError:
                pass
            print('Converting a video into frames......')
            if end_extract_time is not None:
                N = (end_extract_time - initial_extract_time) / extract_time_interval + 1
                success = True
                count = 0
                while success and count < N:
                    cap.set(cv2.CAP_PROP_POS_MSEC, (1000 * initial_extract_time + count * 1000 * extract_time_interval))
                    success, image = cap.read()
                    if success:
                        if not isColor:
                            image = cv2.cvtColor(image, cv2.COLOR_BGR2GRAY)
                        print('Write a new frame2: {}, {}th'.format(success, count + 1))
                        cv2.imwrite(os.path.join(pathOut, "{}_{:06d}.jpg".format(output_prefix, count + 1)), image,
                                    [int(cv2.IMWRITE_JPEG_QUALITY), jpg_quality])  # save frame as JPEG file
                        count = count + 1
            else:
                success = True
                count = 0
                while success:
                    cap.set(cv2.CAP_PROP_POS_MSEC, (1000 * initial_extract_time + count * 1000 * extract_time_interval))
                    success, image = cap.read()
                    if success:
                        if not isColor:
                            image = cv2.cvtColor(image, cv2.COLOR_BGR2GRAY)
                        print('Write a new frame3: {}, {}th'.format(success, count + 1))
                        cv2.imwrite(os.path.join(pathOut, "{}_{:06d}.jpg".format(output_prefix, count + 1)), image,
                                    [int(cv2.IMWRITE_JPEG_QUALITY), jpg_quality])  # save frame as JPEG file
                        count = count + 1


##### 测试
# import cv2 as cv
# cap = cv.VideoCapture("H:\\pyImage\\cs.mp4")

pathIn = r'C:\\Users\\17864\\Desktop\\Python\\binocularResult\\calibration pictures\\640Stable.avi'
video2frames(pathIn, only_output_video_info=True)

pathOut = r'C:\\Users\\17864\\Desktop\\Python\\binocularResult\\calibration pictures\\data'
video2frames(pathIn, pathOut)
我们先要在train.py的当前路径下新建文件夹corridor_datasets,然后再在该文件夹下创建2021_09_17/image_02/data/,得到的训练图片我们将放在上面data路径下,在这之后我们需要将options.py下面的–data_path的默认参数从kitti修改为corridor_datasets。除此之外,我们还需要创建训练集和验证集的文本文档并放置于splits/eigen_zhou/下面,为什么选择eigen_zhou是因为原模型GitHub的README.md里说明了单目采用eigen_zhou,而双目采用eigen_full。文本文档的创建采用如下代码:
# -*- coding: utf-8 -*-
"""
Created on Fri Sep 17 23:48:28 2021

@author: 17864
"""


import os

def makefile(path,content):
    if os.path.exists(path):
        if os.path.isdir(path):
            f = open('C:/Users/17864/Desktop/train_files.txt','a+')
            f.write(content)
            f.write('\\n')
            f.seek(0)
            read = f.readline()
            f.close()
            print(read)
        else:
            print('please input the dir name')
    else:
        print('the path is not exists')


path = r'C:\\Users\\17864\\Desktop'
count = 1
while count < 2581:
    content = r"2021_09_17 {} l".format(count)
    makefile(path,content)
    count = count + 1
创建完train_files.txt之后,我们可以创建一个train_files.txt的副本,并命名为val_files.txt。在这两个文件中我们需要把第一行(1)和最后一行(2580)删掉,空行都不能留,这里的原因主要是单目帧序列训练的时候我们需要输入当前帧的前一帧和后一帧,而第一帧是没有前一帧的,最后一帧是没有后一帧的。到这里我们的数据集准备工作已经做完了。下面我们需要创建环境。
conda创建monodepth2训练环境
首先在命令行运行
conda create -n monodepth2
conda activate monodepth2
创建并激活一个新的环境,刚创建完的环境是空的,我们需要在这个空环境下安装各种第三方包,从README.md我们可以知道我们需要按照下面安装pytorch,opencv等依赖。
conda install pytorch=0.4.1 torchvision=0.2.1 -c pytorch
pip install tensorboardX==1.4
conda install opencv=3.3.1 # just needed for evaluation
除了上面几个之外,建议还安装上scikit-image和IPython两个依赖。这样我们就可以开始我们的训练和测试了。
训练命令
python train.py --model_name mono_model --num_epochs 50
解释:这里训练得到的模型会出现在用户目录下的tmp目录中,如果觉得模型的loss降得差不多了,我们可以把models里面的对应权重(这里是weights_49)复制到train.py目录下的models文件夹中,然后如果需要测试求图片深度,我们可以按照README.md里的命令,按照对应的图片名和模型名称即可完成测试,而测试文件夹里所有的图片则可以使用下面的测试命令。
测试命令
python test_simple.py --image_path /public/home/lcc-dx01/monodepth2-master/corridor_datasets/2021_09_17/image_02/data(640test)/ --image_disp_path /public/home/lcc-dx01/monodepth2-master/corridor_datasets/2021_09_17/image_02/disp(640test)/ --model_name weights_49
解释:我们把需要预测深度的图片序列放到–image_path对应的文件夹中,然后我们按照–image_disp_path创建好需要存放视差图的文件夹,运行上面测试命令即可得到文件夹下所有图片的深度图。这些帧序列还可以按照一定的帧率合成深度视频。
我得到的效果如下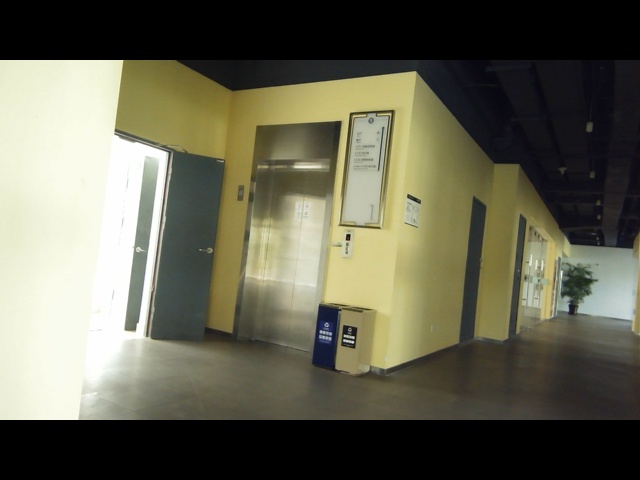
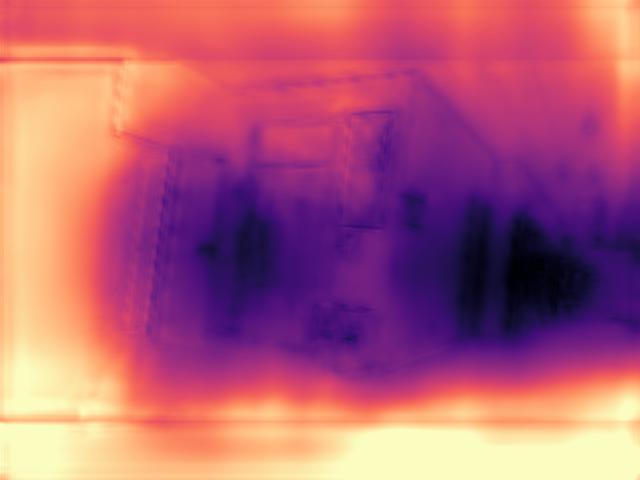 效果似乎很一般,如果知道是什么原因的欢迎交流!
以上是关于Monodepth2单目深度模型的训练————(训练方式一:单目帧序列训练)的主要内容,如果未能解决你的问题,请参考以下文章