龙邱 MPU9250 模块接口 | 基于ESP32模块
Posted 卓晴
tags:
篇首语:本文由小常识网(cha138.com)小编为大家整理,主要介绍了龙邱 MPU9250 模块接口 | 基于ESP32模块相关的知识,希望对你有一定的参考价值。
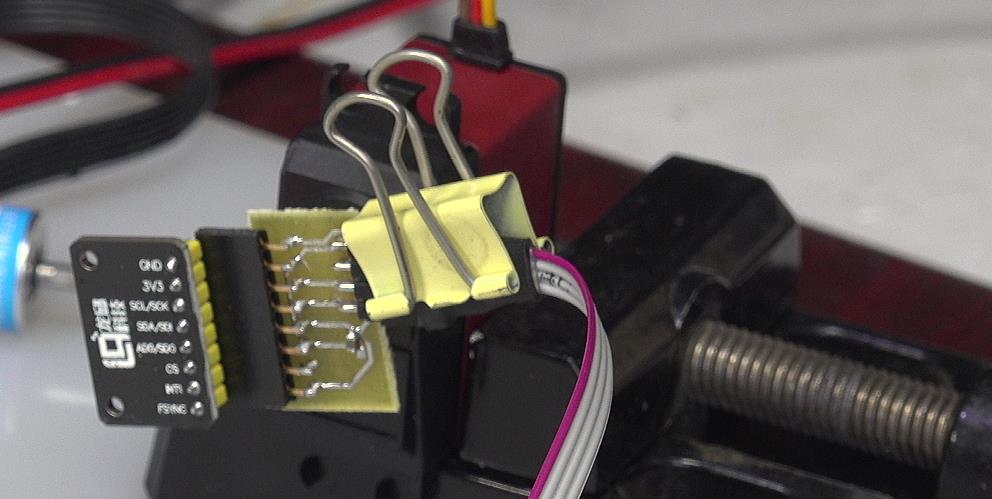
简 介: 制作了MPU9250的转接接口,并利用舵机带动起旋转测量了模块测量角度功能。
关键词: MPU9250,ESP32
§01 模块接口
在博文 龙邱MPU9250传感器 | 使用ESP32 模块进行测试 中使用了 ESP32 对于MPU9250进行初步测试。为了方便今后的使用,制作模块的转接板,从原来的 8PINs 转换成 4PINs 接口。
一、接口定义
对于接口进行简化的功能定义为如下图所示:
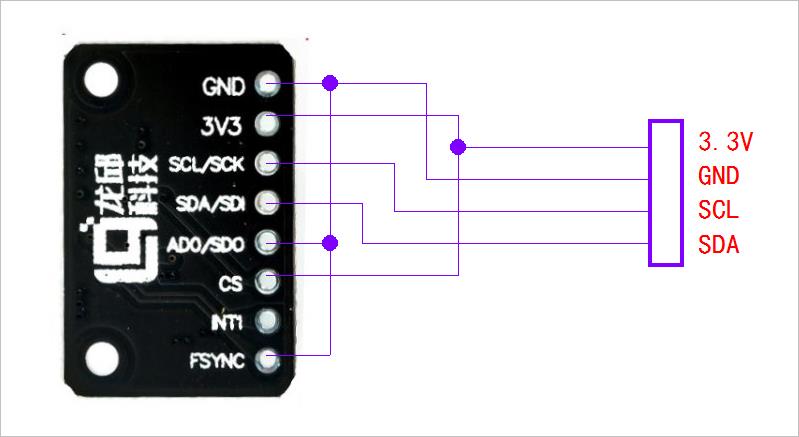
▲ 图1.1 接口定义
二、电路制作
1、原理图

▲ 图1.2.1 接口原理图
2、快速制版
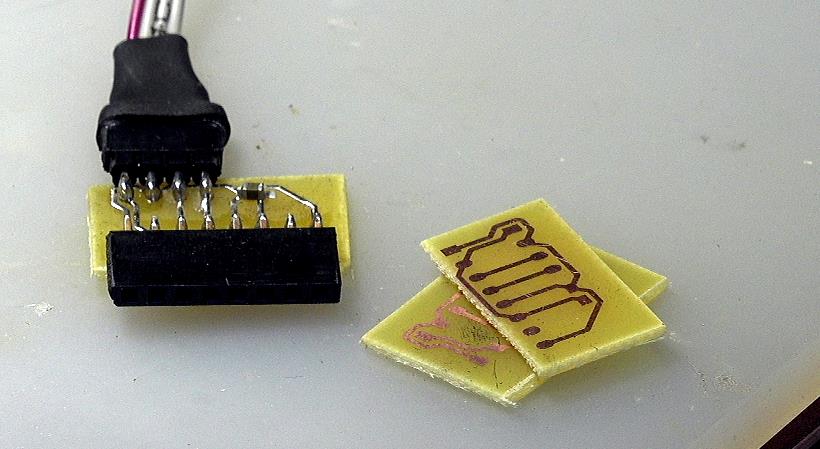
▲ 图1.2.2 快速制版
§02 测试模块
一、测试接口
1、I2C接口
根据 ESP32-S模块转接板设计与实现 选择GPIO2,GPIO15作为 SCL,SDA。
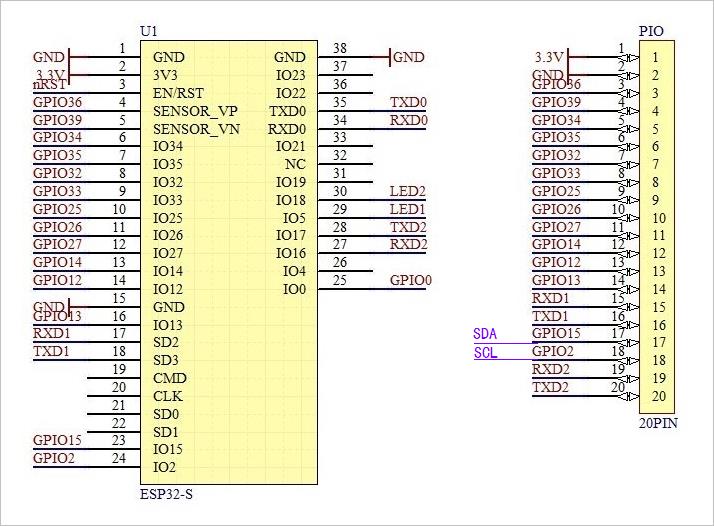
▲ 图2.1.1 ESP32接口
注: 需要在GPIO2 施加 2.2kΩ 上拉电阻来保证它的输出能够使用。
2、舵机接口
选择TXD2(GPIO2)作为输出 100Hz的 舵机信号输出。
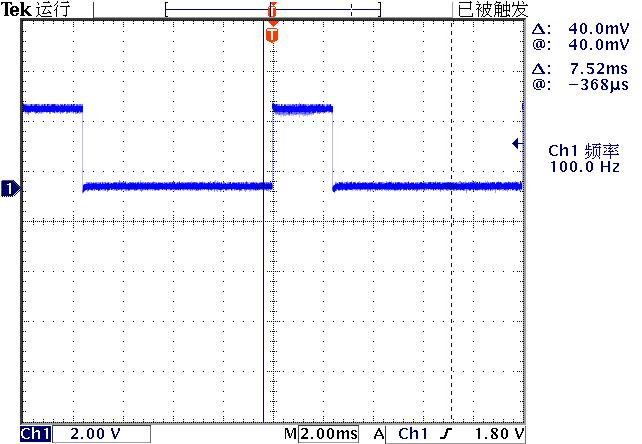
▲ 图2.1.2 输出的PWM波形
二、测试结果
利用PWM控制舵机带动 MPU9250旋转,测量MPU9250 输出的三个加速度传感器数值。
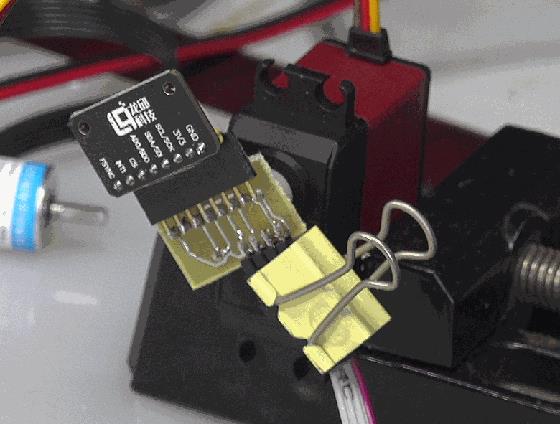
▲ 图2.2.1 测试旋转平台
1、测试程序
(1) MicroPython程序
from machine                import Pin,Timer,SoftI2C,PWM
import time
import math

led0 = Pin(5, Pin.OUT)
led1 = Pin(17, Pin.OUT)

pwm = PWM(Pin(13))
pwm.freq(100)
pwm.duty(100)

i2c = SoftI2C(scl=Pin(2), sda=Pin(15), freq=100000)

MPU9250_ADDRESS            = 0x68
MAG_ADDRESS                = 0x0c

GYRO_FULL_SCALE_250_DPS    = 0x00
GYRO_FULL_SCALE_500_DPS    = 0x08
GYRO_FULL_SCALE_1000_DPS   = 0x10
GYRO_FULL_SCALE_2000_DPS   = 0x18

ACC_FULL_SCALE_2_G        = 0x00
ACC_FULL_SCALE_4_G        = 0x08
ACC_FULL_SCALE_8_G        = 0x10
ACC_FULL_SCALE_16_G       = 0x18

def MPU9250Setup():
    i2c.writeto_mem(MPU9250_ADDRESS, 27, bytearray(GYRO_FULL_SCALE_2000_DPS))
                                    # Configure gyroscope range
    i2c.writeto_mem(MPU9250_ADDRESS, 28, bytearray(ACC_FULL_SCALE_16_G))
                                    # Configure accelerometer range
    i2c.writeto_mem(MPU9250_ADDRESS, 0x37, bytearray(0x2))
                                    # Set by pass mode for magnetometer
                                    # Request first magnetometer single measurement

def bytes2short(b):
    a = int.from_bytes(b, 'big', True)
    if a > 0x7fff:
        return -(0x10000 - a)
    else:  return a

def MPU9250read():
    buf = bytearray(14)
    buf = i2c.readfrom_mem(MPU9250_ADDRESS, 0x3b, 14)

    ax = bytes2short(buf[0:2])
    ay = bytes2short(buf[2:4])
    az = bytes2short(buf[4:6])

    gx = bytes2short(buf[8:10])
    gy = bytes2short(buf[10:12])
    gz = bytes2short(buf[12:14])

    temp = bytes2short(buf[6:8])

    return (ax,ay,az),(gx,gy,gz), temp

MPU9250Setup()

axdim = []
aydim = []
azdim = []

step = 1
start = 50

pwm.duty(50)
time.sleep(1)

for i in range(200):
    pwm.duty(start+step*i)
    time.sleep(1)

    readdata = MPU9250read()
    axdim.append(readdata[0][0])
    aydim.append(readdata[0][1])
    azdim.append(readdata[0][2])

    print(readdata[0])

print(axdim)
print(aydim)
print(azdim)

while True:
    pass

while True:
    led0.on()
    led1.off()
    time.sleep_ms(200)
    led0.off()
    led1.on()
    time.sleep_ms(200)

    print(MPU9250read())
(2) 绘制图形
from headm import *

def thonnycmd(cmd):
    tspsendwindowkey('Thonny', 's', alt=1, noreturn=1)
    tspsendwindowkey('Thonny', '%s'%cmd, noreturn=1)

def thonnyshs(cmd='', wait=0):
    tspsendwindowkey('Thonny', 's', alt=1, noreturn=1)
    if len(cmd) > 0:
        tspsendwindowkey('Thonny', '%s\\r'%cmd, noreturn=1)
    if wait > 0:
        time.sleep(wait)
    tspsendwindowkey('Thonny', 'ac', control=1, noreturn=1)
    tspfocuswindow('TEASOFT:1')
    return clipboard.paste()

pastestr = thonnyshs('', 1)
ax = [float(s) for s in pastestr.split('[')[-3].split(']')[0].split(',')]
ay = [float(s) for s in pastestr.split('[')[-2].split(']')[0].split(',')]
az = [float(s) for s in pastestr.split('[')[-1].split(']')[0].split(',')]

printf(ax, ay, az)

plt.plot(ax, label='ax')
plt.plot(ay, label='ay')
plt.plot(az, label='az')

plt.xlabel("Samples")
plt.ylabel("X,Y,Z")
plt.grid(True)
plt.tight_layout()
plt.show()
2、测试结果
(1) 数据曲线
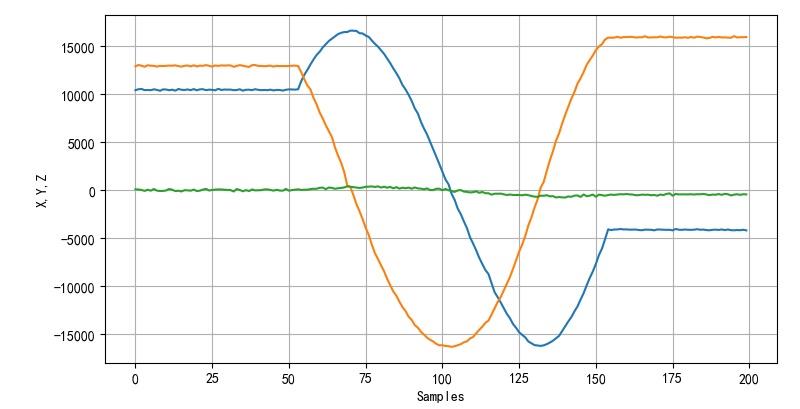
▲ 图2.2.1 采集到的三个加速度数值
(2) 数据分析
对于AX, AY转换成对应的角度。
angle = [math.atan2(y,x)*180/pi for y,x in zip(ay,ax)]
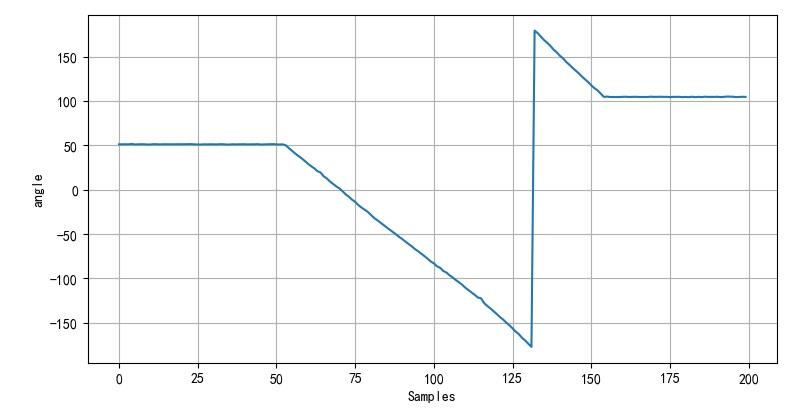
▲ 图2.2.2 转换成了不同的角度数值
-
测量结果:
-
起始角度: 51.05
结束角度: 104.51
最大角度: -177.11
最小角度: 179.21
※ 测试结果 ※
通过测试可以得到以下结论:
- 对于大范围舵机旋转,设置的脉冲宽度从1ms 到2ms,对应的角度变化 307°。
- 可以使用MPU9250的两个加速度值来计算模块的倾角。
■ 相关文献链接:
● 相关图表链接:
- 图1.1 接口定义
- 图1.2.1 接口原理图
- 图1.2.2 快速制版
- 图2.1.1 ESP32接口
- 图2.1.2 输出的PWM波形
- 图2.2.1 测试旋转平台
- 图2.2.1 采集到的三个加速度数值
- 图2.2.2 转换成了不同的角度数值
from headm import *

def thonnycmd(cmd):
    tspsendwindowkey('Thonny', 's', alt=1, noreturn=1)
    tspsendwindowkey('Thonny', '%s'%cmd, noreturn=1)

def thonnyshs(cmd='', wait=0):
    tspsendwindowkey('Thonny', 's', alt=1, noreturn=1)
    if len(cmd) > 0:
        tspsendwindowkey('Thonny', '%s\\r'%cmd, noreturn=1)
    if wait > 0:
        time.sleep(wait)
    tspsendwindowkey('Thonny', 'ac', control=1, noreturn=1)
    tspfocuswindow('TEASOFT:1')
    return clipboard.paste()

pastestr = thonnyshs('', 1)
ax = [float(s) for s in pastestr.split('[')[-3].split(']')[0].split(',')]
ay = [float(s) for s in pastestr.split('[')[-2].split(']')[0].split(',')]
az = [float(s) for s in pastestr.split('[')[-1].split(']')[0].split(',')]

tspsave('measure', ax=ax, ay=ay, az=az)

angle = [math.atan2(y,x)*180/pi for y,x in zip(ay,ax)]

printf(ax, ay, az, angle)
printf(angle[0], angle[-1], min(angle), max(angle))

plt.plot(angle, label='angle')

plt.xlabel("Samples")
plt.ylabel("angle")
plt.grid(True)
plt.tight_layout()
plt.show()
以上是关于龙邱 MPU9250 模块接口 | 基于ESP32模块的主要内容,如果未能解决你的问题,请参考以下文章