YoctoBitBake入门之镜像中的HelloWorld
Posted jiangwei0512
tags:
篇首语:本文由小常识网(cha138.com)小编为大家整理,主要介绍了YoctoBitBake入门之镜像中的HelloWorld相关的知识,希望对你有一定的参考价值。
说明
前一篇【Yocto】BitBake入门之HelloWorld中通过bitbake来打印Hello World,而本篇将打印Hello World的工作放到了镜像中完成。
准备
使用的环境是Ubuntu18.04:
jw@X1C:~/code/poky$ uname -a
Linux X1C 5.4.0-84-generic #94~18.04.1-Ubuntu SMP Thu Aug 26 23:17:46 UTC 2021 x86_64 x86_64 x86_64 GNU/Linux
下载必要的工具:
sudo apt install gawk wget git-core diffstat unzip texinfo gcc-multilib build-essential chrpath socat cpio python python3 python3-pip python3-pexpect xz-utils debianutils iputils-ping
准备一份基础的Yocto代码,可以直接在https://gitee.com/jiangwei0512/poky.git下载,下载到的代码如下:
jw@X1C:~/code/poky$ ls
bitbake               LICENSE.MIT  meta-selftest      README.OE-Core
contrib               Makefile     meta-skeleton      README.poky
documentation         MEMORIAM     meta-yocto-bsp     README.qemu
LICENSE               meta         oe-init-build-env  scripts
LICENSE.GPL-2.0-only  meta-poky    README.hardware
另外,网络和存储空间也有一定的要求,需要保证网络通常能够下载各种安装包,且编译环境有足够的空间(大于50GB)。
自定义的Layer
为了不影响原本的代码框架,这里增加自己的Layer来存放代码、配方和各种配置,这也是Yocto推荐的方式。
创建配方前需要首先执行Yocto的初始脚本oe-init-build-env ,它位于代码根目录,执行过程如下:
jw@X1C:~/code/poky$ source oe-init-build-env
You had no conf/local.conf file. This configuration file has therefore been
created for you with some default values. You may wish to edit it to, for
example, select a different MACHINE (target hardware). See conf/local.conf
for more information as common configuration options are commented.

You had no conf/bblayers.conf file. This configuration file has therefore been
created for you with some default values. To add additional metadata layers
into your configuration please add entries to conf/bblayers.conf.

The Yocto Project has extensive documentation about OE including a reference
manual which can be found at:
    http://yoctoproject.org/documentation

For more information about OpenEmbedded see their website:
    http://www.openembedded.org/


### Shell environment set up for builds. ###

You can now run 'bitbake <target>'

Common targets are:
    core-image-minimal
    core-image-full-cmdline
    core-image-sato
    core-image-weston
    meta-toolchain
    meta-ide-support

You can also run generated qemu images with a command like 'runqemu qemux86'

Other commonly useful commands are:
 - 'devtool' and 'recipetool' handle common recipe tasks
 - 'bitbake-layers' handles common layer tasks
 - 'oe-pkgdata-util' handles common target package tasks
脚本执行之后相当于创建了一个项目,这里使用的是Yocto官方的项目,名称是Yocto,它支持不同的镜像,名称在脚本执行过程中就已经打印出来了:
Common targets are:
    core-image-minimal
    core-image-full-cmdline
    core-image-sato
    core-image-weston
    meta-toolchain
    meta-ide-support
通过bitbake后接上述的目标目标就可以生成镜像,不过这里暂时还不会用到。
下一步需要使用bitbake-layers工具来创建Layer,执行的命令如下:
jw@X1C:~/code/poky/build$ bitbake-layers create-layer ../meta-mylayer
NOTE: Starting bitbake server...
Add your new layer with 'bitbake-layers add-layer ../meta-mylayer'
jw@X1C:~/code/poky/build$ bitbake-layers add-layer ../meta-mylayer
NOTE: Starting bitbake server...
这里分为两步,第一步创建Layer,第二步增加Layer到当前项目中。需要注意,通过source执行oe-init-build-env脚本之后会进入到新建的build目录,所以在创建Layer的时候要特别注意使用../meta-mylayer将Layer创建到根目录,否则创建的自定义Layer会在临时的build目录下,这样就没有意义了。
创建了meta-mylayer之后可以查看其内容:
jw@X1C:~/code/poky/build$ tree ../meta-mylayer/
../meta-mylayer/
├── conf
│   └── layer.conf
├── COPYING.MIT
├── README
└── recipes-example
    └── example
        └── example_0.1.bb

3 directories, 4 files
后续自定义的配方需要在这里面添加。另外通过bitbake-layers可以列出当前项目包含的所有的Layer:
jw@X1C:~/code/poky/meta-mylayer$ bitbake-layers show-layers
NOTE: Starting bitbake server...
layer                 path                                      priority
==========================================================================
meta                  /home/jw/code/poky/meta                   5
meta-poky             /home/jw/code/poky/meta-poky              5
meta-yocto-bsp        /home/jw/code/poky/meta-yocto-bsp         5
meta-mylayer          /home/jw/code/poky/meta-mylayer           6
新增的meta-mylayer也在其中。
自定义配方
在meta-mylayer中增加新的目录recipes-common用于存放通用的配方,并在其中增加helloworld配方及其源码,内容如下:
jw@X1C:~/code/poky/meta-mylayer/recipes-common$ tree
.
└── helloworld
    ├── files
    │   └── helloworld.c
    └── helloworld.bb
首先是配方文件helloworld.bb:
DESCRIPTION = "Prints Hello World"

SRC_URI = "file://helloworld.c"

LICENSE = "MIT"
LIC_FILES_CHKSUM = "file://${COMMON_LICENSE_DIR}/MIT;md5=0835ade698e0bcf8506ecda2f7b4f302"

do_compile() {
    ${CC} ${LDFLAGS} ../helloworld.c -o helloworld
}

do_install() {
    install -d ${D}${bindir}
    install -m 0755 helloworld ${D}${bindir}
}

FILES_${PN} = "${bindir}/helloworld"
关于配方的内容,这里作简单说明:
DESCRIPTION:对配方的说明;SRC_URI:配方使用到的源代码;LICENSE:代码使用的开源许可证;LIC_FILES_CHKSUM:开源许可证文件的Checksum,这里使用的是通用的MIT许可证,COMMON_LICENSE_DIR指向的是meta/files/common-licenses,该目录下包含了所有的开源许可证;do_compile():源码编译的方式;do_install():生成的二进制的安装方式;FILES_${PN}:指定需要放到Package中的文件列表(当前示例中就是helloworld),PN在当前示例中的值是helloworld。bindir变量的值是/usr/bin。
然后是源代码helloworld.c:
#include <stdio.h>

int main()
{
  printf("hello world\\n");
  return 0;
}
将配方放到自定义Layer之后,通过bitbake-layers可以查看项目包含的所有配方,其中就可以看到helloworld配方:
jw@X1C:~/code/poky/meta-mylayer$ bitbake-layers show-recipes
NOTE: Starting bitbake server...
Loading cache: 100% |                                           | ETA:  --:--:--
Loaded 0 entries from dependency cache.
Parsing recipes: 100% |##########################################| Time: 0:00:30
Parsing of 810 .bb files complete (0 cached, 810 parsed). 1424 targets, 42 skipped, 0 masked, 0 errors.
=== Available recipes: ===
helloworld:
  meta-mylayer         1.0
注意这里会显示很多的配方,但是只列出了新增的helloworld配方,有了helloworld配方,就可以执行如下的bitbake helloworld命令,以下是执行的过程:
jw@X1C:~/code/poky$ bitbake helloworld
Loading cache: 100% |############################################| Time: 0:00:00
Loaded 1424 entries from dependency cache.
NOTE: Resolving any missing task queue dependencies

Build Configuration:
BB_VERSION           = "1.49.0"
BUILD_SYS            = "x86_64-linux"
NATIVELSBSTRING      = "ubuntu-18.04"
TARGET_SYS           = "x86_64-poky-linux"
MACHINE              = "qemux86-64"
DISTRO               = "poky"
DISTRO_VERSION       = "3.2+snapshot-12c409c0dbf3c924ec7f76e51ca25a37481bfb5b"
TUNE_FEATURES        = "m64 core2"
TARGET_FPU           = ""
meta
meta-poky
meta-yocto-bsp
meta-mylayer         = "master:12c409c0dbf3c924ec7f76e51ca25a37481bfb5b"

Initialising tasks: 100% |#######################################| Time: 0:00:00
Sstate summary: Wanted 131 Found 0 Missed 131 Current 0 (0% match, 0% complete)
NOTE: Executing Tasks
Currently  3 running tasks (466 of 524)  88% |#############################    |
0: gcc-cross-x86_64-10.2.0-r0 do_compile - 55s (pid 20429)
1: perl-native-5.32.0-r0 do_install - 28s (pid 9495)
2: python3-native-3.9.1-r0 do_compile - 26s (pid 10984)
由于当前配构建成依赖于与其它工具和库,所以可以看到需要生成很多额外的内容(总共524个),这一过程需要持续一段时间。完成之后可以看到生成的内容:
jw@X1C:~/code/poky/build/tmp/work/core2-64-poky-linux$ ll
总用量 32
drwxrwxr-x 8 jw jw 4096 9月  20 17:18 .
drwxrwxr-x 4 jw jw 4096 9月  20 17:17 ..
drwxrwxr-x 3 jw jw 4096 9月  20 17:18 gcc-runtime
drwxrwxr-x 3 jw jw 4096 9月  20 17:17 glibc
drwxrwxr-x 3 jw jw 4096 9月  20 17:18 helloworld
drwxrwxr-x 3 jw jw 4096 9月  20 17:18 libgcc
drwxrwxr-x 3 jw jw 4096 9月  20 17:17 libgcc-initial
drwxrwxr-x 3 jw jw 4096 9月  20 17:17 linux-libc-headers
这里就有helloworld目录了, 里面包含工程中所有的数据。不过当前生成的内容并没有实际作用,还需要把它放到Poky项目镜像中才可以执行。
生成镜像
在生成镜像之前需要先将helloworld添加到镜像中,根据Yocto的手册介绍,可以通过将添加IMAGE_INSTALL_append变量到build/conf/local.conf来完成,具体添加的内容如下:
IMAGE_INSTALL_append = "helloworld"
之后生成镜像的过程并没有什么特别的,只需要执行前面提到的bitbake加镜像名即可,这里使用core-image-minimal,它是最简单的一个。整个构建过程需要比构建helloworld更长的时间,完成之后显示如下:
jw@X1C:~/code/poky$ bitbake core-image-minimal
Loading cache: 100% |                                           | ETA:  --:--:--
Loaded 0 entries from dependency cache.
Parsing recipes: 100% |##########################################| Time: 0:00:23
Parsing of 810 .bb files complete (0 cached, 810 parsed). 1424 targets, 42 skipped, 0 masked, 0 errors.
NOTE: Resolving any missing task queue dependencies

Build Configuration:
BB_VERSION           = "1.49.0"
BUILD_SYS            = "x86_64-linux"
NATIVELSBSTRING      = "universal"
TARGET_SYS           = "x86_64-poky-linux"
MACHINE              = "qemux86-64"
DISTRO               = "poky"
DISTRO_VERSION       = "3.2+snapshot-f13e17656248021debea6fe01564c40af27271d1"
TUNE_FEATURES        = "m64 core2"
TARGET_FPU           = ""
meta
meta-poky
meta-yocto-bsp
meta-mylayer         = "master:f13e17656248021debea6fe01564c40af27271d1"

Initialising tasks: 100% |#######################################| Time: 0:00:01
Sstate summary: Wanted 7 Found 0 Missed 7 Current 1086 (0% match, 99% complete)
NOTE: Executing Tasks
NOTE: Tasks Summary: Attempted 3099 tasks of which 3082 didn't need to be rerun and all succeeded.
到这里镜像就构建完成了,内容如下:
jw@X1C:~/code/poky/build/tmp/deploy/images/qemux86-64$ ls
bzImage
bzImage--5.10.5+git0+47c7a3148a_f08df324cc-r0-qemux86-64-20210920095309.bin
bzImage-qemux86-64.bin
core-image-minimal-qemux86-64-20210920130948.qemuboot.conf
core-image-minimal-qemux86-64-20210920130948.rootfs.ext4
core-image-minimal-qemux86-64-20210920130948.rootfs.manifest
core-image-minimal-qemux86-64-20210920130948.rootfs.tar.bz2
core-image-minimal-qemux86-64-20210920130948.testdata.json
core-image-minimal-qemux86-64.ext4
core-image-minimal-qemux86-64.manifest
core-image-minimal-qemux86-64.qemuboot.conf
core-image-minimal-qemux86-64.tar.bz2
core-image-minimal-qemux86-64.testdata.json
modules--5.10.5+git0+47c7a3148a_f08df324cc-r0-qemux86-64-20210920095309.tgz
modules-qemux86-64.tgz
执行helloworld
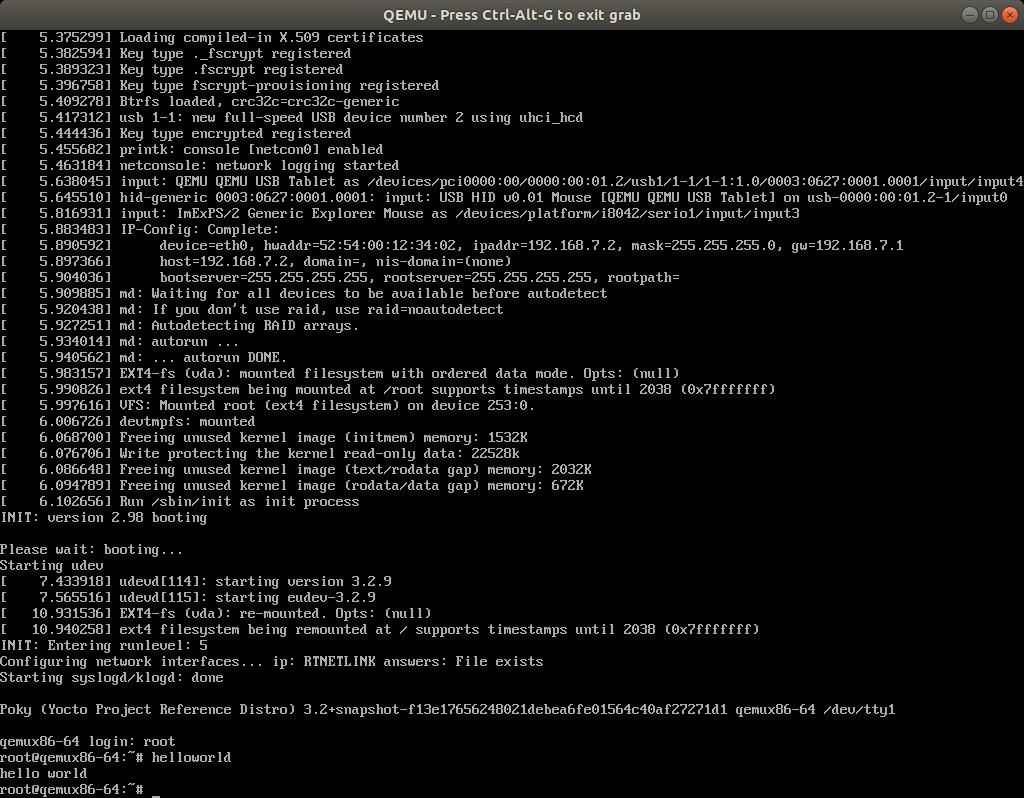
镜像构建完成之后通过执行runqemu就可以启动它:

从上图中可以看到helloworld被执行。
到这里包含自定义工具到Poky项目镜像的任务就完成了。
以上是关于YoctoBitBake入门之镜像中的HelloWorld的主要内容,如果未能解决你的问题,请参考以下文章