█Qt-4-快速入门
Posted itzyjr
tags:
篇首语:本文由小常识网(cha138.com)小编为大家整理,主要介绍了█Qt-4-快速入门相关的知识,希望对你有一定的参考价值。
QML语法
rectangle.qml:
// 一般来说会导入QtQuick2.5来作为初始元素的引用
import QtQuick 2.5// 导入一个指定的模块版本

Rectangle {// 根元素是Rectangle(就像html一样有一个根元素)
    id: root// [矩形]元素ID
    // 属性,格式为 <name>: <value>
    width: 420// [矩形]宽度420像素
    height: 340// [矩形]高度340像素
    color: "#D8D8D8"// [矩形]颜色是灰色
    Image {<!-- 声明一个嵌套元素(根元素的子元素)-->
        id: rocket// [图片]元素ID
        // (x,y)是相对于它的父元素的坐标
        // parent是父元素的引用
        x: (parent.width - width) / 2// [图片]相对于父控件水平居中
        y: 40// [图片]相对于父控件垂直Y坐标
        // [图片]的宽、高都为默认值
        source: 'assets/rocket.png'// [图片]的资源文件
    }
    Text {<!-- 声明第二个嵌套元素 -->
        // [文本]元素未命名
        // 通过id去引用其他元素
        y: rocket.y + rocket.height + 20
        width: root.width// [文本]宽度等于父元素的宽度,高度为默认值
        horizontalAlignment: Text.AlignHCenter// 设置[文本]水平对齐方式
        text: 'Rocket'// [文本]的内容
    }
}
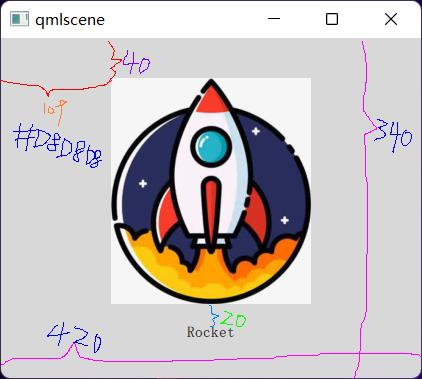
运行效果如下:
import QtQuick 2.5

Text {
    id: label
    x: 24
    y: 24
    // 自定义属性
    property int spacePresses: 0

    text: "Space pressed: " + spacePresses + " times"

    // (1) 文本变化事件的处理。这里每次按下空格键都在控制台输出消息
    onTextChanged: console.log("text changed to:", text)

    // 需要focus属性为true来接收键盘事件,否则不会响应键盘输入
    focus: true

    // (2) 按下空格键的事件响应
    Keys.onSpacePressed: {
        increment()// 调用js函数
    }

    // 按下ESC键的事件响应
    Keys.onEscapePressed: {
        label.text = ''// 这里可以省略label.
    }

    // (3) javascript函数
    function increment() {
        spacePresses = spacePresses + 1
    }
}
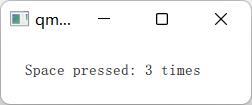
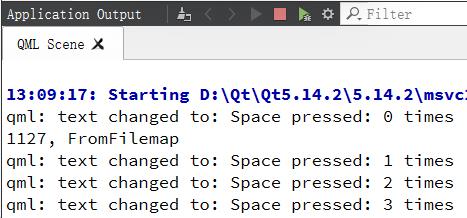
连按三次空格键:
按下ESC键:
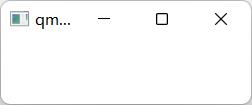

按下ESC键之后再按任何键,不会更新显示也不会在控制台打印了。
text: “Space pressed: " + spacePresses + " times”; 的含义是文本属性名text绑定到后面的属性值,它是个字符串,而字符串绑定了一个自定义属性spacePresses,即文本的改变基于一个增值的绑定并且可以被JavaScript赋值清零。
每次spacePressed的增加都会导致它绑定的属性更新。
每次按下空格键,属性名text的属性值都会因spacePresses值的变化而变化,从而文本区域的内容变化,这将直接更新到显示区域;文本内容的变化触发了onTextChanged,从而在控制台打印相应消息。
当键盘按下ESC键时,有赋值语句label.text = ‘’; 这样一来,label原本绑定一个带有属性值的文本,现在被赋值成一个固定的空字符串,所以再次有键盘事件时,文本就不可能再变化更新了,文本无变化则onTextChanged不回调,控制台也就不可能打印消息了。
( 属性绑定) 与JavaScript的=( 赋值) 是不同的。 绑定是一个协议, 并且存在于整个生命周期。 然而JavaScript赋值( =) 只会产生一次效果。 当一个新的绑定生效或者使用JavaScript赋值给属性时, 绑定的生命周期就会结束。
对于本例,最好不要使用绑定属性。可以在increment(); 语句后加一条text = “Space pressed: " + spacePresses + " times”; 解决问题。
基元素
元素可以分为可视元素和非可视元素。视觉元素(如矩形)具有几何图形,通常在屏幕上显示一个区域。非可视元素(如计时器)提供一般功能,通常用于操纵可视元素。
目前,我们将重点关注基本的视觉元素,如Item、矩形、文本、图像和鼠标区域。但是,通过使用Qt Quick Controls 2模块,可以创建由标准平台组件(如按钮、标签和滑块)构建的用户界面。
①Item元素
基础元素对象Item是所有可视化元素的基础对象,所有其它的可视化元素都继承自Item。
它自身不会有任何绘制操作, 但是定义了所有可视化元素共有的属性:
| Goup(分组) | Properties(属性) |
|---|---|
| Geometry(几何属性) | x,y定义了元素左上角的位置;width,height定义元素的显示范围, z定义元素之间的堆叠次序。 |
| Layout handling(布局操作) | anchors包括left,right,top,bottom,vertical center,horizontal center,margins。它们一起定义了元素与其它元素之间的位置关系。 |
| Key handling(按键操作) | 附加属性key和keyNavigation(按键定位)属性来控制按键操作,处理输入焦点(focus)可用操作。 |
| Transformation(转换) | scale和rotate转换,通用的x,y,z属性列表转换(transform),旋转基点设置(transformOrigin) 。 |
| Visual(可视化) | opacity控制透明度,visible控制元素是否显示,clip用来限制元素边界的绘制,smooth用来提高渲染质量。 |
| State definition(状态定义) | states(状态列表属性)提供了元素当前所支持的状态列表,当前属性的改变也可以使用transitions属性列表来定义状态转变动画。 |
这些基本的属性在所有可视化元素中都是可以使用的, 并且在这些元素中的工作方式都是相同的。
Item通常被用作其它元素的容器使用,类似HTML语言中的div元素。
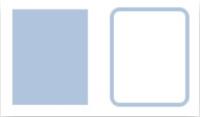
②Rectangle元素
Rectangle {
	id: rect1
	x: 12; y: 12
	width: 76; height: 96
	color: "lightsteelblue"
}
Rectangle {
	id: rect2
	x: 112; y: 12
	width: 76; height: 96
	border.color: "lightsteelblue"
	border.width: 4
	radius: 8
}
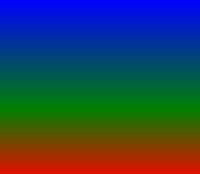
// 填充的颜色与矩形的边框也支持自定义的渐变色
Rectangle {
    id: rect3
    x: 12
    y: 12
    width: 96
    height: width
    gradient: Gradient {
        GradientStop { position: 0.0; color: "blue" }// position=0,顶
        GradientStop { position: 0.6; color: "green" }
        GradientStop { position: 1.0; color: "red" }// position=1,底
    }
}
③Text元素
Text {
	text: "这是个白色文本"
    color: "white"

    font.family: "楷体"
    font.pixelSize: 120

    elide: Text.ElideMiddle // (edide[iˈlaɪd])过长时会省略Middle(中间)部分

    style: Text.Sunken// (sunken[sʌŋkən])凹陷样式。还可以设置如浮雕效果样式
    styleColor: 'red'// 样式部分的颜色为红色

    verticalAlignment: Text.AlignTop// 文本垂直方向对齐Top(顶部)
    // wrapMode: Text.WordWrap// 仅在非Edide模式下,并且明确设置了宽度后才生效
}

④Image元素
Image {
	x: 12
    y: 12
    source: "assets/triangle.png"
}
Image {
    x: 112
    y: 12
    width: 48// 图片原始宽度
    height: 118 / 2// 图片原始高度的一半
    source: "assets/triangle.png"
    fillMode: Image.PreserveAspectCrop// 如果不裁剪,使用等比例缩放:Image.PreserveAspectFit
    clip: true// 打开裁剪来约束边界矩形的绘制
}

默认情况下裁剪是被禁用的(clip:false)。你需要打开裁剪(clip:true)来约束边界矩形的绘制。这对任何可视化元素都是有效的。
建议:
使用QQmlImageProvider你可以通过C++代码来创建自己的图像提供器, 这允许你动态创建图像并且使用线程加载。
⑤MouseArea元素
为了与不同的元素交互, 你通常需要使用MouseArea(鼠标区域)元素。这是一个矩形的非可视化元素对象,你可以通过它来捕捉鼠标事件。当用户与可视化端口交互时,mouseArea通常被用来与可视化元素对象一起执行命令。
Item {
    Rectangle {
        id: rect1
        x: 12
        y: 12
        width: 76
        height: 96
        color: "lightsteelblue"
        MouseArea {
            id: area
            width: parent.width
            height: parent.height
            onClicked: rect2.visible = !rect2.visible
        }
    }

    Rectangle {
        id: rect2
        x: 112
        y: 12
        width: 76
        height: 96
        border.color: "lightsteelblue"
        border.width: 4
        radius: 8
    }
}
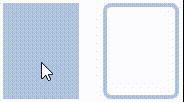
这是QtQuick中非常重要的概念, 输入处理与可视化显示分开(可以看作一个不可见图层,所以可以使用parent访问父级元素)。 这样你的交互区域可以比你显示的区域大很多。
组件
一个组件是一个可以重复使用的元素, QML提供几种不同的方法来创建组件。 但是目前我们只对其中一种方法进行讲解: 一个文件就是一个基础组件。 一个以文件为基础的组件在文件中创建了一个QML元素, 并且将文件以元素类型来命名( 例如Button.qml) 。 你可以像任何其它的QtQuick模块中使用元素一样来使用这个组件。
我们用封装Button组件的方式,来完成以下代码的功能:
Item {
    Rectangle {
        // our inlined button ui
        id: button
        x: 12
        y: 12
        width: 116
        height: 26
        color: "lightsteelblue"
        border.color: "slategrey"
        Text {
            anchors.centerIn: parent
            text: "Start"
        }
        MouseArea {
            anchors.fill: parent
            onClicked: {
                status.text = "Button clicked!"
            }
        }
    }
    Text {
        // text changes when button was clicked
        id: status
        x: 12
        y: 76
        width: 116
        height: 26
        text: "waiting ..."
        horizontalAlignment: Text.AlignHCenter
    }
}
我们的自定义组件如下:
Button.qml:
import QtQuick 2.5
Rectangle {
    id: root
    property alias text: label.text// 导出label.text属性
    signal clicked// 导出点击信号
    width: 116
    height: 26
    color: "lightsteelblue"
    border.color: "slategrey"
    Text {
        id: label
        anchors.centerIn: parent// 文本放在父控件的正中心(即,centerInParent)
        text: "Start"
    }
    MouseArea {
        anchors.fill: parent// MouseArea区域与父控件大小一样(即,fill_parent)
        onClicked: {
            root.clicked()
        }
    }
}
我们使用了QML的alias(别名)的功能,它可以将内部嵌套的QML元素的属性导出到外面使用。
有一点很重要, 只有根级目录的属性才能够被其它文件的组件访问!
我们已经在根层级导出了“text”属性和“clicked”信号。
使用自定义的Button组件:
Rectangle {
    Button {
        id: button
        x: 12
        y: 12
        text: "My Start Button"
        onClicked: {
            status.text = "My Button clicked!"
        }
    }
    Text {
        // text changes when button was clicked
        id: status
        x: 12
        y: 76
        width: 116
        height: 26
        text: "my waiting ..."
        horizontalAlignment: Text.AlignHCenter
    }
}
如果在Button.qml中去掉property alias text: label.text; 则在text: “My Start Button”; 这行编译报错:
Cannot assign to non-existent property “text”
如果在Button.qml中去掉signal click; 则在onClicked: {…}; 这行编译报错:
Cannot assign to non-existent property “onClicked”
如果在Button.qml中去掉root.clicked(); 则不会响应点击事件。
由于只有根级目录的属性才能够被其它文件的组件访问,那么如果防止用户改变我们设计的按钮颜色这样的根元素该怎么做呢?很简单,可以将根矩形框替换为一个基元素(Item),然后将一个矩形框嵌套在这个根元素就可以完成,如下:
Item {
	id: root
	Rectangle {
		anchors.fill parent
		color: "lightsteelblue"
		border.color: "slategrey"
	}
	...
}
使用这项技术,可以非常方便地创建一个可以全局使用的可重复使用的组件。
简单的变换
QML Items通常能够位移、旋转和缩放。
我们先定义一个ClickableImage元素,它仅仅是一张图片并带有鼠标点击区域:
ClickableImage.qml:
import QtQuick 2.5
Image {
	id: root
	signal clicked
	MouseArea {
		anchors.fill: parent
		onClicked: root.clicked()
	}
}
示例:
Item {
    // set width based on given background
    width: bg.width
    height: bg.height
    Image {
        // nice background image
        id: bg
        source: "assets/background.png"
    }
    // 如果MouseArea定义放到三张ClickableImage之后,则点击ClickableImage无效果!
    MouseArea {
        id: backgroundClicker
        // *needs to be before the images as order matters*
        // otherwise this mousearea would be before the other elements
        // and consume the mouse events
        anchors.fill: parent
        onClicked: {
            // reset our little scene
            circle.x = 84
            box.rotation = 0
            triangle.rotation = 0
            triangle.scale = 1.0
        }
    }
    ClickableImage {
        id: circle
        x: 84
        y: 68
        source: "assets/circle_blue.png"
        antialiasing: true
        onClicked: {
            // increase the x-position on click
            x += 20
        }
    }
    ClickableImage {
        id: box
        x: 164
        y: 68
        source: "assets/box_green.png"
        antialiasing: true
        onClicked: {
            // increase the rotation on click
            rotation += 15
        }
    }
    ClickableImage {
        id: triangle
        x: 248
        y: 68
        source: "assets/triangle_red.png"
        antialiasing: true
        onClicked: {
            // several transformations
            rotation += 15
            scale += 0.05
        }
    }
}
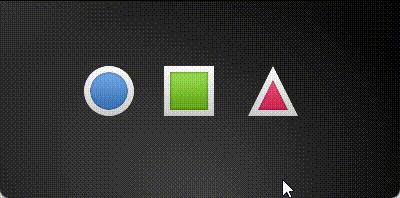
默认布局格式,各元素的顺序是后放入的元素会在UI的最上层,先放置的元素在最底层。
如果将元素的x属性都只相对偏移一点点,则可以直观地看到叠放顺序:

我们知道,鼠标区域也是个图层,只不过是个不可见图层而已,所以如果这个鼠标区域是最后放入到Item{}中的最后面,则点击事件最先被这个鼠标区域捕获和消费,这样的话三个ClickableImage就没法响应到鼠标事件了。
最先出现在代码中的元素会有一个更低层的栈顺序(z-order),其中包含鼠标区域层。
z-order可以通过z-property操纵。
antialiasing: true是为了启用anti-aliasing(抗锯齿),为了性能的原因它默认是关闭的(和clip属性是一样的)。当你看到图片有些光栅化边缘时,应该手动开启。
⑥定位元素
我们先定义几个帮助元素。红色、绿色、蓝色、亮色和暗色的方块。每个组件都包含一个48×48像素的有颜色矩形。
RedSquare.qml:
import QtQuick 2.5
Rectangle {
	width: 48; height: 48
	// RedSquare.qml红色:#ea7025
	// GreenSquare.qml绿色:#67c111
	// BlueSquare.qml蓝色:#00bde3
	// BrightSquare亮色:#f0f0f0
	// DarkSquare暗色:#3c3c3c
	color: "#ea7025"
	border.color: Qt.lighter(color)
}
Qt.lighter(color)产生一个基于填充颜色的更亮的颜色。
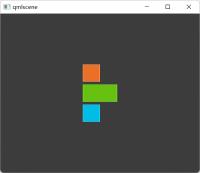
线性布局(列式):
column.qml:
import QtQuick 2.5
DarkSquare {
	id: root
	width: 120; height: 240
	Column {
		id: row
		anchors.centerIn: parent// 将列放在父控件的正中心
		spacing: 8// 子元素[组件]的间距
		RedSquare {}
		GreenSquare { width: 96 }
		BlueSquare {}
	}
}
线性布局(行式):
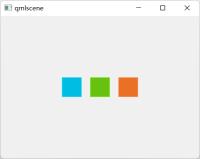
row.qml:
import QtQuick 2.5
BrightSquare {
	id: root
	width: 400; height: 120
	Row {
		id: row
		anchors.centerIn: parent
		spacing: 20
		BlueSquare {}
		GreenSquare {}
		RedSquare {}
	}
}
网络布局:
grid.qml:
import QtQuick 2.5
BrightSquare {
	id: root
	width: 160
	height: 160
	Grid {
		id: grid
		rows: 2; columns: 2// 限定行数与列数
		anchors.centerIn: parent
		spacing: 8
		RedSquare {}
		RedSquare {}
		GreenSquare {}
		BlueSquare {}
	}
}
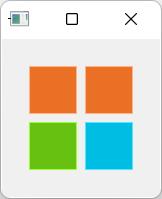
可通过flow: Grid.TopToBottom和layoutDirection: "RightToLeft"这样的属性去控制以什么顺序将元素添加到Grid网络中。
流式布局:
flow.qml:
import QtQuick 2.5
BrightSquare {
	id: root
	width: 160// for flow layout, must set width or height
	height: 160
	Flow {
		anchors.fill: parent
		RedSquare {}
		BlueSquare {}
		GreenSquare {}
	}
}
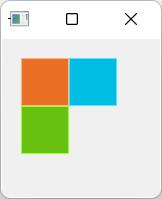
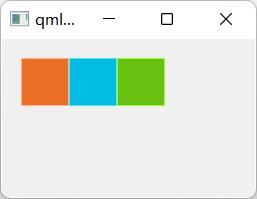
在Flow中添加项目时,会根据需要将其包装成新行或新列。
为了使Flow工作,它必须具有宽度或高度。可直接设定或通过anchor layouts设定。
可通过flow: Grid.TopToBottom和layoutDirection: "RightToLeft"这样的属性去控制以什么顺序将元素添加到Flow流中。
Repeater
repeater.qml:
import QtQuick 2.5
DarkSquare {
	id: root
	width: 252
	height: 252
	property variant colorArray: ["#00bde3", "#67c111", "#ea7025"]
	Grid {
		anchors.fill: parent
		anchors.margins: 8// Grid元素[边框]的间距
		spacing: 4// 子元素[组件]的间距
		Repeater {
			model: 16
			Rectangle {
				width: 56; height: 56
				property int colorIndex: Math.floor(Math.random() * 3)
				color: root.colorArray[colorIndex]
				border.color: Qt.lighter(color)
				Text {
					anchors.centerIn: parent
					color: "#f0f0f0"
					// A repeater injects the 'index' property into the repeater
					text: "Cell " + index
				}
			}
		}
	}
}
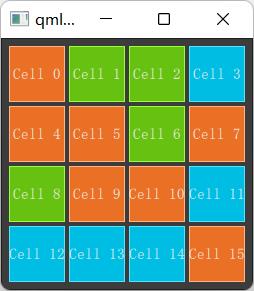
anchors.margin指的是本容器(当前元素)边框的间距;spacing指的是容器的子元素之间的距离。
布局Items
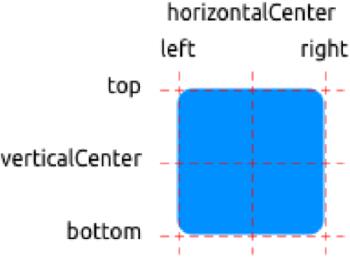
- 填充父元素
GreenSquare {
	BlueSquare {
		width: 12
		anchors.fill: parent
		anchors.margins: 8
		text: '(1)'
	}
}

2. 左对齐父元素
GreenSquare {
	BlueSquare {
		width: 48
		y: 8
		anchors.left: parent.left
		anchors.leftMargin: 8
		text: '(2)'
	}
}

3. 左边对齐父元素的右边
GreenSquare {
	BlueSquare {
		width: 48
		anchors.left: parent.right
		text: '(3)'
	}
}

4. BlueSquare相对父容器水平居中,RedSquare相对BlueSquare水平居中且它的顶部对齐BlueSquare的底部
GreenSquare {
    BlueSquare {
        id: blue
        width: 48; height: 24
        y: 8
        anchors.horizontalCenter: parent.horizontalCenter
    }
    RedSquare {
        width: 72; height: 24
        anchors.top: blue.bottom
        anchors.topMargin: 4
        anchors.horizontalCenter: blue.horizontalCenter
    }
}
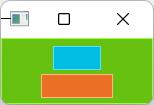
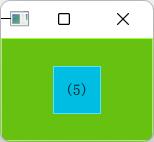
5. 在父元素中居中
GreenSquare {
	BlueSquare {
		width: 48
		anchors.centerIn: parent
		text: '(5)'
	}
}
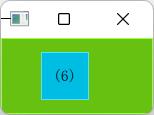
6. 相对父元素有一个left-offset且居中
GreenSquare {
	BlueSquare {
		width: 48
		anchors.horizontalCenter: parent.horizontalCenter
		anchors.horizontalCenterOffset: -12
		anchors.verticalCenter: parent.verticalCenter
		text: '(6)'
	}
}
⑦键盘输入元素
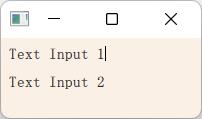
TextInput允许用户输入一行文本。元素支持输入约束,例如validator、inputMask和echoMode。
Rectangle {
    width: 200
    height: 80
    color: "linen"
    TextInput {
        id: input1
        x: 8; y: 8
        width: 96; height: 20
        focus: true
        text: "Text Input 1"
        KeyNavigation.tab: input2
    }
    TextInput {
        id: input2
        x: 8; y: 36
        width: 96; height: 20
        text: "Text Input 2"
        KeyNavigation.tab: input1
    }
}
我们将代码封装进我们的自定义组件TLineEditV1中以便复用:
TLineEditV1.qml:
Rectangle {
	width: 96; height: input.height + 8
	color: "lightsteelblue"
	border.color: "gray"

	property alias text: input.text
	property alias input: input

	TextInput {
		id: input
		anchors.fill: parent
		anchors.margins: 4
		focus: true
	}
}
这样使用我们的组件:
Rectangle {
	...
	TLineEditV1 {
		id: input1
		...
	}
	TLineEditV1 {
		id: input2
		...
	}
}
之前Tab键功能都正常,但用封装的组件时,按下Tab键焦点并没有转到input2。这是因为焦点转到的input2元素的顶层元素,即Rectangle接收到焦点,焦点并没有传递到TextInput。可以用FocusScope来解决此问题。
FocusScope {
	...// 代码与TLineEditV1.qml相同,只是用FocusScope{}包围起来了
}
Tab切换焦点功能正常了。
TextEdit
TextEdit与TextInput非常相似,支持多行文本编辑字段。它没有文本约束属性,因为这取决于文本的绘制大小(paintedHeight、paintedWidth)。
TTextEdit.qml:
FocusScope {
	width: 96; height: 96
	Rectangle {
		anchors.fill: parent
		color: "lightsteelblue"
		border.color: "gray"
	}
	property alias text: input.text
	property alias input: input
	TextEdit {
		id: input
		anchors.fill: parent
		anchors.margins: 4
		focus: true
	}
}
Rectangle {
    width: 136
    height: 120
    color: "linen"
    TTextEdit {
        id: input
        x: 8
        y: 8
        width: 120; height: 104
        focus: true
        text: 以上是关于█Qt-4-快速入门的主要内容,如果未能解决你的问题,请参考以下文章