WPF 跟随拖动改变的三次贝塞尔曲线思路
Posted dotNET跨平台
tags:
篇首语:本文由小常识网(cha138.com)小编为大家整理,主要介绍了WPF 跟随拖动改变的三次贝塞尔曲线思路相关的知识,希望对你有一定的参考价值。
代码不多,思路也很简单,
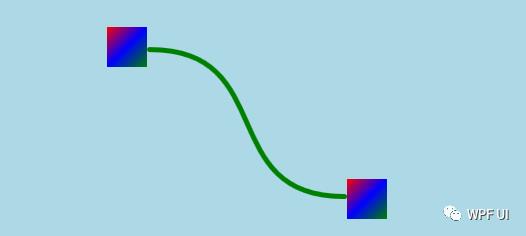
先看看效果:
简单示例,所有代码都在MainWindow.xaml和MainWindow.xaml.cs内,
Xaml代码:
<Window x:Class="WPFDemos.MainWindow"
        xmlns="http://schemas.microsoft.com/winfx/2006/xaml/presentation"
        xmlns:x="http://schemas.microsoft.com/winfx/2006/xaml"
        xmlns:d="http://schemas.microsoft.com/expression/blend/2008"
        xmlns:mc="http://schemas.openxmlformats.org/markup-compatibility/2006"
        xmlns:local="clr-namespace:WPFDemos"
        mc:Ignorable="d"
        x:Name="widnow"
        WindowStartupLocation="CenterScreen"
        UseLayoutRounding="True"
        Background="LightBlue"
        FontSize="16"
        Title="拖动" Height="500" Width="1000">
    <Window.Resources>
        <ControlTemplate x:Key="template" TargetType="{x:Type Thumb}">
            <Grid x:Name="bg">
                <Grid.Background>
                    <LinearGradientBrush >
                        <GradientStop Color="Red" Offset="0."/>
                        <GradientStop Color="Blue" Offset="0.5"/>
                        <GradientStop Color="Green" Offset="1"/>
                    </LinearGradientBrush>
                </Grid.Background>
            </Grid>
            <ControlTemplate.Triggers>
                <Trigger Property="IsDragging" Value="True">
                    <Setter TargetName="bg" Property="Background" Value="DarkGray"/>
                </Trigger>
            </ControlTemplate.Triggers>
        </ControlTemplate>
    </Window.Resources>
    <Grid>
        <Canvas x:Name="canvas" Margin="0,0">
            <Thumb x:Name="thumb1" Canvas.Top="0" Canvas.Left="0" Width="40" Height="40" Template="{StaticResource template}" DragDelta="Thumb_DragDelta"/>
            <Thumb x:Name="thumb2" Canvas.Top="200" Canvas.Left="200" Width="40" Height="40" Template="{StaticResource template}" DragDelta="Thumb_DragDelta"/>
            <Path  x:Name="path" Data="M 0,0 c 200,0 100,300 300,300" Height="200"
                   Stretch="Fill" Stroke="Green" StrokeStartLineCap="Round" StrokeEndLineCap="Round"
                   StrokeThickness="5" Width="200" Canvas.Left="381" Canvas.Top="105" RenderTransformOrigin="0.5,0.5">
                <Path.RenderTransform>
                    <TransformGroup>
                        <ScaleTransform x:Name="scale" ScaleX="0"/>
                    </TransformGroup>
                </Path.RenderTransform>
            </Path>
        </Canvas>
    </Grid>
</Window>
后台代码:
using System;
using System.Windows;
using System.Windows.Controls;
using System.Windows.Controls.Primitives;


namespace WPFDemos
{
    public partial class MainWindow : Window
    {
        private void UpdateThumb()
        {
            var point1 = new Point((double)thumb1.GetValue(Canvas.LeftProperty)+thumb1.Width, (double)thumb1.GetValue(Canvas.TopProperty) + thumb1.Height / 2);
            var point2 = new Point((double)thumb2.GetValue(Canvas.LeftProperty), (double)thumb2.GetValue(Canvas.TopProperty) + thumb2.Height / 2);
            path.SetValue(Canvas.LeftProperty, Math.Min(point1.X,point2.X));
            path.SetValue(Canvas.TopProperty, Math.Min(point1.Y,point2.Y));
            path.Width = Math.Abs(point1.X - point2.X);
            path.Height = Math.Abs(point1.Y - point2.Y);
            if (point1.X < point2.X)
            {
                scale.ScaleX = point1.Y < point2.Y ? 1 : -1;
            }
            else
            {
                scale.ScaleX = point1.Y < point2.Y ? -1 : 1;


            }
        }

        public MainWindow()
        {
            InitializeComponent();
            UpdateThumb();
        }
        private void Thumb_DragDelta(object sender, System.Windows.Controls.Primitives.DragDeltaEventArgs e)
        {
            Thumb myThumb = (Thumb)sender; double nTop = Canvas.GetTop(myThumb) + e.VerticalChange;
            double nLeft = Canvas.GetLeft(myThumb) + e.HorizontalChange;
            Canvas.SetTop(myThumb, nTop);
            Canvas.SetLeft(myThumb, nLeft);
            UpdateThumb();
        }
    }
}
好了,结束了,
效果图:

以上是关于WPF 跟随拖动改变的三次贝塞尔曲线思路的主要内容,如果未能解决你的问题,请参考以下文章