Spring Boot数据访问
Posted shi_zi_183
tags:
篇首语:本文由小常识网(cha138.com)小编为大家整理,主要介绍了Spring Boot数据访问相关的知识,希望对你有一定的参考价值。
Spring Boot数据访问
Spring Boot数据访问概述
Spring Data是Spring提供了一个用于简化数据库访问、支持云服务的开源框架。它是一个伞形项目,包含了大量关系型数据库及非关系型数据库的数据访问解决方案,其设计目的是使我们可以快速且简单地使用各种数据访问技术。Spring Boot默认采用整合Spring Data地方式统一处理数据访问层,通过添加大量自动配置,引入各种数据访问模板xxxTemplate以及统一的Repository接口,从而达到简化数据访问层的操作。
Spring Data提供了多种类型数据库支持,Spring Boot对Spring Data支持的数据库进行了整合管理,提供了各种依赖启动器。
| 名称 | 描述 |
|---|---|
| spring-boot-starter-data-jpa | Spring Data JPA与Hibernate的启动器 |
| spring-boot-start-data-mongodb | MongoDB和Spring Data MongoDB的启动器 |
| spring-boot-start-data-neo4 | Neo4j图数据库和Spring Data Neo4j的启动器 |
| spring-boot-start-redis | Redis键值数据存储与Spring Data Redis和Jedis客户端的启动器 |
Spring Boot没有提供MyBatis场景依赖,但是MyBatis开发团队自己适配了Spring Boot,提供了mybatis-spring-boot-starter依赖启动器实现数据访问操作。
Spring Boot整合MyBatis
基础环境搭建
因为Spring Boot框架开发很便利,所以实现Spring Boot与数据访问层框架的整合非常简单,主要是引入对应的依赖启动器,并进行数据库相关参数设置即可。
1、数据准备
在mysql中,创建一个名为springbootdata的数据库,在该数据库中创建两个表t_article和t_comment,并预先插入几条测试数据
springbootdata.sql
create database springbootdata;
use springbootdata;
drop table if exists `t_article`;
create table `t_article` (
	`id` int(20) not null auto_increment comment '文章id',
	`title` varchar(200) default null comment '文章标题',
	`content` longtext comment '文章内容',
	primary key (`id`)
) engine=InnoDB auto_increment=2 default charset=utf8;
insert into `t_article` values ('1','Spring Boot 基础入门','从入门到精通讲解...');
insert into `t_article` values ('2','Spring Cloud基础入门','从入门到精通讲解...');
drop table if exists `t_comment`;
create table `t_comment` (
	`id` int(20) not null auto_Increment comment '评论id',
	`content` longtext comment '评论内容',
	`author` varchar(200) default null comment '评论作者',
	`a_id` int(20) default null comment '关联的文章id',
	primary key (`id`)
) engine=InnoDB auto_increment=3 default charset=utf8;
insert into `t_comment` values ('1','123','tom1','1');
insert into `t_comment` values ('2','123','tom2','1');
insert into `t_comment` values ('3','123','tom3','1');
insert into `t_comment` values ('4','123','tom4','1');
insert into `t_comment` values ('5','123','tom5','2');
2、创建项目,引入相应的启动器
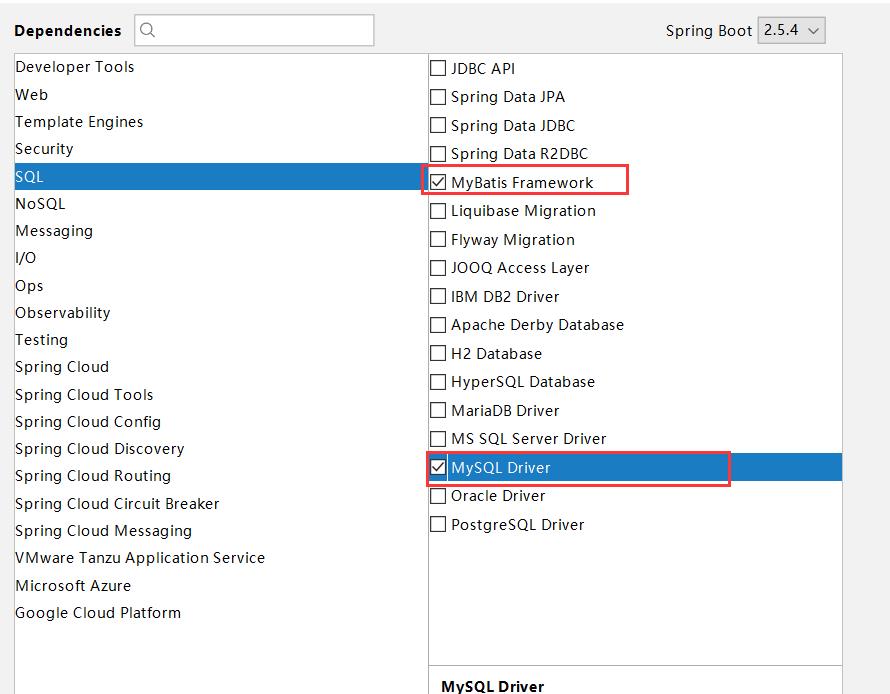
1)创建Spring Boot项目。创建一个名为chapter03的Spring Boot项目,在Dependencies依赖中选中SQL模块中的Mysql和MyBatis依赖,并根据后续提示完成项目创建。

2)编写数据库对应的实体类。在chapter03项目中创建名为com.example.chapter03的包,并在该包中编写与数据库表对应的实体类Comment和Article
Comment.java
package com.example.chapter03;

public class Comment {
    private Integer id;
    private String content;
    private String author;
    private Integer aId;
    //省略属性getter和setter方法
    //省略toString()方法
}
Article.java
package com.example.chapter03;

import java.util.List;

public class Article {
    private Integer id;
    private String title;
    private String content;
    private List<Comment> commentList;
    //省略属性getter和setter方法
    //省略toString()方法
}
3、编写配置文件
1)在application.properties配置文件中进行数据库连接配置。
application.properties
spring.datasource.url=jdbc:mysql://localhost:3306/springbootdata?serverTimezone=UTC
spring.datasource.username=root
spring.datasource.password=123456
2)数据源类型选择配置。Spring Boot 1.x版本默认使用的使tomcat.jdbc数据源,Spring Boot 2.x版本默认使用的是hikari数据源。如果使用其他数据源,还需要进行额外配置。
这里选择使用阿里巴巴的Druid数据源。在pom.xml文件中添加Druid数据源启动器。
		<dependency>
            <groupId>com.alibaba</groupId>
            <artifactId>druid-spring-boot-starter</artifactId>
            <version>1.1.10</version>
        </dependency>
上述引入的依赖druid-spring-boot-starter,同样是阿里巴巴为了迎合Spring Boot项目而适配的Druid数据源启动器,当在pom.xml中引入该启动器后,不需要再进行其他额外配置,Spring Boot项目会自动识别配置Druid数据源。
需要说明的是,上述配置的Druid数据源启动器内部已经初始化了一些运行参数,如果开发过程中需要修改第三方Druid的运行参数,则必须在全局配置文件中修改。
application.properties
spring.datasource.type=com.alibaba.druid.pool.DruidDataSource
spring.datasource.initialSize=20
spring.datasource.minIdle=10
spring.datasource.maxActive=100
修改了Druid数据源的类型、初始化连接数、最小空闲数和最大连接数
注:配置完之后会发现spring.datasource.initialSize、spring.datasource.minIdle、spring.datasource.maxActive属性底纹为黄色,这是因为Spring Boot提供的数据源自动配置类org.springframework.boot.autoconfigure.jdbc.DataSourceProperties中,没有与这些参数对应的默认属性,所以这些设置的属性值无法识别和生效。为此我们需要编写一个自定义配置类,将配置文件中的属性注入到Druid数据源属性中。
在chapter03项目中创建名为com.example.chapter03.config的包,并在该包下创建一个自定义配置类对Druid数据源属性值进行注入
DataSourceConfig.java
package com.example.chapter03.config;

import com.alibaba.druid.pool.DruidDataSource;
import org.springframework.boot.context.properties.ConfigurationProperties;
import org.springframework.context.annotation.Bean;
import org.springframework.context.annotation.Configuration;

import javax.sql.DataSource;

@Configuration
public class DataSourceConfig {
    @Bean
    @ConfigurationProperties(prefix = "spring.datasource")
    public DataSource getDruid(){
        return new DruidDataSource();
    }
}
以上是关于Spring Boot数据访问的主要内容,如果未能解决你的问题,请参考以下文章