听说越来越卷,那我们就用卷积神经网络CNN来识别狗狗吧!!
Posted 江 月
tags:
篇首语:本文由小常识网(cha138.com)小编为大家整理,主要介绍了听说越来越卷,那我们就用卷积神经网络CNN来识别狗狗吧!!相关的知识,希望对你有一定的参考价值。
听说越来越卷,那我们就用卷积神经网络CNN来识别狗狗吧!!
文章目录
一、识别狗狗
首先介绍博文的内容;
在这篇博文中,
我们将借助Python使用CNN卷积神经网络来进行狗脸的识别,我们知道狗狗是有120多种类别,我们本次的目标就是要通过深度学习使得机器可以区分出来这120种狗狗的类别并且较为准确的将结果告诉使用者。
总之一句话,识别不同狗狗的种类。
(下图有一只猫,但是我们应该忽略它,因为我们在做狗脸识别。)
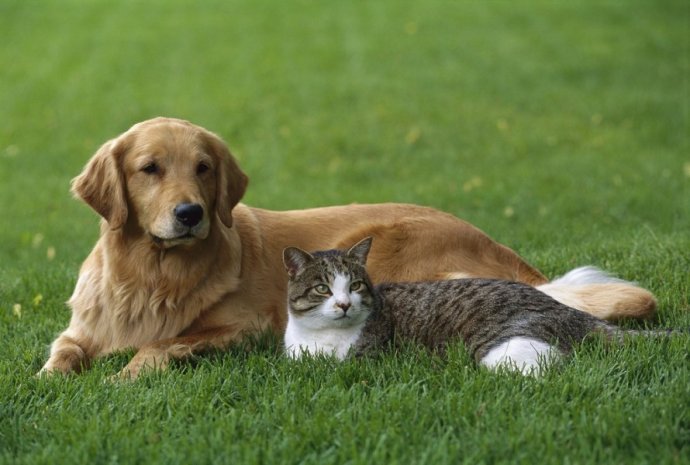
当然了,
想要区分猫和狗比给狗狗分类要简单多了,毕竟,猫和狗,这是二元的分类问题;
而,狗狗的不同种类,多打120种,是一个比较多的多元分类,明显会比较复杂了啦。
本文是要讲解识别不同狗狗的种类了啦。
二、CNN简介
CNN是卷积神经网络,
CNNs是深度卷积神经网络。
神经网络(neual networks)
是人工智能研究领域的一部分,当前最流行的神经网络是深度卷积神经网络(deep convolutional neural networks, CNNs)以及卷积神经网络(CNN),虽然卷积网络也存在浅层结构,但是因为准确度和表现力等原因很少使用。
目前提到CNNs和卷积神经网络(CNN),学术界和工业界不再进行特意区分,一般都指深层结构的卷积神经网络,层数从”几层“到”几十上百“不定。
基础的CNN由
卷积(convolution), 激活(activation), and 池化(pooling)三种结构组成。
CNN输出的结果是每幅图像的特定特征空间。当处理图像分类任务时,我们会把CNN输出的特征空间作为全连接层或全连接神经网络(fully connected neural network, FCN)的输入,用全连接层来完成从输入图像到标签集的映射,即分类。
当然,整个过程最重要的工作就是如何通过训练数据迭代调整网络权重,也就是后向传播算法。
目前主流的卷积神经网络(CNNs),比如VGG, ResNet都是由简单的CNN调整,组合而来。
例如,
对于数字八的识别,我们有如下的操作:
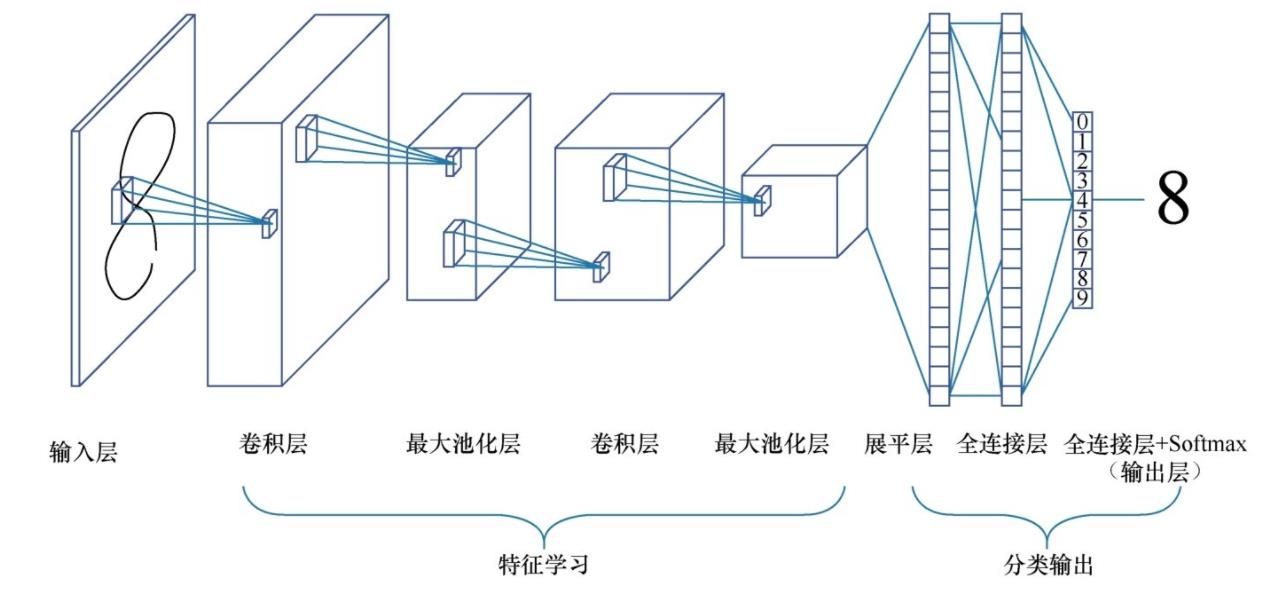
它的本质其实就是下面所示的啦,这就是卷积神经网络哦:
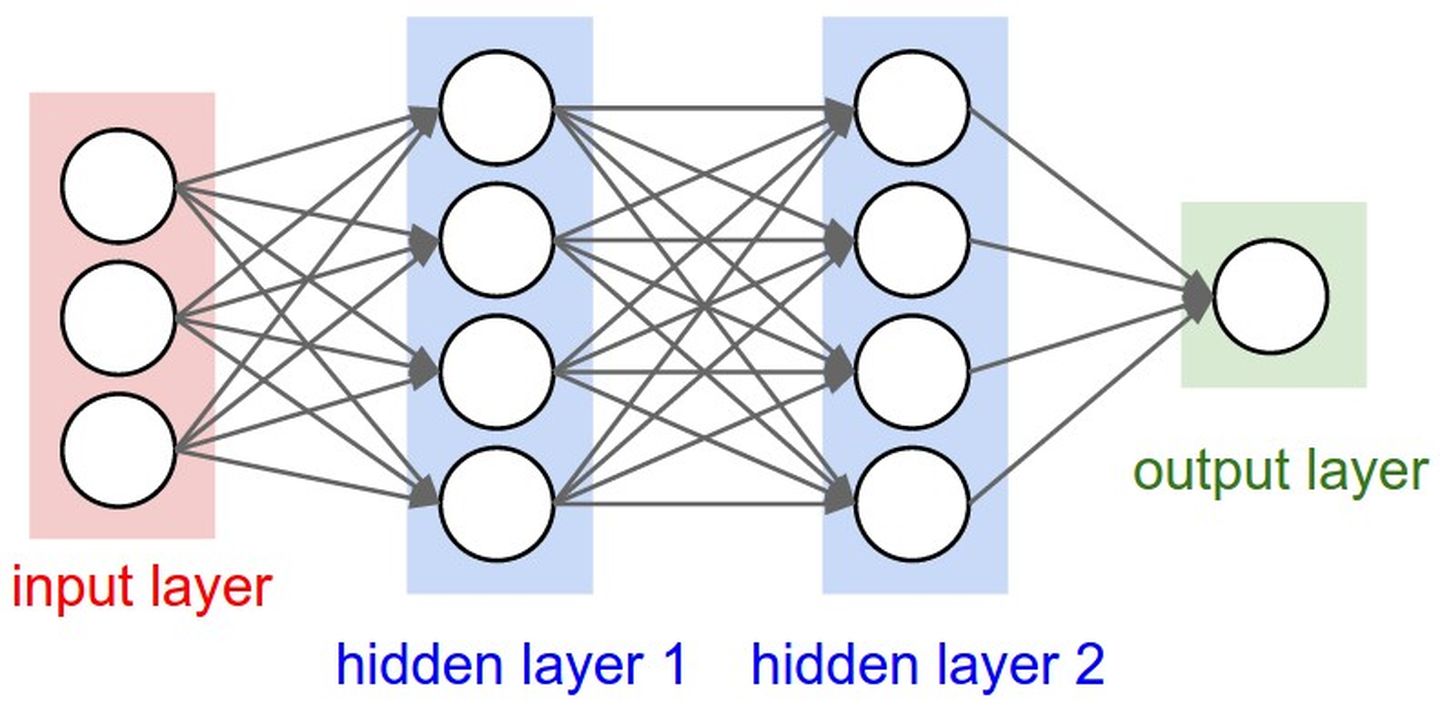
如果需要进行简单的描述,那么就是,下面举一个简单的例子,如下所示:
将这个简化
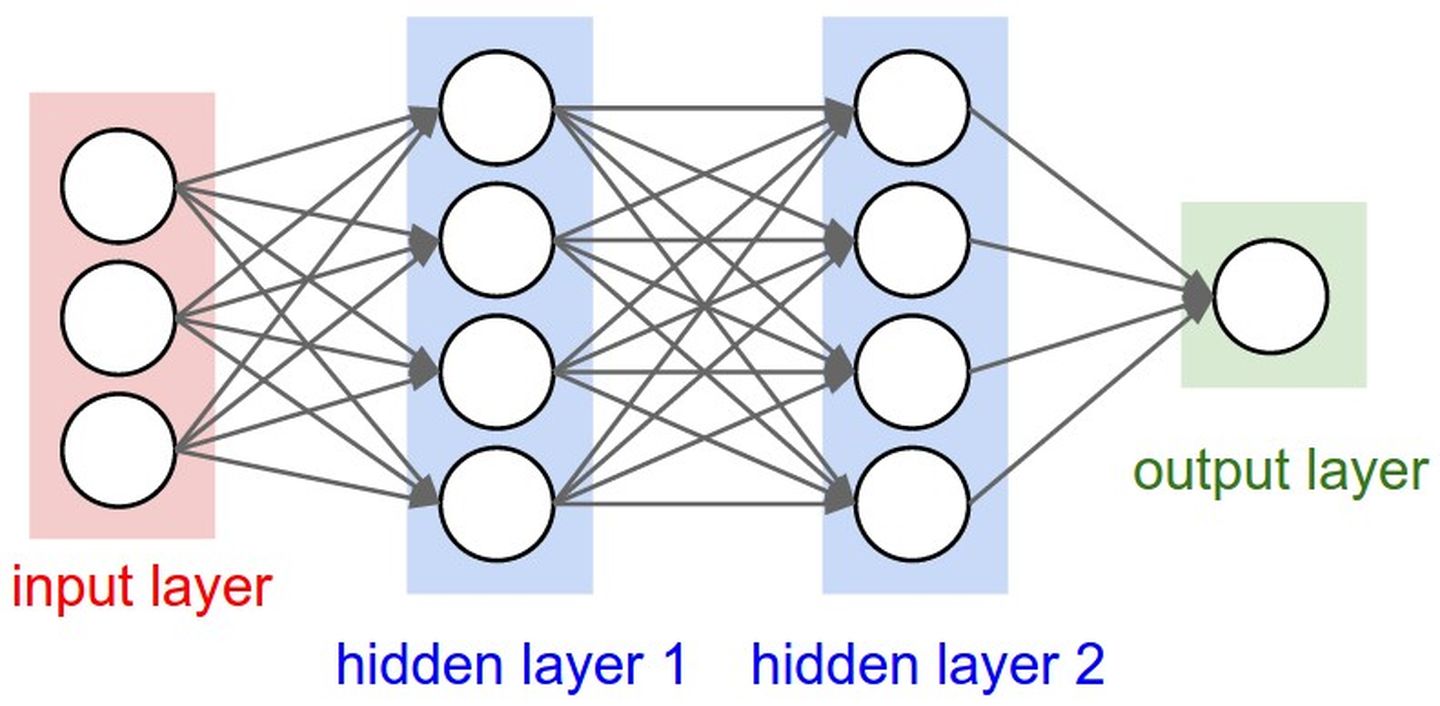
于是就变为了:
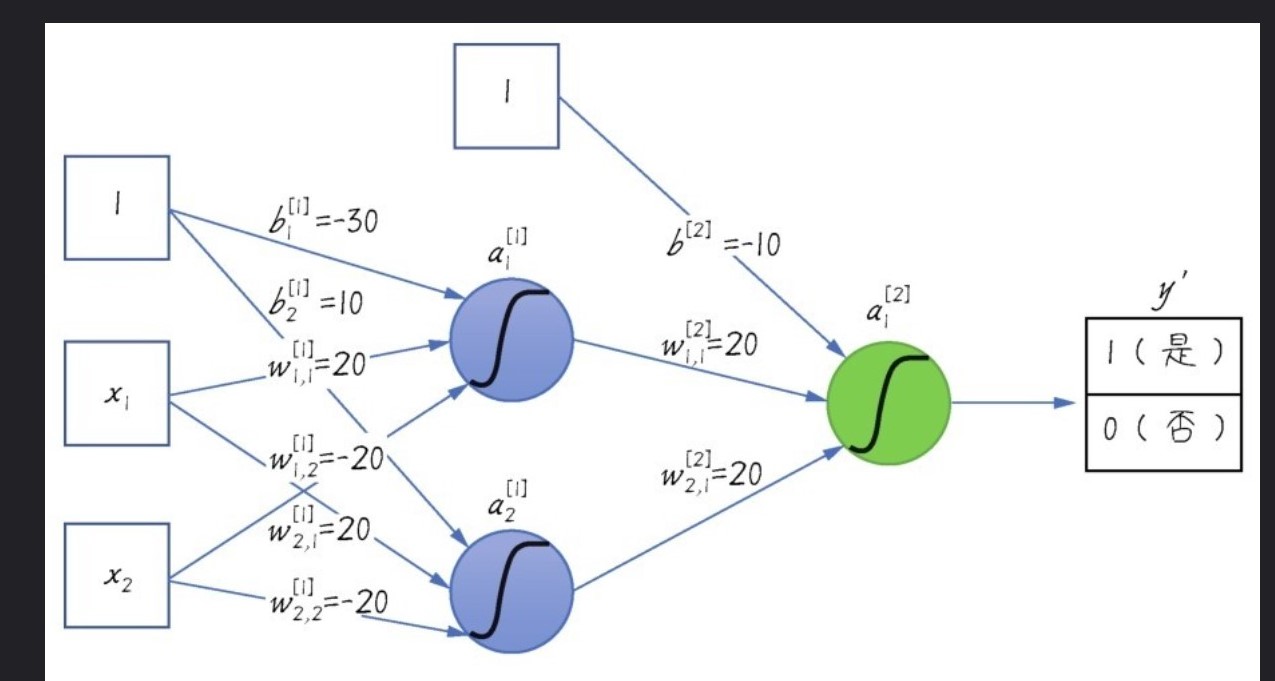
其实,CNN的本质还是梯度下降,只不过这里的反馈与前面的反馈有所不同而已,但是还是同样的思路。
对于狗狗:
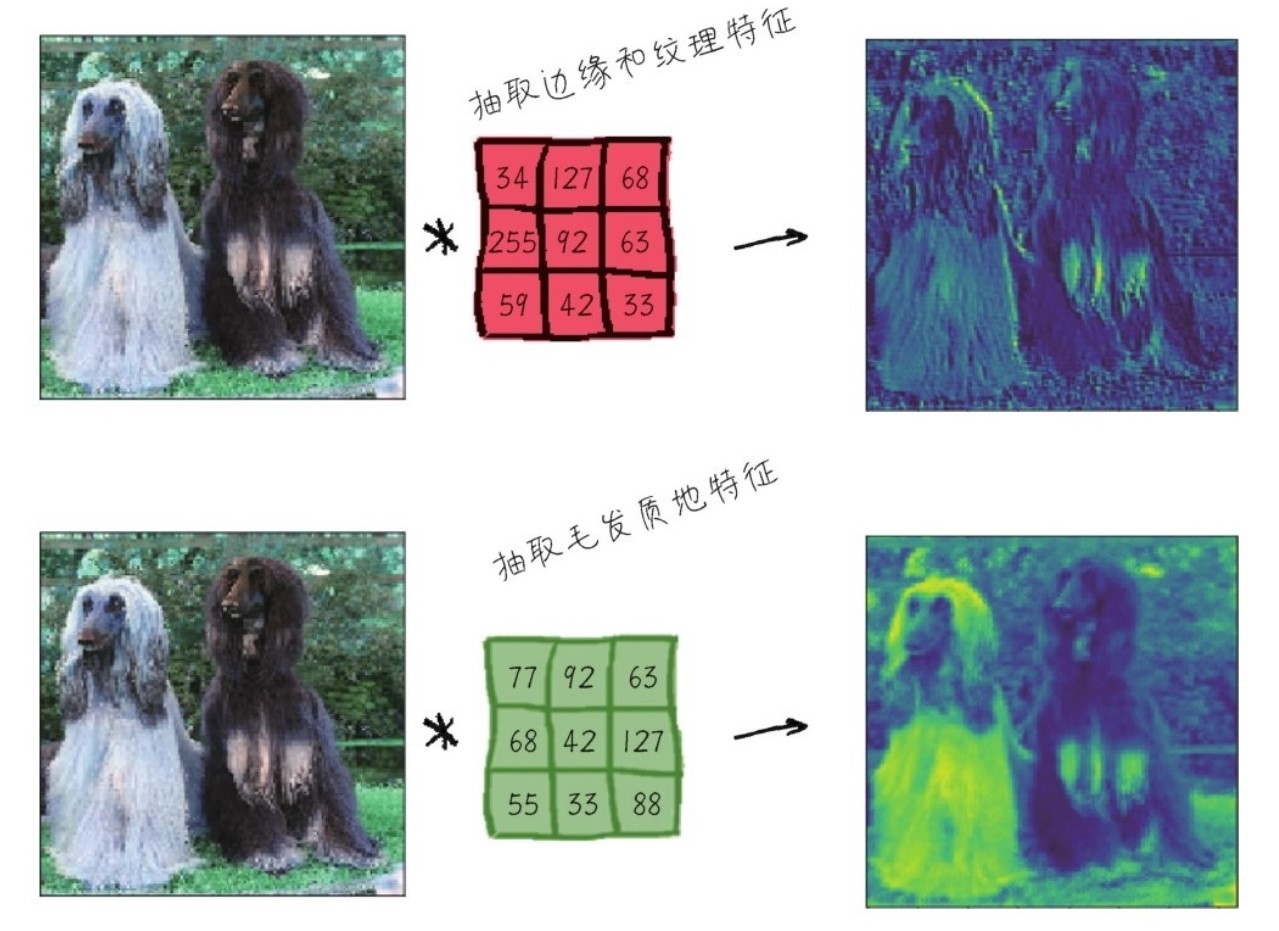
(卷积的操作)
在读入狗狗的数据以后,还会进行例如下图的类似操作,进行卷积以及池化:
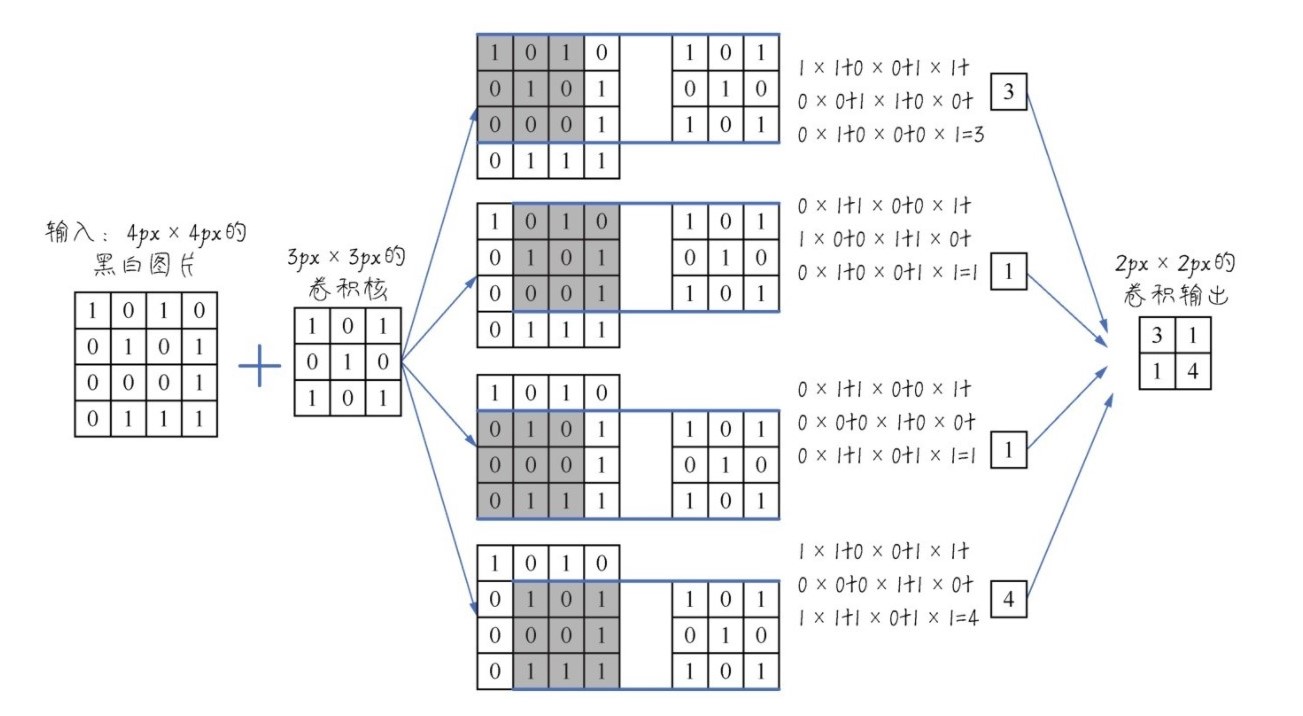
还有:(RGB是通过红、绿、蓝三种颜色组合而成的颜色)

三、环境的配置
1、Python
人工智能我们还是建议使用Python来完成相关的工作。
同时,Python版本需要3.x的。
2、模块
在Python中,我们在这个案例中需要用到不少的模块;
此次我们将使用如下模块:
1)numpy
这个模块十分常用,是一个Python处理数据的科学模块,此处我们会用来处理数组、矩阵等数据类型的数据。
2)pandas
这个模块也是十分常用的数据分析模块,这里我们将主要用来处理DataFrame对象,其实本质上就是张量。
3)sklearn
这个是机器学习的一个模块。
我们会用它来划分数据集等等。
4)keras
这是构建卷积神经网络所需要的模块,我们在这里将会通过Keras模块来构建卷积神经网络。
5)matplotlib.pyplot
这个是绘图模块,可以较为清晰的呈现学习的状况。
6)os
我们需要读取数据,因此,os模块可以较为方便的帮助我们处理文件的查找以及路径的寻找等问题。
7)TensorFlow
我们会间接的使用到TensorFlow模块。
四、获取狗狗的图片信息
原本这些信息可以在Kaggle上面获得:
(任意点击一个就可以了。)
链接:
狗狗图片汇总数据
链接是:https://www.kaggle.com/jessicali9530/stanford-dogs-dataset
但是,如果你不懂什么魔法之类的东西,那么你下载起来是很费劲的啦。
因此对于不懂魔法的用户呢,我将这一份数据放在了我的资源里面,而且是永久免费的哦!!!
截图为证:
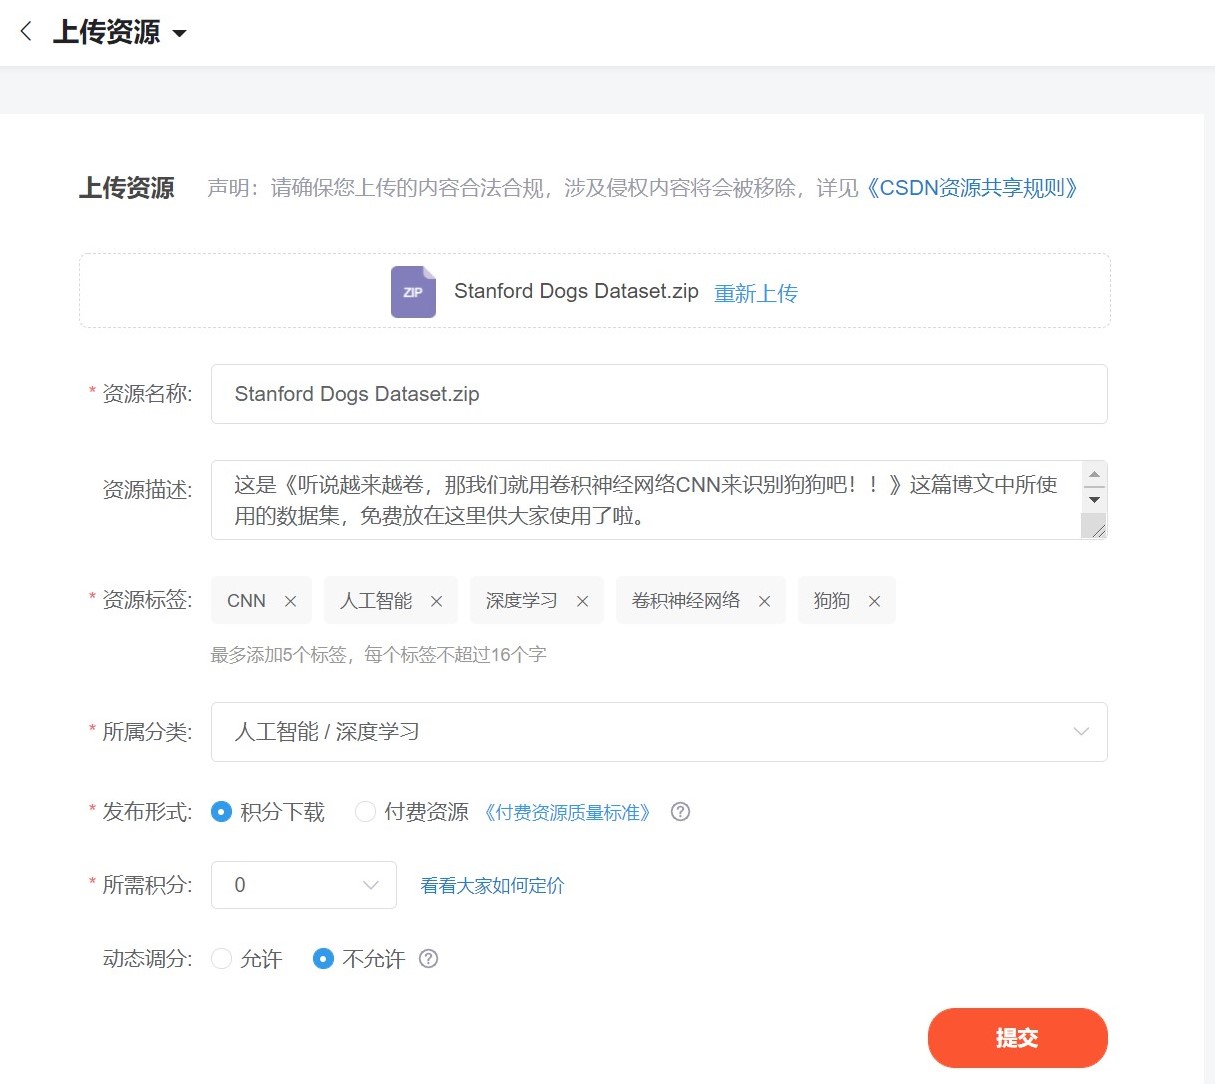
这份永久免费的资源的地址是:
有些无良人士直接放空的资源,为了防止大家以为我是这样的人,于是这个资源是免费的啦。
地址;
https://download.csdn.net/download/m0_54218263/21360497?spm=1001.2014.3001.5501
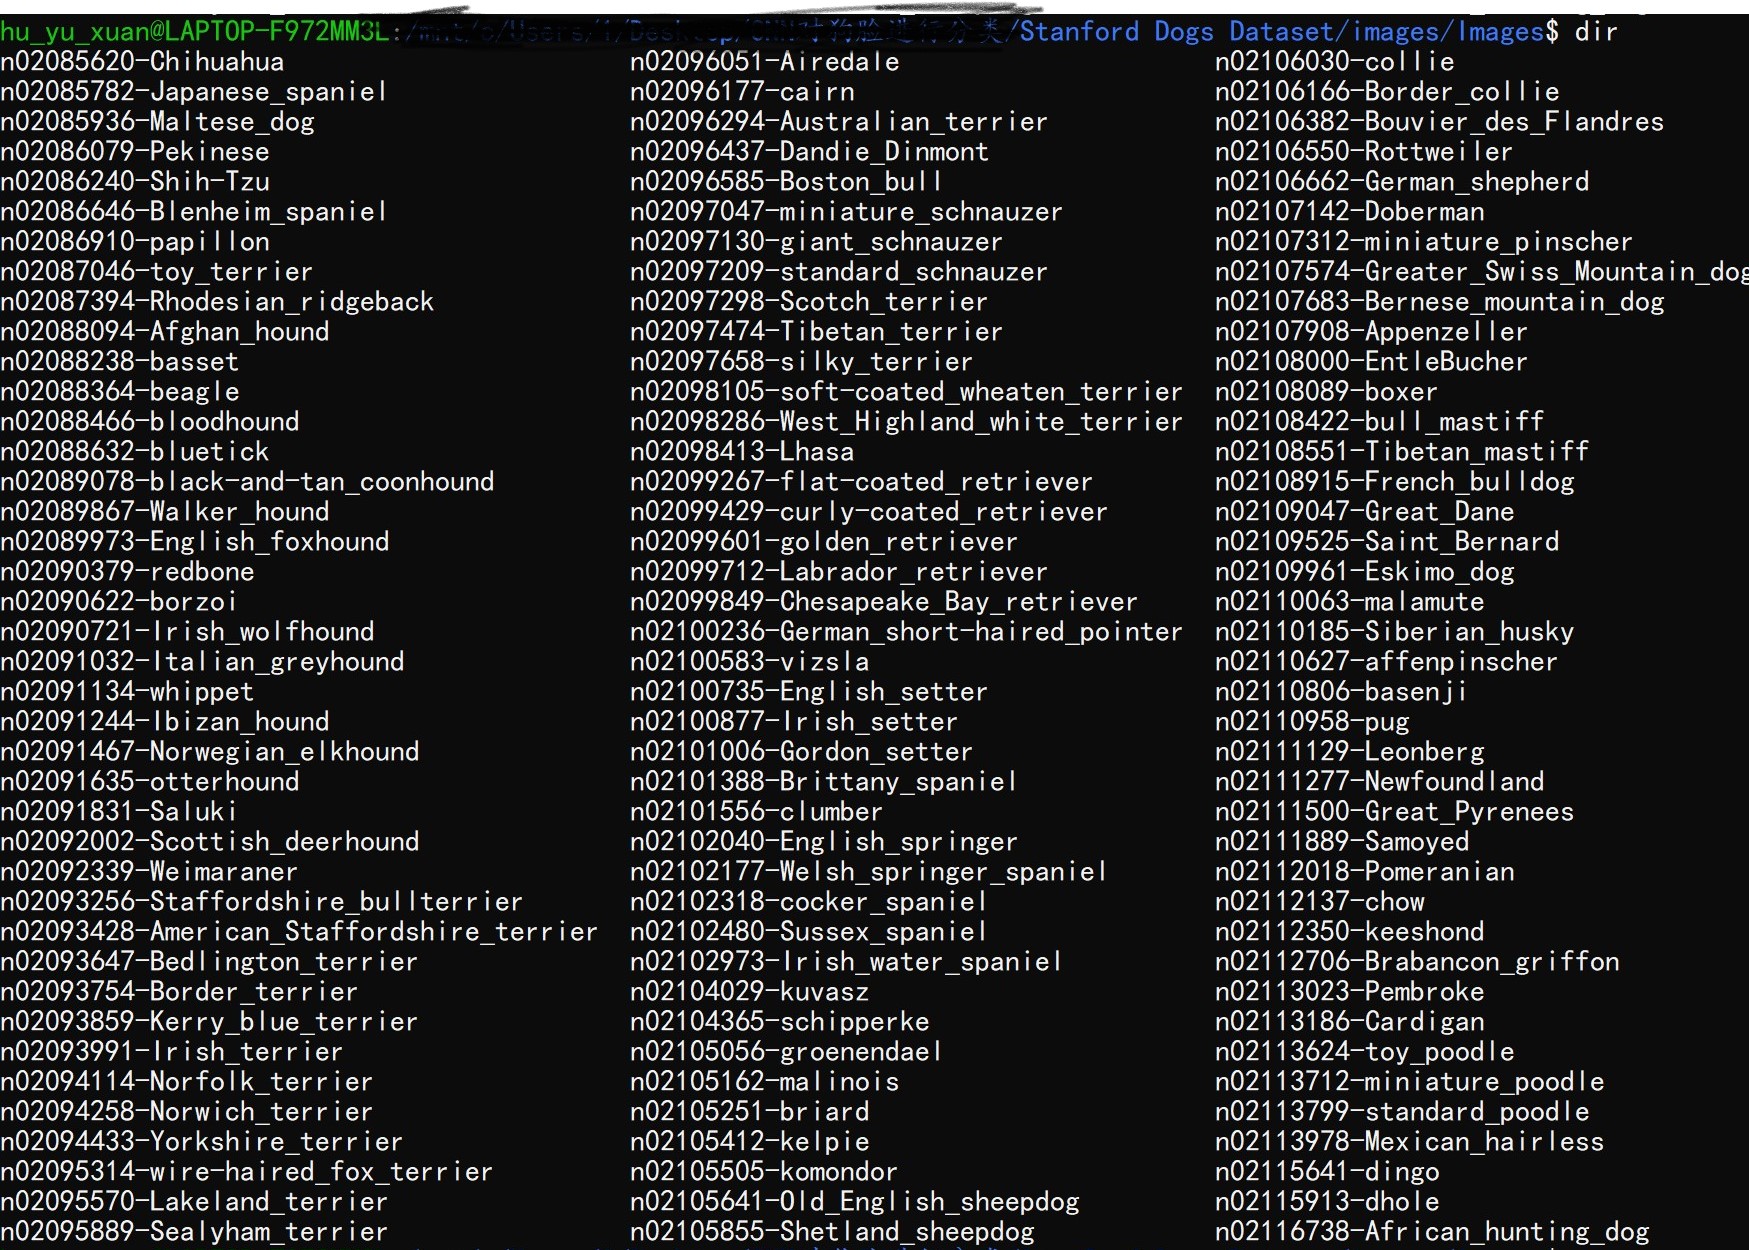
数据集里面的数据有:
120种狗狗的照片,每一种狗狗有150张照片。
五、数据的读取
在读取数据之前,我们首先导入一些模块:
import os
import cv2
import numpy as np
import pandas as pd
from sklearn.model_selection import train_test_split
# this is the split module
from tensorflow import keras
# keras
# use this method to import keras will not appear error
from tensorflow.keras import models, layers
from tensorflow.keras.utils import to_categorical
from sklearn.preprocessing import LabelEncoder
from tensorflow.keras.layers import Dense, Dropout, Flatten, Conv2D, MaxPooling2D
接下来,我们进行数据的读取操作;
(由于数据量巨大,我们这里仅仅只是做10种狗狗的识别,当然120种只需要修改种类数目就可以了啦。)
下面是读取数据的代码;
dogs_img_list = os.listdir("Stanford Dogs Dataset/images/images")
for i in dogs_img_list:
    print(i)

root_dir = "Stanford Dogs Dataset/images/images/"
# root package
dog_img_dir = []
# dir of each dog
"""
because of the large quantities of data,
we just recognize 10 kinds of dogs
"""
for i in range(10):
    # 10 kinds
    dog_img_dir.append(root_dir + dogs_img_list[i])
    # append the message of the dogs
X = []
# X
y_label = []
# y_label
img_size = 150
# the size of the img


def training_data(label, data_dir):
    """
    read data and store them into the X and the y_label
    :param label: the label of the dog, that means the kind of the dog
    :param data_dir: data
    :return: none
    """
    print("reading...", data_dir)
    # tip messages
    for img in os.listdir(data_dir):
        path = os.path.join(data_dir, img)
        img = cv2.imread(path, cv2.IMREAD_COLOR)
        img = cv2.resize(img, (img_size, img_size))
        # X
        X.append(np.array(img))
        # y_label
        y_label.append(str(label))


# use the method above to read the dog's data
for i in range(10):
    # use 10 to test our main, 10 kinds
    training_data(label=dog_img_dir[i].split("-")[1], data_dir=dog_img_dir[i])
执行代码以后的效果图如下:
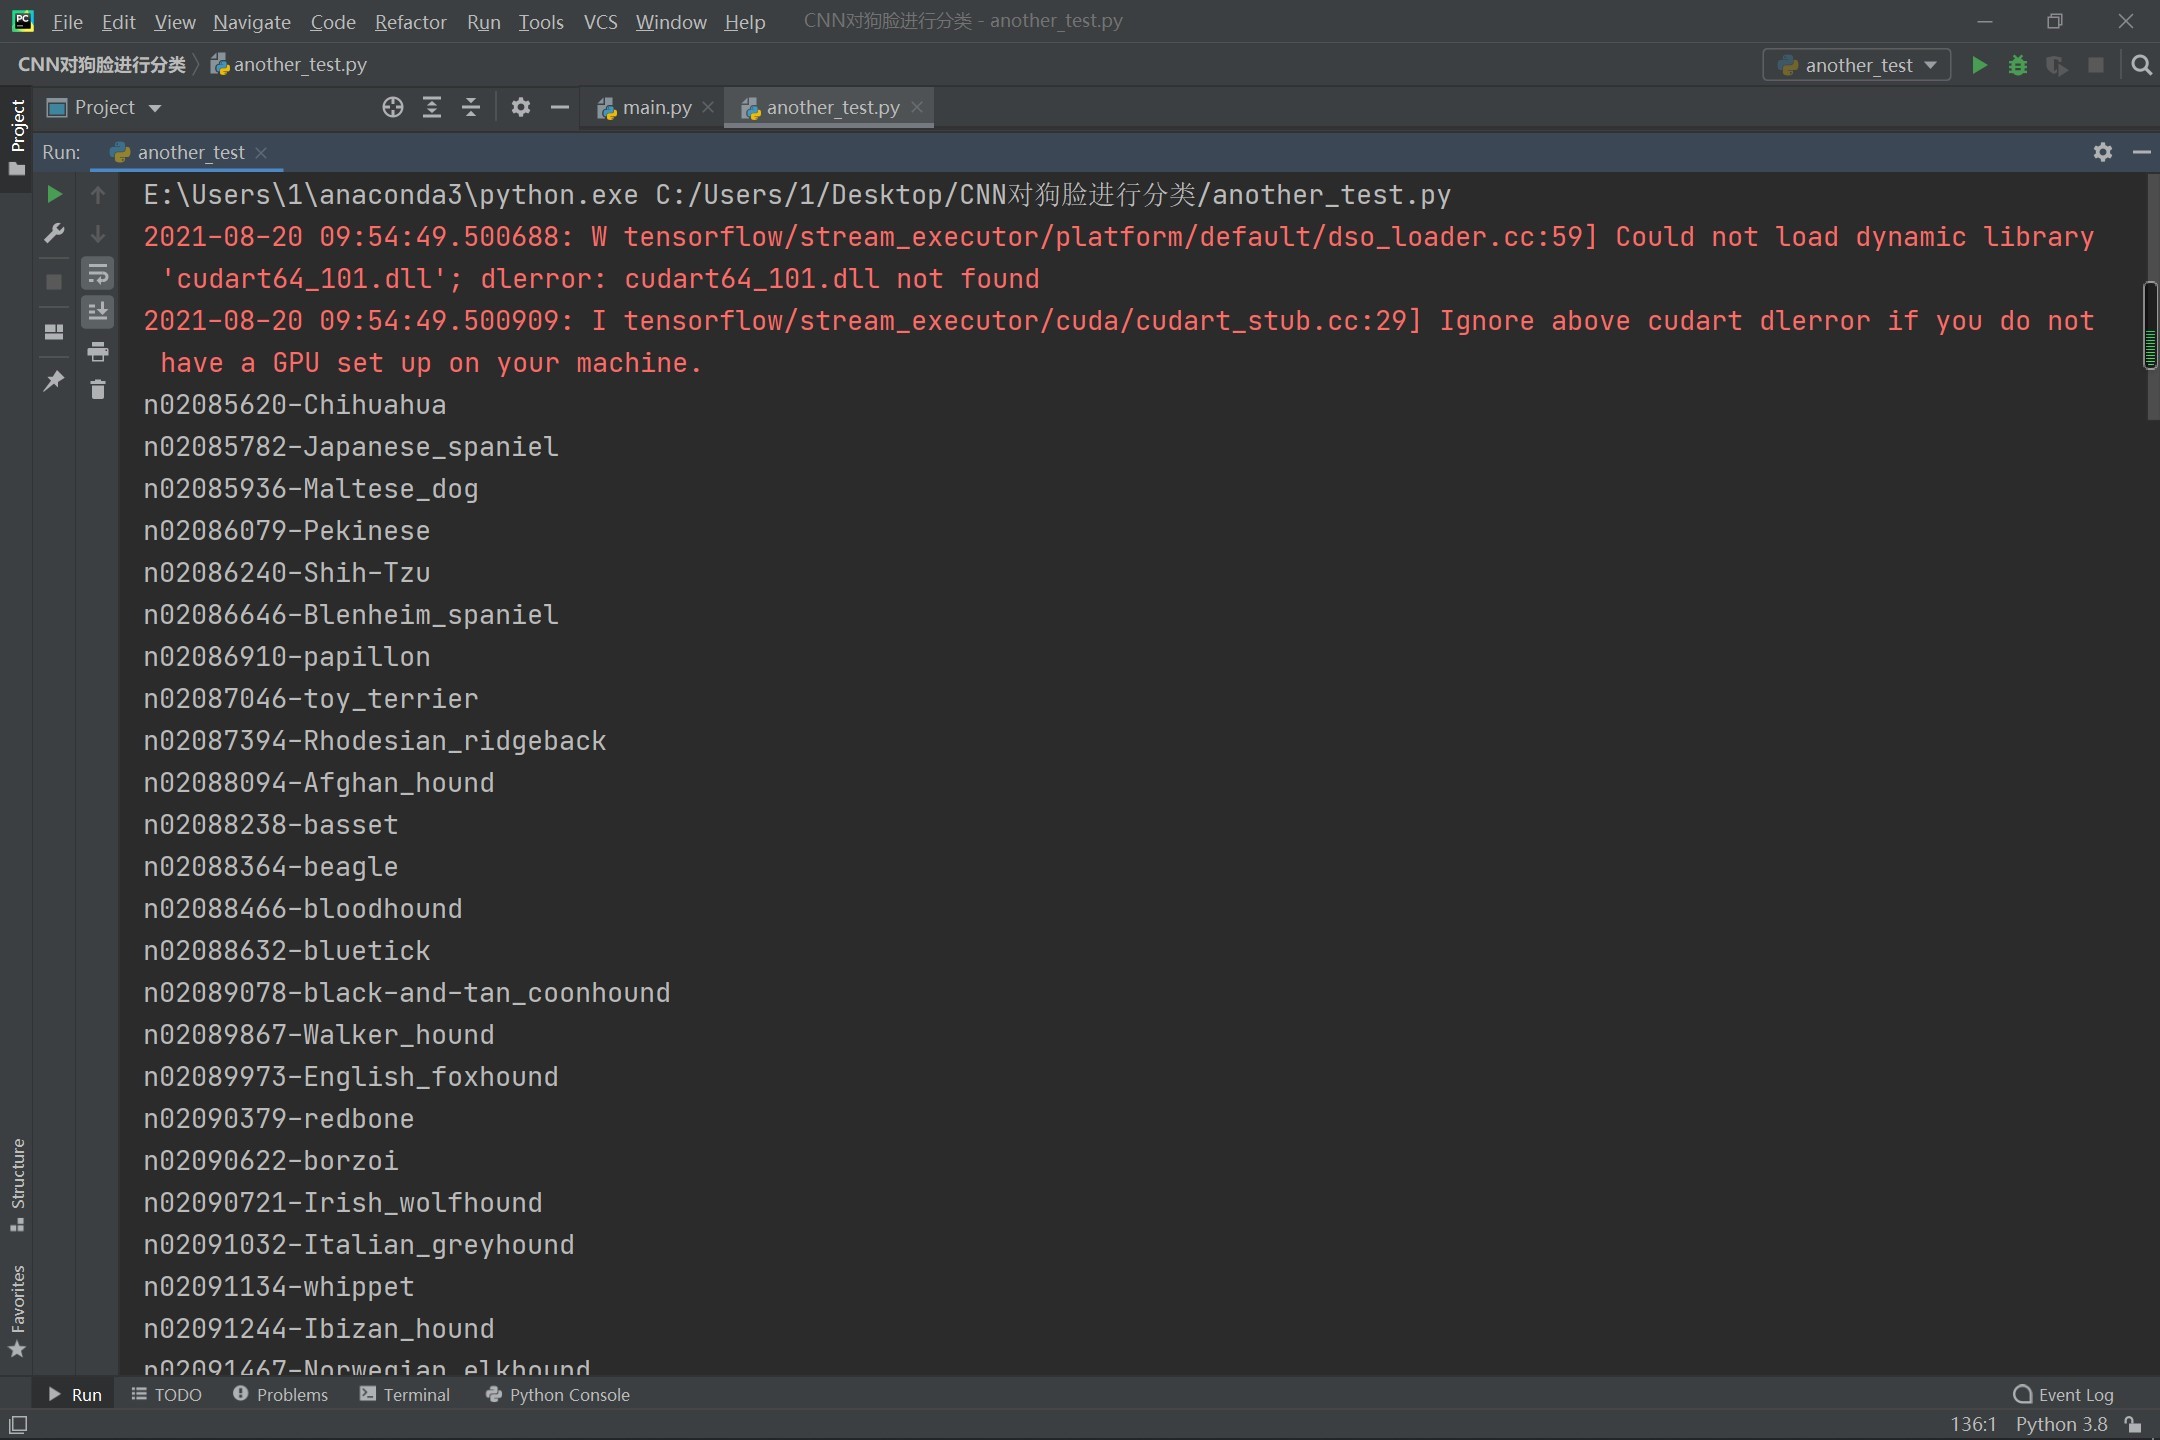
大家注意一下,这里的红色不是错误啊!!
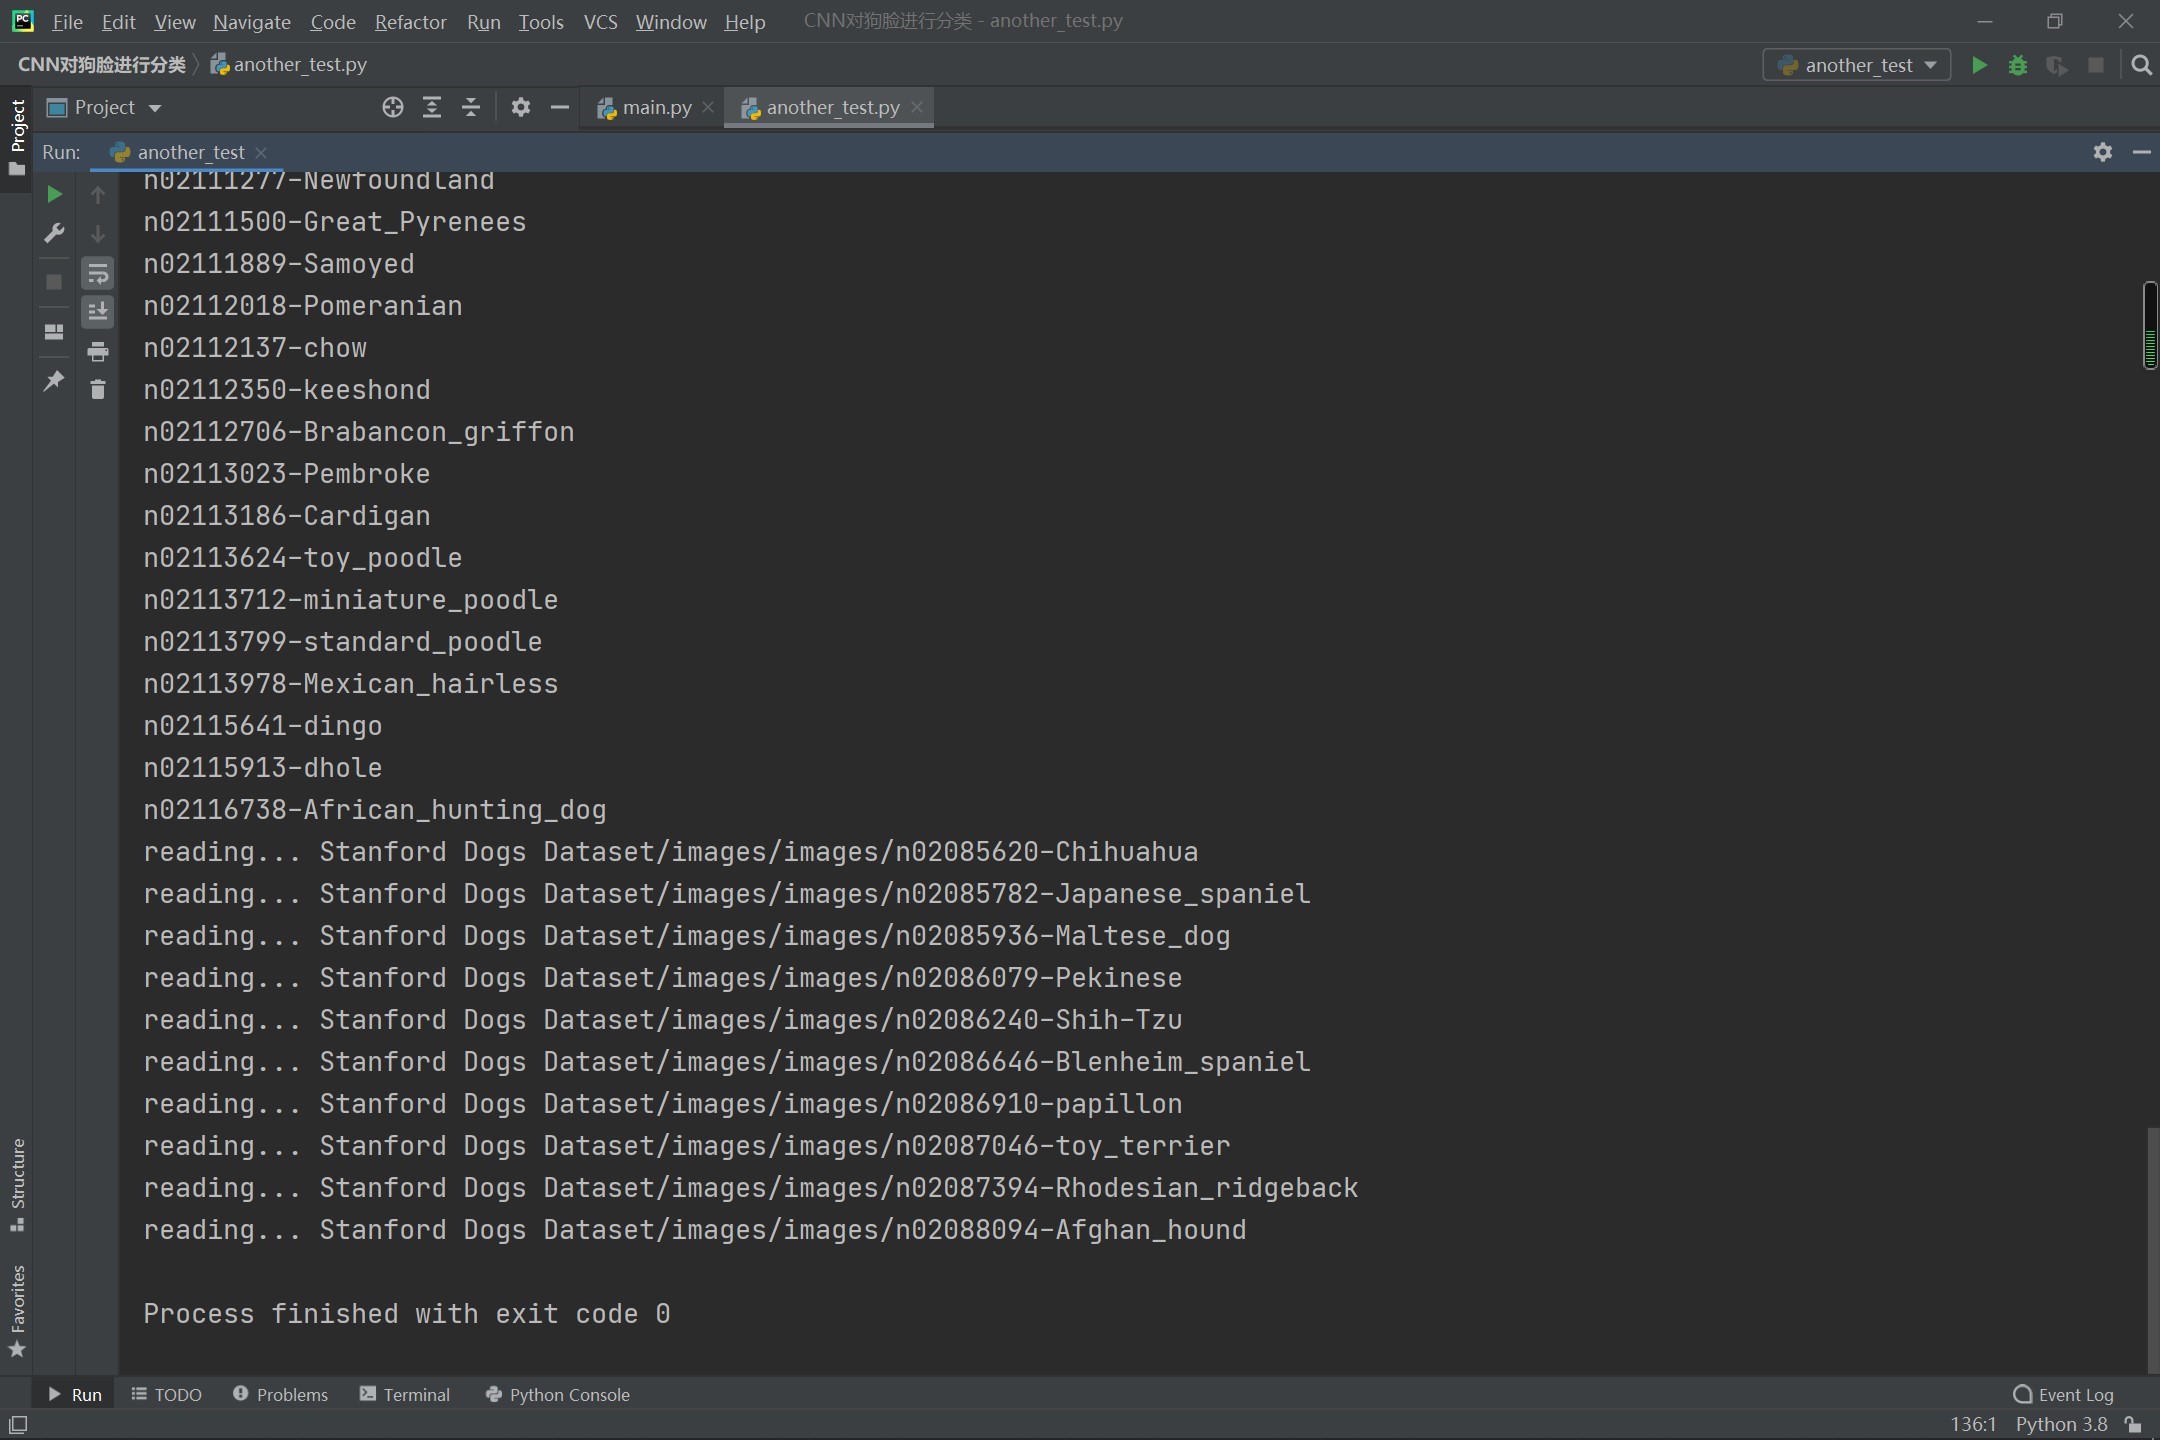
这里读出来了10种狗狗的数据。
六、数据的预处理
进行预处理的代码如下所示;
# deal with the data
label_encoder = LabelEncoder()
# object
y = label_encoder.fit_transform(y_label)
y = to_categorical(y, 10)
# 10 kinds

X = np.array(X)
X = X / 255
# normalization
七、数据集的分割(划分为训练集以及测试集)
数据集的分割比较简单,就是把所有的数据分割为训练集以及测试集,一般按照80%和20%的比例来进行分割。
这里可以直接使用内置的方法进行分割,也可以自己分割,因为其实就是进行切片而已,这里我们采用内置的方法:
"""
4.split the data collection
"""
X_train, X_test, y_train, y_test = train_test_split(X, y, test_size=0.2, random_state=0)
这里的代码就是进行了数据集的分割操作。
这步很简单了啦。
八、CNN 卷积神经网络的搭建
这一步,我们将要搭建卷积神经网络。
这个就是整个 CNN 卷积神经网络 识别狗狗的项目中的最关键的步骤之一,也是训练机器的过程了啦。
"""
5.training the machine (CNN)
这里的步骤,包括了卷积、池化、卷积、池化的循环操作,
以及,
展平的操作,
还有,
全连接层和分类输出。
"""

# CNN
# cnn = models.Sequential()
cnn = models.Sequential()

cnn.add(layers.Conv2D(32, (3, 3), activation="relu", input_shape=(150, 150, 3)))
# 使用 relu 来进行激活神经元
cnn.add(layers.MaxPooling2D((2, 2)))


cnn.add(layers.Conv2D(64, (3, 3), activation="relu"))
cnn.add(layers.MaxPooling2D((2, 2)))


cnn.add(layers.Conv2D(128, (3, 3), activation="relu"))
cnn.add(layers.MaxPooling2D((2, 2)))


cnn.add(layers.Conv2D(128, (3, 3), activation="relu"))
cnn.add(layers.MaxPooling2D((2, 2)))

cnn.add(layers.Flatten())

# cnn.add(layers.Dense(512, activation="relu"))
cnn.add(layers.Dense(512, activation="relu"))

# cnn.add(Dense), 120
# cnn.add(layers.Dense(120, activation="softmax"))
cnn.add(layers.Dense(10, activation="softmax"))
# 使用 softmax 激活神经元

# cnn.add(layers.Dense(120, activation="softmax"))
# cnn.add(layers.Dense(120, activation="softmax"))

cnn.compile(loss="categorical_crossentropy", optimizer="rmsprop", metrics=['acc'])
# 损失函数, 优化器, 评估指标

# the code above is to create the cnn
# and the
# train the machine
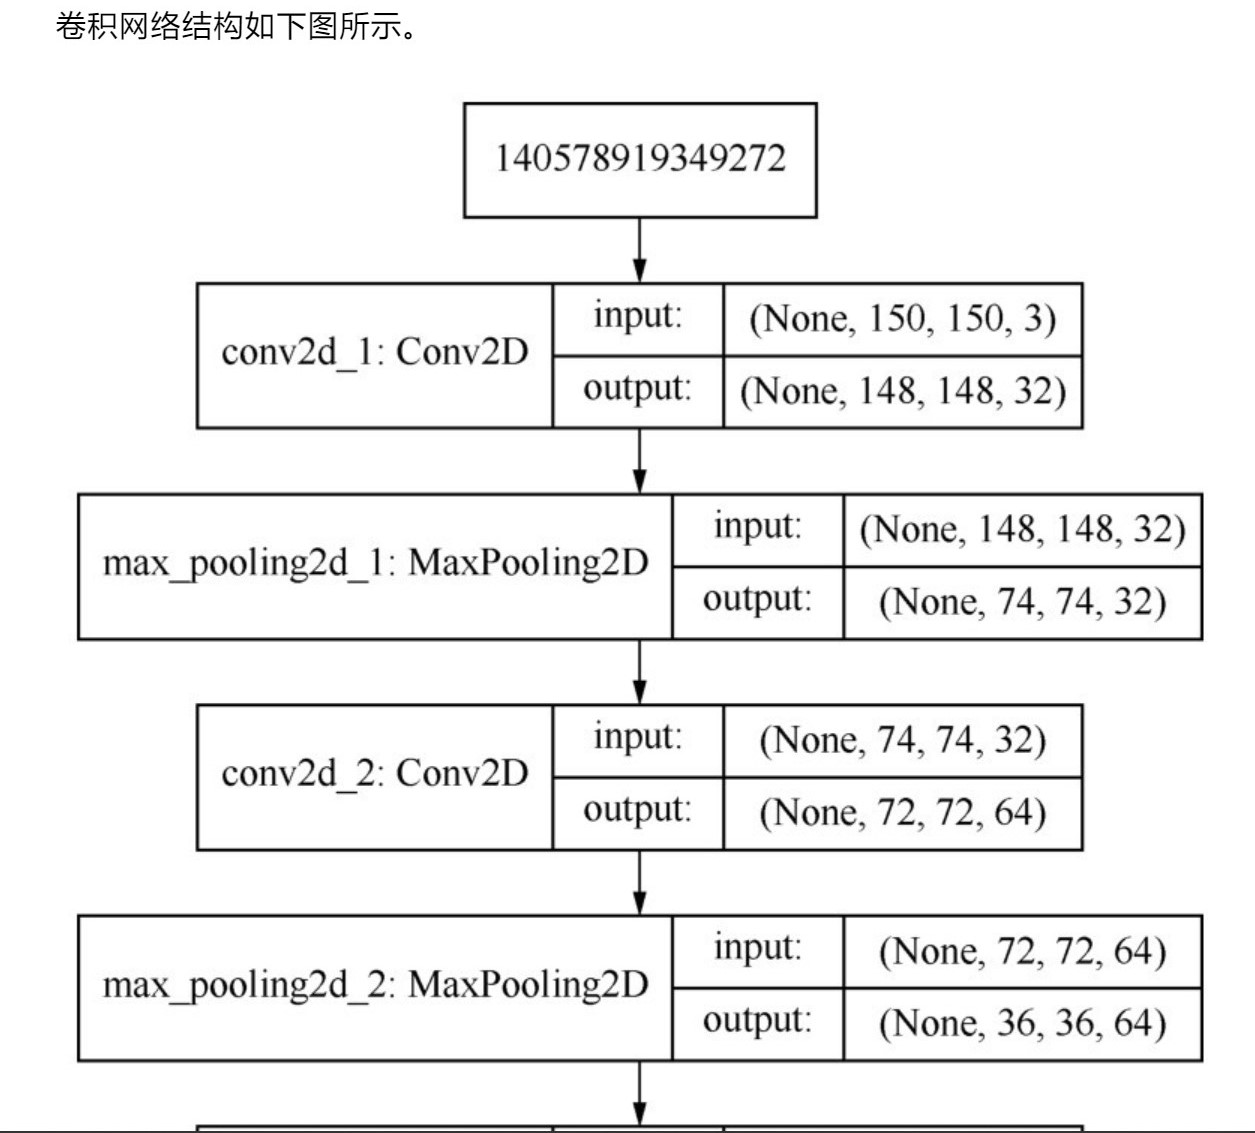
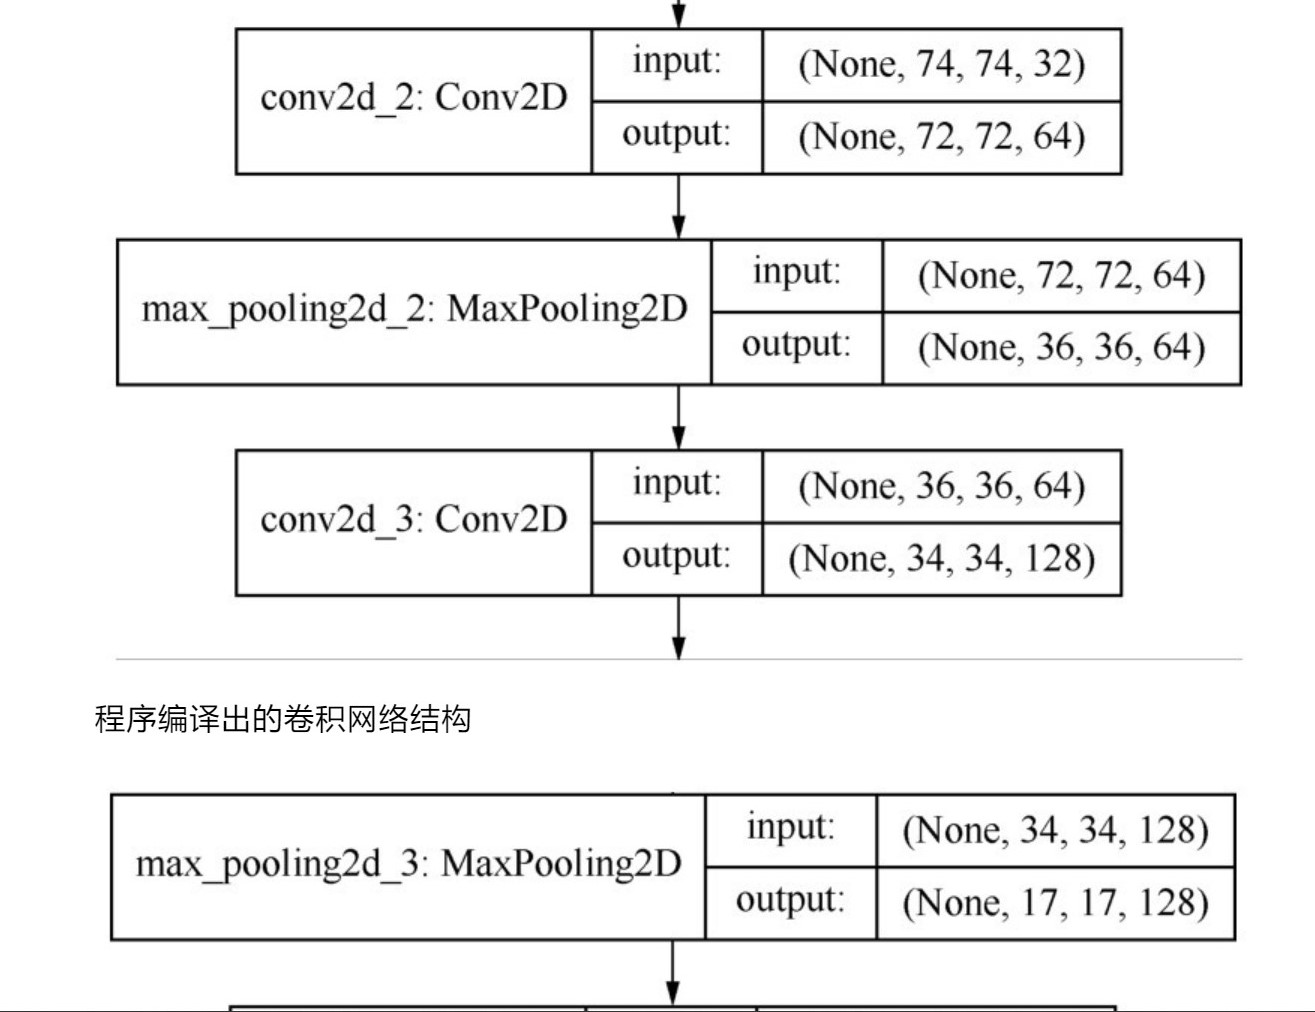
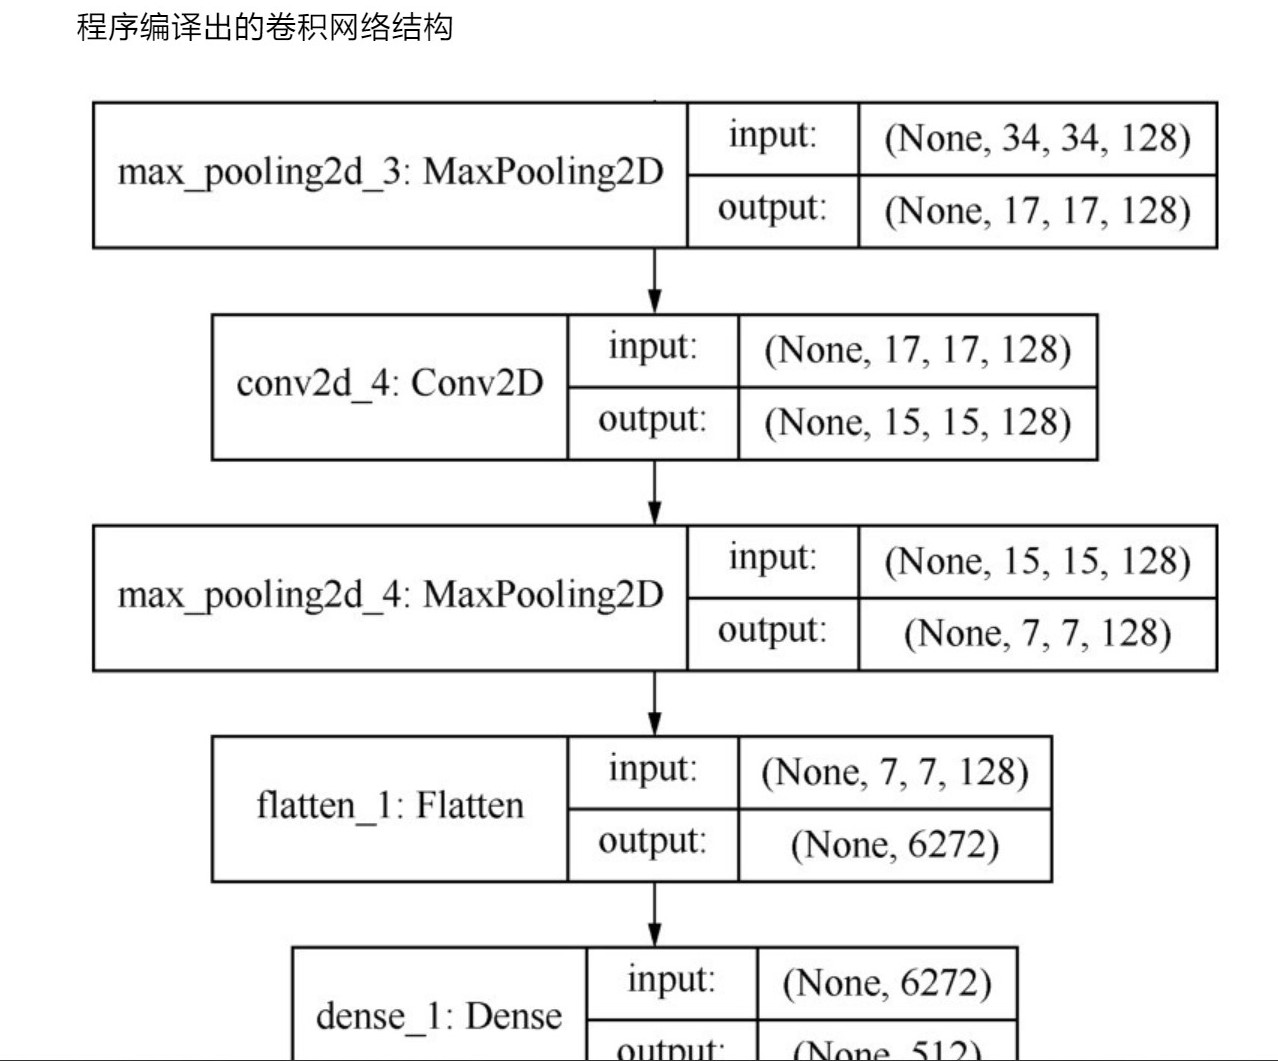
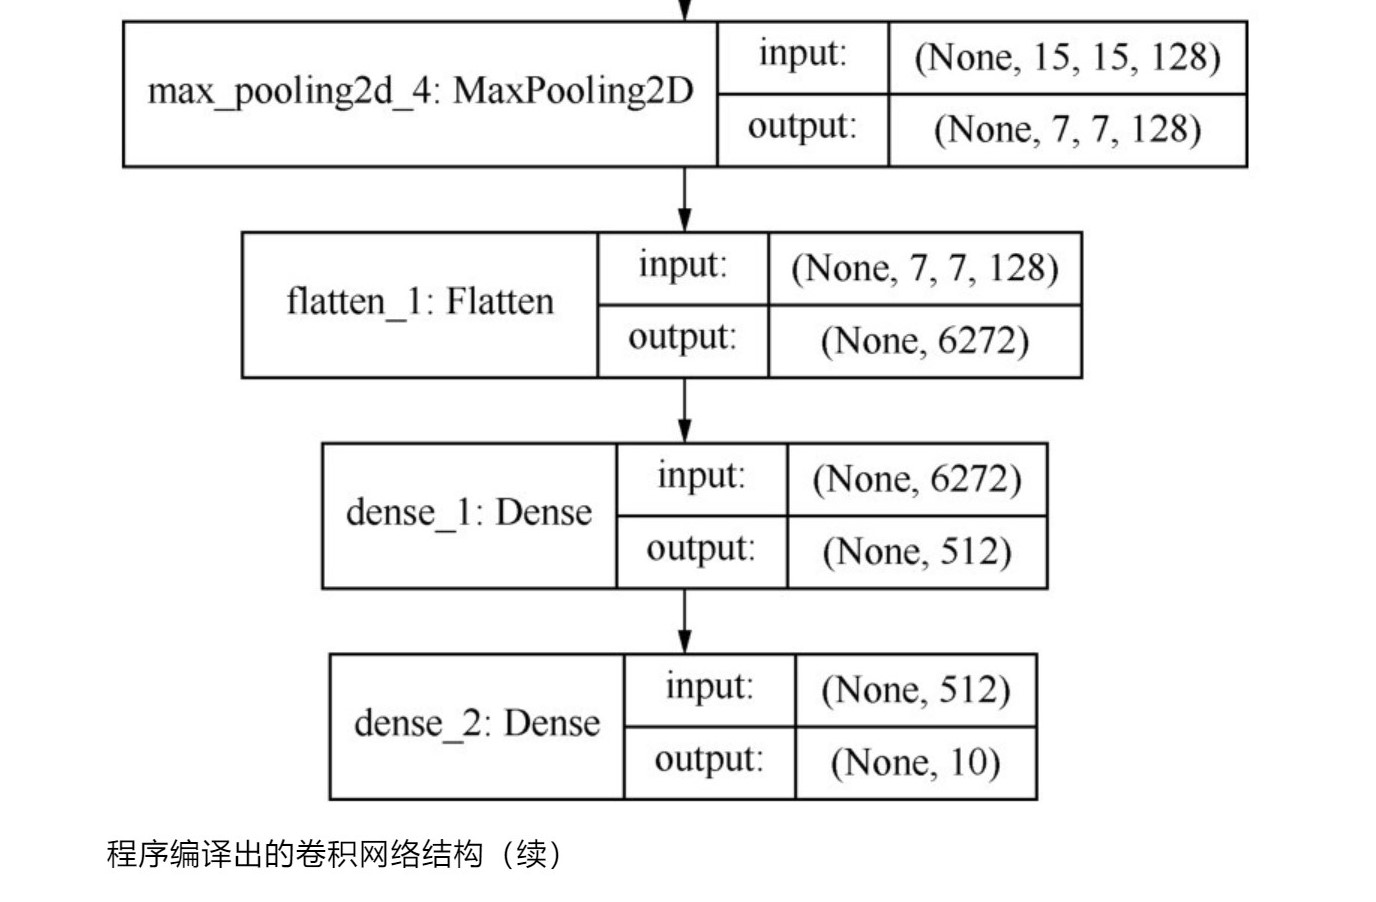
下面描述一下卷积神经网络的结构:
(由于这里是图片太长了,所以分割开来展示了)
1、
2、
3、
4、
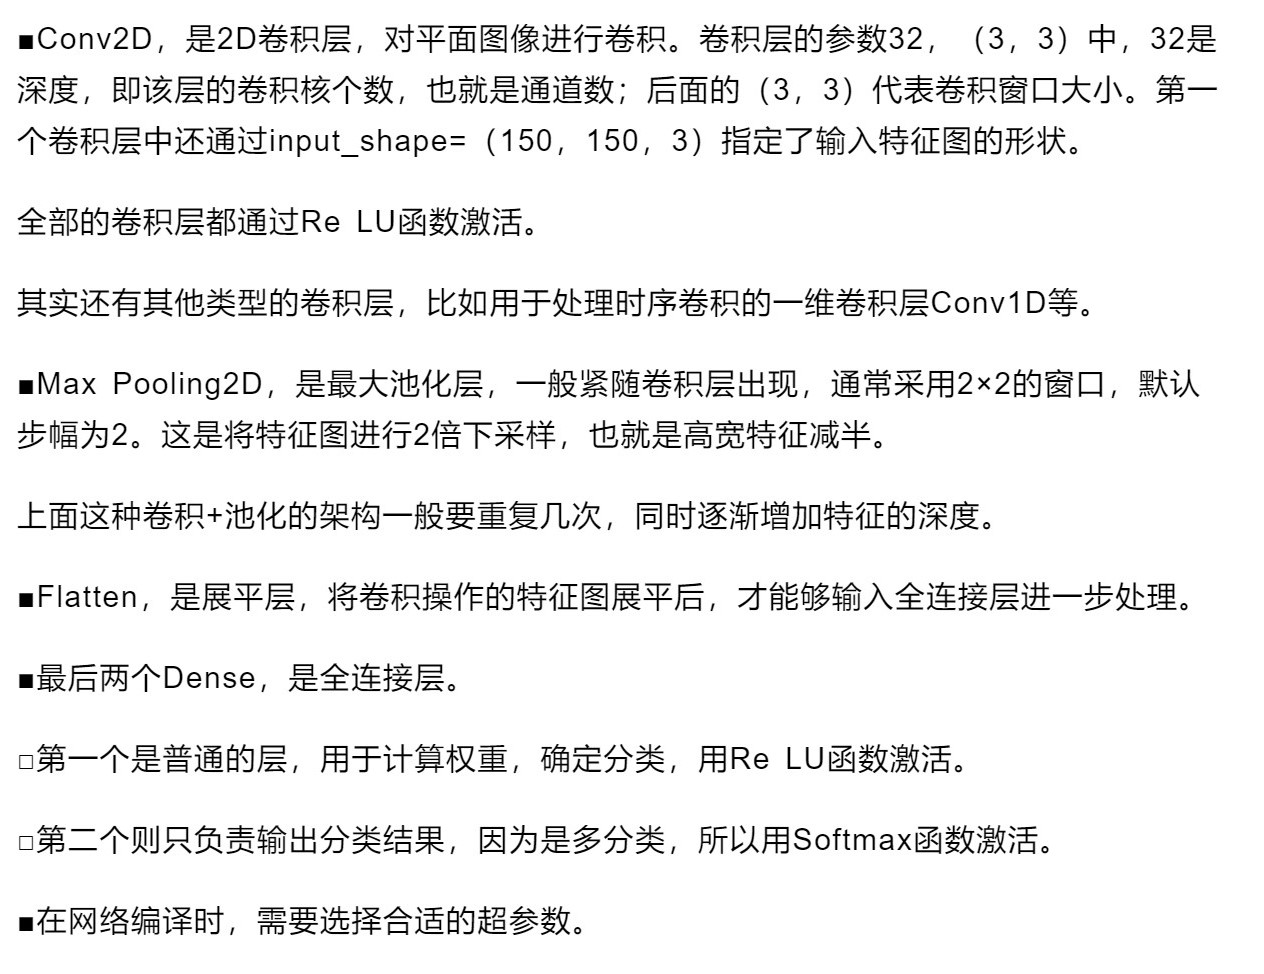
其他的一些解释如下:
这里解释了一些名次和概念。
九、训练CNN 卷积神经网络
这里是利用 fit 方法来进行训练这个搭建好了的神经网络了啦。
"""
6.training the data and get the model
"""

# train

history = cnn.fit(X_train, y_train,
                  # 指定训练集
                  epochs=50,
                  # 指定次数(或者说是轮次)
                  batch_size=256,
                  # 指定批量的大小
                  validation_data=(X_test, y_test)
                  # 指定验证集
                  )
以上是使用一个函数进行训练,十分快捷。
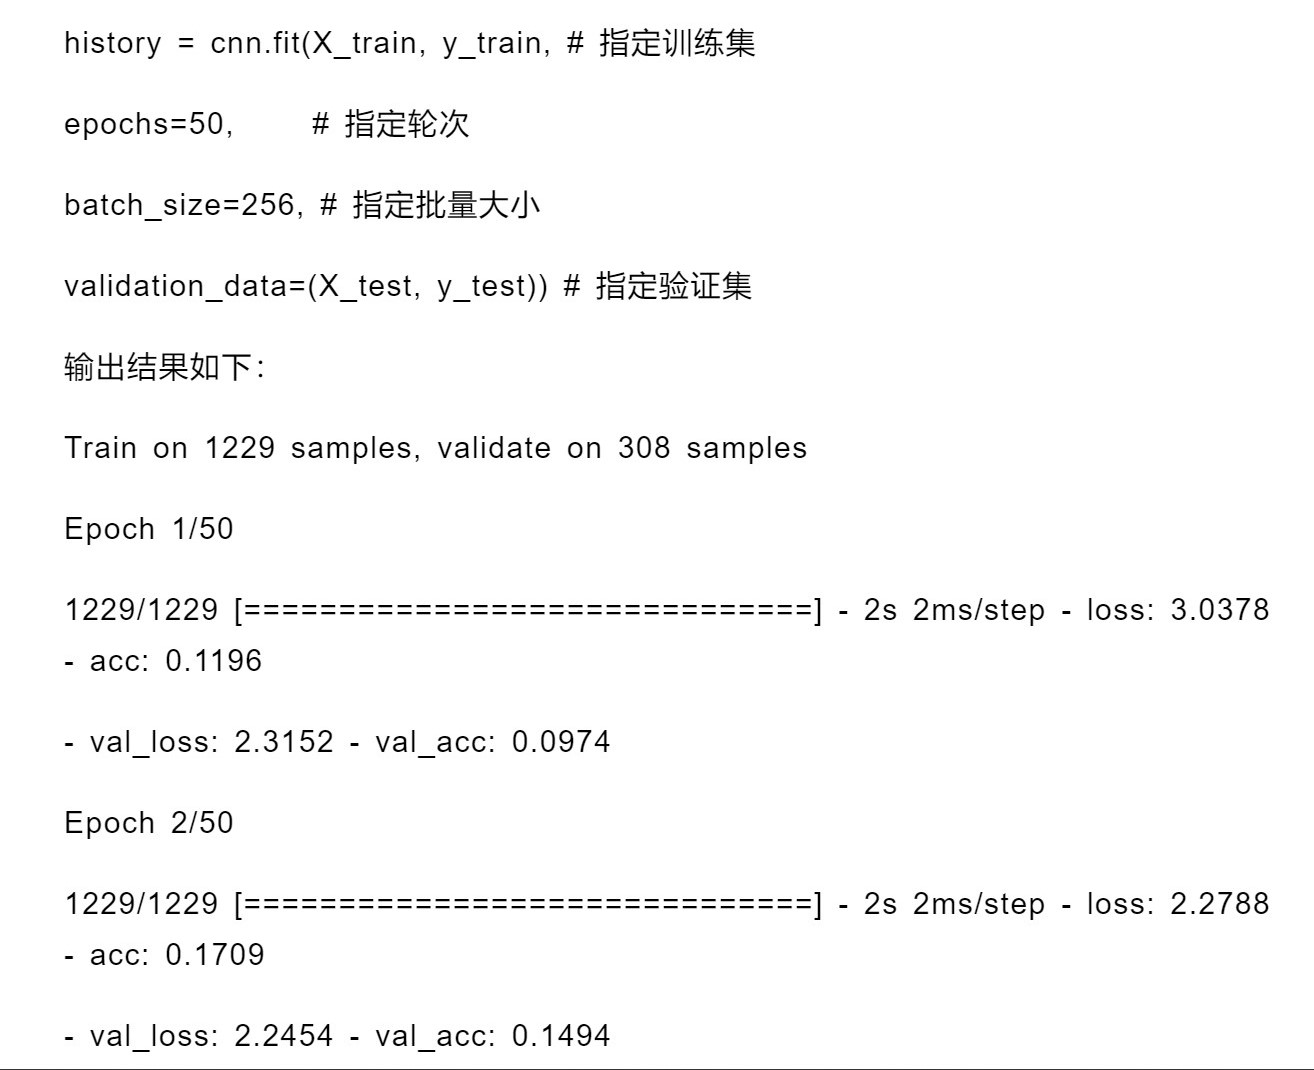
十、得到模型
其实模型是在上一个步骤中就已经处理好了,我们只需要调用就可以了,为了方便操作,我们首先只迭代一次来看看history究竟是怎么样的吧:
# train

history = cnn.fit(X_train, y_train,
                  epochs=1,
                  batch_size=256,
                  validation_data=(X_test, y_test))

print(history.history)
print(history.epoch)
输出如下:
1/6 [====>.........................] - ETA: 0s - loss: 2.3056 - acc: 0.12502021-08-20 10:53:05.338453: W tensorflow/core/framework/cpu_allocator_impl.cc:81] Allocation of 717750272 exceeds 10% of free system memory.
2021-08-20 10:53:09.549353: W tensorflow/core/framework/cpu_allocator_impl.cc:81] Allocation of 717750272 exceeds 10% of free system memory.
2/6 [=========>....................] - ETA: 11s - loss: 3.2431 - acc: 0.13092021-08-20 10:53:10.900707: W tensorflow/core/framework/cpu_allocator_impl.cc:81] Allocation of 717750272 exceeds 10% of free system memory.
6/6 [==============================] - 30s 5s/step - loss: 2.6397 - acc: 0.1107 - val_loss: 2.2892 - val_acc: 0.1901
{'loss': [2.639716863632202], 'acc': [0.11074918508529663], 'val_loss': [2.2892367839813232], 'val_acc': [0.1901041716337204]}
[0]

Process finished with exit code 0
这里体现了训练的过程以及history的内容
History的源码是:
@keras_export('keras.callbacks.History')
class History(Callback):
  """Callback that records events into a `History` object.
  This callback is automatically applied to
  every Keras model. The `History` object
  gets returned by the `fit` method of models.
  Example:
  >>> model = tf.keras.models.Sequential([tf.keras.layers.Dense(10)])
  >>> model.compile(tf.keras.optimizers.SGD(), loss='mse')
  >>> history = model.fit(np.arange(100).reshape(5, 20), np.zeros(5),
  ...                     epochs=10)
  >>> print(history.params)
  {'verbose': 1, 'epochs': 10, 'steps': 1}
  >>> # check the keys of history object
  >>> print(history.history.keys())
  dict_keys(['loss'])
  """

  def __init__(self):
    super(History, self).__init__()
    self.history = {}

  def on_train_begin(self, logs=None):
    self.epoch = []

  def on_epoch_end(self, epoch, logs=None):
    logs = logs or {}
    self.epoch.append(epoch)
    for k, v in logs.items():
      self.history.setdefault(k, []).append(v)

    # Set the history attribute on the model after the epoch ends. This will
    # make sure that the state which is set is the latest one.
    self.model.history = self
可以参见Keras源码:
十一、进行测试检查预测的效果(检验测试集)
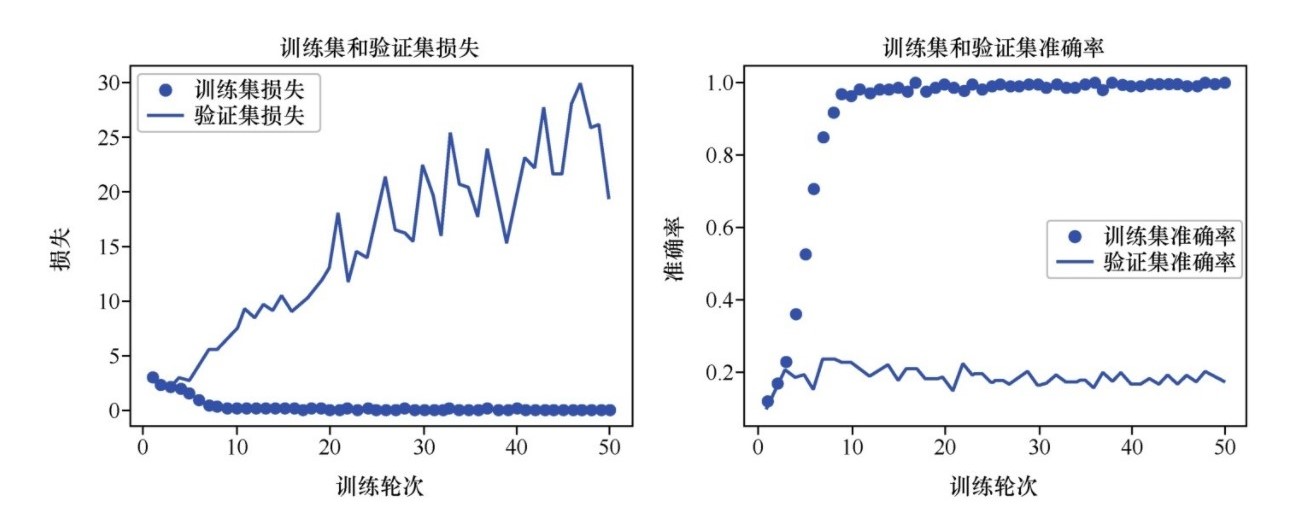
检验测试集的效果,我们主要是看损失的大小了啦,在上面所说的History对象中我们是可以看到loss的啦,测试的效果通过上面的代码就可以得到了啦,这里只需要单独挑出来就好了。
print(history.history)
print(history.epoch)
print(history.history["loss"])
我们设法绘制出来训练的过程的图像,这个需要matplotlib.pyplot,由于篇幅以及能力的限制(主要是能力的限制,这个模块我掌握的不太好了啦),所以不展示源码,直接展示图片,有兴趣的大佬可以自己进行绘制了啦。
十二、完整的代码(全部源码)
这是所有的源代码,如下所示:
# CNN
"""
1.import modules
there are many modules we need to import
"""
import os
import cv2
import numpy as np
import pandas as pd
from sklearn.model_selection import train_test_split
# this is the split module
from tensorflow import keras
# keras
# use this method to import keras will not appear error
from tensorflow.keras import models, layers
from tensorflow.keras.utils import to_categorical
from sklearn.preprocessing import LabelEncoder
from tensorflow.keras.layers import Dense, Dropout, Flatten, Conv2D, MaxPooling2D


"""
2.read the file of the dog pictures
"""
dogs_img_list = os.listdir("Stanford Dogs Dataset/images/images")
for i in dogs_img_list:
    print(i)

root_dir = "Stanford Dogs Dataset/images/images/"
# root package
dog_img_dir = []
# dir of each dog
"""
because of the large quantities of data,
we just recognize 10 kinds of dogs
"""
for i in range(10):
    # 10 kinds
    dog_img_dir.append(root_dir + dogs_img_list[i])
    # append the message of the dogs
X = []
# X
y_label = []
# y_label
img_size = 150
# the size of the img


def training_data(label, data_dir):
    """
    read data and store them into the X and the y_label
    :param label: the label of the dog, that means the kind of the dog
    :param data_dir: data
    :return: none
    """
    print("reading...", data_dir)
    # tip messages
    for img in os.listdir(data_dir):
        path = os.path.join(data_dir, img)
        img = cv2.imread(path, cv2.IMREAD_COLOR)
        img = cv2.resize(img, (img_size, img_size))
        # X
        X.append(np.array(img))
        # y_label
        y_label.append(str(label))


# use the method above to read the dog's data
for i in range(10):
    # use 10 to test our main, 10 kinds
    training_data(label=dog_img_dir[i].split("-")[1], data_dir=dog_img_dir[i])

"""
3.deal with the data before deep learning
"""
# deal with the data
label_encoder = LabelEncoder()
# object
y = label_encoder.fit_transform(y_label)
# 这是标签编码
y = to_categorical(y, 10)
# 这是 One-hot 编码
# 10 kinds dog

X = np.array(X)
X = X / 255
# normalization

"""
4.split the data collection
"""
X_train, X_test, y_train, y_test = train_test_split(X, y, test_size=0.2, random_state=0)

"""
5.training the machine (CNN)
这里的步骤,包括了卷积、池化、卷积、池化的循环操作,
以及,
展平的操作,
还有,
全连接层和分类输出。
"""

# CNN
# cnn = models.Sequential()
cnn = models.Sequential()

cnn.add(layers.Conv2D(32, (3, 3), activation="relu", input_shape=(150, 150, 3)))
# 使用 relu 来进行激活神经元
cnn.add(layers.MaxPooling2D((2, 2)))


cnn.add(layers.Conv2D(64, (3, 3), activation="relu"))
cnn.add(layers.MaxPooling2D((2, 2)))


cnn.add(layers.Conv2D(128, (3, 3), activation="relu"))
cnn.add(layers.MaxPooling2D(以上是关于听说越来越卷,那我们就用卷积神经网络CNN来识别狗狗吧!!的主要内容,如果未能解决你的问题,请参考以下文章