Flutter打包APK注意事项
Posted 白玉梁
tags:
篇首语:本文由小常识网(cha138.com)小编为大家整理,主要介绍了Flutter打包APK注意事项相关的知识,希望对你有一定的参考价值。
打包步骤:
- 生成jks签名文件:
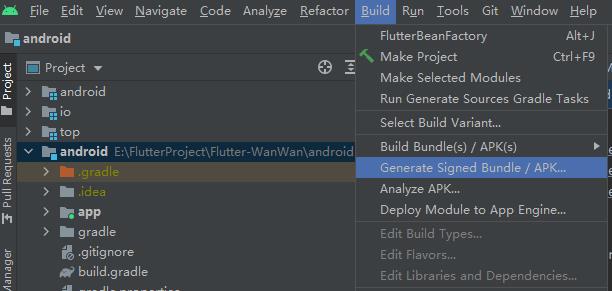
我们可以用AS打开android项目,并创建jks:

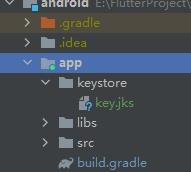
创建成功后,将jks文件放进app下的keystore目录(当然jks文件放入位置是自定义的):

- 在android根目录下创建key.properties:
storePassword=123456
keyPassword=123456
keyAlias=wanwan
storeFile=keystore/key.jks
- 打开app的build.gradle,添加代码:
	def keystorePropertiesFile = rootProject.file("key.properties")
	def keystoreProperties = new Properties()
	keystoreProperties.load(new FileInputStream(keystorePropertiesFile))

	signingConfigs {
	   release {
	       keyAlias keystoreProperties['keyAlias']
	       keyPassword keystoreProperties['keyPassword']
	       storeFile file(keystoreProperties['storeFile'])
	       storePassword keystoreProperties['storePassword']
	   }
	}

	buildTypes {
	   release {
	       signingConfig signingConfigs.release
	       minifyEnabled false
	       shrinkResources false
	   }
	   debug {
	       signingConfig signingConfigs.release
	       minifyEnabled false
	       shrinkResources false
	   }
    }
注意点:minifyEnabled 混淆和shrinkResources移除无用资源需同时为true或false,否则可能导致编译失败!
同时我们可以在defaultConfig中开启multiDex,以及自定义支持的cpu架构:
    defaultConfig {
        applicationId "com.byl.wanwan"
        minSdkVersion 21
        targetSdkVersion 27
        versionCode flutterVersionCode.toInteger()
        versionName flutterVersionName
        flavorDimensions "22"
        multiDexEnabled true
        ndk {
            abiFilters "armeabi", "armeabi-v7a"
        }
    }
**注意点:**此时若直接运行,会报错,找不到libflutter.so!这是因为在编译debug时,flutter默认会把所支持的cpu架构全部编译,而我们只定义了arm,所以在某些设备上就会运行失败!我们可以在build.gradle中可以看到有一句代码:
apply from: "$flutterRoot/packages/flutter_tools/gradle/flutter.gradle"
这个就是flutter在编译apk时的配置信息 :
    // The platforms that can be passed to the `--Ptarget-platform` flag.
    private static final String PLATFORM_ARM32  = "android-arm";
    private static final String PLATFORM_ARM64  = "android-arm64";
    private static final String PLATFORM_X86    = "android-x86";
    private static final String PLATFORM_X86_64 = "android-x64";

    // The ABI architectures.
    private static final String ARCH_ARM32      = "armeabi-v7a";
    private static final String ARCH_ARM64      = "arm64-v8a";
    private static final String ARCH_X86        = "x86";
    private static final String ARCH_X86_64     = "x86_64";
要解决这个问题,我们可以指定target-platform,在build.gradle中,apply from: "$flutterRoot/packages/flutter_tools/gradle/flutter.gradle"前,加上:
project.setProperty('target-platform', 'android-arm')
此时就可以运行成功了!
然后我们可以测试,用flutter build apk,生成的release包会发现比之前的debug小了很多!
将release包安装后 ,会发现运行速度比debug包快了几倍,然额,出现了点小问题,首页列表数据没有展示,这是什么鬼?debug是没有问题的,为什么release出了问题?
仔细查找log,发现了一处错误提示:
Instance of 'DiagnosticsProperty<void>'
在查询了该错误的原因后,大概是因为Expanded组件的错误使用导致,Expanded一般只在Colunm和Row以及Flex下使用,在其它组件下在打包时就可能出现问题,修改后,再次打包,显示正常!
以上是关于Flutter打包APK注意事项的主要内容,如果未能解决你的问题,请参考以下文章