Raspberry Pi 4B 颜色检测
Posted ʚVVcatɞ
tags:
篇首语:本文由小常识网(cha138.com)小编为大家整理,主要介绍了Raspberry Pi 4B 颜色检测相关的知识,希望对你有一定的参考价值。
环境:
- Python:3.7.3
- opencv-python:3.4.6.27
main.py文件
#!/usr/bin/env python
# coding: UTF-8
#显示摄像头组件
import cv2
import sys, os
HSV_Configwidgets_path = os.getcwd()
sys.path.append(HSV_Configwidgets_path)
from time import time
from IPython.display import display
import HSV_Config

image = cv2.VideoCapture(0)

image.set(3, 320)
image.set(4, 240)
image.set(5, 30)  #设置帧率
image.set(cv2.CAP_PROP_FOURCC, cv2.VideoWriter.fourcc('M', 'J', 'P', 'G'))
image.set(cv2.CAP_PROP_BRIGHTNESS, 62) #设置亮度 -64 - 64  0.0
image.set(cv2.CAP_PROP_CONTRAST, 63) #设置对比度 -64 - 64  2.0
image.set(cv2.CAP_PROP_EXPOSURE, 4800) #设置曝光值 1.0 - 5000  156.0

update_hsv = HSV_Config.update_hsv()

color_hsv  = {"red"   : ((0, 70, 72), (7, 255, 255)),
              "green" : ((54, 109, 78), (77, 255, 255)),
              "blue"  : ((92, 100, 62), (121, 251, 255)),
              "yellow": ((26, 100, 91), (32, 255, 255))}

print("开始检测...")
while True:
    start_time = time()
    ret, frame = image.read()
    frame, binary = update_hsv.get_contours(frame, color_hsv)
    parsing_time = time() - start_time
    cv2.putText(frame, "infer time(ms): %.3f, FPS: %.2f" % (parsing_time * 1000, 1 / (parsing_time + 0.0001)), (15, 55), cv2.FONT_HERSHEY_SIMPLEX, 0.5, (255, 0, 255), 1)
    # 显示检测结果
    cv2.imshow('capture', frame)
	# 检测按键
    k = cv2.waitKey(1)
    if k==27:
        break

image.release()
cv2.destroyAllWindows()
HSV_Config.py 文件
# !/usr/bin/env python
# coding: utf-8
import random
import cv2 as cv
import numpy as np
import tkinter as tk


class update_hsv:
    def __init__(self):
        '''
        初始化一些参数
        '''
        self.image = None
        self.binary = None

    def Image_Processing(self, hsv_range):
        '''
        形态学变换去出细小的干扰因素
        :param img: 输入初始图像
        :return: 检测的轮廓点集(坐标)
        '''
        (lowerb, upperb) = hsv_range
        # 复制原始图像,避免处理过程中干扰
        color_mask = self.image.copy()
        # 将图像转换为HSV。
        hsv_img = cv.cvtColor(self.image, cv.COLOR_BGR2HSV)
        # 筛选出位于两个数组之间的元素。
        color = cv.inRange(hsv_img, lowerb, upperb)
        # 设置非掩码检测部分全为黑色
        color_mask[color == 0] = [0, 0, 0]
        # 将图像转为灰度图
        gray_img = cv.cvtColor(color_mask, cv.COLOR_RGB2GRAY)
        # 获取不同形状的结构元素
        kernel = cv.getStructuringElement(cv.MORPH_RECT, (5, 5))
        # 形态学闭操作
        dst_img = cv.morphologyEx(gray_img, cv.MORPH_CLOSE, kernel)
        # 图像二值化操作
        ret, binary = cv.threshold(dst_img, 10, 255, cv.THRESH_BINARY)
        # 获取轮廓点集(坐标) python2和python3在此处略有不同
        # _, contours, heriachy = cv.findContours(binary, cv.RETR_EXTERNAL, cv.CHAIN_APPROX_SIMPLE) #python2
        contours, heriachy = cv.findContours(binary, cv.RETR_EXTERNAL, cv.CHAIN_APPROX_SIMPLE)  # python3
        return contours, binary

    def draw_contours(self, hsv_name, contours):
        '''
        采用多边形逼近的方法绘制轮廓
        '''
        for i, cnt in enumerate(contours):
            # 计算多边形的矩
            mm = cv.moments(cnt)
            if mm['m00'] == 0:
                continue
            cx = mm['m10'] / mm['m00']
            cy = mm['m01'] / mm['m00']
            # 获取多边形的中心
            (x, y) = (np.int(cx), np.int(cy))
            # 计算轮廓的⾯积
            area = cv.contourArea(cnt)
            # ⾯积⼤于10000
            if area > 800:
                # 绘制中⼼
                cv.circle(self.image, (x, y), 5, (0, 0, 255), -1)
                # 计算最小矩形区域
                rect = cv.minAreaRect(cnt)
                # 获取盒⼦顶点
                box = cv.boxPoints(rect)
                # 转成long类型
                box = np.int0(box)
                # 绘制最小矩形
                cv.drawContours(self.image, [box], 0, (255, 0, 0), 2)
                cv.putText(self.image, hsv_name, (int(x - 15), int(y - 15)),
                           cv.FONT_HERSHEY_SIMPLEX, 1, (255, 0, 255), 2)

    def get_contours(self, img, color_hsv):
        binary = None
        # 规范输入图像大小
        self.image = cv.resize(img, (320, 240), )
        for key, value in color_hsv.items():
            # 检测轮廓点集
            color_contours, binary = self.Image_Processing(color_hsv[key])
            # 绘制检测图像,并控制跟随
            self.draw_contours(key, color_contours)
        return self.image, binary
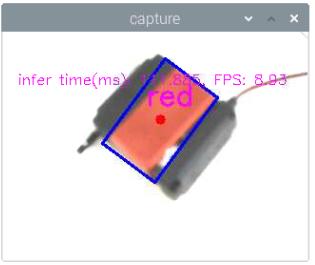
识别效果:
以上是关于Raspberry Pi 4B 颜色检测的主要内容,如果未能解决你的问题,请参考以下文章