97%!中文版的数字识别还可以这样玩!!!
Posted K同学啊
tags:
篇首语:本文由小常识网(cha138.com)小编为大家整理,主要介绍了97%!中文版的数字识别还可以这样玩!!!相关的知识,希望对你有一定的参考价值。
大家好,我是『K同学啊』!
接着上一篇文章 深度学习100例 | 第24天-卷积神经网络(Xception):动物识别,我用Xception模型实现了对狗、猫、鸡、马等四种动物的识别,带大家了解了Xception的构建。这次我们来 实现一下中文版的 手写数字识别 ,听到手写数字识别或许会觉得简单,今天可能不一定哈。
本次的重点:
- 数据检查:在开始之前做一系列检查避免后期由于数据原因出现的bug。
- 各项指标评估部分
🚀 我的环境:
- 语言环境:Python3.6.5
- 编译器:jupyter notebook
- 深度学习环境:TensorFlow2.4.1
- 显卡(GPU):NVIDIA GeForce RTX 3080
🚀 来自专栏:《深度学习100例》
如果你是一名深度学习小白可以先看看我这个专门为你写的专栏:《小白入门深度学习》
- 小白入门深度学习 | 第一篇:配置深度学习环境
- 小白入门深度学习 | 第二篇:编译器的使用-Jupyter Notebook
- 小白入门深度学习 | 第三篇:深度学习初体验
- 小白入门深度学习 | 第四篇:配置PyTorch环境
🚀 往期精彩-卷积神经网络篇:
- 深度学习100例-卷积神经网络(CNN)实现mnist手写数字识别 | 第1天
- 深度学习100例-卷积神经网络(CNN)彩色图片分类 | 第2天
- 深度学习100例-卷积神经网络(CNN)服装图像分类 | 第3天
- 深度学习100例-卷积神经网络(CNN)花朵识别 | 第4天
- 深度学习100例-卷积神经网络(CNN)天气识别 | 第5天
- 深度学习100例-卷积神经网络(VGG-16)识别海贼王草帽一伙 | 第6天
- 深度学习100例-卷积神经网络(VGG-19)识别灵笼中的人物 | 第7天
- 深度学习100例-卷积神经网络(ResNet-50)鸟类识别 | 第8天
- 深度学习100例-卷积神经网络(AlexNet)手把手教学 | 第11天
- 深度学习100例-卷积神经网络(CNN)识别验证码 | 第12天
- 深度学习100例-卷积神经网络(Inception V3)识别手语 | 第13天
- 深度学习100例-卷积神经网络(Inception-ResNet-v2)识别交通标志 | 第14天
- 深度学习100例-卷积神经网络(CNN)实现车牌识别 | 第15天
- 深度学习100例-卷积神经网络(CNN)识别神奇宝贝小智一伙 | 第16天
- 深度学习100例-卷积神经网络(CNN)注意力检测 | 第17天
- 深度学习100例-卷积神经网络(VGG-16)猫狗识别 | 第21天
- 深度学习100例-卷积神经网络(LeNet-5)深度学习里的“Hello Word” | 第22天
- 深度学习100例-卷积神经网络(CNN)3D医疗影像识别 | 第23天
- 深度学习100例 | 第24天-卷积神经网络(Xception):动物识别
🚀 往期精彩-循环神经网络篇:
🚀 往期精彩-生成对抗网络篇:
- 深度学习100例-生成对抗网络(GAN)手写数字生成 | 第18天
- 深度学习100例-生成对抗网络(DCGAN)手写数字生成 | 第19天
- 深度学习100例-生成对抗网络(DCGAN)生成动漫小姐姐 | 第20天
文章目录
一、设置GPU
import tensorflow as tf
gpus = tf.config.list_physical_devices("GPU")

if gpus:
    gpu0 = gpus[0] #如果有多个GPU,仅使用第0个GPU
    tf.config.experimental.set_memory_growth(gpu0, True) #设置GPU显存用量按需使用
    tf.config.set_visible_devices([gpu0],"GPU")

import matplotlib.pyplot as plt
import os,PIL,pathlib
import numpy as np
import pandas as pd
import warnings
from tensorflow import keras

warnings.filterwarnings("ignore")#忽略警告信息
plt.rcParams['font.sans-serif'] = ['SimHei']  # 用来正常显示中文标签
plt.rcParams['axes.unicode_minus'] = False  # 用来正常显示负号
os.environ['TF_CPP_MIN_LOG_LEVEL']='2'
二、导入数据
IMAGE_WIDTH = 64
IMAGE_HEIGHT = 64
IMAGE_CHANNELS = 1
RANDOM_STATE = 42
TEST_SIZE = 0.2
VAL_SIZE = 0.2
BATCH_SIZE = 32
NO_EPOCHS = 50
PATIENCE = 5
VERBOSE = 1
1. pandas导入数据
data_df = pd.read_csv("./data/chinese_mnist.csv")

data_df.sample(100).head()
| suite_id | sample_id | code | value | character | |
|---|---|---|---|---|---|
| 7606 | 63 | 6 | 2 | 1 | 一 |
| 223 | 29 | 3 | 10 | 9 | 九 |
| 852 | 86 | 2 | 10 | 9 | 九 |
| 2408 | 45 | 8 | 12 | 100 | 百 |
| 6743 | 76 | 3 | 1 | 0 | 零 |
2. 检查数据是否缺失
# 查看是否有缺失数据
def missing_data(data):
    total = data.isnull().sum().sort_values(ascending = False)
    percent = (data.isnull().sum()/data.isnull().count()*100).sort_values(ascending = False)
    return pd.concat([total, percent], axis=1, keys=['Total', 'Percent'])
missing_data(data_df)
| Total | Percent | |
|---|---|---|
| character | 0 | 0.0 |
| value | 0 | 0.0 |
| code | 0 | 0.0 |
| sample_id | 0 | 0.0 |
| suite_id | 0 | 0.0 |
(1)打印数据总量
IMAGE_PATH = './data/pictures/'
image_files = list(os.listdir(IMAGE_PATH))
print("数据总量: {}".format(len(image_files)))
数据总量: 15000
(2)匹配到的数据总量
def create_file_name(x):
    file_name = f"input_{x[0]}_{x[1]}_{x[2]}.jpg"
    return file_name

data_df["file"] = data_df.apply(create_file_name, axis=1)

file_names = list(data_df['file'])
print("匹配到的数据总量: {}".format(len(set(file_names).intersection(image_files))))
匹配到的数据总量: 15000
(3)检查数据的各项信息
def read_image_sizes(file_name):
    image = skimage.io.imread(IMAGE_PATH + file_name)
    return list(image.shape)
import skimage
import skimage.io
import skimage.transform
m = np.stack(data_df['file'].apply(read_image_sizes))

df = pd.DataFrame(m,columns=['w','h'])
data_df = pd.concat([data_df,df],axis=1, sort=False)
data_df.head()
| suite_id | sample_id | code | value | character | file | w | h | |
|---|---|---|---|---|---|---|---|---|
| 0 | 1 | 1 | 10 | 9 | 九 | input_1_1_10.jpg | 64 | 64 |
| 1 | 1 | 10 | 10 | 9 | 九 | input_1_10_10.jpg | 64 | 64 |
| 2 | 1 | 2 | 10 | 9 | 九 | input_1_2_10.jpg | 64 | 64 |
| 3 | 1 | 3 | 10 | 9 | 九 | input_1_3_10.jpg | 64 | 64 |
| 4 | 1 | 4 | 10 | 9 | 九 | input_1_4_10.jpg | 64 | 64 |
3. 划分数据集
from sklearn.model_selection import train_test_split

train_df, test_df = train_test_split(data_df, test_size=TEST_SIZE, random_state=RANDOM_STATE, stratify=data_df["code"].values)
train_df, val_df  = train_test_split(train_df, test_size=VAL_SIZE, random_state=RANDOM_STATE, stratify=train_df["code"].values)
print("Train set rows: {}".format(train_df.shape[0]))
print("Test  set rows: {}".format(test_df.shape[0]))
print("Val   set rows: {}".format(val_df.shape[0]))
Train set rows: 9600
Test  set rows: 3000
Val   set rows: 2400
三、构建模型
def read_image(file_name):
    image = skimage.io.imread(IMAGE_PATH + file_name)
    image = skimage.transform.resize(image, (IMAGE_WIDTH, IMAGE_HEIGHT, 1), mode='reflect')
    return image[:,:,:]
def categories_encoder(dataset, var='character'):
    X = np.stack(dataset['file'].apply(read_image))
    y = pd.get_dummies(dataset[var], drop_first=False) #get_dummies是利用pandas实现one hot encode的方式。
    return X, y
train_df.shape
(9600, 8)
X_train, y_train = categories_encoder(train_df)
X_val,   y_val   = categories_encoder(val_df)
X_test,  y_test  = categories_encoder(test_df)
X_train.shape,y_train.shape
((9600, 64, 64, 1), (9600, 15))
import tensorflow as tf

model = tf.keras.Sequential([
    tf.keras.layers.Conv2D(filters=16,kernel_size=(3,3),padding="same",activation="relu",input_shape=[64, 64, 1]),
    tf.keras.layers.Conv2D(filters=16,kernel_size=(3,3),padding="same",activation="relu"),

    tf.keras.layers.MaxPooling2D((2,2)),
    tf.keras.layers.Dropout(0.5),
    tf.keras.layers.Conv2D(filters=16,kernel_size=(3,3),padding="same",activation="relu"),
    tf.keras.layers.MaxPooling2D((2,2)),
    tf.keras.layers.Conv2D(filters=16,kernel_size=(3,3),padding="same",activation="relu"),
    tf.keras.layers.MaxPooling2D((2,2)),
    tf.keras.layers.Flatten(),
    tf.keras.layers.Dense(15, activation="softmax")
])
model.summary()
Model: "sequential"
_________________________________________________________________
Layer (type)                 Output Shape              Param #
=================================================================
conv2d (Conv2D)              (None, 64, 64, 16)        160
_________________________________________________________________
conv2d_1 (Conv2D)            (None, 64, 64, 16)        2320
_________________________________________________________________
max_pooling2d (MaxPooling2D) (None, 32, 32, 16)        0
_________________________________________________________________
dropout (Dropout)            (None, 32, 32, 16)        0
_________________________________________________________________
conv2d_2 (Conv2D)            (None, 32, 32, 16)        2320
_________________________________________________________________
max_pooling2d_1 (MaxPooling2 (None, 16, 16, 16)        0
_________________________________________________________________
conv2d_3 (Conv2D)            (None, 16, 16, 16)        2320
_________________________________________________________________
max_pooling2d_2 (MaxPooling2 (None, 8, 8, 16)          0
_________________________________________________________________
flatten (Flatten)            (None, 1024)              0
_________________________________________________________________
dense (Dense)                (None, 15)                15375
=================================================================
Total params: 22,495
Trainable params: 22,495
Non-trainable params: 0
_________________________________________________________________
四、编译
model.compile(optimizer="adam",
                loss='categorical_crossentropy',
                metrics=['accuracy'])
y_train.shape
(9600, 15)
五、训练模型
from tensorflow.keras.callbacks import ModelCheckpoint, Callback, EarlyStopping, ReduceLROnPlateau, LearningRateScheduler

# 设置动态学习率
annealer = LearningRateScheduler(lambda x: 1e-3 * 0.99 ** (x+NO_EPOCHS))

# 设置早停
earlystopper = EarlyStopping(monitor='loss', patience=PATIENCE, verbose=VERBOSE)

#
checkpointer = ModelCheckpoint('best_model.h5',
                                monitor='val_accuracy',
                                verbose=VERBOSE,
                                save_best_only=True,
                                save_weights_only=True)
train_model  = model.fit(X_train, y_train,
                  batch_size=BATCH_SIZE,
                  epochs=NO_EPOCHS,
                  verbose=1,
                  validation_data=(X_val, y_val),
                  callbacks=[earlystopper, checkpointer, annealer])
Epoch 1/50
300/300 [==============================] - 4s 5ms/step - loss: 1.8074 - accuracy: 0.4356 - val_loss: 1.2356 - val_accuracy: 0.6237

Epoch 00001: val_accuracy improved from -inf to 0.62375, saving model to best_model.h5
Epoch 2/50
300/300 [==============================] - 1s 4ms/step - loss: 0.9848 - accuracy: 0.6914 - val_loss: 0.7914 - val_accuracy: 0.7508

Epoch 00002: val_accuracy improved from 0.62375 to 0.75083, saving model to best_model.h5
Epoch 3/50
300/300 [==============================] - 1s 4ms/step - loss: 0.6645 - accuracy: 0.7898 - val_loss: 0.5913 - val_accuracy: 0.8117

......
Epoch 00046: val_accuracy did not improve from 0.96833
Epoch 47/50
300/300 [==============================] - 1s 4ms/step - loss: 0.0243 - accuracy: 0.9924 - val_loss: 0.1612 - val_accuracy: 0.9646

Epoch 00047: val_accuracy did not improve from 0.96833
Epoch 48/50
300/300 [==============================] - 1s 4ms/step - loss: 0.0262 - accuracy: 0.9911 - val_loss: 0.1613 - val_accuracy: 0.9642

Epoch 00048: val_accuracy did not improve from 0.96833
Epoch 49/50
300/300 [==============================] - 1s 4ms/step - loss: 0.0244 - accuracy: 0.9920 - val_loss: 0.1448 - val_accuracy: 0.9658

Epoch 00049: val_accuracy did not improve from 0.96833
Epoch 50/50
300/300 [==============================] - 1s 4ms/step - loss: 0.0287 - accuracy: 0.9908 - val_loss: 0.1575 - val_accuracy: 0.9679

Epoch 00050: val_accuracy did not improve from 0.96833
六、评估模型
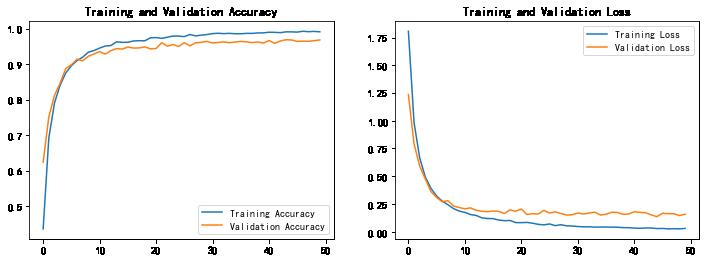
1. Accuracy与Loss图
acc = train_model.history['accuracy']
val_acc = train_model.history['val_accuracy']

loss = train_model.history['loss']
val_loss = train_model.history['val_loss']

epochs_range = range(len(acc))

plt.figure(figsize=(12, 4))
plt.subplot(1, 2, 1)

plt.plot(epochs_range, acc, label='Training Accuracy')
plt.plot(epochs_range, val_acc, label='Validation Accuracy')
plt.legend(loc='lower right')
plt.title('Training and Validation Accuracy')

plt.subplot(1, 2, 2)
plt.plot(epochs_range, loss, label='Training Loss')
plt.plot(epochs_range, val_loss, label='Validation Loss')
plt.legend(loc='upper right')
plt.title('Training and Validation Loss')
plt.show()

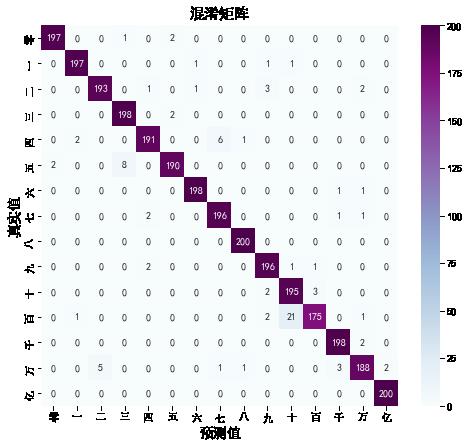
2. 混淆矩阵
from sklearn.metrics import confusion_matrix
import seaborn as sns
import pandas as pd

class_names = ["零","一","二","三","四","五","六","七","八","九","十","百","千","万","亿"]

# 定义一个绘制混淆矩阵图的函数
def plot_cm(labels, predictions):

    # 生成混淆矩阵
    conf_numpy = confusion_matrix(labels, predictions)
    # 将矩阵转化为 DataFrame
    conf_df = pd.DataFrame(conf_numpy, index=class_names ,columns=class_names)

    plt.figure(figsize=(8,7))

    sns.heatmap(conf_df, annot=True, fmt="d", cmap="BuPu")

    plt.title('混淆矩阵',fontsize=15)
    plt.ylabel('真实值',fontsize=14)
    plt.xlabel('预测值',fontsize=14)

predicted      = model.predict(X_test)
test_predicted = np.argmax(predicted, axis=1)
test_truth     = np.argmax(y_test.values, axis=1)
# 绘制混淆矩阵
plot_cm(test_truth,test_predicted)

3. 各项指标评估
score = model.evaluate(X_test, y_test, verbose=0)
print('Test loss:', score[0])
print('Test accuracy:', score[1])
Test loss: 0.13785076141357422
Test accuracy: 0.9706666469573975
from sklearn import metrics

def test_accuracy_report(model):
    predicted      = model.predict(X_test)
    test_predicted = np.argmax(predicted, axis=1)
    test_truth     = np.argmax(y_test.values, axis=1)

    print(metrics.classification_report(test_truth, test_predicted, target_names=y_test.columns))

    test_res = model.evaluate(X_test, y_test.values, verbose=0)
    print('Loss function: %s, accuracy:' % test_res[0], test_res[1])
test_accuracy_report(model)
              precision    recall  f1-score   support

           一       0.99      0.98      0.99       200
           七       0.98      0.98      0.98       200
           万       0.97      0.96      0.97       200
           三       0.96      0.99      0.97       200
           九       0.97      0.95      0.96       200
           二       0.98      0.95      0.96       200
           五       0.99      0.99      0.99       200
           亿       0.97      0.98      0.97       200
           八       0.99      1.00      1.00       200
           六       0.96      0.98      0.97       200
           十       0.89      0.97      0.93       200
           千       0.98      0.88      0.92       200
           四       0.98      0.99      0.98       200
           百       0.96      0.94      0.95       200
           零       0.99      1.00      1.00       200

    accuracy                           0.97      3000
   macro avg       0.97      0.97      0.97      3000
weighted avg       0.97      0.97      0.97      3000

Loss function: 0.13785076141357422, accuracy: 0.9706666469573975
七、同系列作品
🚀 深度学习新人必看:《小白入门深度学习》
- 小白入门深度学习 | 第一篇:配置深度学习环境
- 小白入门深度学习 | 第二篇:编译器的使用-Jupyter Notebook
- 小白入门深度学习 | 第三篇:深度学习初体验
- 小白入门深度学习 | 第四篇:配置PyTorch环境
🚀 往期精彩-卷积神经网络篇:
- 深度学习100例-卷积神经网络(CNN)实现mnist手写数字识别 | 第1天
- 深度学习100例-卷积神经网络(CNN)彩色图片分类 | 第2天
- 深度学习100例-卷积神经网络(CNN)服装图像分类 | 第3天
- 深度学习100例-卷积神经网络(CNN)花朵识别 | 第4天
- 深度学习100例-卷积神经网络(CNN)天气识别 | 第5天
- 深度学习100例-卷积神经网络(VGG-16)识别海贼王草帽一伙 | 第6天
- 深度学习100例-卷积神经网络(VGG-19)识别灵笼中的人物 | 第7天
- 深度学习100例-卷积神经网络(ResNet-50)鸟类识别
以上是关于97%!中文版的数字识别还可以这样玩!!!的主要内容,如果未能解决你的问题,请参考以下文章