TensorFlow by Google一个计算机视觉示例Machine Learning Foundations: Ep #2 - First steps in computer vision(代码
Posted 架构师易筋
tags:
篇首语:本文由小常识网(cha138.com)小编为大家整理,主要介绍了TensorFlow by Google一个计算机视觉示例Machine Learning Foundations: Ep #2 - First steps in computer vision(代码相关的知识,希望对你有一定的参考价值。


1. 超越 Hello World,一个计算机视觉示例
bit.ly/tfw-lab2cv
在前面的练习中,您看到了如何创建一个神经网络来找出您要解决的问题。这给出了学习行为的明确例子。当然,在那种情况下,这有点矫枉过正,因为直接编写函数 Y=3x+1 会更容易,而不是费心使用机器学习来学习一组固定的 X 和 Y 之间的关系值,并将其扩展到所有值。
但是,如果编写这样的规则要困难得多——例如计算机视觉问题,那该怎么办?让我们看一个场景,在这个场景中,我们可以识别不同的服装项目,这些项目是从包含 10 种不同类型的数据集训练出来的。
1.1 开始编码
让我们从我们导入 TensorFlow 开始
import tensorflow as tf
print(tf.__version__)
2.6.0
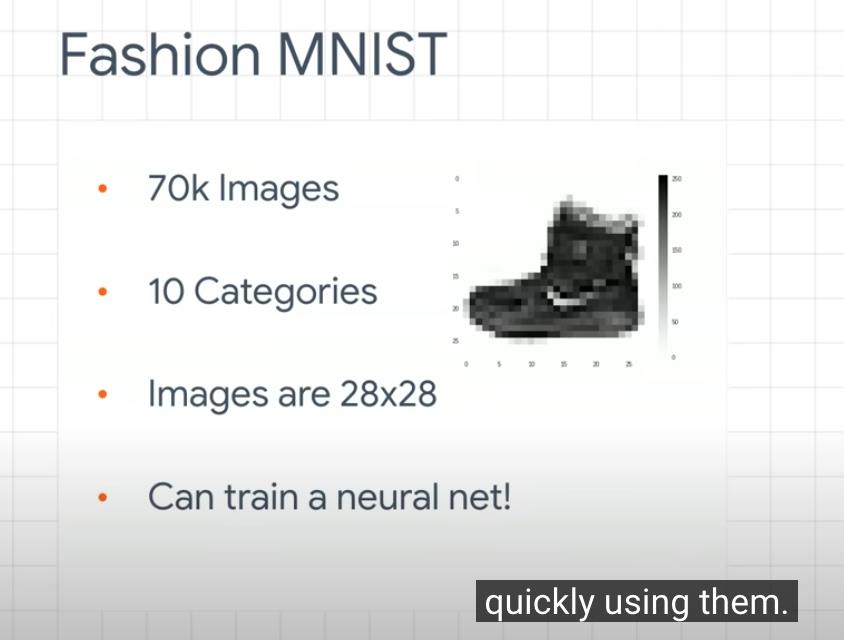
我们将训练一个神经网络从一个名为 Fashion MNIST 的通用数据集中识别服装项目。您可以在此处了解有关此数据集的更多信息。
它包含 10 个不同类别的 70,000 件服装。每件衣服都是 28x28 的灰度图像。你可以在这里看到一些例子:

Fashion MNIST 数据可直接在 tf.keras 数据集 API 中获得。你像这样加载它:
mnist = tf.keras.datasets.fashion_mnist
在此对象上调用 load_data 将为您提供两组两个列表,这些将是包含服装项目及其标签的图形的训练和测试值。
(training_images, training_labels), (test_images, test_labels) = mnist.load_data()
Downloading data from https://storage.googleapis.com/tensorflow/tf-keras-datasets/train-labels-idx1-ubyte.gz
32768/29515 [=================================] - 0s 0us/step
40960/29515 [=========================================] - 0s 0us/step
Downloading data from https://storage.googleapis.com/tensorflow/tf-keras-datasets/train-images-idx3-ubyte.gz
26427392/26421880 [==============================] - 0s 0us/step
26435584/26421880 [==============================] - 0s 0us/step
Downloading data from https://storage.googleapis.com/tensorflow/tf-keras-datasets/t10k-labels-idx1-ubyte.gz
16384/5148 [===============================================================================================] - 0s 0us/step
Downloading data from https://storage.googleapis.com/tensorflow/tf-keras-datasets/t10k-images-idx3-ubyte.gz
4423680/4422102 [==============================] - 0s 0us/step
4431872/4422102 [==============================] - 0s 0us/step
这些值是什么样的?让我们打印一张训练图像和一个训练标签以查看…数组中不同索引的实验。例如,还要看一下索引 42…这与索引 0 处的引导不同
import matplotlib.pyplot as plt
plt.imshow(training_images[0])
print(training_labels[0])
print(training_images[0])
这里的数据表示每一行的像素点,范围为[0,255],比如第一行都是黑色,都是0.
9
[[  0   0   0   0   0   0   0   0   0   0   0   0   0   0   0   0   0   0
    0   0   0   0   0   0   0   0   0   0]
 [  0   0   0   0   0   0   0   0   0   0   0   0   0   0   0   0   0   0
    0   0   0   0   0   0   0   0   0   0]
 [  0   0   0   0   0   0   0   0   0   0   0   0   0   0   0   0   0   0
    0   0   0   0   0   0   0   0   0   0]
 [  0   0   0   0   0   0   0   0   0   0   0   0   1   0   0  13  73   0
    0   1   4   0   0   0   0   1   1   0]
 [  0   0   0   0   0   0   0   0   0   0   0   0   3   0  36 136 127  62
   54   0   0   0   1   3   4   0   0   3]
 [  0   0   0   0   0   0   0   0   0   0   0   0   6   0 102 204 176 134
  144 123  23   0   0   0   0  12  10   0]
 [  0   0   0   0   0   0   0   0   0   0   0   0   0   0 155 236 207 178
  107 156 161 109  64  23  77 130  72  15]
 [  0   0   0   0   0   0   0   0   0   0   0   1   0  69 207 223 218 216
  216 163 127 121 122 146 141  88 172  66]
 [  0   0   0   0   0   0   0   0   0   1   1   1   0 200 232 232 233 229
  223 223 215 213 164 127 123 196 229   0]
 [  0   0   0   0   0   0   0   0   0   0   0   0   0 183 225 216 223 228
  235 227 224 222 224 221 223 245 173   0]
 [  0   0   0   0   0   0   0   0   0   0   0   0   0 193 228 218 213 198
  180 212 210 211 213 223 220 243 202   0]
 [  0   0   0   0   0   0   0   0   0   1   3   0  12 219 220 212 218 192
  169 227 208 218 224 212 226 197 209  52]
 [  0   0   0   0   0   0   0   0   0   0   6   0  99 244 222 220 218 203
  198 221 215 213 222 220 245 119 167  56]
 [  0   0   0   0   0   0   0   0   0   4   0   0  55 236 228 230 228 240
  232 213 218 223 234 217 217 209  92   0]
 [  0   0   1   4   6   7   2   0   0   0   0   0 237 226 217 223 222 219
  222 221 216 223 229 215 218 255  77   0]
 [  0   3   0   0   0   0   0   0   0  62 145 204 228 207 213 221 218 208
  211 218 224 223 219 215 224 244 159   0]
 [  0   0   0   0  18  44  82 107 189 228 220 222 217 226 200 205 211 230
  224 234 176 188 250 248 233 238 215   0]
 [  0  57 187 208 224 221 224 208 204 214 208 209 200 159 245 193 206 223
  255 255 221 234 221 211 220 232 246   0]
 [  3 202 228 224 221 211 211 214 205 205 205 220 240  80 150 255 229 221
  188 154 191 210 204 209 222 228 225   0]
 [ 98 233 198 210 222 229 229 234 249 220 194 215 217 241  65  73 106 117
  168 219 221 215 217 223 223 224 229  29]
 [ 75 204 212 204 193 205 211 225 216 185 197 206 198 213 240 195 227 245
  239 223 218 212 209 222 220 221 230  67]
 [ 48 203 183 194 213 197 185 190 194 192 202 214 219 221 220 236 225 216
  199 206 186 181 177 172 181 205 206 115]
 [  0 122 219 193 179 171 183 196 204 210 213 207 211 210 200 196 194 191
  195 191 198 192 176 156 167 177 210  92]
 [  0   0  74 189 212 191 175 172 175 181 185 188 189 188 193 198 204 209
  210 210 211 188 188 194 192 216 170   0]
 [  2   0   0   0  66 200 222 237 239 242 246 243 244 221 220 193 191 179
  182 182 181 176 166 168  99  58   0   0]
 [  0   0   0   0   0   0   0  40  61  44  72  41  35   0   0   0   0   0
    0   0   0   0   0   0   0   0   0   0]
 [  0   0   0   0   0   0   0   0   0   0   0   0   0   0   0   0   0   0
    0   0   0   0   0   0   0   0   0   0]
 [  0   0   0   0   0   0   0   0   0   0   0   0   0   0   0   0   0   0
    0   0   0   0   0   0   0   0   0   0]]

您会注意到数字中的所有值都在 0 到 255 之间。如果我们正在训练一个神经网络,出于各种原因,如果我们将所有值都视为 0 到 1 之间会更容易,这个过程称为“归一化”。 . 幸运的是,在 Python 中很容易对这样的列表进行规范化而无需循环。你这样做:
training_images  = training_images / 255.0
test_images = test_images / 255.0
现在你可能想知道为什么有 2 组…训练和测试——还记得我们在介绍中谈到过吗?这个想法是有一组数据用于训练,然后是另一组数据…模型还没有看到…看看它在分类值方面有多好。毕竟,当您完成后,您会想要尝试使用以前从未见过的数据!
现在让我们设计模型。这里有很多新概念,但别担心,你会掌握它们的窍门。
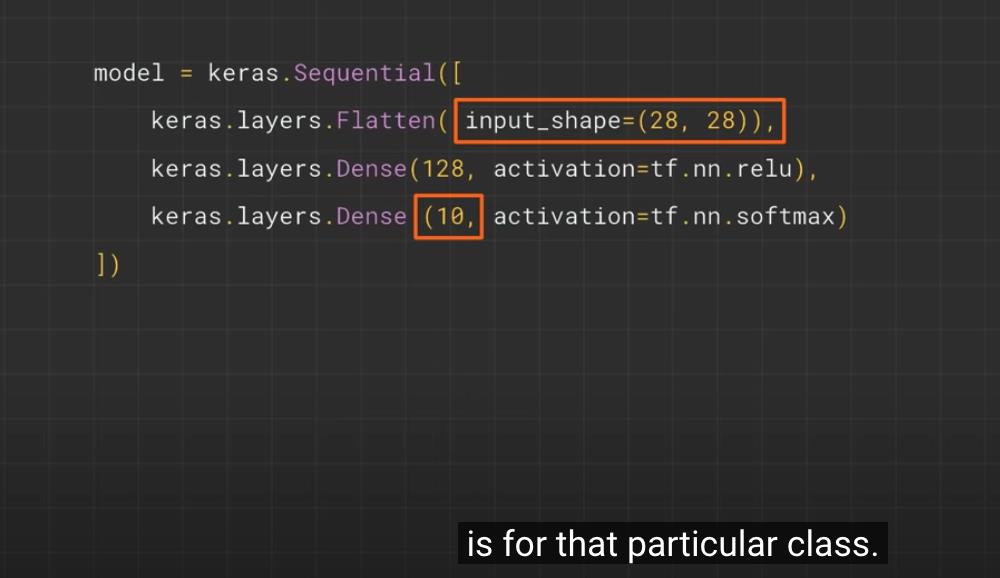
model = tf.keras.models.Sequential([tf.keras.layers.Flatten(),
                                    tf.keras.layers.Dense(128, activation=tf.nn.relu),
                                    tf.keras.layers.Dense(10, activation=tf.nn.softmax)])
-
Sequential:定义神经网络中层的序列
-
Flatten:还记得之前我们打印出来的图像是正方形的吗?Flatten 只是将那个正方形变成一维集合。
-
Dense : 添加一层神经元
每一层神经元都需要一个激活函数来告诉它们该做什么。有很多选择,但现在就使用这些。
-
Relu实际上意味着“如果 X>0 返回 X,否则返回 0”——所以它所做的只是将值 0 或更大的值传递给网络中的下一层。
-
Softmax取一组值,并有效地选择最大的值,因此,例如,如果最后一层的输出看起来像
[0.1, 0.1, 0.05, 0.1, 9.5, 0.1, 0.05, 0.05, 0.05],它会节省你从它钓鱼中寻找最大的值,然后把它变成[0,0,0,0,1,0,0,0,0]– 目标是节省大量的编码!
现在模型已经定义,接下来要做的就是实际构建它。您可以像以前一样使用优化器和损失函数对其进行编译,然后通过调用 * model.fit *要求它使您的训练数据适合您的训练标签来训练它-即让它弄清楚两者之间的关系训练数据及其实际标签,因此将来如果您有与训练数据相似的数据,那么它可以预测该数据的外观。
model.compile(optimizer = tf.keras.optimizers.Adam(),
              loss = 'sparse_categorical_crossentropy',
              metrics=['accuracy'])

model.fit(training_images, training_labels, epochs=5)
Epoch 1/5
1875/1875 [==============================] - 4s 2ms/step - loss: 0.5011 - accuracy: 0.8227
Epoch 2/5
1875/1875 [==============================] - 3s 2ms/step - loss: 0.3738 - accuracy: 0.8658
Epoch 3/5
1875/1875 [==============================] - 3s 2ms/step - loss: 0.3372 - accuracy: 0.8772
Epoch 4/5
1875/1875 [==============================] - 4s 2ms/step - loss: 0.3143 - accuracy: 0.8846
Epoch 5/5
1875/1875 [==============================] - 3s 2ms/step - loss: 0.2984 - accuracy: 0.8909
<keras.callbacks.History at 0x7f1f6187afd0>
一旦完成训练——你应该在最后一个时期结束时看到一个准确度值。它可能看起来像 0.9098。这告诉您,您的神经网络对训练数据进行分类的准确率约为 91%。IE,它找出了图像和标签之间的模式匹配,在 91% 的时间里都有效。不是很好,但考虑到它只训练了 5 个 epoch 并且完成得很快。
但是它如何处理看不见的数据呢?这就是为什么我们有测试图像。我们可以调用model.evaluate,并传入两个集合,它会报告每个集合的损失。试一试吧:
model.evaluate(test_images, test_labels)
313/313 [==============================] - 0s 1ms/step - loss: 0.3710 - accuracy: 0.8642
[0.371006578207016, 0.8641999959945679]
对我来说,这返回了大约 0.8838 的准确度,这意味着它的准确度约为 88%。正如预期的那样,它可能不会像对待训练数据那样处理看不见的数据!在学习本课程时,您将寻找改进方法。
要进一步探索,请尝试以下练习:
2. 探索练习
2.1 练习 1:
对于第一个练习,运行以下代码:它为每个测试图像创建一组分类,然后打印分类中的第一个条目。运行后的输出是一个数字列表。你认为这是为什么,这些数字代表什么?
classifications = model.predict(test_images)

print(classifications[0])
提示:尝试运行 print(test_labels[0]) – 你会得到一个 9。这是否有助于你理解为什么这个列表看起来是这样的?
print(test_labels[0])
9


2.2 练习 2:
现在让我们看看模型中的层。对具有 512 个神经元的密集层尝试不同的值。你在损失、训练时间等方面得到了什么不同的结果?你认为为什么会这样?
import tensorflow as tf
print(tf.__version__)

mnist = tf.keras.datasets.fashion_mnist

(training_images, training_labels) ,  (test_images, test_labels) = mnist.load_data()

training_images = training_images/255.0
test_images = test_images/255.0

model = tf.keras.models.Sequential([tf.keras.layers.Flatten(),
                                    tf.keras.layers.Dense(1024, activation=tf.nn.relu),
                                    tf.keras.layers.Dense(10, activation=tf.nn.softmax)])

model.compile(optimizer = 'adam',
              loss = 'sparse_categorical_crossentropy')

model.fit(training_images, training_labels, epochs=5)

model.evaluate(test_images, test_labels)

classifications = model.predict(test_images)

print(classifications[0])
print(test_labels[0])
2.6.0
Epoch 1/5
1875/1875 [==============================] - 12s 6ms/step - 损失: 0.4715
Epoch 2/5
1875/1875 [==============================] - 11s 6ms/step - 损失:0.3583
Epoch 3/5
1875/1875 [==============================] - 11s 6ms/step - 损失:0.3205
Epoch 4/ 5
1875/1875 [==============================] - 12s 6ms/step - 损失:0.2963
Epoch 5/5
1875 /1875 [==============================] - 12s 6ms/step - 损失:0.2800
313/313 [=== ==========================] - 1s 3ms/step - 损失:
0.3366 [6.0128713e-08 3.6625007e-08 6.0206345e-10 1.6711460e-10 4.0677031e-09
 5.6566618e-04 1.1954526e-08 5.5199428e-03 1.0437609e-08 9.9391431e-01]
9

2.3 练习 3:
如果删除 Flatten() 层会发生什么。你认为为什么会这样?
您会收到有关数据形状的错误。现在可能看起来很模糊,但它强化了经验法则,即网络中的第一层应该与数据具有相同的形状。现在我们的数据是 28x28 的图像,28 层的 28 个神经元是不可行的,因此将 28,28“展平”为 784x1 更有意义。我们不是自己编写所有代码来处理它,而是在开始时添加 Flatten() 层,当数组稍后加载到模型中时,它们会自动为我们展平。
import tensorflow as tf
print(tf.__version__)

mnist = tf.keras.datasets.fashion_mnist

(training_images, training_labels) ,  (test_images, test_labels) = mnist.load_data()

training_images = training_images/255.0
test_images = test_images/255.0


model = tf.keras.models.Sequential([tf.keras.layers.Flatten(),
                                    tf.keras.layers.Dense(64, activation=tf.nn.relu),
                                    tf.keras.layers.Dense(10, activation=tf.nn.softmax)])

# This version has the 'flatten' removed. Replace the above with this one to see the error.
#model = tf.keras.models.Sequential([tf.keras.layers.Dense(64, activation=tf.nn.relu),
#                                    tf.keras.layers.Dense(10, activation=tf.nn.softmax)])


model.compile(optimizer = 'adam',
              loss = 'sparse_categorical_crossentropy')

model.fit(training_images, training_labels, epochs=5)

model.evaluate(test_images, test_labels)

classifications = model.predict(test_images)

print(classifications[0])
print(test_labels[0])
2.4 练习 4:
考虑最终(输出)层。为什么有 10 个?如果您的数量与 10 不同,会发生什么?例如,尝试用 5
一旦发现意外值,您就会收到错误消息。另一个经验法则——最后一层的神经元数量应该与您要分类的类别数量相匹配。在这种情况下,它是数字 0-9,所以有 10 个,因此您的最后一层应该有 10 个神经元。
import tensorflow as tf
print(tf.__version__)

mnist = tf.keras.datasets.fashion_mnist

(training_images, training_labels) ,  (test_images, test_labels) = mnist.load_data()

training_images = training_images/255.0
test_images = test_images/255.0

model = tf.keras.models.Sequential([tf.keras.layers.Flatten(),
                                    tf.keras.layers.Dense(64, activation=tf.nn.relu),
                                    tf.keras.layers.Dense(10, activation=tf.nn.softmax)])

# Replace the above model definiton with this one to see the network with 5 output layers
# And you'll see errors as a result!
# model = tf.keras.models.Sequential([tf.keras.layers.Flatten(),
#                                    tf.keras.layers.Dense(64, activation=tf.nn.relu),
#                                    tf.keras.layers.Dense(5, activation=tf.nn.softmax)])

model.compile(optimizer = 'adam',
              loss = 'sparse_categorical_crossentropy')

model.fit(training_images, training_labels, epochs=5)

model.evaluate(test_images, test_labels)

classifications = model.predict(test_images)

print(classifications[0])
print(test_labels[0])
2.5 练习 5:
考虑网络中附加层的影响。如果在 512 层和最后一层 10 之间添加另一层会发生什么。
回答:没有显着影响——因为这是相对简单的数据。对于更复杂的数据(包括您将在下一课中看到的被归类为花的彩色图像),通常需要额外的图层。
import tensorflow as tf
print(tf.__version__)

mnist = tf.keras.datasets.fashion_mnist

(training_images, training_labels) ,  (test_images, test_labels) = mnist.load_data()

training_images = training_images/255.0
test_images = test_images/255.0

model = tf.keras.models.Sequential([tf.keras.layers.Flatten(),
                                    tf.keras.layers.Dense(512, activation=tf.nn.relu),
                                    tf.keras.layers.Dense(256, activation=tf.nn.relu),
                                    tf.keras.layers.Dense(10, activation=tf.nn.softmax)])

model.compile(optimizer = 'adam',
              loss = 'sparse_categorical_crossentropy')

model.fit(training_images, training_labels, epochs=5)

model.evaluate(test_images, test_labels)

classifications = model.predict(test_images)

print(classifications[0])
print(test_labels[0])
2.6 练习 6:
考虑训练或多或少时期的影响。你认为为什么会这样?
尝试 15 个时期——你可能会得到一个损失比 5 个尝试 30 个时期更好的模型——你可能会看到损失值停止减少,有时会增加。这是一种称为“过度拟合”的副作用,您可以在 [某处] 了解它,并且在训练神经网络时需要注意这一点。如果你没有改善你的损失,那么浪费你的时间训练是没有意义的,对吧!😃
import tensorflow as tf
print(tf.__version__)

mnist = tf.keras.datasets.fashion_mnist

(training_images, training_labels) ,  (test_images, test_labels) = mnist.load_data()

training_images = training_images/255.0
test_images = test_images/255.0

model = tf.keras.models.Sequential([tf.keras.layers.Flatten(),
                                    tf.keras.layers.Dense(128, activation=tf.nn.relu),
                                    tf.keras.layers.Dense(10, activation=tf.nn.softmax)])

model.compile(optimizer = 'adam',
              loss = 'sparse_categorical_crossentropy')

model.fit(training_images, training_labels, epochs=30)

model.evaluate(test_images, test_labels)

classifications = model.predict(test_images)

print(classifications[34])
print(test_labels[34])
2.7 练习 7:
在训练之前,您对数据进行了标准化,从 0-255 的值到 0-1 的值。去掉它会有什么影响?这是尝试的完整代码。为什么你认为你会得到不同的结果?
import tensorflow as tf
print(tf.__version__)
mnist = tf.keras.datasets.fashion_mnist
(training_images, training_labels), (test_images, test_labels) = mnist.load_data()
# To experiment with removing normalization, comment out the following 2 lines
training_images=training_images/255.0
test_images=test_images/255.0
model = tf.keras.models.Sequential([
  tf.keras.layers.Flatten(),
  tf.keras.layers.Dense(512, activation=tf.nn.relu),
  tf.keras.layers.Dense(10, activation=tf.nn.softmax)
])
model.compile(optimizer='adam', loss='sparse_categorical_crossentropy')
model.fit(training_images, training_labels, epochs=5)
model.evaluate(test_images, test_labels)
classifications = model.predict(test_images)
print(classifications[0])
print(test_labels[0])
2.8 练习 8:
早些时候,当您为额外的 epoch 进行训练时,您遇到了一个问题,您的损失可能会发生变化。您可能需要一些时间来等待训练来执行此操作,并且您可能会想“如果我能在达到所需值时停止训练,那不是很好吗?” – 即 95% 的准确率对您来说可能就足够了,如果您在 3 个 epoch 后达到该准确度,为什么要坐等它完成更多的 epoch…那么您将如何解决这个问题?像任何其他程序一样…你有回调!让我们看看他们在行动……
import tensorflow as tf
print(tf.__version__)

class myCallback(tf.keras.callbacks.Callback):
  def on_epoch_end(self, epoch, logs={}):
    if(logs.get('accuracy')>0.9):
      print("\\nReached 90% accuracy so cancelling training!")
      self.model.stop_training = True

callbacks = myCallback()
mnist = tf.keras.datasets.fashion_mnist
(training_images, training_labels), (test_images, test_labels) = mnist.load_data()
training_images=training_images/255.0
test_images=test_images/255.0
model = tf.keras.models.Sequential([
  tf.keras.layers.Flatten(),
  tf.keras.layers.Dense(512, activation=tf.nn.relu),
  tf.keras.layers.Dense(10, activation=tf.nn.softmax)
])
model.compile(optimizer='adam', loss='sparse_categorical_crossentropy', metrics=['accuracy'])
model.fit(training_images, training_labels, epochs=5, callbacks=[callbacks])


参考
https://www.youtube.com/watch?v=j-35y1M9rRU
以上是关于TensorFlow by Google一个计算机视觉示例Machine Learning Foundations: Ep #2 - First steps in computer vision(代码的主要内容,如果未能解决你的问题,请参考以下文章