前端笔记四前后端通信实例(http协议和Ajax)
Posted 桥本环奈粤港澳分奈
tags:
篇首语:本文由小常识网(cha138.com)小编为大家整理,主要介绍了前端笔记四前后端通信实例(http协议和Ajax)相关的知识,希望对你有一定的参考价值。
一、准备工作
js和界面部分和前面的笔记一样【前端笔记】二、JavaScript实例
通信部分【前端笔记】三、前后端通信(http协议和Ajax)
回顾发送请求的方法:
//需要发送的消息
var msg = 'hello'
// 创建一个XHR对象
var xhr = new XMLHttpRequest();
console.log('刚刚创建的XHR对象:', xhr.readyState);

// 打开XHR对象,
xhr.open('POST', 'https://www.qsxqd.com/api/play/helloworld');
console.log('调用open函数后的XHR对象:', xhr.readyState);

// 设定XHR对象的onreadystatechange属性
xhr.onreadystatechange = function() {
  console.log('调用send函数后的XHR对象:', xhr.readyState);

  // 浏览器接收完成服务器数据
  if (xhr.readyState === 4) {
    // 响应状态码有效
    if (200 <= xhr.status < 300 || xhr.status === 304) {
      console.log('接收到服务器数据:', xhr.responseText);
    }
  }
}

// 发送http请求
xhr.send(msg);
关注open函数,xhr.open('POST', 'https://www.qsxqd.com/api/play/helloworld');,第一个参数为请求方式,第二个参数为url
修改第一个参数,由post方式改为get 方式,然后修改url
var xhr = new XMLHttpRequest();
console.log('刚刚创建的XHR对象:', xhr.readyState);

// 打开XHR对象,请求方式为GET
xhr.open('GET', 'https://robotchat.xhxly.cn/api.php?key=free&appid=0&msg='+msg);
console.log('调用open函数后的XHR对象:', xhr.readyState);

// 设定XHR对象的onreadystatechange属性
xhr.onreadystatechange = function() {
  console.log('调用send函数后的XHR对象:', xhr.readyState);

  // 浏览器接收完成服务器数据
  if (xhr.readyState === 4) {
    // 响应状态码有效
    if (200 <= xhr.status < 300 || xhr.status === 304) {
      console.log('接收到服务器数据:', xhr.responseText);
    }
  }
}

// 发送http请求
xhr.send();
get请求和post请求的主要区别是:
- get请求直接通过URL来给服务端发消息,也就是消息被一起拼接在URL里
- post请求,约定通过body来传递消息,也就是**xhr.send()**括号里的内容
函数封装:
function ajax(method, url, data, cb) {
  // 默认请求方式为 GET
  method = method || "GET";
  data = data || null;

  if (!url) {
    throw new Error("必须指定 url 参数");
  }

  var xhr = new XMLHttpRequest();
  xhr.open(method, url);
  xhr.onreadystatechange = function() {
    // readyState 为 4 时表示已经全部接收到响应数据
    if (xhr.readyState === 4) {
      // Http 状态码大于等于 200 小于 300,或者等于 304,表示请求成功
      if ((xhr.status >= 200 && xhr.status < 300) || xhr.status === 304) {
        cb(xhr.responseText);
      } else {
        cb(null);
      }
    }
  };

  xhr.send(data);
}
var msg = 'hello'
ajax('GET', 'https://robotchat.xhxly.cn/api.php?key=free&appid=0&msg='+msg, null,function success(response){console.log(response)})
这里的cb是一个回调函数,ajax函数执行后调用传入的这个函数来发送消息
二、调用相关API完成机器人实现自动回复
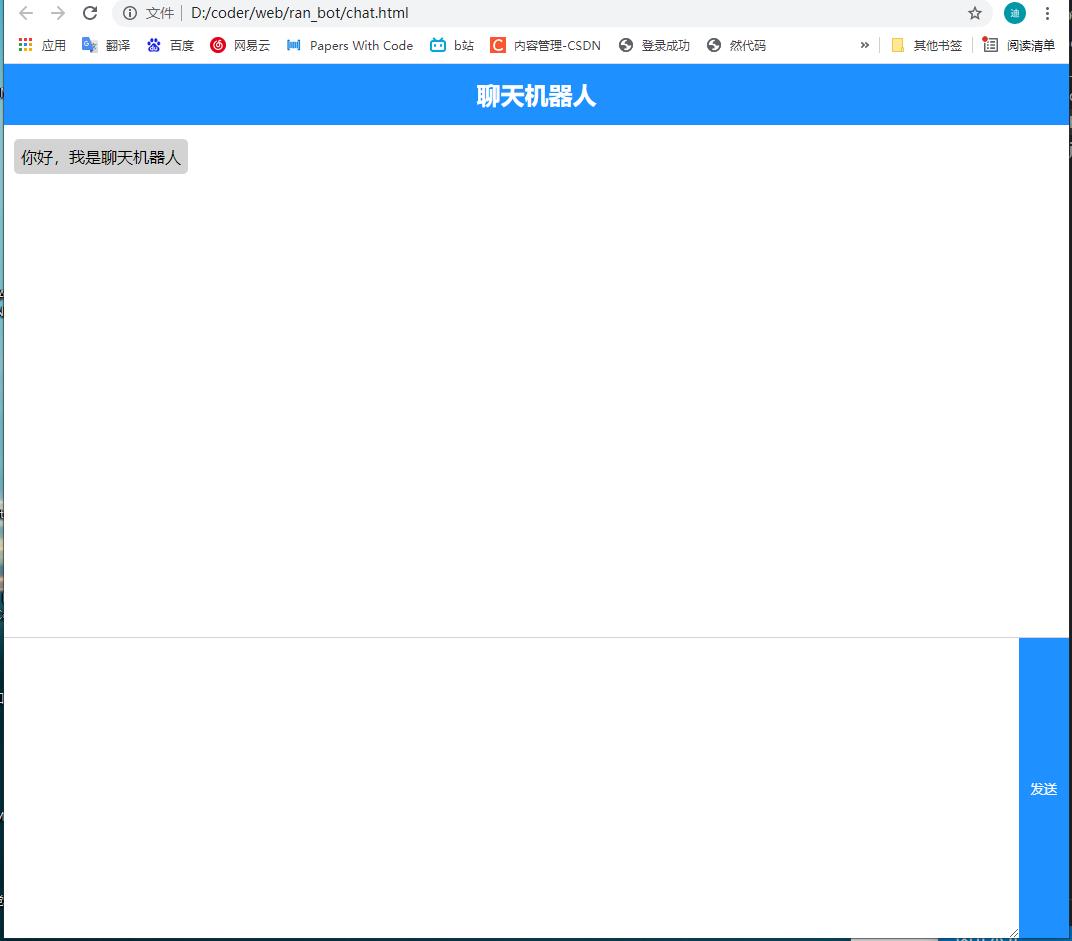
html界面布局:
<!DOCTYPE html>
<html>

<body>

    <header>
        <link rel="stylesheet" type="text/css" href="chat.css">
        <h2>聊天机器人</h2>
    </header>

    <ul class="message-list" id="message-list">
        <li class="message-list__item-robot">
            <div>
                你好,我是聊天机器人
            </div>
        </li>
        <li class="message-list__item-user">
            <div>
                你好
            </div>
        </li>
    </ul>

    <!--输入区-->
    <div class="message-send ">
        <textarea id="inputArea"></textarea>
        <button id="sendMsgButton">发送</button>
    </div>

</body>
<script src="./chat_utf.js"></script>

</html>
css样式:
* {
    margin: 0;
    padding: 0;
}

header {
    background-color: dodgerblue;
    color: white;
    padding: 15px 0px;
    display: flex;
    justify-content: center;
}

.message-list {
    width: 100%;
    padding: 10px;
    overflow-y: scroll;
    position: fixed;
    top: 65px;
    bottom: 300px;
    left: 0px;
}

.message-list__item-robot,
.message-list__item-user {
    margin-bottom: 10px;
    display: flex;
}

.message-list__item-user {
    flex-direction: row-reverse;
}

.message-list__item-robot div {
    padding: 7px;
    border-radius: 5px;
    background: lightgray;
}

.message-list__item-user div {
    padding: 7px;
    border-radius: 5px;
    background: dodgerblue;
    color: white;
    display: none;
}

.message-send {
    display: flex;
    border-top: 1px solid lightgray;
    height: 300px;
    width: 100%;
    display: flex;
    position: fixed;
    bottom: 0px;
    left: 0px;
}

.message-send textarea {
    outline: none;
    border: none;
    flex-grow: 1;
    padding: 7px;
    font-size: 16px;
}

.message-send button {
    border: none;
    width: 50px;
    background: dodgerblue;
    color: white;
}
js功能:
// 找到发送按钮
var sendMsgButton = document.getElementById('sendMsgButton')
// 找到输入框
var inputArea = document.getElementById('inputArea')
// 找到聊天列表
var msgList = document.getElementById('message-list')
/**
 * 封装与服务器通信的ajax函数
 * @param method 请求方式,GET或POST
 * @param url 服务器url地址
 * @param data 传送的data
 * @param cb 回调函数,用于获取服务器发送的回复
 */
// 向服务器发送请求
function ajax(method, url, data, cb) {
    var xhr = new XMLHttpRequest();
    xhr.open(method, url);
    console.log("xhr.readyState=" + xhr.readyState + "  open xhr")
    xhr.onreadystatechange = function() {
        console.log("onreadystatechange readyState: " + xhr.readyState)
        if (xhr.readyState === 4) {
            console.log("xhr.readyState = 4   xhr.status = " + xhr.status)
                // Http 状态码大于等于 200 小于 300,或者等于 304,表示请求成功
            if ((xhr.status >= 200 && xhr.status < 300) || xhr.status === 304) {
                console.log("xhr.responseText:" + xhr.responseText)
                cb(xhr.responseText);
            } else {
                cb(null);
            }
        }
    };
    xhr.send(data)
    console.log("xhr.readyState=" + xhr.readyState + "   send data")
}
/**
 * 统一的添加消息函数
 * @param msg 需要添加的消息
 * @param className 消息节点的类名
 */
function sendMsg(msg, className) {
    //创建元素
    var li = document.createElement('li')
    li.className = className
    var div = document.createElement('div')
    div.innerText = msg
        //添加至聊天记录中
    li.appendChild(div)
    msgList.appendChild(li)
    if (className == "message-list__item-user") div.style.display = "block"
}
/**
 * 点击事件
 */
function handleSendMsg() {
    // 获取输入框文字
    var userMsg = inputArea.value;
    // 清空输入框
    console.log("userMsg:" + userMsg);
    if (userMsg == "") {
        alert("消息不得为空")
        return;
    }
    inputArea.value = ''
        //发送用户消息
    sendMsg(userMsg, "message-list__item-user");
    var url = "http://api.qingyunke.com/api.php?key=free&appid=0&msg=" + userMsg;
    // var url = "https://robotchat.xhxly.cn/api.php?key=free&appid=0&msg=" + userMsg;

    console.log("url:" + url);
    ajax('GET', url, null, function success(response) {
        console.log("response:\\n" + response);
    })
}

// 监听点击事件
sendMsgButton.addEventListener('click', handleSendMsg);

…
待完善内容:
- 回车发送
- 发送图片
- 回复时自动显示最新消息(消息列表滚动到最底部,页面不被遮挡)
参考:
前端入门:https://www.zhihu.com/question/32314049/answer/713711753
然代码:https://www.qsxqd.com/
以上是关于前端笔记四前后端通信实例(http协议和Ajax)的主要内容,如果未能解决你的问题,请参考以下文章