理财通app的设计与实现
Posted 加州枫景
tags:
篇首语:本文由小常识网(cha138.com)小编为大家整理,主要介绍了理财通app的设计与实现相关的知识,希望对你有一定的参考价值。
一、欢迎界面的设计与实现
1、界面效果图

2、前期准备工作
(1)背景图片

(2)样式文件
(3)样式文件 1:btn_style_one.xml
<?xml version="1.0" encoding="utf-8"?>
<shape xmlns:android="http://schemas.android.com/apk/res/android">
     <stroke android:color="#ffffff" android:width="1dp"/>
     <solid android:color="#575d91"/>
     <corners android:radius="20dp"/>
</shape>
(4)样式文件 2:btn_style_two.xml
<?xml version="1.0" encoding="utf-8"?>
<shape xmlns:android="http://schemas.android.com/apk/res/android">
     <stroke android:color="#6A6969" android:width="1dp"/>
     <solid android:color="#eeeeee"/>
     <corners android:radius="20dp"/>
</shape>
(5)样式文件 3:btn_style_three.xml
<?xml version="1.0" encoding="utf-8"?>
<shape xmlns:android="http://schemas.android.com/apk/res/android">
     <stroke android:color="#ffffff" android:width="1dp"/>
     <corners android:radius="20dp"/>
</shape>
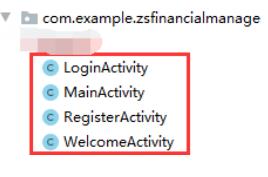
(6)选择工程的包名,新建另外的三个页面
类文件名称如下:
欢迎界面:WelcomeActivity
注册界面:RegisterActivity
登录界面:LoginActivity

3、布局界面 activity_welcome.xml
<?xml version="1.0" encoding="utf-8"?>
<LinearLayout xmlns:android="http://schemas.android.com/apk/res/android"
     xmlns:app="http://schemas.android.com/apk/res-auto"
     xmlns:tools="http://schemas.android.com/tools"
     android:layout_width="match_parent"
     android:layout_height="match_parent"
     android:orientation="vertical"
     android:background="@drawable/welcomebg"
     tools:context=".WelcomeActivity">
     <ImageView
         android:layout_width="wrap_content"
         android:layout_height="400dp"
         android:src="@drawable/wel_icon"/>
     <TextView
         android:layout_width="wrap_content"
         android:layout_height="wrap_content"
         android:text="钱都花哪了?"
         android:textSize="30sp"
         android:textColor="#ffffff"
         android:layout_gravity="center"
         android:layout_marginTop="30dp"/>
     <TextView
         android:layout_width="wrap_content"
         android:layout_height="wrap_content"
         android:text="记录生活,点亮财富人生!"
         android:textSize="20sp"
         android:textColor="#ffffff"
         android:layout_gravity="center"
         android:layout_marginTop="30dp"/>
     <Button
         android:id="@+id/bt_know_wel"
         android:layout_width="wrap_content"
         android:layout_height="wrap_content"
         android:text="知道了"
         android:textSize="20sp"
         android:textColor="#ffffff"
         android:layout_gravity="center"
         android:layout_marginTop="30dp"
         android:background="@drawable/btn_style_three"/>
</LinearLayout>
4、类文件 WelcomeActivity.java
public class WelcomeActivity extends AppCompatActivity {
     //定义对象
     Button bt_know_wel;
     @Override
     protected void onCreate(Bundle savedInstanceState) {
         super.onCreate(savedInstanceState);
         setContentView(R.layout.activity_welcome);
         //绑定控件
         bt_know_wel=findViewById(R.id.bt_know_wel);
         //按钮单击事件
         bt_know_wel.setOnClickListener(new View.OnClickListener() {
             @Override
             public void onClick(View v) {
                 Intent intent=new Intent(WelcomeActivity.this,LoginActivity.class);
                 startActivity(intent);
                 finish();
             }
         });
     }
}
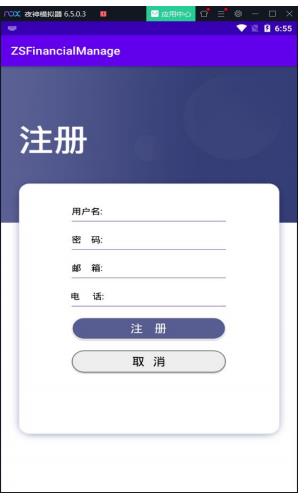
二、注册界面的设计与实现
1、界面效果图

2、前期准备工作
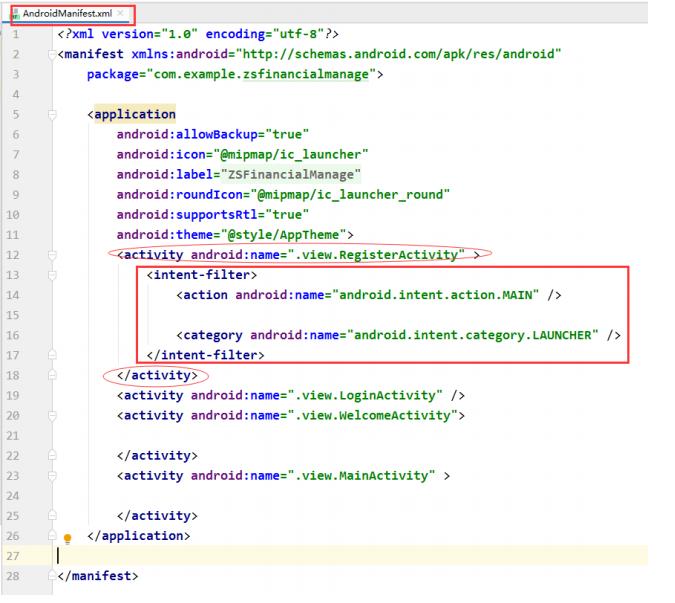
(1)设置程序从注册界面启动
打开工程的配置文件 AndroidManifest.xml,将程序启动的四行代码放置到注册界面的开始节 点与结束节点之间。如下图所示。
3、布局界面 activity_register.xml
<?xml version="1.0" encoding="utf-8"?>
<LinearLayout xmlns:android="http://schemas.android.com/apk/res/android"
     xmlns:app="http://schemas.android.com/apk/res-auto"
     xmlns:tools="http://schemas.android.com/tools"
     android:layout_width="match_parent"
     android:layout_height="match_parent"
     android:orientation="vertical"
     android:background="@drawable/registerbg"
     tools:context=".view.RegisterActivity">
<LinearLayout
     android:layout_width="match_parent"
     android:layout_height="wrap_content"
     android:orientation="horizontal"
     android:layout_marginTop="260dp"
     android:layout_marginLeft="60dp"
     android:layout_marginRight="60dp">
     <TextView
         android:layout_width="wrap_content"
         android:layout_height="wrap_content"
         android:text="用户名"
         android:textSize="15sp"
         android:textColor="#000000"/>
     <EditText
         android:id="@+id/et_name_rg"
         android:layout_width="match_parent"
         android:layout_height="wrap_content"
         android:background="@null"
         android:gravity="center"/>
</LinearLayout>
     <View
         android:layout_width="match_parent"
         android:layout_height="2dp"
         android:background="#3700b3"
         android:layout_marginRight="60dp"
         android:layout_marginLeft="60dp"/>
     <LinearLayout
         android:layout_width="match_parent"
         android:layout_height="wrap_content"
         android:orientation="horizontal"
         android:layout_marginTop="20dp"
         android:layout_marginLeft="60dp"
         android:layout_marginRight="60dp">
         <TextView
             android:layout_width="wrap_content"
             android:layout_height="wrap_content"
             android:text="密 码"
             android:textSize="15sp"
             android:textColor="#000000"/>
         <EditText
             android:id="@+id/et_pwd_rg"
             android:layout_width="match_parent"
             android:layout_height="wrap_content"
             android:background="@null"
             android:gravity="center"/>
     </LinearLayout>
     <View
         android:layout_width="match_parent"
         android:layout_height="2dp"
         android:background="#3700b3"
         android:layout_marginRight="60dp"
         android:layout_marginLeft="60dp"/>
     <LinearLayout
         android:layout_width="match_parent"
         android:layout_height="wrap_content"
         android:orientation="horizontal"
         android:layout_marginTop="20dp"
         android:layout_marginLeft="60dp"
         android:layout_marginRight="60dp">
         <TextView
             android:layout_width="wrap_content"
             android:layout_height="wrap_content"
             android:text="邮 箱"
             android:textSize="15sp"
             android:textColor="#000000"/>
         <EditText
             android:id="@+id/et_email_rg"
             android:layout_width="match_parent"
             android:layout_height="wrap_content"
             android:background="@null"
             android:gravity="center"/>
     </LinearLayout>
     <View
         android:layout_width="match_parent"
         android:layout_height="2dp"
         android:background="#3700b3"
         android:layout_marginRight="60dp"
         android:layout_marginLeft="60dp"/>
     <LinearLayout
         android:layout_width="match_parent"
         android:layout_height="wrap_content"
         android:orientation="horizontal"
         android:layout_marginTop="20dp"
         android:layout_marginLeft="60dp"
         android:layout_marginRight="60dp">
         <TextView
             android:layout_width="wrap_content"
             android:layout_height="wrap_content"
             android:text="电 话"
             android:textSize="15sp"
             android:textColor="#000000"/>
         <EditText
             android:id="@+id/et_phone_rg"
             android:layout_width="match_parent"
             android:layout_height="wrap_content"
             android:background="@null"
             android:gravity="center"/>
     </LinearLayout>
     <View
         android:layout_width="match_parent"
         android:layout_height="2dp"
         android:background="#3700b3"
         android:layout_marginRight="60dp"
         android:layout_marginLeft="60dp"/>
     <Button
         android:id="@+id/bt_ok_rg"
         android:layout_width="match_parent"
         android:layout_height="wrap_content"
         android:text="注册"
         android:textSize="20sp"
         android:textColor="#ffffff"
         android:layout_marginLeft="60dp"
         android:layout_marginRight="60dp"
         android:background="@drawable/btn_style_one"
         android:layout_marginTop="40dp"/>
     <Button
         android:id="@+id/bt_cancel_rg"
         android:layout_width="match_parent"
         android:layout_height="wrap_content"
         android:text="取消"
         android:textSize="20sp"
         android:textColor="#000000"
         android:layout_marginLeft="60dp"
         android:layout_marginRight="60dp"
         android:background="@drawable/btn_style_two"
         android:layout_marginTop="20dp"/>
</LinearLayout>
4、创建数据库类文件 MyDBHelper.java
(1)建立一个 db 文件夹
(1)右键单击工程的包名——新建——Package——在目前已有包名的后面数据 db——OK。 便可在目前工程的包名下方出现了 db 文件夹,里面放置数据库类文件。
(2)在 db 文件夹中建立数据库类文件
选择 db——右击——新建——javaclass——输入类名:MyDBHelper——super class 中输入父类:SQLiteOpenHelper——单击 OK 按钮。
(3)数据库类文件代码
public class MyDBHelper extends SQLiteOpenHelper {
private static final String DBNAME="financial.db";
private static final int VERSION=1;
     public MyDBHelper(Context context) {
         super(context, DBNAME, null, VERSION);
     }
     //1 创建数据库
     @Override
     public void onCreate(SQLiteDatabase db) {
         //创建用户表
         db.execSQL("create table tb_userinfo(id integer primary key autoincrement,name varchar(10),pwd varchar(15),email varchar(50),phone varchar(11))");
     }
     //2 升级数据库
     @Override
     public void onUpgrade(SQLiteDatabase db, int oldVersion, int newVersion)
{
     }
}
5、注册界面类文件 RegisterActivity.java
public class RegisterActivity extends AppCompatActivity {
     //3 定义对象
     EditText et_name,et_pwd,et_email,et_phone;
     Button btn_register,btn_cancel;
     MyDBHelper mhelper;//创建一个数据库类文件
     SQLiteDatabase db;//创建一个可以操作的数据库对象
     @Override
     protected void onCreate(Bundle savedInstanceState) {
         super.onCreate(savedInstanceState);
         setContentView(R.layout.activity_register);
         //4 绑定控件
         initView();
         //5 注册按钮功能的实现
         btnRegister();
         //6 取消按钮功能的实现
         btnCancel();
     }
     //4 绑定控件--------代码
     private void initView() {
         et_name=findViewById(R.id.et_name_rg);
         et_pwd=findViewById(R.id.et_pwd_rg);
         et_email=findViewById(R.id.et_email_rg);
         et_phone=findViewById(R.id.et_phone_rg);
         btn_register=findViewById(R.id.bt_ok_rg);
         btn_cancel=findViewById(R.id.bt_cancel_rg);
         mhelper=new MyDBHelper(RegisterActivity.this);
         db=mhelper.getWritableDatabase();
     }
     //5 注册按钮功能的实现--------------------代码
     private void btnRegister() {
         btn_register.setOnClickListener(new View.OnClickListener() {
             @Override
             public void onClick(View v) {
                 //创建一个对象,用来封装一行数据
                 ContentValues values=new ContentValues();
                 values.put("name",et_name.getText().toString());//将输入的用户名放到 name 列
                 values.put("pwd",et_pwd.getText().toString());//将输入的密码放到 pwd 列
                 values.put("email",et_email.getText().toString());//将输入的邮箱放到 email 列
                 values.put("phone",et_phone.getText().toString());//将输入的电话放到 phone 列
                 //将封装好的一行数据保存到数据库的 tb_userinfo 表中
                 db.insert("tb_userinfo",null,values);
                 Toast.makeText(RegisterActivity.this,"注册成功",Toast.LENGTH_SHORT).show();
             }
         });
     }
     //6 取消按钮功能的实现-------------------代码
     private void btnCancel() {
         btn_cancel.setOnClickListener(new View.OnClickListener() {
             @Override
             public void onClick(View v) {
                 Intent intent=new Intent(RegisterActivity.this, LoginActivity.class);
                 startActivity(intent);
                 finish();
             }
         });
     }
}
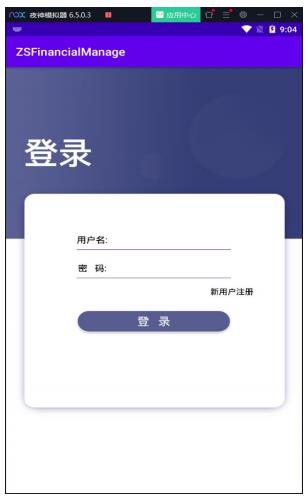
三、登陆界面
1、界面效果

2、登录界面布局 activity_login.xml
<?xml version="1.0" encoding="utf-8"?>
<LinearLayout
     xmlns:android="http://schemas.android.com/apk/res/android"
     xmlns:app="http://schemas.android.com/apk/res-auto"
     xmlns:tools="http://schemas.android.com/tools"
     android:layout_width="match_parent"
     android:layout_height="match_parent"
     android:orientation="vertical"
     android:background="@drawable/loginbg"
     tools:context=".view.LoginActivity">
     <LinearLayout
         android:layout_width="match_parent"
         android:layout_height="wrap_content"
         android:orientation="horizontal"
         android:layout_marginTop="260dp"
         android:layout_marginLeft="60dp"
         android:layout_marginRight="60dp">
         <TextView
             android:layout_width="wrap_content"
             android:layout_height="wrap_content"
             android:text="用户名"
             android:textSize="15sp"
             android:textColor="#000000"/>
         <EditText
             android:id="@+id/et_name_lg"
             android:layout_width="match_parent"
             android:layout_height="wrap_content"
             android:background="@null"
             android:gravity="center"/>
     </LinearLayout>
     <View
         android:layout_width="match_parent"
         android:layout_height="2dp"
         android:background="#3700b3"
         android:layout_marginRight="60dp"
         android:layout_marginLeft="60dp"/>
     <LinearLayout
         android:layout_width="match_parent"
         android:layout_height="wrap_content"
         android:orientation="horizontal"
         android:layout_marginTop="20dp"
         android:layout_marginLeft="60dp"
         android:layout_marginRight="60dp">
         <TextView
             android:layout_width="wrap_content"
             android:layout_height="wrap_content"
             android:text="密 码"
             android:textSize="15sp"
             android:textColor="#000000"/>
         <EditText
             android:id="@+id/et_pwd_lg"
             android:layout_width="match_parent"
             android:layout_height="wrap_content"
             android:background="@null"
             android:inputType="textPassword"
             android:gravity="center"/>
     </LinearLayout>
     <View
         android:layout_width="match_parent"
         android:layout_height="2dp"
         android:background="#3700b3"
         android:layout_marginRight="60dp"
         android:layout_marginLeft="60dp"/>
     <Button
         android:id="@+id/bt_newregister_lg"
         android:layout_width="wrap_content"
         android:layout_height="wrap_content"
         android:text="新用户注册"
         android:textSize="20sp"
         android:textColor="#000000"
         android:layout_marginLeft="60dp"
         android:layout_marginRight="60dp"
         android:background="@null"
         android:layout_marginTop="20dp"
         android:layout_gravity="right"/>
     <Button
         android:id="@+id/bt_login_lg"
         android:layout_width="match_parent"
         android:layout_height="wrap_content"
         android:text="登录"
         android:textSize="20sp"
         android:textColor="#ffffff"
         android:layout_marginLeft="60dp"
         android:layout_marginRight="60dp"
         android:background="@drawable/btn_style_one"
         android:layout_marginTop="40dp"/>
</LinearLayout>
3、登录界面类文件 LoginActivity.java
public class LoginActivity extends AppCompatActivity {
     //1 定义对象
     EditText et_name,et_pwd;
     Button btn_newregister,btn_login;
     MyDBHelper mhelper;
     SQLiteDatabase db;
     @Override
     protected void onCreate(Bundle savedInstanceState) {
         super.onCreate(savedInstanceState);
         setContentView(R.layout.activity_login);
         //2 绑定控件
         initView();
         //3 登录按钮功能的实现
         btnLogin();
         //4 新用户注册按钮功能的实现
         btnNewRegister();
     }
     //2 绑定控件--------------------代码
     private void initView() {
         et_name=findViewById(R.id.et_name_lg);
         et_pwd=findViewById(R.id.et_pwd_lg);
         btn_newregister=findViewById(R.id.bt_newregister_lg);
         btn_login=findViewById(R.id.bt_login_lg);
         mhelper=new MyDBHelper(LoginActivity.this);
         db=mhelper.getWritableDatabase();
     }
     //3 登录按钮功能的实现---------------------------代码
     private void btnLogin() {
         btn_login.setOnClickListener(new View.OnClickListener() {
             @Override
             public void onClick(View v) {
                 //首先:获取输入的用户名和密码
                 String inputname=et_name.getText().toString();
                 String inputpwd=et_pwd.getText().toString();
                 //其次:对获取的用户名和密码进行判断
                 if(inputname.equals("")||inputpwd.equals("")){//用户名或密码为空
                     Toast.makeText(LoginActivity.this,"用户名或密码不能为空",Toast.LENGTH_SHORT).show();
                 }else{//用户名或密码不为空时,我们再对输入的正确性进行判断。
                     // 根据输入的用户名和密码从数据库中查询
                     Cursor cursor =db.rawQuery("select * from tb_userinfo where name=? and pwd=?",new String[]{inputname,inputpwd});
                     //根据查询到的结果进行判断
                 if (cursor.moveToNext()){//查询到时
                     String getname=cursor.getString(cursor.getColumnIndex("name"));
                     String getpwd=cursor.getString(cursor.getColumnIndex("pwd"));

                if(inputname.equalsIgnoreCase(getname)&&inputpwd.equalsIgnoreCase(getpwd)){
                         Toast.makeText(LoginActivity.this,"用户名和密码正确,欢迎登陆",Toast.LENGTH_SHORT).show();
                         Intent intent=new Intent(LoginActivity.this, MainActivity.class);
                         startActivity(intent);
                        finish();
                     }
                 }else{//没有查询到结果时
                     Toast.makeText(LoginActivity.this,"用户名或密码错误,请重新输入",Toast.LENGTH_SHORT).show();
                     et_name.setText("");
                     et_pwd.setText("");
                     }
                 }
             }
         });
      }
     //4 新用户注册按钮功能的实现------------------------代码
     private void btnNewRegister() {
         btn_newregister.setOnClickListener(new View.OnClickListener()
    {
             @Override
             public void onClick(View v) {
                 Intent intent=new Intent(LoginActivity.this, RegisterActivity.class);
                 startActivity(intent);
                 finish();
             }
         });
     }
}
以上是关于理财通app的设计与实现的主要内容,如果未能解决你的问题,请参考以下文章
基于Android的家庭理财系统的设计与实现.rar(毕业论文+项目源码)
基于Android的家庭理财系统的设计与实现.rar(毕业论文设计+程序源码) android studio导入可直接打开
