springboot入门(项目搭建及基本配置)
Posted *King*
tags:
篇首语:本文由小常识网(cha138.com)小编为大家整理,主要介绍了springboot入门(项目搭建及基本配置)相关的知识,希望对你有一定的参考价值。
代码路径:
https://mp.csdn.net/mp_download/manage/download/UpDetailed
一、创建项目
1、先创建一个maven项目


删除不用的文件

2、再创建一个springboot项目

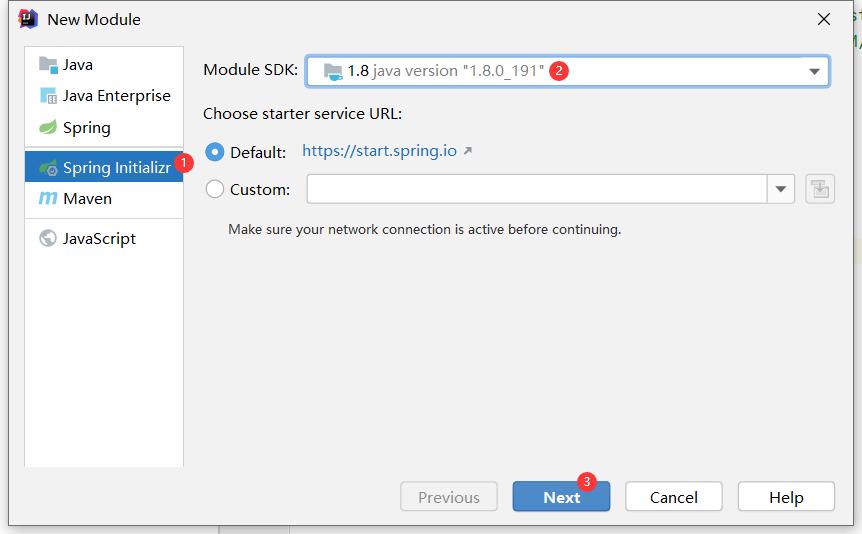
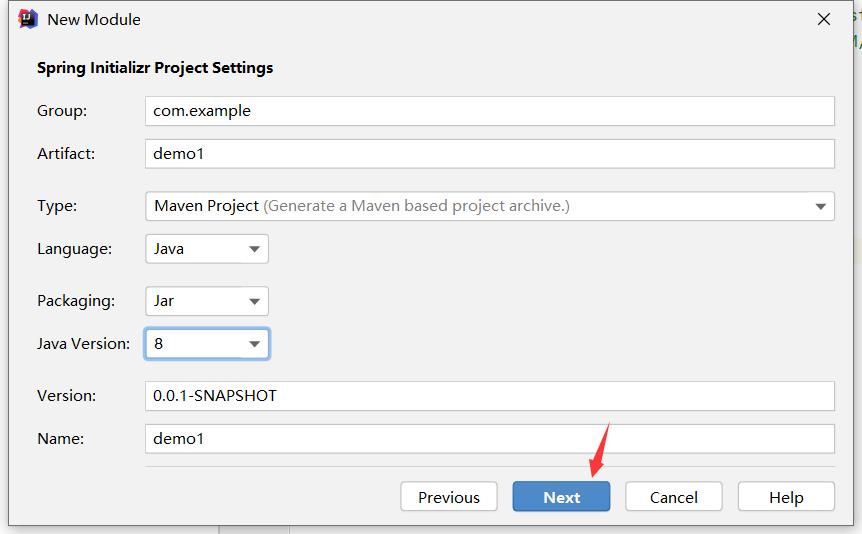

二、SpringBoot–配置属性
1、SpringBoot的配置
SpringBoot使用一个固定文件名做为全局的配置文件,用来修改SpringBoot自动配置的默认值
application.properties
application.yml
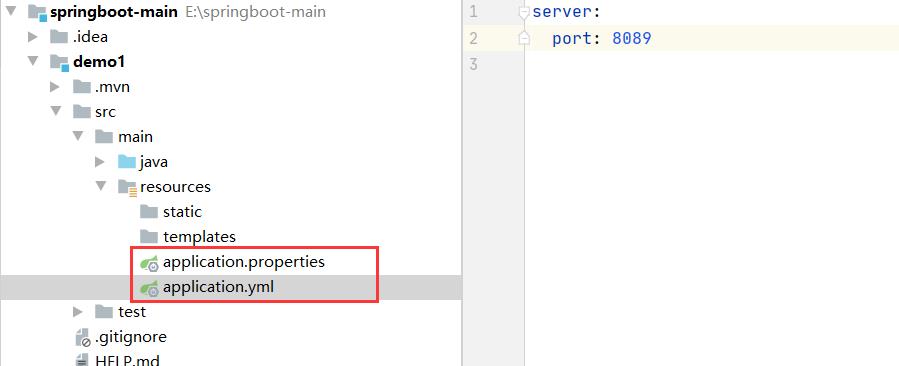
2、YAML语法
基本语法:k:(空格)v:表示一对键值对,值可以是数字,字符串,布尔,对象,Map等
字面量,键值对写法:
双引号:\\表示转义字符
name: "111\\n222"
相当于
name: 111换行222
单引号: \\表示一般字符
name: '111\\n222'
相当于
name: 111\\n222
对象、Map,键值对写法:
  dog:
    name: 小黑
    age: 2
数组(List、Set),键值对写法:
  lists:
    - user1
    - user2
    - user3
3、实战代码:
/**
 * 将配置文件中配置的每一个属性的值映射到这个组件中
 * @ConfigurationProperties:告诉SpringBoot将本类中的所有属性和配置文件中相关的配置进行绑定,默认从全局配置文件中获取值。
 * prefix = "person":读取配置application.yml中,前缀为person的对象的值。
 * @Component:把普通pojo实例化到spring容器中
 * 要使用@ConfigurationProperties功能,需要将类实例化到容器里面。
 * @author wanglu
 * @since 1.0, 2021/8/28 14:53
 */
@Data
@Component
@ConfigurationProperties(prefix = "person")
public class Person {
    private  String lastName;
    private Integer age;
    private Boolean boss;
    private Date birth;
    private Map<String,Object> maps;
    private List<Object> lists;
    private Dog dog;
}
/**
 * Dog类
 * @author <a href="mailto:wanglu@smartdot.com.cn">wanglu</a>
 * @since 1.0, 2021/8/28 15:09
 */
@Data
public class Dog {
    private String name;
    private  Integer age;
}
application.yml
person:
  lastName: 张三
  age: 18
  boss: false
  birth: 2019/02/05
  dog:
    name: 小黑
    age: 2
  lists:
    - user1
    - user2
    - user3
  maps: {k1: v1,k2: v2}
测试类:
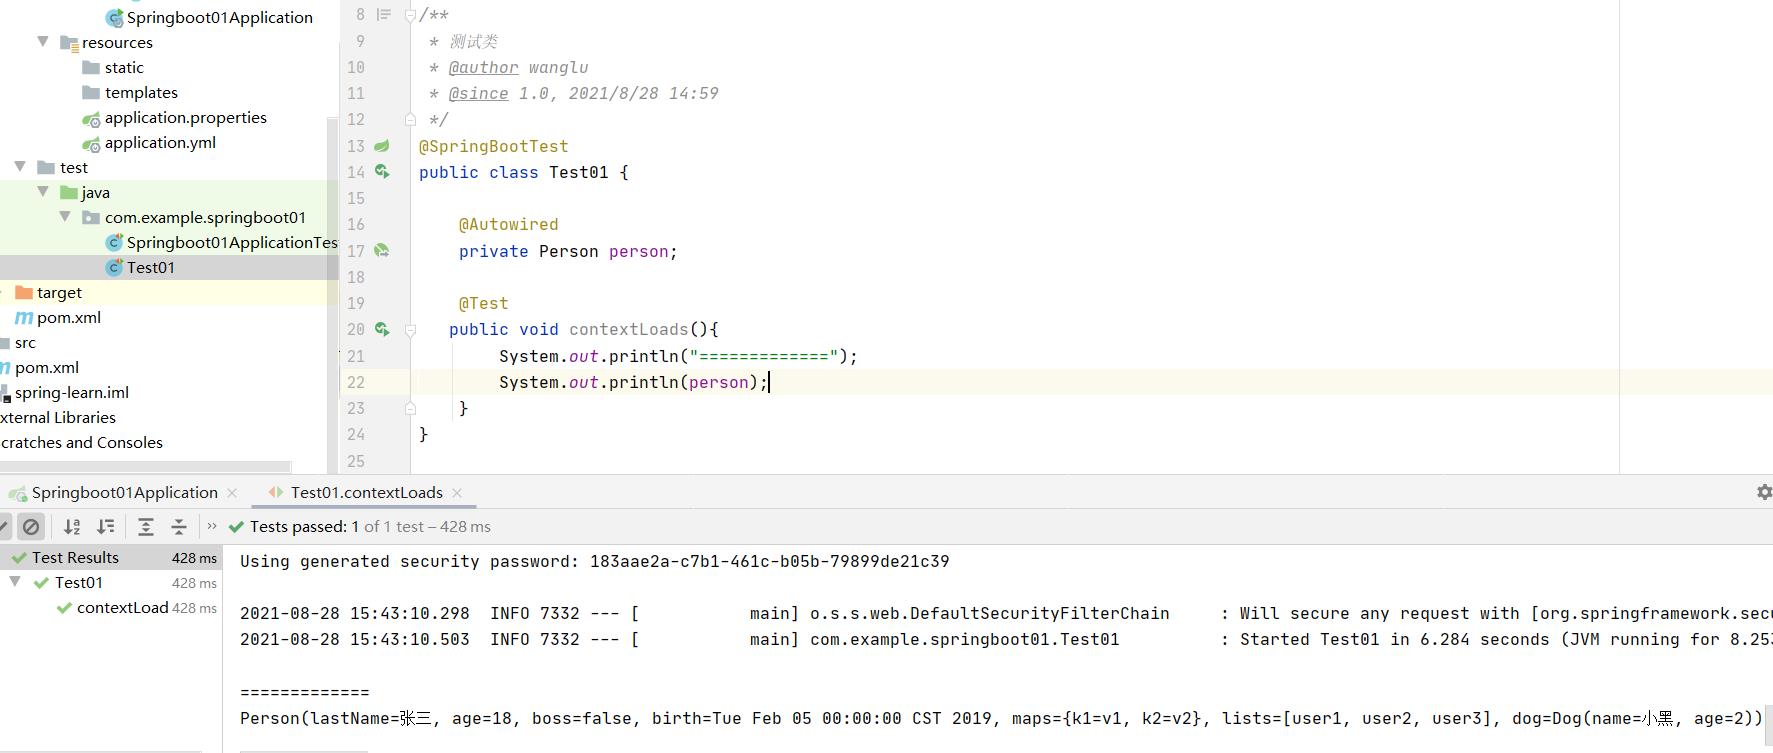
运行结果:
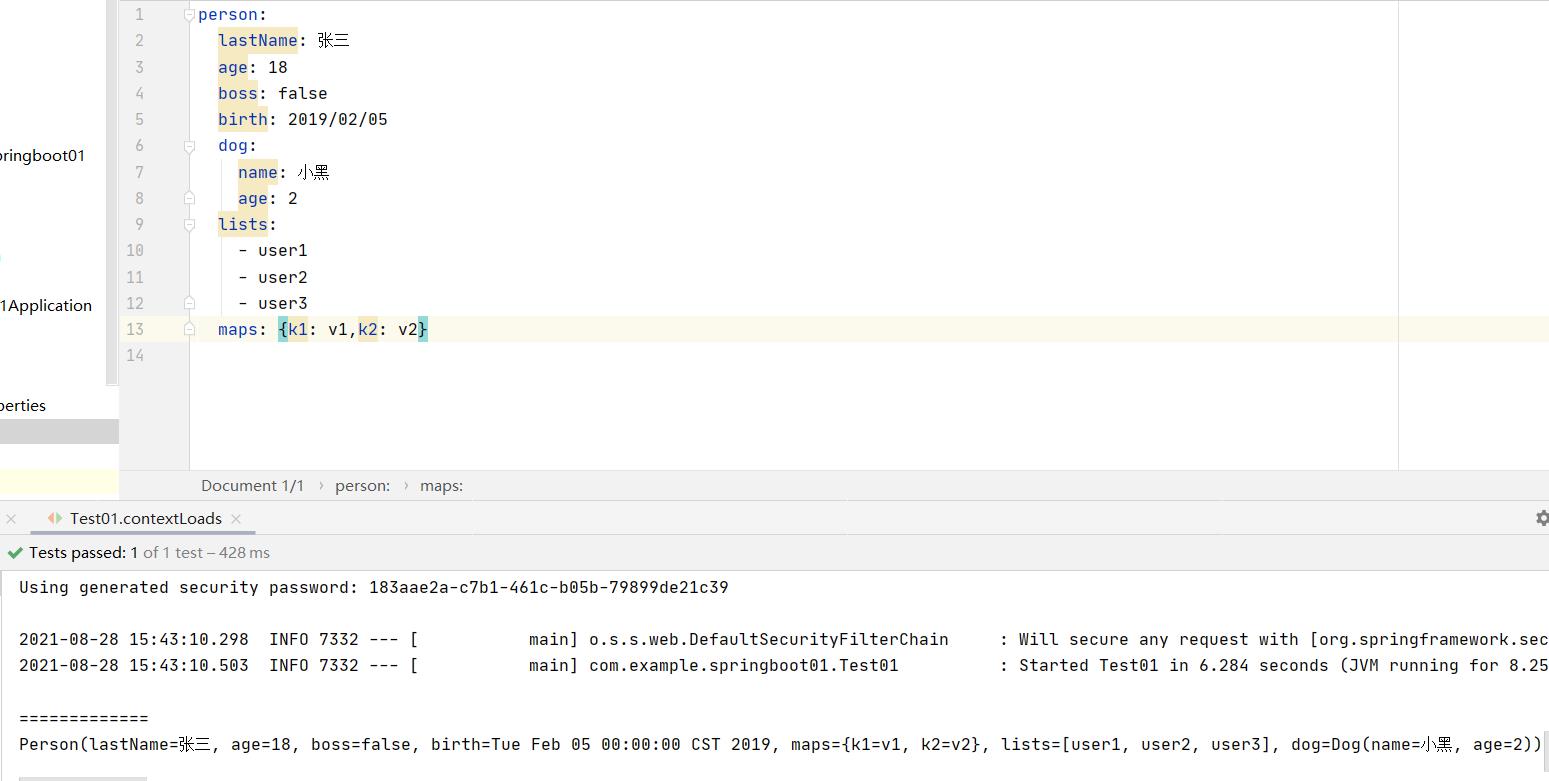
如果出现以下提示,则需要导入配置文件处理器依赖,使配置文件和代码进行绑定

[外链图片转存失败,源站可能有防盗链机制,建议将图片保存下来直接上传(img-JWTWZmE8-1630142803568)(springboot入门(项目搭建及基本配置).assets/image-20210828155202327.png)]
<!-- 导入配置文件处理器,配置文件进行绑定时会有提示-->
<dependency>
    <groupId>org.springframework.boot</groupId>
    <artifactId>spring-boot-configuration-processor</artifactId>
     <optional>true</optional>
</dependency>
导入jar包后,重启一下,就可以看到写配置文件的时候会有自动提示了
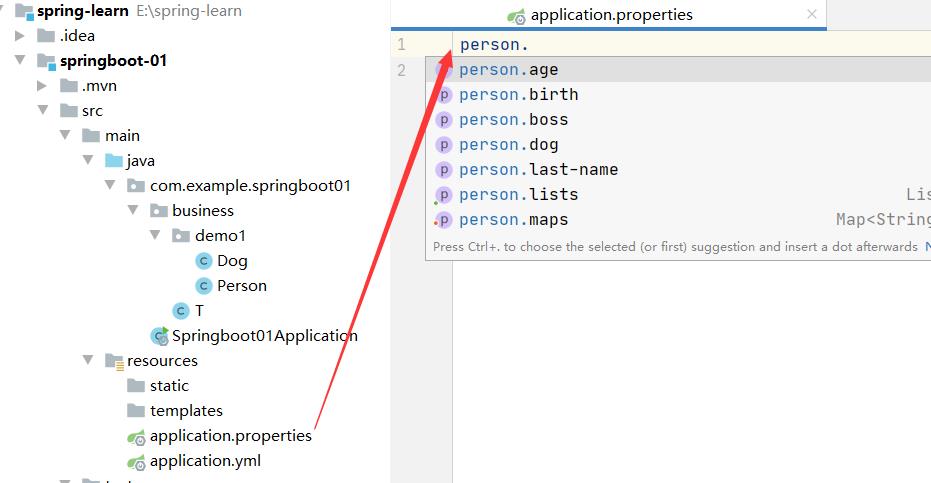
4、@Value的使用
给字段设置值
@Value与@ConfigurationProperties比较

写法:
value=“字面量”
value="${key}" //从环境变量、配置文件中获取值
value="#{SpEL}" //从表达式设置值
实践1:
@Data
@Component
public class Person2 {

    //字面量
    @Value("张三")
    private  String lastName;

    //#{SpEL}
    @Value("#{2+2}")
    private Integer age;

    //从配置文件中读取
    @Value("${person.boss}")
    private Boolean boss;
}
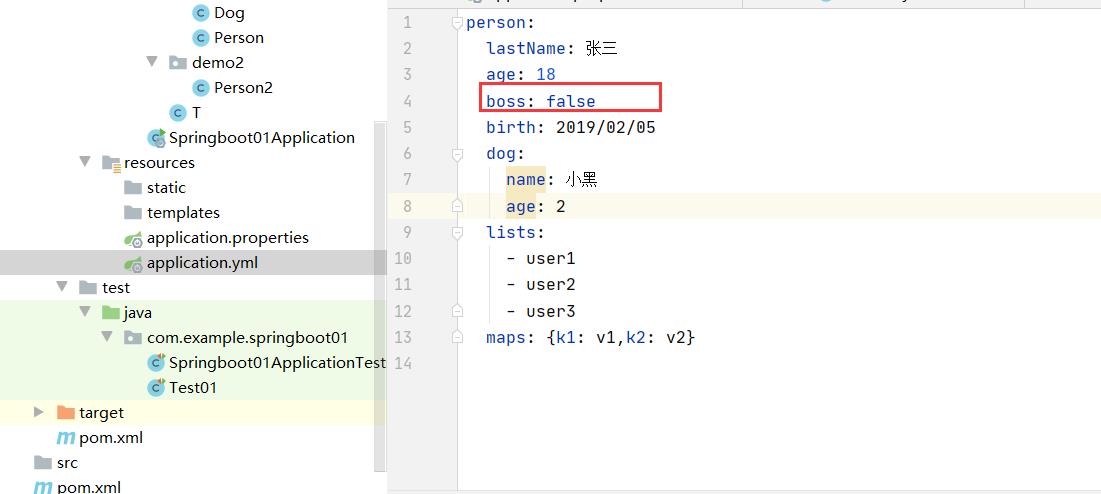
结果:

实践2:

代码:
import lombok.Data;
import org.springframework.beans.factory.annotation.Value;
import org.springframework.stereotype.Component;

@Data
@Component
public class Person3 {

    @Value("张小")
    private String lastName;

}
import org.springframework.beans.factory.annotation.Value;
import org.springframework.context.annotation.AnnotationConfigApplicationContext;
import org.springframework.context.annotation.ComponentScan;
import org.springframework.context.annotation.Configuration;
import org.springframework.context.annotation.PropertySource;
import org.springframework.core.io.Resource;

@Configuration
@ComponentScan("com.example.springboot01.business.demo3")
// 注入配置文件
@PropertySource("classpath:demo3/test.properties")
public class ElConfig {

    //常量
    @Value("111")
    private String normal;

    //注入操作系统属性
    @Value("#{systemProperties['os.name']}")
    private String osName;

    //注入表达式结果
    @Value("#{T(java.lang.Math).random()*100.00}")
    private Double randomNum;

    //注入其他bean属性
    @Value("#{person3.lastName}")
    private String lastName;

    //注入文件资源
    @Value("classpath:demo3/1.txt")
    private Resource testFile;

    //注入网站资源
    @Value("http://www.baidu.com")
    private Resource testUrl;

    //注入配置文件
    @Value("${book.name}")
    private String bookName;

    @Override
    public String toString() {
        return "ElConfig{" +
                "normal='" + normal + '\\'' +
                ", osName='" + osName + '\\'' +
                ", randomNum=" + randomNum +
                ", lastName='" + lastName + '\\'' +
                ", testFile=" + testFile +
                ", testUrl=" + testUrl +
                ", bookName='" + bookName + '\\'' +
                '}';
    }

    public static void main(String[] args) {
        AnnotationConfigApplicationContext context = new AnnotationConfigApplicationContext(ElConfig.class);
        ElConfig elConfig = context.getBean(ElConfig.class);
        System.out.println("-----");
        System.out.println(elConfig);
        context.close();
    }
}
1.txt
2222
test.properties
book.name=这是书名
结果:

5、@PropertySource:加载指定的配置文件,在配置类上设置
代码:

Person4
import lombok.Data;
import org.springframework.boot.context.properties.ConfigurationProperties;
import org.springframework.context.annotation.PropertySource;
import org.springframework.stereotype.Component;

@Data
@Component
@PropertySource("classpath:demo4/test4.properties")
@ConfigurationProperties(prefix = "person4")
public class Person4 {
    private String lastName;
    private Integer age;
    private Boolean boss;
}
test4.properties
person4.lastName=小小明
person4.age=15
person4.boss=true
结果:

6、@ImportResource:导入Spring的配置文件,让配置文件里面的内容生效;
代码:

在有@Component注解的地方加上@ImportResource导入Spring配置文件,这里直接在主程序上加上

import lombok.Data;

@Data
public class Dog5 {
    private String name;
    private Integer age;
}
bean.xml
<?xml version="1.0" encoding="UTF-8"?>
<beans xmlns="http://www.springframework.org/schema/beans"
       xmlns:xsi="http://www.w3.org/2001/XMLSchema-instance"
       xsi:schemaLocation="http://www.springframework.org/schema/beans http://www.springframework.org/schema/beans/spring-beans.xsd">


    <bean id="dog5" class="com.example.springboot01.business.demo5.Dog5">
        <property name="name" value="小小狗"></property>
        <property name="age" value="12"></property>
    </bean>
</beans>
结果:
Schema-instance"
xsi:schemaLocation=“http://www.springframework.org/schema/beans http://www.springframework.org/schema/beans/spring-beans.xsd”>
<bean id="dog5" class="com.example.springboot01.business.demo5.Dog5">
    <property name="name" value="小小狗"></property>
    <property name="age" value="12"></property>
</bean>
结果:

以上是关于springboot入门(项目搭建及基本配置)的主要内容,如果未能解决你的问题,请参考以下文章
创建Spring boot入门项目 在项目中,如何用浏览器所写代码
SpringBoot入门基础:构建SpringBoot项目及启动器讲解
SpringBoot.01.SpringBoot概述及基本环境搭建
SpringBoot.01.SpringBoot概述及基本环境搭建