OpenCV-Python实战(番外篇)——OpenCV中绘制模拟时钟显示当前时间
Posted 盼小辉丶
tags:
篇首语:本文由小常识网(cha138.com)小编为大家整理,主要介绍了OpenCV-Python实战(番外篇)——OpenCV中绘制模拟时钟显示当前时间相关的知识,希望对你有一定的参考价值。
OpenCV-Python实战(番外篇)——OpenCV中绘制模拟时钟显示当前时间
前言
我们已经在《OpenCV-Python实战(3)——OpenCV中绘制图形与文本》学习了如何使用 OpenCV 绘制图形和文本。在本番外篇中,将进一步利用所学的绘图函数,学习如何在实战项目中使用绘图,绘制模拟时钟显示当前时间。
模拟时钟外观
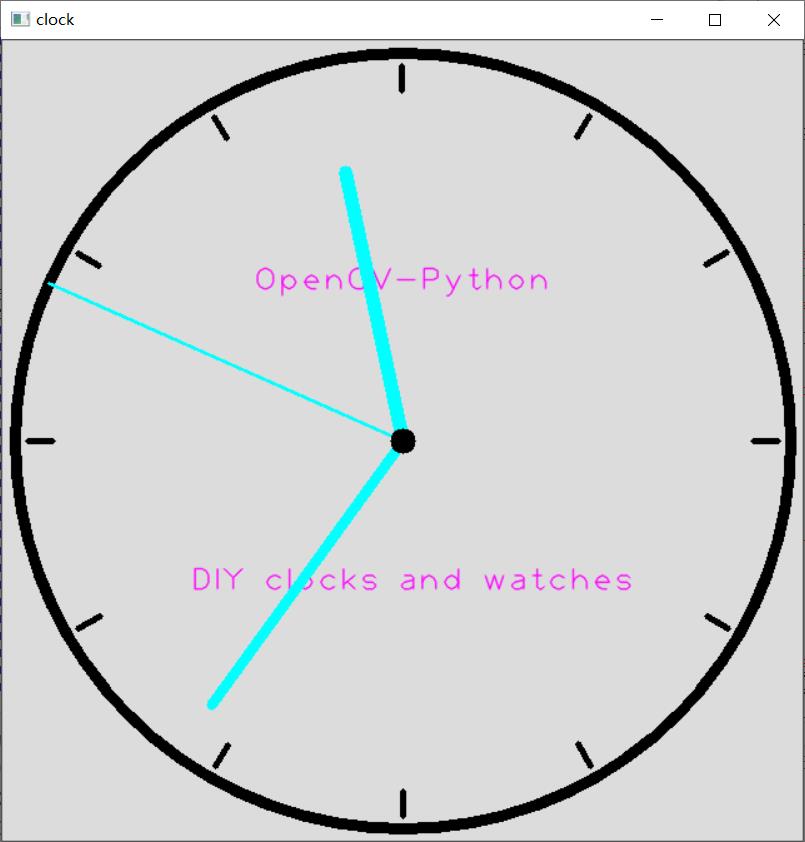
结合《OpenCV-Python实战(3)——OpenCV中绘制图形与文本》中讲解的 OpenCV 中的绘图函数(例如,cv2.line()、cv2.circle()和 cv2.putText() 等),以渲染更高级的绘图,同时更好的理解和实际运用所了解的绘图函数。为了将所有绘图函数进行综合运用,构建一个模拟时钟来显示当前时间——包括时针、分针和秒针。
为了实现上述需求,编写 clock_appearance.py 脚本。clock_appearance.py 脚本使用 cv.line() 、 cv.circle() 和 cv2.putText() 绘制模拟时钟,首先绘制静态时钟外观,我们需要两个包含固定坐标的数组(至于这些数组是如何计算得到的,将在下一小节中介绍):
hours_orig = np.array([(620,320), (580, 470), (470, 580), (320, 620), (170, 580), (60, 470), (20, 320), (60, 170), (169, 61), (319, 20), (469, 60), (579, 169)])
hours_dest = np.array([(600,320), (563, 460), (460, 562), (320, 600), (180, 563), (78, 460), (40, 320), (77, 180), (179, 78), (319, 40), (459, 77), (562, 179)])
这些数组是渲染小时刻度所必需的,因为它们定义了时钟每小时的刻度线条。数组定义完成后,将这些刻度进行绘制:
for i in range(0, 12):
    cv2.line(image, array_to_tuple(hours_orig[i]), array_to_tuple(hours_dest[i]), colors['black'], 3)
此外,还应该绘制了一个大圆圈,对应于模拟时钟表盘的形状:
cv2.circle(image, (320, 320), 310, colors['black'], 8)
最后,在时钟内绘制文本,进行个性化定制:
cv2.rectangle(image, (150, 175), (490, 270), colors['dark_gray'], -1)
cv2.putText(image, "Mastering OpenCV 4", (150, 200), 1, 2, colors['light_gray'], 1, cv2.LINE_AA)
cv2.putText(image, "with Python", (210, 250), 1, 2, colors['light_gray'], 1, cv2.LINE_AA)
一旦在图像中绘制了这些静态信息,我们将其复制到 image_original 图像中:
image_original = image.copy()
在下图中,可以看到模拟时钟的外观:

计算时针刻度 hours_orig 和 hours_dest 数组
为了计算计算时针刻度 hours_orig 和 hours_dest 数组,我们编写 clock_hours.py 计算 hours_orig 和 hours_dest 数组的固定坐标。为了计算小时刻度的 (x, y) 坐标,我们使用圆的参数方程:
{
x
=
x
0
+
r
∗
c
o
s
(
t
)
,
0
≤
t
≤
2
π
y
=
y
0
+
r
∗
s
i
n
(
t
)
,
0
≤
t
≤
2
π
\\begin{cases} x=x_0+r*cos(t), & \\text{$0 \\le t \\le 2\\pi$} \\\\ y=y_0+r*sin(t), & \\text{$0 \\le t \\le 2\\pi$} \\end{cases}
{x=x0+r∗cos(t),y=y0+r∗sin(t),0≤t≤2π0≤t≤2π
按照上述公式计算从 0 度开始每隔 30 度为一个时针刻度,共 12 个点 P(x, y) 的坐标( 0、30、60、90、120、150、180、210、240、270、300 和 330 ),为了获取两个端点的坐标,我们具有两个不同的半径。这样,我们就可以得到时针刻度线的坐标:
radius = 300
center = (320, 320)

for x in (0, 30, 60, 90, 120, 150, 180, 210, 240, 270, 300, 330):
    x_coordinate = center[0] + radius * math.cos(x * 3.14 / 180)
    y_coordinate = center[1] + radius * math.sin(x * 3.14 / 180)
    print("x: {} y: {}".format(round(x_coordinate), round(y_coordinate)))

print("----------------------")

for x in (0, 30, 60, 90, 120, 150, 180, 210, 240, 270, 300, 330):
    x_coordinate = center[0] + (radius - 20) * math.cos(x * 3.14 / 180)
    y_coordinate = center[1] + (radius - 20) * math.sin(x * 3.14 / 180)
    print("x: {} y: {}".format(round(x_coordinate), round(y_coordinate)))
使用模拟时钟显示当前时间
得到表盘外观后,接下来就要使用模拟时钟显示当前时间:
- 从当前时间获取小时、分钟和秒:
date_time_now = datetime.datetime.now() time_now = date_time_now.time() hour = math.fmod(time_now.hour, 12) minute = time_now.minute second = time_now.second - 将时、分和秒都转换为角度,用于接下来指针线段的绘制:
second_angle = math.fmod(second * 6 + 270, 360) minute_angle = math.fmod(minute * 6 + 270, 360) hour_angle = math.fmod((hour*30) + (minute/2) + 270, 360) - 绘制与时针、分针和秒针对应的线段:
second_x = round(320 + 310 * math.cos(second_angle * 3.14 / 180)) second_y = round(320 + 310 * math.sin(second_angle * 3.14 / 180)) cv2.line(image, (320, 320), (second_x, second_y), colors['cyan'], 2) minute_x = round(320 + 260 * math.cos(minute_angle * 3.14 / 180)) minute_y = round(320 + 260 * math.sin(minute_angle * 3.14 / 180)) cv2.line(image, (320, 320), (minute_x, minute_y), colors['cyan'], 8) hour_x = round(320 + 220 * math.cos(hour_angle * 3.14 / 180)) hour_y = round(320 + 220 * math.sin(hour_angle * 3.14 / 180)) cv2.line(image, (320, 320), (hour_x, hour_y), colors['cyan'], 10) - 最后绘制一个小圆圈作为三根指针的连接点:
cv2.circle(image, (320, 320), 10, colors['dark_gray'], -1)
clock_appearance.py 完整代码
clock_appearance.py 脚本完整代码如下:
import cv2
import numpy as np
import datetime
import math

def array_to_tuple(arr):
    return tuple(arr.reshape(1, -1)[0])

colors = {'blue': (255, 0, 0), 'green': (0, 255, 0), 'red': (0, 0, 255), 'yellow': (0, 255, 255),
          'magenta': (255, 0, 255), 'cyan': (255, 255, 0), 'white': (255, 255, 255), 'black': (0, 0, 0),
          'gray': (125, 125, 125), 'rand': np.random.randint(0, high=256, size=(3,)).tolist(),
          'dark_gray': (50, 50, 50), 'light_gray': (220, 220, 220)}

# 创建画布
image = np.zeros((640, 640, 3), dtype="uint8")
# 背景色
image[:] = colors['light_gray']

# 定义时针刻度数组
hours_orig = np.array(
    [(620, 320), (580, 470), (470, 580), (320, 620), (170, 580), (60, 470), (20, 320), (60, 170), (169, 61), (319, 20),
     (469, 60), (579, 169)])

hours_dest = np.array(
    [(600, 320), (563, 460), (460, 562), (320, 600), (180, 563), (78, 460), (40, 320), (77, 180), (179, 78), (319, 40),
     (459, 77), (562, 179)])

# 绘制时针刻度
for i in range(0, 12):
    cv2.line(image, array_to_tuple(hours_orig[i]), array_to_tuple(hours_dest[i]), colors['black'], 3)

# 绘制表盘
cv2.circle(image, (320, 320), 310, colors['black'], 8)

cv2.putText(image, "OpenCV-Python", (200, 200), 1, 1.8, colors['magenta'], 1, cv2.LINE_AA)
cv2.putText(image, "DIY clocks and watches", (150, 440), 1, 1.8, colors['magenta'], 1, cv2.LINE_AA)

image_original = image.copy()

# 模拟时钟显示当前时间
while True:
    date_time_now = datetime.datetime.now()
    # 获取当前时间
    time_now = date_time_now.time()
    # 计算当前时分秒
    hour = math.fmod(time_now.hour, 12)
    minute = time_now.minute
    second = time_now.second

    print("hour:'{}' minute:'{}' second: '{}'".format(hour, minute, second))

    # 获取时、分、秒角度
    second_angle = math.fmod(second * 6 + 270, 360)
    minute_angle = math.fmod(minute * 6 + 270, 360)
    hour_angle = math.fmod((hour * 30) + (minute / 2) + 270, 360)

    print("hour_angle:'{}' minute_angle:'{}' second_angle: '{}'".format(hour_angle, minute_angle, second_angle))

    # 绘制时针
    second_x = round(320 + 310 * math.cos(second_angle * 3.14 / 180))
    second_y = round(320 + 310 * math.sin(second_angle * 3.14 / 180))
    cv2.line(image, (320, 320), (second_x, second_y), colors['cyan'], 2)

    # 绘制分针
    minute_x = round(320 + 260 * math.cos(minute_angle * 3.14 / 180))
    minute_y = round(320 + 260 * math.sin(minute_angle * 3.14 / 180))
    cv2.line(image, (320, 320), (minute_x, minute_y), colors['cyan'], 8)

    # 绘制秒针
    hour_x = round(320 + 220 * math.cos(hour_angle * 3.14 / 180))
    hour_y = round(320 + 220 * math.sin(hour_angle * 3.14 / 180<以上是关于OpenCV-Python实战(番外篇)——OpenCV中绘制模拟时钟显示当前时间的主要内容,如果未能解决你的问题,请参考以下文章