java学习---Spring Cloud Config分布式配置中心
Posted 易小顺
tags:
篇首语:本文由小常识网(cha138.com)小编为大家整理,主要介绍了java学习---Spring Cloud Config分布式配置中心相关的知识,希望对你有一定的参考价值。
Spring-Cloud-Config 分布式配置
1、简介
1.1、问题
- 在分布式系统中,由于服务数量非常多,配置文件分散在不同的微服务项目中,管理不方便。
- 为了方便配置文件的集中管理,需要分布式配置中心组件。
- 在 Spring Cloud 中,提供了
Spring Cloud Config,它支持配置文件放在配置服务的本地,也支持放在远程Git仓库(GitHub、码云)。 - 本地通过
bootstrap.yml进行整体系统的配置,仓库添加application.yml作为应用的配置,可更改。
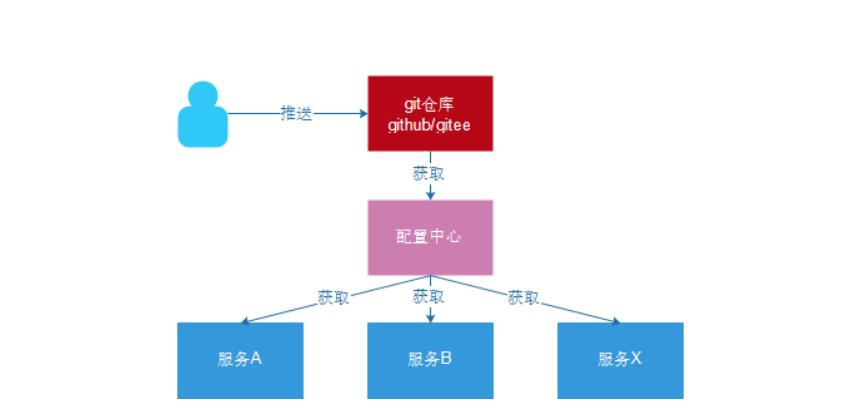
1.2、服务架构
配置中心本质上也是一个微服务,同样需要注册到 Eureka 服务注册中心。
1.3、仓库
知名的Git远程仓库有国外的 GitHub 和国内的 码云(gitee)。但是使用GitHub时,国内的用户经常遇到的问题是访 问速度太慢,有时候还会出现无法连接的情况。如果希望体验更好一些,可以使用国内的Git托管服务——码云 (gitee.com)。
与GitHub相比,码云也提供免费的Git仓库。此外,还集成了代码质量检测、项目演示等功能。 对于团队协作开发,码云还提供了项目管理、代码托管、文档管理的服务。本章中使用的远程Git仓库是码云。
码云访问地址:https://gitee.com/
2、仓库创建
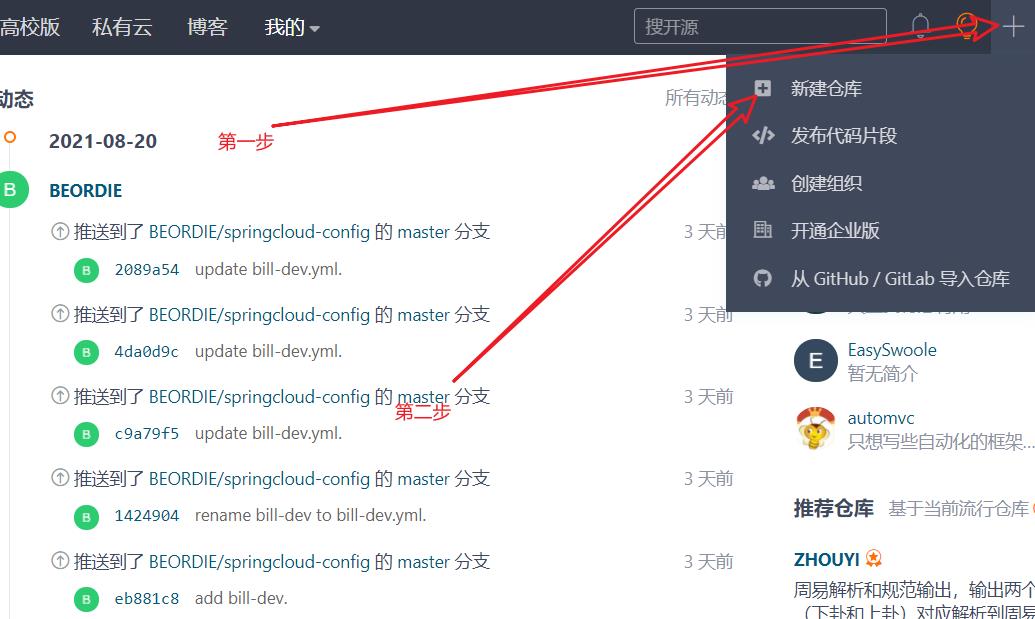
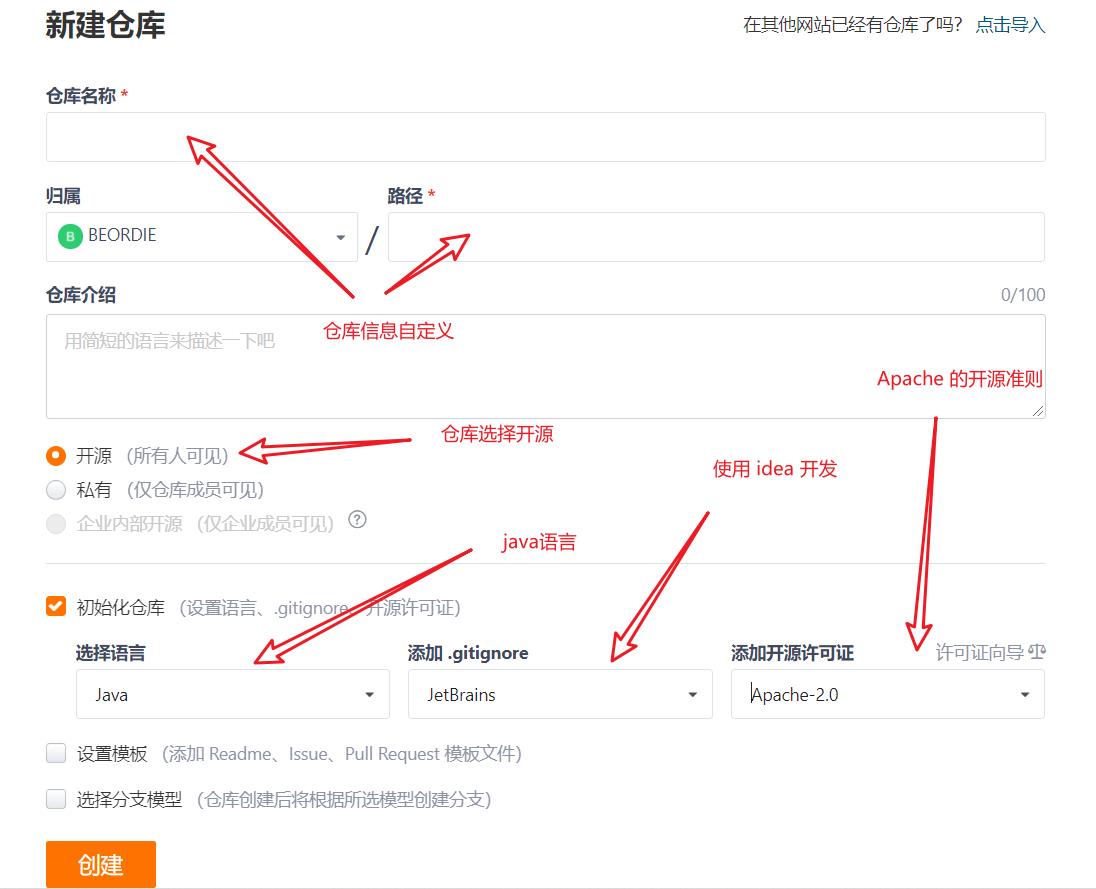
2.1、创建远程仓库
首先要使用码云上的私有远程 git 仓库需要先注册帐号;请先自行访问网站并注册帐号,然后使用帐号登录码云控制台并创建公开仓库。
2.2、创建配置文件
在新建的仓库中创建需要被统一配置管理的配置文件。
配置文件的命名方式:{application}-{profile}.yml 或 {application}-{profile}.properties
-
application为应用名称;
-
profile用于区分开发环境,测试环境、生产环境等。
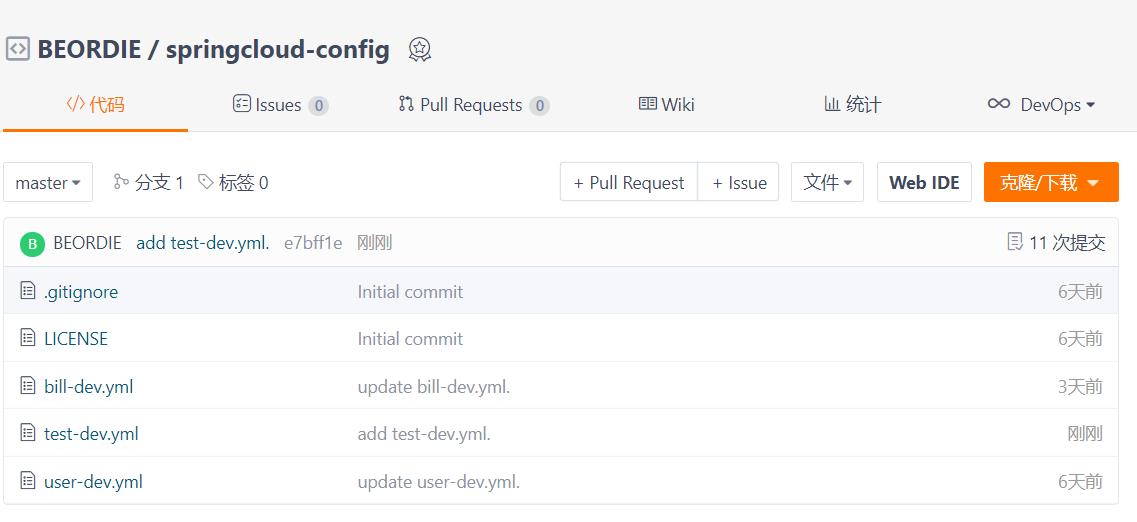
如 user-dev.yml,表示用户微服务开发环境下使用的配置文件。创建完文件之后将配置信息填充到文件中,填写格式满足对应的配置问价的格式。
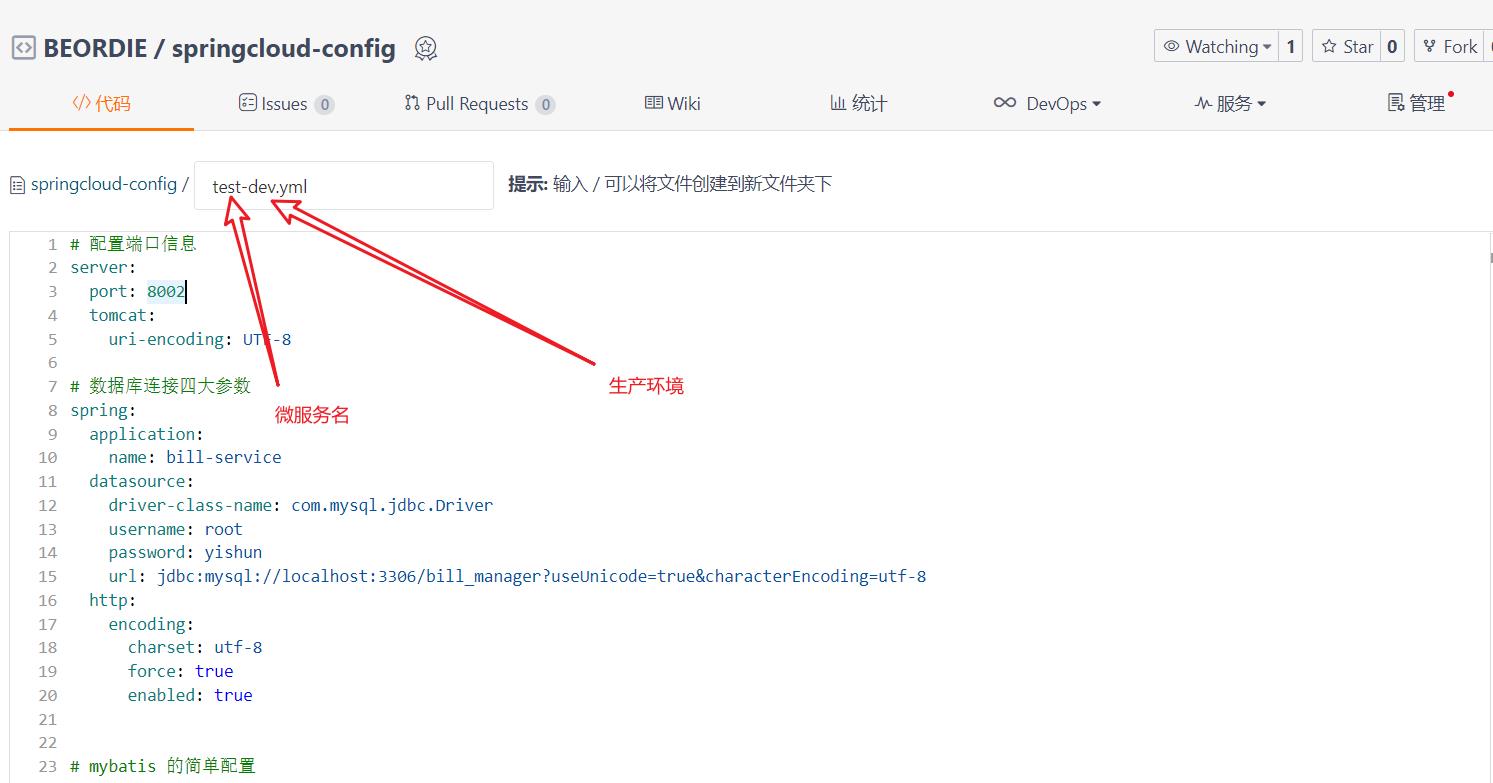
- 创建完文件的仓库
3、搭建配置中心微服务
添加子模块 config-server 模块名自定义,没有要求,见名知意。
3.1、添加项目依赖
<?xml version="1.0" encoding="UTF-8"?>
<project xmlns="http://maven.apache.org/POM/4.0.0"
         xmlns:xsi="http://www.w3.org/2001/XMLSchema-instance"
         xsi:schemaLocation="http://maven.apache.org/POM/4.0.0 http://maven.apache.org/xsd/maven-4.0.0.xsd">
    <parent>
        <artifactId>bill-manager-springCloud</artifactId>
        <groupId>com.beordie</groupId>
        <version>1.0-SNAPSHOT</version>
    </parent>
    <modelVersion>4.0.0</modelVersion>

    <artifactId>config-server</artifactId>

    <dependencies>
        <dependency>
            <groupId>org.springframework.cloud</groupId>
            <artifactId>spring-cloud-starter-netflix-eureka-client</artifactId>
        </dependency>
        <dependency>
            <groupId>org.springframework.cloud</groupId>
            <artifactId>spring-cloud-config-server</artifactId>
        </dependency>

        <!--中间件-->
        <dependency>
            <groupId>org.springframework.cloud</groupId>
            <artifactId>spring-cloud-bus</artifactId>
        </dependency>
        <dependency>
            <groupId>org.springframework.cloud</groupId>
            <artifactId>spring-cloud-stream-binder-rabbit</artifactId>
        </dependency>

    </dependencies>

</project>
3.2、配置启动类
除了添加正常的 boot 启动注解外还需要添加 配置中心服务 的注解。
package com.beordie;

import org.springframework.boot.SpringApplication;
import org.springframework.boot.autoconfigure.SpringBootApplication;
import org.springframework.cloud.config.server.EnableConfigServer;

/**
 * @Description
 * @Date 2021/8/20 8:19
 * @Created 30500
 */
@SpringBootApplication
@EnableConfigServer
public class Application {
    public static void main(String[] args) {
        SpringApplication.run(Application.class, args);
    }
}
3.3、添加配置文件
# 配置端口信息
server:
  port: 12000

spring:
  application:
    name: config-server
  cloud:
    config:
      server:
        git:
          uri: https://gitee.com/BeOrDie/springcloud-config

eureka:
  client:
    service-url:
      defaultZone: http://127.0.0.1:10086/eureka

management:
  endpoints:
    web:
      exposure:
        # 暴露触发消息总线的地址
        include: bus-refresh
uri 中填写的是仓库的地址。
3.4、启动测试
启动eureka 注册中心 和 配置中心,然后访问http://localhost:12000/test-dev.yml ,查看能否输出在码云存储管理的 user-dev.yml 文件。并且可以在 gitee上 修改 user-dev.yml 然后刷新上述测试地址也能及时到最新数据。
4、获取配置中心配置文件
前面已经完成了配置中心微服务的搭建,下面我们就需要改造一下具体的微服务,配置文件信息不再由微服务项目提供,而是从配置中心获取。
4.1、添加依赖
<dependency>
     <groupId>org.springframework.cloud</groupId>
     <artifactId>spring-cloud-starter-config</artifactId>
</dependency>
4.2、修改配置
删除本地的 application.yml 文件,添加 bootstrap.yml 文件并填写配置信息。
# 配置端口信息
spring:
  cloud:
    config:
      name: bill # 配置文件的application
      profile: dev # 配置文件的profile
      lable: master # 仓库所属的分支
      discovery:
        enabled: true
        service-id: config-server # 指定配置中心的服务名

eureka:
  client:
    service-url:
      defaultZone: http://127.0.0.1:10086/eureka
application.yml和bootstrap.yml虽然都是Spring Boot的默认配置文件,但是定位却不相同。bootstrap.yml可以理解成系统级别的一些参数配置,这些参数一般是不会变动的。application.yml可以用来定义应用级别 的参数,如果搭配 spring cloud config 使用,application.yml 里面定义的文件可以实现动态替换。
4.3、启动测试
启动注册中心 eureka-server 、配置中心 config-server 、用户服务 billr-service ,如果启动没有报错其实已经 使用上配置中心内容,可以到注册中心查看,也可以检验 user-service 的服务。
5、Spring Cloud Bus服务总线
- 前面已经完成了将微服务中的配置文件集中存储在远程Git仓库,并且通过配置中心微服务从Git仓库拉取配置文 件, 当用户微服务启动时会连接配置中心获取配置信息从而启动用户微服务。
- 但是现在存在一个问题就是我们在更新配置中心的文件之后,服务内部加载的配置文件并不会进行改变,也就是我们必须重启服务才会重新拉取配置中心的配置文件。
5.1、Spring Cloud Bus简介
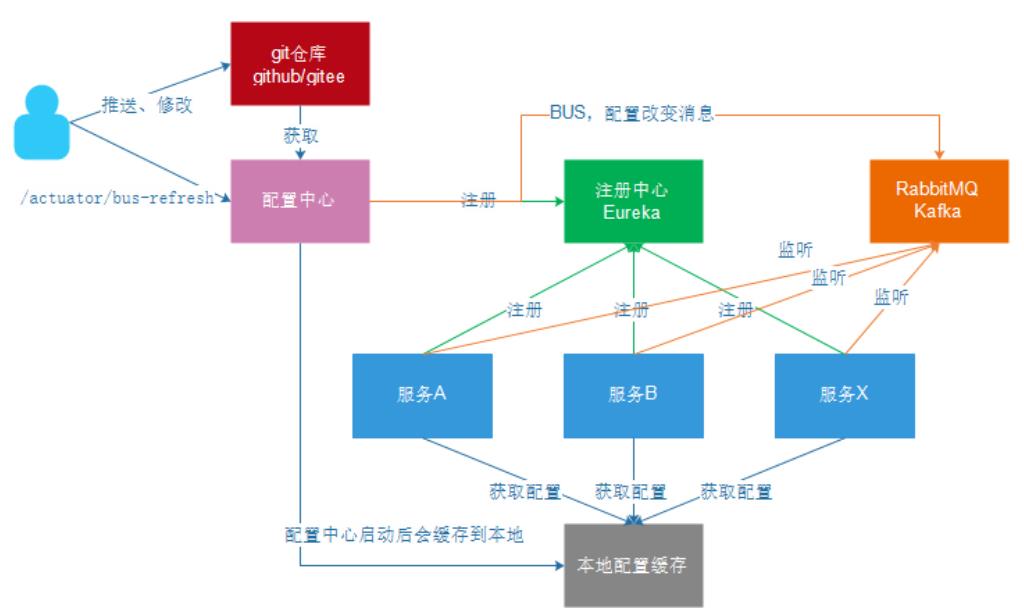
Spring Cloud Bus 是用轻量的消息代理将分布式的节点连接起来,可以用于广播配置文件的更改或者服务的监控管理。也就是消息总线可以为微服务做监控,也可以实现应用程序之间相互通信。
-
Spring Cloud Bus可选的消息代理有
RabbitMQ和Kafka,我们这里使用RabbitMQ作为中间件。 -
添加
bus后:
5.2、消息中间件的准备
-
要使用
RabbitMQ需要安装一下文件信息,安装 otp_win64_23.0.exe 和 rabbitmq-server-3.8.5.exe 用于服务的支持。 -
配置中心添加相关的
jar依赖:<!--中间件--> <dependency> <groupId>org.springframework.cloud</groupId> <artifactId>spring-cloud-bus</artifactId> </dependency> <dependency> <groupId>org.springframework.cloud</groupId> <artifactId>spring-cloud-stream-binder-rabbit</artifactId> </dependency> -
配置中心添加消息总线的地址,用于文件更新时刷新通知:
management: endpoints: web: exposure: # 暴露触发消息总线的地址 include: bus-refresh -
配置文件的使用服务添加
jar依赖:<dependency> <groupId>org.springframework.cloud</groupId> <artifactId>spring-cloud-bus</artifactId> </dependency> <dependency> <groupId>org.springframework.cloud</groupId> <artifactId>spring-cloud-stream-binder-rabbit</artifactId> </dependency> <dependency> <groupId>org.springframework.boot</groupId> <artifactId>spring-boot-starter-actuator</artifactId> </dependency> -
同时在配置中心和抓取配置的服务配置文件中添加配置信息(配置中心在本地添加,服务的配置文件在
gitee仓库中更改):spring: # 配置rabbitmq信息;如果是都与默认值一致则不需要配置 rabbitmq: host: localhost port: 5672 username: guest password: guest
5.3、测试
- 在具体的服务模块中,添加
@RefreshScope注解声明刷新配置。 - 依次启动 服务中心、 配置中心、服务提供模块,然后更改
gitee仓库中的配置文件。 - 使用 Postman 工具发送
POST方式请求访问地址http://127.0.0.1:12000/actuator/bus-refresh, 此址的作用是访问配置中心的消息总线服务,消息总线服务接收到请求后会向消息队列中发送消息,各个微服务会监听消息队列。 - 当微服务接收到队列中的消息后,会重新从配置中心获取最新的配置信息,达到文件的更改同步。
以上是关于java学习---Spring Cloud Config分布式配置中心的主要内容,如果未能解决你的问题,请参考以下文章
分布式配置中心config-client配置报错:java.lang.IllegalStateException: duplicate key: spring
java B2B2C Springcloud电子商城系统-Spring Cloud学习
Spring Cloud Alibaba 学习记录 - Sentinel