一步一步手写实现实时监测物体YOLO v3 EASY METHOD | OpenCV Python CNN卷积神经网络
Posted 架构师易筋
tags:
篇首语:本文由小常识网(cha138.com)小编为大家整理,主要介绍了一步一步手写实现实时监测物体YOLO v3 EASY METHOD | OpenCV Python CNN卷积神经网络相关的知识,希望对你有一定的参考价值。
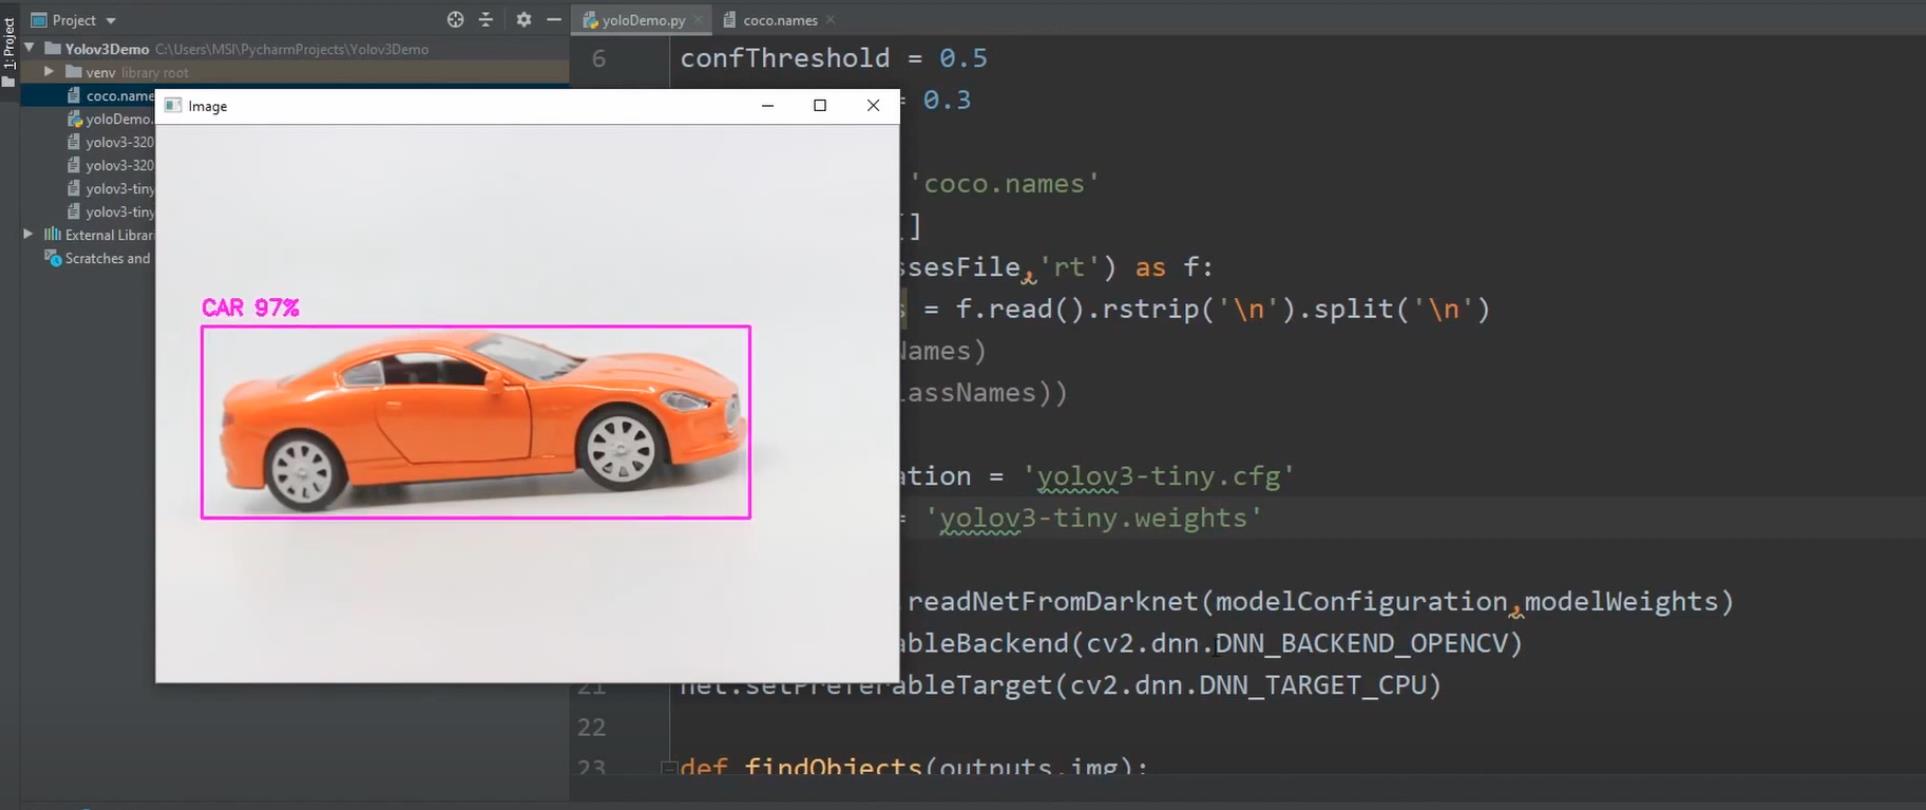
先看程序实现效果

1. 设置环境
IDE:PyCharm
Python:3.8
新建 project: Yolov3

安装依赖 Package, (路径: 菜单 PyCharm > Preferences > Project: Yolov3 > Python Interpreter)
- numpy
- opencv-python

2. 下载对象名字coco.names, 参数文件cfg,和权重文件 weights
coco.names 下载
https://github.com/pjreddie/darknet/blob/master/data/coco.names
cfg和weights,这里会下载两套,一套是精准预测YOLOv3-320,一套是速度比较快不那么精准YOLOv3-tiny。 下载请点击下面的链接,注意名字要命名为
- yolov3-320.cfg
- yolov3-320.weights
- yolov3-tiny.cfg
- yolov3-tiny.weights
| Model | Train | Test | mAP | FLOPS | FPS | Cfg | Weights |
|---|---|---|---|---|---|---|---|
| YOLOv3-320 | COCO trainval | test-dev | 51.5 | 38.97 Bn | 45 | cfg | weights |
| YOLOv3-416 | COCO trainval | test-dev | 55.3 | 65.86 Bn | 35 | cfg | weights |
| YOLOv3-608 | COCO trainval | test-dev | 57.9 | 140.69 Bn | 20 | cfg | weights |
| YOLOv3-tiny | COCO trainval | test-dev | 33.1 | 5.56 Bn | 220 | cfg | weights |
3. 代码实现
3.1 开发摄像头,持续读取图像
import cv2
import numpy as np

cap = cv2.VideoCapture(0)

with open(classesFile, 'rt') as f:
    classNames = f.read().rstrip('\\n').split('\\n')

while True:
    success, img = cap.read()

    cv2.imshow('Image', img)
    cv2.waitKey(1)
3.2 读取可以识别的物体coco.names, 权重和参数
import cv2
import numpy as np

cap = cv2.VideoCapture(0)

classesFile = 'coco.names'
classNames = []
with open(classesFile, 'rt') as f:
    classNames = f.read().rstrip('\\n').split('\\n')
# print(classNames)
# print(len(classNames))

modelConfiguration = 'yolov3-320.cfg'
modelWeights = 'yolov3-320.weights'

# modelConfiguration = 'yolov3-tiny.cfg'
# modelWeights = 'yolov3-tiny.weights'

net = cv2.dnn.readNetFromDarknet(modelConfiguration, modelWeights)
net.setPreferableBackend(cv2.dnn.DNN_BACKEND_OPENCV)
net.setPreferableTarget(cv2.dnn.DNN_TARGET_CPU)


3.3 cnn神经网络前向传播,计算预测值,有3个输出layers
import cv2
import numpy as np

cap = cv2.VideoCapture(0)
whT = 320
confThreshold = 0.5
nmsThreshold = 0.3

# ...

while True:
    success, img = cap.read()

    blob = cv2.dnn.blobFromImage(img, 1/255, (whT, whT), [0,0,0], 1, crop=False)
    net.setInput(blob)

    layerNames = net.getLayerNames()
    # print(layerNames)
    outputNames = [layerNames[i[0]-1] for i in net.getUnconnectedOutLayers()]
    # print(outputNames)
    # print(net.getUnconnectedOutLayers())

    outputs = net.forward(outputNames)
    # print(outputs[0].shape)
    # print(outputs[1].shape)
    # print(outputs[2].shape)
    # print(outputs[0][0])

    #...
    cv2.imshow('Image', img)
    cv2.waitKey(1)

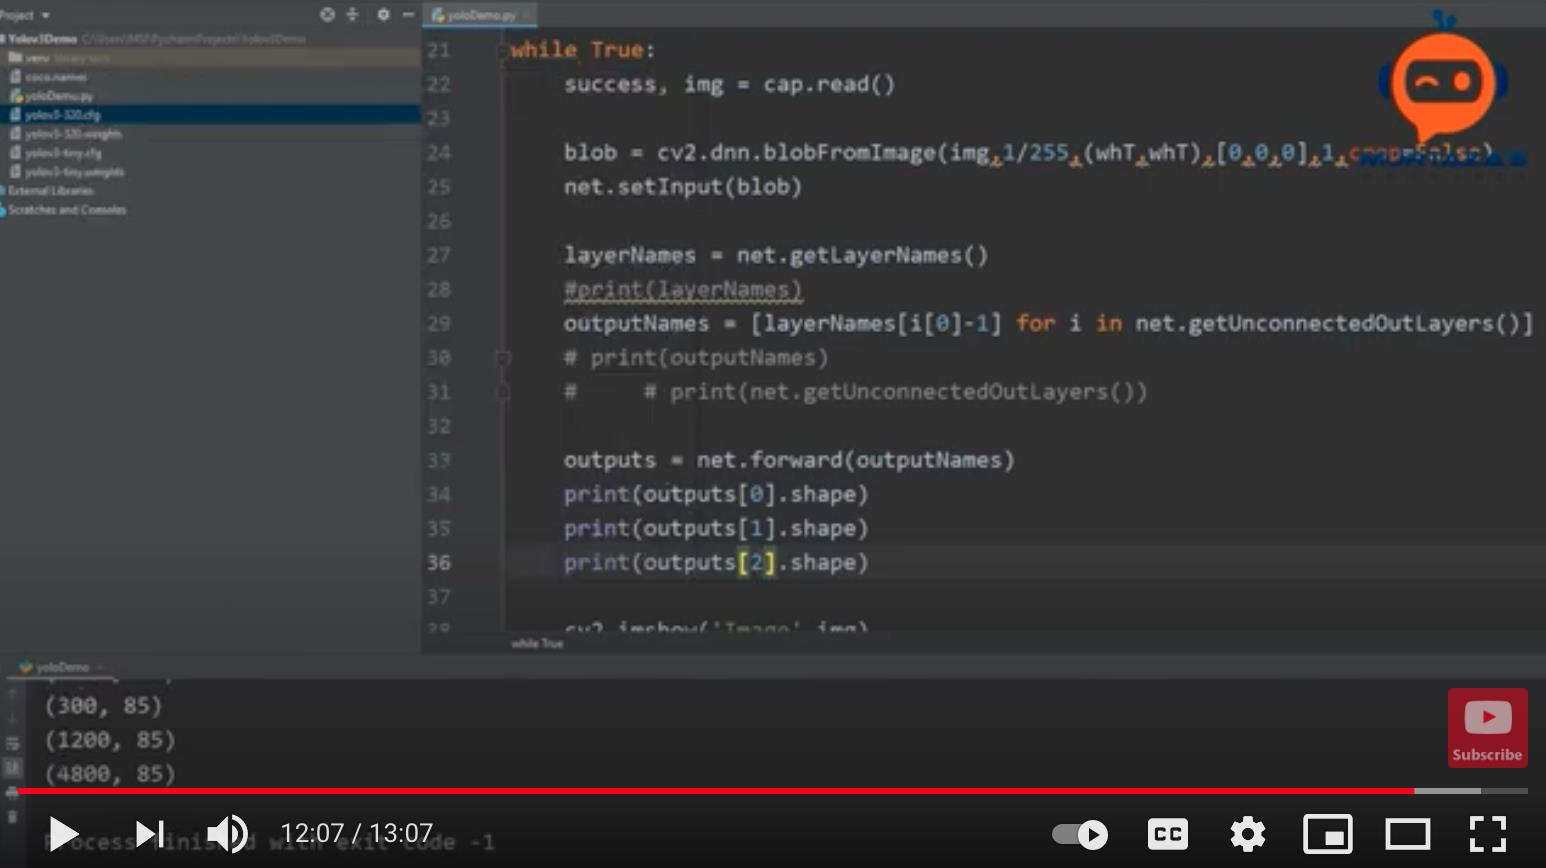
三个layers 输出参数shape如下:
- (300, 85)
- (1200, 85)
- (4800, 85)

80个数据分类: - 位置(0~3):cx,cy,w,h
- 检测到物体的概率(4):confidence
- 每一个物体的概率比如(5~79):比如car 0.93

3.4 检测物体,去除概率比较低的检测,只留下最大的,添加物体框,物体名字,概率
def findObjects(outputs, img):
    hT, wT, cT = img.shape
    bbox = []
    classIds = []
    confs = []

    for output in outputs:
        for det in output:
            scores = det[5:]
            classId = np.argmax(scores)
            confidence = scores[classId]
            if confidence > confThreshold:
                w, h = int(det[2]*wT), int(det[3]*hT)
                x, y = int((det[0]*wT) - w/2), int((det[1]*hT) - h/2)
                bbox.append([x,y,w,h])
                classIds.append(classId)
                confs.append(float(confidence))
    #print(len(bbox))

    indices = cv2.dnn.NMSBoxes(bbox,confs,confThreshold,nmsThreshold)
    # print(indices)
    for i in indices:
        i = i[0]
        box = bbox[i]
        x,y,w,h = box[0], box[1], box[2], box[3]
        cv2.rectangle(img,(x,y),(x+w, y+h),(255,0,255),2)
        cv2.putText(img,f'{classNames[classIds[i]].upper()} {int(confs[i]*100)}%', (x,y-10), cv2.FONT_HERSHEY_SIMPLEX, 0.6,(255,0,255),2)

3.5 为了更快检测,可以替换参数pkg和权重weights为tiny
	modelConfiguration = 'yolov3-tiny.cfg'
	modelWeights = 'yolov3-tiny.weights'
4. 完整代码如下
import cv2
import numpy as np

cap = cv2.VideoCapture(0)
whT = 320
confThreshold = 0.5
nmsThreshold = 0.3

classesFile = 'coco.names'
classNames = []
with open(classesFile, 'rt') as f:
    classNames = f.read().rstrip('\\n').split('\\n')
# print(classNames)
# print(len(classNames))

modelConfiguration = 'yolov3-320.cfg'
modelWeights = 'yolov3-320.weights'

# modelConfiguration = 'yolov3-tiny.cfg'
# modelWeights = 'yolov3-tiny.weights'

net = cv2.dnn.readNetFromDarknet(modelConfiguration, modelWeights)
net.setPreferableBackend(cv2.dnn.DNN_BACKEND_OPENCV)
net.setPreferableTarget(cv2.dnn.DNN_TARGET_CPU)

def findObjects(outputs, img):
    hT, wT, cT = img.shape
    bbox = []
    classIds = []
    confs = []

    for output in outputs:
        for det in output:
            scores = det[5:]
            classId = np.argmax(scores)
            confidence = scores[classId]
            if confidence > confThreshold:
                w, h = int(det[2]*wT), int(det[3]*hT)
                x, y = int((det[0]*wT) - w/2), int((det[1]*hT) - h/2)
                bbox.append([x,y,w,h])
                classIds.append(classId)
                confs.append(float(confidence))
    #print(len(bbox))

    indices = cv2.dnn.NMSBoxes(bbox,confs,confThreshold,nmsThreshold)
    # print(indices)
    for i in indices:
        i = i[0]
        box = bbox[i]
        x,y,w,h = box[0], box[1], box[2], box[3]
        cv2.rectangle(img,(x,y),(x+w, y+h),(255,0,255),2)
        cv2.putText(img,f'{classNames[classIds[i]].upper()} {int(confs[i]*100)}%', (x,y-10), cv2.FONT_HERSHEY_SIMPLEX, 0.6,(255,0,255),2)

while True:
    success, img = cap.read()

    blob = cv2.dnn.blobFromImage(img, 1/255, (whT, whT), [0,0,0], 1, crop=False)
    net.setInput(blob)

    layerNames = net.getLayerNames()
    # print(layerNames)
    outputNames = [layerNames[i[0]-1] for i in net.getUnconnectedOutLayers()]
    # print(outputNames)
    # print(net.getUnconnectedOutLayers())

    outputs = net.forward(outputNames)
    # print(outputs[0].shape)
    # print(outputs[1].shape)
    # print(outputs[2].shape)
    # print(outputs[0][0])

    findObjects(outputs, img)
    cv2.imshow('Image', img)
    cv2.waitKey(1)
参考
- https://www.youtube.com/watch?v=GGeF_3QOHGE&ab_channel=Murtaza%27sWorkshop-RoboticsandAI
- https://www.youtube.com/watch?v=9AycYn9gj1U&ab_channel=Murtaza%27sWorkshop-RoboticsandAI
- https://www.youtube.com/watch?v=xK4li3jinSw&ab_channel=Murtaza%27sWorkshop-RoboticsandAI
- https://www.youtube.com/watch?v=xK4li3jinSw&ab_channel=Murtaza%27sWorkshop-RoboticsandAI
- https://pjreddie.com/darknet/yolo/
以上是关于一步一步手写实现实时监测物体YOLO v3 EASY METHOD | OpenCV Python CNN卷积神经网络的主要内容,如果未能解决你的问题,请参考以下文章