springboot websocket示例
Posted luffy5459
tags:
篇首语:本文由小常识网(cha138.com)小编为大家整理,主要介绍了springboot websocket示例相关的知识,希望对你有一定的参考价值。
springboot项目如果要加入websocket,只需要在普通的依赖基础上,加上spring-boot-starter-websocket即可。
<dependency>
       <groupId>org.springframework.boot</groupId>
       <artifactId>spring-boot-starter-websocket</artifactId>
</dependency>
这里使用注解定义WebSocket服务。
package com.xxx.springboot.ws;

import java.io.IOException;
import java.util.concurrent.ConcurrentHashMap;
import java.util.concurrent.atomic.AtomicInteger;

import javax.websocket.OnClose;
import javax.websocket.OnError;
import javax.websocket.OnMessage;
import javax.websocket.OnOpen;
import javax.websocket.Session;
import javax.websocket.server.PathParam;
import javax.websocket.server.ServerEndpoint;

import org.springframework.stereotype.Component;

@Component
@ServerEndpoint("/webSocket/{sid}")
public class DemoEndPoint {
	private static AtomicInteger onlineNum = new AtomicInteger();

	private static ConcurrentHashMap<String, Session> sessionPools = new ConcurrentHashMap<>();

	public void sendMessage(Session session,String message) throws IOException{
		if(session!=null) {
			synchronized (session) {
				System.out.println("send message -> "+message);
				session.getBasicRemote().sendText(message);
			}
		}
	}


	@OnOpen
	public void onOpen(Session session,@PathParam(value="sid")String sid) {
		sessionPools.put(sid, session);

		onlineNum.incrementAndGet();//

		System.out.println("user "+sid +" add websocket,current users is "+onlineNum);

		try {
			sendMessage(session, "welcome to websocket.");
		} catch (Exception e) {
			e.printStackTrace();
		}

	}

	@OnClose
	public void onClose(@PathParam("sid")String sid) {
		sessionPools.remove(sid);

		onlineNum.decrementAndGet();

		System.out.println(sid +" close websocket,current users is "+onlineNum);
	}

	@OnMessage
	public void onMessage(String message) throws IOException{
		message = "client message "+ message +",received";
		System.out.println(message);

		for(Session session:sessionPools.values()) {
			try {
				sendMessage(session, message);
			} catch (IOException e) {
				// TODO Auto-generated catch block
				e.printStackTrace();
			}
		}
	}

	@OnError
	public void onError(Session session,Throwable thrown) {
		System.out.println("error occured");
		thrown.printStackTrace();
	}

}
WebSocket服务,与http服务可以共用一个容器,只不过他们的协议不同,而使用springboot,需要添加一个配置,将有@ServerEndPoint的类加入到容器中。
package com.xxx.springboot.config;

import org.springframework.context.annotation.Bean;
import org.springframework.context.annotation.Configuration;
import org.springframework.web.socket.server.standard.ServerEndpointExporter;

@Configuration
public class WSConfig {

	@Bean
	public ServerEndpointExporter serverEndpointExporter() {
		return new ServerEndpointExporter();
	}
}
有了这个配置,我们启动springboot项目,就可以通过ws协议访问我们的websocket服务了。
在传统的项目中,直接启动tomcat即可,而不需要人为将WebSocket服务添加到容器里。
以上代码只是做了一个websocket服务端,要测试,可以直接使用一些在线websocket测试工具,直接输入地址 -> ws://localhost:8000/springboot/webSocket/aaa,然后点击连接,就可以进行测试了。
本示例,是一个需要客户端连接并发送消息的例子,所以一般的在线测试工具没法进行互动,所以还是需要一个自己编写的例子。
<!DOCTYPE html>
<html>
<head>
<meta charset="UTF-8">
<title>webSocket</title>
<style type="text/css">
  .box{padding:5px;}
  label{display:inline-block;width:70px;vertical-align:top;}
  input{border:1px solid #ddd;outline:none;height:25px;line-height:25px;border-radius:3px;width:300px;}
  button{display:inline-block;height:30px;line-height:30px;padding:0px 10px;font-size:16px;
  border: 1px solid #eee;border-radius:3px;outline:none;background:lightgreen;color:#fff;
  }
  textarea{width:500px;height:400px;resize:none;outline:none;border:1px solid #999;border-radius:3px;}
</style>
</head>
<body>
      <h2>hello,websocket.</h2>
      <div class="box">
      	<label>username:</label>
      	<input id="sid" type="text"/>
        <button  onclick="connect()">connect</button>
      </div>
      <div class="box">
       <label>content:</label>
       <input id="message" type="text"/>
       <button onclick="send()">send</button>
      </div>
      <div class="box">
        <label>response:</label>
        <textarea id="response"></textarea>
      </div>
</body>
<script type="text/javascript">
   var socket;
   window.onload = function(){

   }

   function $(id){
	   return document.getElementById(id);
   }

   function connect(){
	   if(typeof(WebSocket)=="undefined"){
		   alert("your browser not supported websocket.")
	   }else{
		   var sid = $("sid").value;
		   var url = "ws://localhost:8000/springboot/webSocket/"+sid;

		   if(socket!=null){
			   socket.close();
			   socket = null;
		   }

		   socket = new WebSocket(url)

		   socket.onopen = function(){
			   $("response").value = "connect successfully.\\r\\n";
		   }

		   socket.onmessage = function(message){
			   $("response").value += message.data+"\\r\\n";
		   }

		   socket.onclose = function(){
			   $("response").value += "close websocket.\\r\\n";
		   }

		   socket.onerror = function(){
			   $("response").value += "websocket on error.\\r\\n";
		   }
	   }
   }

   function send(){
	   var message = $("message").value;
	   if(message == "" || message == null){
		   alert("message could't be null.")
	   }
	   socket.send(message)
   }
</script>
</html>
添加一个页面跳转的控制类:
package com.xxx.springboot.controller;

import org.springframework.stereotype.Controller;
import org.springframework.web.bind.annotation.GetMapping;
import org.springframework.web.bind.annotation.RequestMapping;

@Controller
@RequestMapping("/")
public class IndexController {

    public String index() {
    	return "index";
    }

    @GetMapping("/ws")
    public String webSocket() {
    	return "webSocket";
    }

}
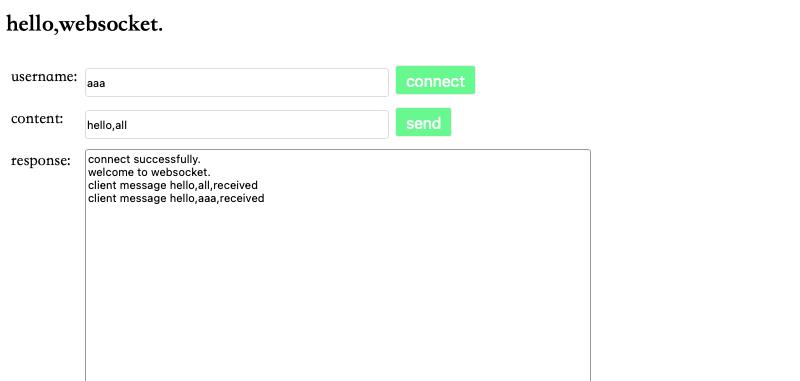
启动springboot服务,然后用浏览器打开页面http://localhost:8000/springboot/ws,在用户名输入框中输入一个名字,然后点击“connect”按钮,就连接websocket服务了,接着在message输入框中输入消息,就可以点击“send”按钮发送,然后下方的消息显示框就可以显示消息了。
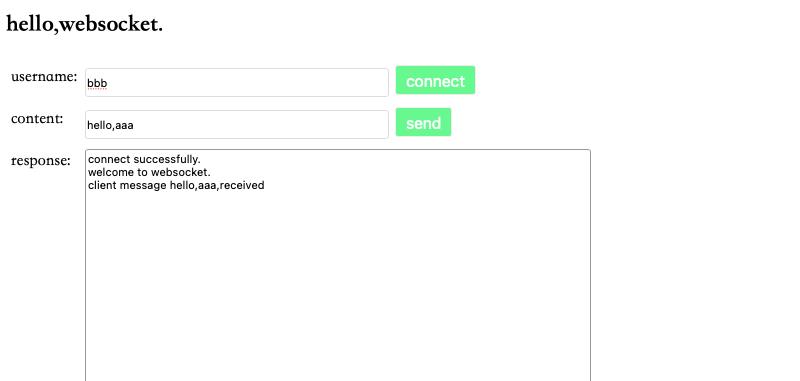
在浏览器中新开一个标签页,在地址栏输入同样的URL:http://localhost:8000/springboot/ws,重复上面的操作,就可以进行类似聊天室聊天了。

另一个浏览器标签页面: 
springboot结合websocket,可以在请求路径上添加动态参数,这样我们就可以根据@PathParam获取参数值,并进行相关逻辑的编写。
websocket是全双工通信,属于长连接类型,本示例也采用了和springboot web项目一样的端口,只不过协议不一样,另外请求的路径也是定制化的。
websocket的应用,有很多,这里简单的用来做聊天,而且是群发消息。也可以用来做消息推送,或者消息订阅发布,当用户连接之后,后台会根据活跃的用户,发布对应的活动提醒,活动推荐,也可以做定向推送,精准推送。
以上是关于springboot websocket示例的主要内容,如果未能解决你的问题,请参考以下文章