微服务架构师-docker私有镜像仓库的配置和使用
Posted 学神来啦
tags:
篇首语:本文由小常识网(cha138.com)小编为大家整理,主要介绍了微服务架构师-docker私有镜像仓库的配置和使用相关的知识,希望对你有一定的参考价值。
文章目录
docker私有化仓库介绍
私有仓库介绍
dockerhub大家还记着是干什么的吗?
存放镜像的,公共仓库
官方网站:
Docker hub 官网:https://registry.hub.docker.com
有时候使用Docker Hub这样的公共仓库可能不方便(有时候无法访问),用户可以创建一个本地仓库供私人使用,可以使用官方提供的工具docker-registry来配置私有镜像仓库
1、使用官方提供的工具来配置
docker-registry 是官方提供的工具,可以用于构建私有的镜像仓库。
registry [ˈredʒɪstri] 记录,登记
私有镜像仓库有哪些有优点?
私有仓库好处:
1、速度快
2、维护方便
3、安全
搭建私有仓库的思路:
老的思路:下载源码tar/yum安装 -》 安装-》修改配置文件-》启动服务
使用docker思路:直接下载并使用registry镜像启动docker实例,这样仓库就搭建成功了。
有了docker以后,所有软件不再以office.exe 或lrzsz.rpm形式发布,而以docker镜像发布。你只需要下载docker镜像并运行一个docker实例。有了docker以后,再也不用为安装linux服务而发愁!
实验环境规划
实验环境:
docker私有仓库地址:xuegod64 xuegod64机器需要的内存至少要2G,我分配的是6G
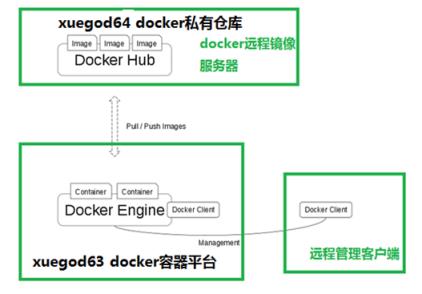
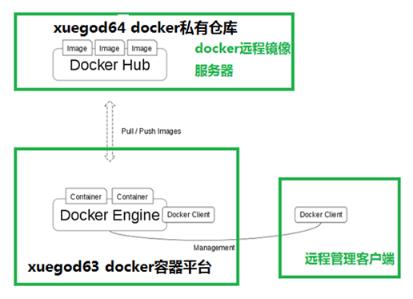
docker服务器地址 : xuegod63 ,xuegod63会使用xuegod64上docker私有仓库来pull/push镜像,实验拓扑图:

使用registry搭建docker私有仓库
Docker服务:
主机名为xuegod63
主机ip: 192.168.1.63(这个ip大家可以根据自己所在环境去配置,配置成静态IP)
配置:4vCPU/4Gi内存
准备实验环境:
新创建一台centos7.6 64位虚拟机
主机名为xuegod64
主机ip: 192.168.1.64(这个ip大家可以根据自己所在环境去配置,配置成静态IP)
配置:4vCPU/4Gi内存
初始化实验环境-安装docker
#配置静态IP
把虚拟机或者物理机配置成静态ip地址,这样机器重新启动后ip地址也不会发生改变。以xuegod64主机为例,修改静态IP:
修改/etc/sysconfig/network-scripts/ifcfg-ens33文件,变成如下:
TYPE=Ethernet
PROXY_METHOD=none
BROWSER_ONLY=no
BOOTPROTO=static
IPADDR=192.168.1.64
NETMASK=255.255.255.0
GATEWAY=192.168.1.1
DNS1=192.168.1.1
DEFROUTE=yes
IPV4_FAILURE_FATAL=no
IPV6INIT=yes
IPV6_AUTOCONF=yes
IPV6_DEFROUTE=yes
IPV6_FAILURE_FATAL=no
IPV6_ADDR_GEN_MODE=stable-privacy
NAME=ens33
DEVICE=ens33
ONBOOT=yes
#修改配置文件之后需要重启网络服务才能使配置生效,重启网络服务命令如下:
service network restart

#配置主机名:xuegod64
hostnamectl set-hostname xuegod64
#在xuegod63和xuegod64上配置hosts文件,让两台主机hosts文件保持一致
[root@xuegod63 ~]# cat /etc/hosts
127.0.0.1   localhost localhost.localdomain localhost4 localhost4.localdomain4
::1         localhost localhost.localdomain localhost6 localhost6.localdomain6
192.168.1.63 xuegod63
192.168.1.64 xuegod64
[root@xuegod64 ~]# cat /etc/hosts
127.0.0.1   localhost localhost.localdomain localhost4 localhost4.localdomain4
::1         localhost localhost.localdomain localhost6 localhost6.localdomain6
192.168.1.63 xuegod63
192.168.1.64 xuegod64
#关闭firewalld防火墙
[root@xuegod64 ~]# systemctl stop firewalld ; systemctl disable firewalld
#关闭iptables防火墙
[root@xuegod64 ~]# yum install iptables-services -y  #安装iptables
#禁用iptables
[root@xuegod64 ~]# service iptables stop   && systemctl disable iptables
清空防火墙规则
[root@xuegod64 ~]# iptables -F
#关闭selinux
[root@xuegod64 ~]# setenforce 0   #临时禁用
#永久禁用
[root@xuegod64 ~]# sed -i 's/SELINUX=enforcing/SELINUX=disabled/g' /etc/selinux/config
注意:修改selinux配置文件之后,重启机器,selinux才能永久生效
[root@xuegod64 ~]# getenforce
Disabled
#配置时间同步
[root@xuegod64 ~]# ntpdate cn.pool.ntp.org
#编写计划任务
crontab -e
* */1 * * * /usr/sbin/ntpdate   cn.pool.ntp.org
重启crond服务使配置生效:
service crond restart
方法1:在线安装docker-ce , 配置国内docker-ce的yum源(阿里云)
[root@xuegod64 ~]# yum-config-manager --add-repo http://mirrors.aliyun.com/docker-ce/linux/centos/docker-ce.repo
配置docker-ce的离线yum源:
方法2:推荐大家使用离线安装,下面需要的k8s-docker.tar.gz压缩包私信我
[root@xuegod64 ~]# tar xf k8s-docker.tar.gz -C /opt/
[root@xuegod64 ~]# tee /etc/yum.repos.d/k8s-docker.repo << ‘EOF’
[k8s-docker]
name=k8s-docker
baseurl=file:///opt/k8s-docker
enable=1
gpgcheck=0
EOF
安装基础软件包
[root@xuegod64 ~]# yum install -y  wget net-tools nfs-utils lrzsz gcc gcc-c++ make cmake libxml2-devel openssl-devel curl
 curl-devel unzip sudo ntp libaio-devel wget vim ncurses-devel autoconf automake zlib-devel  python-devel epel-release
 openssh-server socat  ipvsadm conntrack ntpdate  telnet
安装docker环境依赖
[root@xuegod64 ~]# yum install -y yum-utils device-mapper-persistent-data lvm2
安装docker-ce
[root@xuegod64 ~]# yum install docker-ce docker-ce-cli containerd.io -y
注:docker-ce-cli 作用是docker命令行工具包
containerd.io 作用是容器接口相关包
yum info 软件包的名字,可以查看一个包的具体作用。
#启动docker服务
[root@xuegod64 ~]# systemctl start docker && systemctl enable docker
#查看Docker 版本信息
[root@xuegod64 ~]# docker version
[root@xuegod64 ~]# systemctl status docker
● docker.service - Docker Application Container Engine
   Loaded: loaded (/usr/lib/systemd/system/docker.service; enabled; vendor preset: disabled)
   Active: active (running) since Tue 2021-04-20 10:07:23 CST; 9s ago
开启包转发功能和修改内核参数
内核参数修改:
[root@xuegod64 ~]# modprobe br_netfilter
[root@xuegod64 ~]# echo "modprobe br_netfilter" >> /etc/profile
[root@xuegod64 ~]# cat > /etc/sysctl.d/docker.conf <<EOF
net.bridge.bridge-nf-call-ip6tables = 1
net.bridge.bridge-nf-call-iptables = 1
net.ipv4.ip_forward = 1
EOF
[root@xuegod64 ~]# sysctl -p /etc/sysctl.d/docker.conf
#重启docker
[root@xuegod64 ~]# systemctl restart docker
什么是br_netfilter?
linux iptables/netfilter通过和linux bridge功能联动,以实现透明防火墙功能。
透明防火墙(Transparent Firewall)又称桥接模式防火墙(Bridge Firewall)。简单来说,就是在网桥设备上加入防火墙功能。透明防火墙具有部署能力强、隐蔽性好、安全性高的优点。
为什么要执行modprobe br_netfilter?
在/etc/sysctl.conf中添加:
net.bridge.bridge-nf-call-ip6tables = 1
net.bridge.bridge-nf-call-iptables = 1
执行sysctl -p 时出现:
解决方法:
modprobe br_netfilter
还记着net.bridge.bridge-nf-call-ip6tables和net.ipv4.ip_forward吗?
net.ipv4.ip_forward:
单机docker的网络架构实质上是在宿主机上安装了一个docker0的网桥,从外部访问容器内部时只需要访问宿主机的地址和对应的容器映射的地址,访问的数据包到宿主机上后经过ip包解析后通过目的port和iptables的规则会将数据包由eth0网卡转发至docker0网桥上进行下一步路由。所以如果容器的宿主机上的ip_forward未打开,那么该宿主机上的容器则不能被其他宿主机访问
net.bridge.bridge-nf-call-ip6tables:
默认情况下,从容器发送到默认网桥的流量,并不会被转发到外部。要开启转发:net.bridge.bridge-nf-call-ip6tables = 1
配置xuegod64为docker私有仓库服务端
1.拉取registry 镜像。 registry镜像中包括搭建本地私有仓库的软件:
registry [ˈredʒɪstri] 记录,登记 ; pull 拉 ; push 推
把registry.tar上传到xuegod64上
导入本地镜像:
[root@xuegod64 ~]# docker load -i registry.tar
- 查看registry镜像
[root@xuegod64 ~]# docker images
REPOSITORY           TAG                 IMAGE ID            CREATED             SIZE
registry      latest              047218491f8c        3 weeks ago         33.17 MB
- 实战:使用registry镜像搭建一个私有仓库
使用registry镜像搭建一个私有仓库。 registry镜像中已经把搭建私有库程序安装好了,我只需要使用registry镜像运行一个docker实例就可以了。
registry服务监听到端口号,默认是5000
[root@xuegod64~]# docker run -d --name registry -p 5000:5000 -v /opt/registry:/var/lib/registry   registry:latest
e4698f625a56661edd2678269215ba42d4fa41c2da881768a741a72b4a3d0c60
默认情况下,Registry存放镜像的目录是/var/lib/registry目录下,这样如果容器被删除,则存放于容器中的镜像也会丢失,所以我们一般情况下会指定本地物理机一个目录如/opt/registry挂载到容器的/var/lib/registry下。使用-v参数,指定本地持久的路径。
[root@xuegod64~]# ls  /opt/registry    # 这个目录会自动创建
[root@xuegod64~]# docker ps
CONTAINER ID   IMAGE             COMMAND                  CREATED          STATUS          PORTS                    NAMES
90cc7afb477e   registry:latest   "/entrypoint.sh /etc…"   34 seconds ago   Up 33 seconds   0.0.0.0:5000->5000/tcp   registry
[root@xuegod63 ~]# netstat  -antup | grep 5000
tcp6       0      0 :::5000                 :::*                    LISTEN      4032/docker-proxy
说明,私有库已经启动成功。
查看私有仓库中的镜像列表:
curl http://192.168.1.64:5000/v2/_catalog
{"repositories":[]}
#发现,现在还是空的,后期上传了本地docker镜像到私有仓库中,就有数据了。
配置xuegod63上的docker使用xuegod64上的私有仓库
修改docker配置文件,指定docker镜像加速结点为:私有仓库的地址
[root@xuegod63 ~]# vim /etc/docker/daemon.json
#修改daemon.json文件,写入以下内容:
“insecure-registries”: [ “192.168.1.64:35000” ]
修改之后的/etc/docker/daemon.json文件完整内容如下:
{
"registry-mirrors":["https://rsbud4vc.mirror.aliyuncs.com","https://registry.docker-
cn.com","https://docker.mirrors.ustc.edu.cn","https://dockerhub.azk8s.cn","http://hub-
mirror.c.163.com","http://qtid6917.mirror.aliyuncs.com","https://rncxm540.mirror.aliyuncs.com"
,"https://e9yneuy4.mirror.aliyuncs.com"],
"insecure-registries": [ "192.168.1.64:5000" ]
}
注: --insecure-registry不安全的注册。这里的不安全指的是走http协议,要想安全传输镜像,需要使用https协议。我们的私有仓库一般是局域中使用,所以直接使用http协议就可以了。
#重新加载,使配置生效
[root@xuegod63 ~]# systemctl daemon-reload
#重新启动docker服务
[root@xuegod63 ~]# systemctl restart docker
实战-上传本地镜像到私有仓库
- 从Docker HUB 上拉取一个测试镜像,名字: busybox
本地导入
上传busybox.tar镜像到xuegod63上,作为测试镜像。
[root@xuegod63 ~]# docker load -i  busybox.tar
[root@xuegod63 ~]# docker images
REPOSITORY  TAG      IMAGE ID		     CREATED            SIZE
busybox      latest     00f017a8c2a6    	2 weeks ago         1.11 MB
注:
BusyBox 概述: BusyBox是一个集成了一百多个最常用Linux命令和工具的软件。BusyBox 包含了BusyBox一些简单的工具,例如ls、cat和echo等等,还包含了一些更大、更复杂的工具,例grep、find、mount以及telnet。有些人将 BusyBox 称为 Linux 工具里的瑞士军刀。简单的说BusyBox就好像是个大工具箱,它集成压缩了 Linux 的许多工具和命令,也包含了 android 系统的自带的shell。
瑞士军刀见过没?

官网: www.busybox.net

2 .为基础镜像打个标签(复制一个镜像并起一个名字)
语法: docker tag 原镜像名:标签 私有仓库地址/新镜像名:标签
执行:
[root@xuegod63 ~]# docker tag busybox:latest 192.168.1.64:5000/busybox:latest
注: 不写镜像标签,默认是:latest
[root@xuegod63 ~]# docker images
REPOSITORY                  TAG                 IMAGE ID            CREATED             SIZE
192.168.1.64:5000/busybox   latest    00f017a8c2a6   4 years ago    1.11MB
3.将刚新打好标签的192.168.1.64:35000/busybox镜像,push到xuegod64私有仓库中。
[root@xuegod63 ~]# docker push 192.168.1.64:5000/busybox
push :把镜像传到私有镜像仓库
4.登录xuegod64上,查看镜像的存储目录和文件
[root@xuegod64 ~]# yum install tree -y
[root@xuegod64 ~]# tree /opt/registry/docker/registry/v2/repositories/
/opt/registry/docker/registry/v2/repositories/
└── busybox   #可以看到上传的镜像
访问http://192.168.1.64:5000/v2/_catalog
#可以查看私有仓库中的镜像列表,如下图:
{"repositories":["busybox"]}
3.2.6 实战-使用私有仓库中的镜像创建服务
删除镜像:
语法: docker rmi 镜像名:标签
[root@xuegod63 ~]# docker rmi 192.168.1.64:5000/busybox #删除镜像
[root@xuegod63 ~]# docker pull 192.168.1.64:5000/busybox #下载镜像
[root@xuegod63 ~]# docker images #查看导入的镜像
REPOSITORY TAG IMAGE ID CREATED SIZE
192.168.1.64:5000/busybox latest 00f017a8c2a6 2 weeks ago 1.11 MB
使用新导入的镜像,运行一个新docker实例:
[root@xuegod63 ~]# docker run 192.168.1.64:5000/busybox:latest echo “hello”
hello
运行成功。
总结
搭建私有仓库步骤:
1、把registry镜像导入xuegod64机器
2、基于registry镜像运行一个docker实例,registry默认监听5000端口,在宿主机上需要映射5000端口
把镜像传到私有仓库步骤:
1、安装docker服务
2、修改docker服务镜像源,改成私有仓库地址:
"insecure-registries": [ "192.168.1.64:5000" ]
3、把要导入的镜像打个标签如: 192.168.1.64:5000/busybox:latest
4、上传打了标签的镜像到私有仓库: docker push 192.168.1.64:5000/busybox:latest
从私有仓库下载镜像:
1、修改docker服务镜像源,改成私有仓库地址:
"insecure-registries": [ "192.168.1.64:5000" ]
2、下载刚才上传的镜像 : docker pull 192.168.1.64:5000/busybox:latest
3、查看私有仓库中的镜像列表:http://192.168.1.64:5000/v2/_catalog
实战:使用 harbor 搭建Docker私有仓库
harbor介绍
Docker容器应用的开发和运行离不开可靠的镜像管理,虽然Docker官方也提供了公共的镜像仓库,但是从安全和效率等方面考虑,部署我们私有环境内的Registry也是非常必要的。Harbor是由VMware公司开源的企业级的Docker Registry管理项目,它包括权限管理(RBAC)、LDAP、日志审核、管理界面、自我注册、镜像复制和中文支持等功能。
官网地址:https://github.com/goharbor/harbor

harbor ['hɑ:bə] 海湾
实验环境:
xuegod64机器需要的内存至少要2G,我分配的是6G
注:安装harbor,系统根分区的可用空间需要大于6G,否则安装时会报空间不足。内存2G以上

为harbor签发证书
[root@xuegod64 ~]# mkdir /data/ssl -p
[root@xuegod64 ~]# cd /data/ssl/
生成ca证书:
[root@xuegod64 ssl]# openssl genrsa -out ca.key 3072
#生成一个3072位的key,也就是私钥
[root@xuegod64 ssl]# openssl req -new -x509 -days 3650 -key ca.key -out ca.pem
#生成一个数字证书ca.pem,3650表示证书的有效时间是3年,按箭头提示填写即可,没有箭头标注的为空:
[root@xuegod64 ssl]# openssl req -new -x509 -days 3650 -key ca.key -out ca.pem
You are about to be asked to enter information that will be incorporated
into your certificate request.
What you are about to enter is what is called a Distinguished Name or a DN.
There are quite a few fields but you can leave some blank
For some fields there will be a default value,
If you enter '.', the field will be left blank.
-----
Country Name (2 letter code) [XX]:CN
State or Province Name (full name) []:BJ
Locality Name (eg, city) [Default City]:BJ
Organization Name (eg, company) [Default Company Ltd]:xuegod
Organizational Unit Name (eg, section) []:CA
Common Name (eg, your name or your server's hostname) []:xuegod64.cn
Email Address []:mk@163.com
#生成域名的证书:
[root@xuegod64 ssl]# openssl genrsa -out harbor.key 3072
#生成一个3072位的key,也就是私钥
[root@xuegod64 ssl]# openssl req -new -key harbor.key -out harbor.csr
#生成一个证书请求,一会签发证书时需要的,标箭头的按提示填写,没有箭头标注的为空:
[root@xuegod64 ssl]#  openssl req -new -key harbor.key -out harbor.csr
You are about to be asked to enter information that will be incorporated
into your certificate request.
What you are about to enter is what is called a Distinguished Name or a DN.
There are quite a few fields but you can leave some blank
For some fields there will be a default value,
If you enter '.', the field will be left blank.
-----
Country Name (2 letter code) [XX]:CN
State or Province Name (full name) []:BJ
Locality Name (eg, city) [Default City]:BJ
Organization Name (eg, company) [Default Company Ltd]:xuegod
Organizational Unit Name (eg, section) []:CA
Common Name (eg, your name or your server's hostname) []:xuegod64.cn
Email Address []:mk@163.com

Please enter the following 'extra' attributes
to be sent with your certificate request
A challenge password []:
An optional company name []:
签发证书:
[root@xuegod64 ssl]# openssl x509 -req -in harbor.csr -CA ca.pem -CAkey ca.key -CAcreateserial -out harbor.pem -days 3650
显示如下,说明证书签发好了:

查看证书是否有效:
openssl x509 -noout -text -in harbor.pem
显示如下,说明有效:
Certificate:
    Data:
        Version: 1 (0x0)
        Serial Number:
            cd:21:3c:44:64:17:65:40
    Signature Algorithm: sha256WithRSAEncryption
        Issuer: C=CH, ST=BJ, L=BJ, O=Default Company Ltd
        Validity
            Not Before: Dec 26 09:29:19 2020 GMT
            Not After : Dec 24 09:29:19 2030 GMT
        Subject: C=CH, ST=BJ, L=BJ, O=Default Company Ltd, CN=harbor
        Subject Public Key Info:
            Public Key Algorithm: rsaEncryption
                Public-Key: (3072 bit)
                Modulus:
                    00:b0:60:c3:e6:35:70:11:c8:73:83:38:9a:7e:b8:
                    。。。
安装harbor
#删除之前registry容器,防止跟安装harbor冲突
[root@xuegod64 ssl]# docker rm -f registry
创建安装目录
[root@xuegod64 ssl]# mkdir /data/install -p
[root@xuegod64 ssl]# cd /data/install/
安装harbor
/data/ssl目录下有如下文件:
ca.key  ca.pem  ca.srl  harbor.csr  harbor.key  harbor.pem

[root@xuegod64 install]# cd /data/install/
#把harbor的离线包harbor-offline-installer-v1.5.0.tgz上传到这个目录,离线包在课件里提供了,可自行下载:
解压:
[root@xuegod64 install]# tar zxvf harbor-offline-installer-v1.5.0.tgz
[root@xuegod64 install]# cd harbor
[root@xuegod64 harbor]# ls
#可看到如下目录:
#common目录:存放模板配置
#ha目录:做harbor高可用的
修改配置文件:
[root@xuegod64 harbor]# vim harbor.cfg
hostname = xuegod64
#修改hostname,跟上面签发的证书域名保持一致
ui_url_protocol = https
#协议用https
ssl_cert = /data/ssl/harbor.pem
ssl_cert_key = /data/ssl/harbor.key
邮件和ldap不需要配置,在harbor的web界面可以配置
其他配置采用默认即可
修改之后保存退出
注:harbor默认的账号密码:admin/Harbor12345
安装docker-compose
方法1:离线上传docker-compose到服务器上
下载二进制文件上传至linux(课程资料已提供docker-compose二进制文件可直接上传)
[root@xuegod63 ~]# rz

[root@xuegod63 ~]# mv docker-compose-Linux-x86_64 /usr/local/bin/docker-compose
添加执行权限
[root@xuegod63 ~]# chmod +x /usr/local/bin/docker-compose
注: docker-compose项目是Docker官方的开源项目,负责实现对Docker容器集群的快速编排。Docker-Compose的工程配置文件默认为docker-compose.yml,Docker-Compose运行目录下的必要有一个docker-compose.yml。docker-compose可以管理多个docker实例。
方法2:在线安装:
[root@xuegod63 ~]# curl -L https://github.com/docker/compose/releases/download/1.26.2/docker-compose-`uname -s`-`uname -m` > /usr/local/bin/docker-compose
添加执行权限
[root@xuegod63 ~]# chmod +x /usr/local/bin/docker-compose
安装harbor需要的离线镜像包docker-harbor.tar.gz在课件,可上传到xuegod64,通过docker load -i解压
[root@xuegod64 ~]#  docker load -i docker-harbor.tar.gz
[root@xuegod64 install]# cd /data/install/harbor
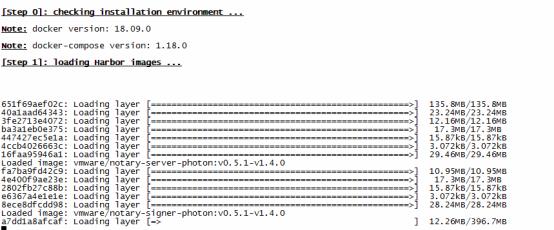
[root@xuegod64 harbor]# ./install.sh --with-notary --with-clair
#clair 开启镜像的漏洞扫描。Clair是一个开源项目,它提供了一个工具,通过静态分析appc和docker容器中的漏洞来监控容器的安全性。Clair是一个API驱动的分析引擎,它逐层检查容器是否存在已知的安全缺陷。使用Clair,您可以轻松构建为容器漏洞提供连续监视的服务。


安装过程会出现上面的界面,说明安装正常,docker ps 显示如下,说明容器启动正常

在自己电脑修改hosts文件

在hosts文件添加如下一行,然后保存即可
192.168.1.64 xuegod64
扩展:
如何停掉harbor:
你可以使用docker-compose来启动或关闭Harbor服务。但必须在与docker-compose.yml相同的目录中运行。
[root@xuegod64 harbor]# cd /data/install/harbor
[root@xuegod64 harbor]# docker-compose stop
或:docker-compose stop  -f /data/install/docker-compose.yml
如何启动harbor:
[root@xuegod64 harbor]# cd /data/install/harbor
[root@xuegod64 harbor]# docker-compose start
docker-compose start
如果docker-compose start启动harbor之后,还是访问不了,那就需要重启虚拟机
harbor 图像化界面使用说明
在浏览器输入:
https://xuegod64

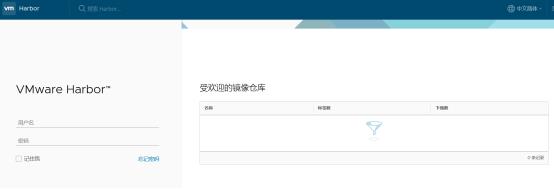
接收风险并继续,出现如下界面,说明访问正常

账号:admin
密码:Harbor12345
输入账号密码出现如下:
docker私有镜像仓库搭建和镜像删除