@FeignClient的代理创建和调用过程
Posted 奋斗吧_攻城狮
tags:
篇首语:本文由小常识网(cha138.com)小编为大家整理,主要介绍了@FeignClient的代理创建和调用过程相关的知识,希望对你有一定的参考价值。
1、动态代理的创建过程
前面分析过@EnablefeignClient会引入FeignClientsRegistrar,将@FeignClient注解的类以FeignClientFactoryBean的形式往BeanFactory注入BeanDefinition。Spring refresh生命周期的最后一步会将所有单例非懒加载的BeanDefinition执行getBean操作。所以我们需要关注FeignClientFactoryBean#getObejct方法,返回的对象。
为了方便分析,以下面的Feign接口为例:
@FeignClient(value = "log-service", contextId = "remoteOperateLogService",path = "/provider/v1/operateLog", fallback = RemoteOperateLogServiceFallbackImpl.class)
public interface RemoteOperateLogService {
    @PostMapping("create")
    ResponseEntity<Void> create(@RequestBody OperateLogDTO operateLogDTO);
先直接看一下FactoryBean返回的bean信息:

可以看见返回的是HystrixInvocationHandler代理对象:
target属性为当前代理的对象信息,name为服务名称(对应注册中心的名称),url为访问地址,type为原始接口全限定名
dispatch属性为LinkedHashMap类型,key为调用的方法(当前只有一个方法),value为SynchronousMethodHandler类型的代理对象
继续追踪FeignClientFactoryBean#getObject方法:
@Override
public Object getObject() throws Exception {
    return getTarget();
}

<T> T getTarget() {
    FeignContext context = this.applicationContext.getBean(FeignContext.class);
    Feign.Builder builder = feign(context);

    if (!StringUtils.hasText(this.url)) {
        if (!this.name.startsWith("http")) {
            this.url = "http://" + this.name;
        }
        else {
            this.url = this.name;
        }
        this.url += cleanPath();
        return (T) loadBalance(builder, context,
                new Target.HardCodedTarget<>(this.type, this.name, this.url));
    }
    if (StringUtils.hasText(this.url) && !this.url.startsWith("http")) {
        this.url = "http://" + this.url;
    }
    String url = this.url + cleanPath();
    Client client = getOptional(context, Client.class);
    if (client != null) {
        if (client instanceof LoadBalancerFeignClient) {
            // not load balancing because we have a url,
            // but ribbon is on the classpath, so unwrap
            client = ((LoadBalancerFeignClient) client).getDelegate();
        }
        builder.client(client);
    }
    Targeter targeter = get(context, Targeter.class);
    return (T) targeter.target(this, builder, context,
            new Target.HardCodedTarget<>(this.type, this.name, url));
}
上面主要完成了
1、获取在FeignAutoConfiguration中注入的FeignContext;
2、调用feign方法,获取构建器
protected Feign.Builder feign(FeignContext context) {
    FeignLoggerFactory loggerFactory = get(context, FeignLoggerFactory.class);
    Logger logger = loggerFactory.create(this.type);

    // @formatter:off
    Feign.Builder builder = get(context, Feign.Builder.class)
            // required values
            .logger(logger)
            .encoder(get(context, Encoder.class))
            .decoder(get(context, Decoder.class))
            .contract(get(context, Contract.class));
    // @formatter:on

    configureFeign(context, builder);

    return builder;
}
根据FeignContext处理了我们自定义的@FeignClient以及全局@EnableFeignClients中配置的日志,加、解密器,验证器等,最后configureFeign如下,处理了链接超时、读取超时等配置项:
protected void configureFeign(FeignContext context, Feign.Builder builder) {
    FeignClientProperties properties = this.applicationContext.getBean(FeignClientProperties.class);
    if (properties != null) {
        if (properties.isDefaultToProperties()) {
            configureUsingConfiguration(context, builder);
            configureUsingProperties(
                    properties.getConfig().get(properties.getDefaultConfig()),
                    builder);
            configureUsingProperties(properties.getConfig().get(this.contextId),
                    builder);
        } else {
            configureUsingProperties(
                    properties.getConfig().get(properties.getDefaultConfig()),
                    builder);
            configureUsingProperties(properties.getConfig().get(this.contextId),
                    builder);
            configureUsingConfiguration(context, builder);
        }
    } else {
        configureUsingConfiguration(context, builder);
    }
}3、处理链接的Http或Https请求
4、根据Targeter(获取子类DefaultTargeter或HystrixTargeter),使用InvocationHandlerFactory工厂创建代理对象DefaultInvocationHandler或SynchronousMethodHandler【当前创建了该类型】。上面的截图已经非常清晰了
5、再调用Targeter内部类HardCodedTarget#terget方法,返回了创建的代理对象,结构如上图
2、方法调用【动态代理的执行invoke过程】

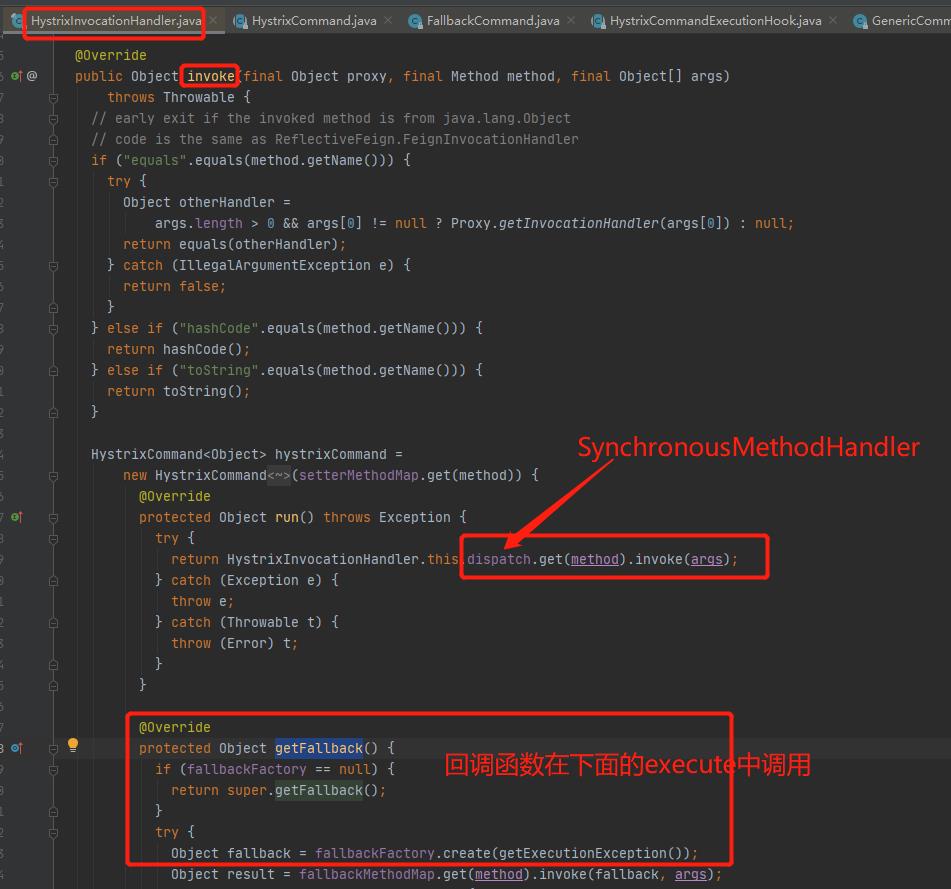
如上创建的代理对象结构,当真正访问@FeignClient接口时,就是层层拆代理的过程,主要代理对象有HystrixInvocationHandler:处理@FeignClient对应的接口类,其Map结构的属性dispatch的存储了接口方法与调用的代理SynchronousMethodHandler
1、HystrixInvocationHandler#invoke方法
1)、创建HystrixCommand对象,内置了两个回调函数。Http请求的真正调用HystrixInvocationHandler.this.dispatch.get(method).invoke(args);
2)、getFallback方法,预制了我们配置的降级方法或降级方法工厂
3)、再调用该对象的execute或toObservable().toCompletable()方法,执行请求

2、SynchronousMethodHandler#invoke
真正每个方法的调用,根据Method获取到SynchronousMethodHandler查看其invoke方法:
@Override
public Object invoke(Object[] argv) throws Throwable {
    RequestTemplate template = buildTemplateFromArgs.create(argv);
    Request.Options options = findOptions(argv);
    Retryer retryer = this.retryer.clone();
    while (true) {
        try {
            return executeAndDecode(template, options);
        } catch (RetryableException e) {
            try {
                retryer.continueOrPropagate(e);
            } catch (RetryableException th) {
                Throwable cause = th.getCause();
                if (propagationPolicy == UNWRAP && cause != null) {
                    throw cause;
                } else {
                    throw th;
                }
            }
            if (logLevel != Logger.Level.NONE) {
                logger.logRetry(metadata.configKey(), logLevel);
            }
            continue;
        }
    }
}
1、获取RequestTemplate类型的对象,为Ribbon的封装
2、如果我们引入了spring-retry重试机制,那么根据Retryer对象在try finally创建重试代码
3、executeAndDecode执行请求和编解码
1)、遍历所有的RequestInterceptor拦截器进行处理
2)、获取装饰器LoadBalancerFeignClient进行请求处理,真正的处理过程会交给我们根据优先级配置的 ApacheHttpClient、OkHttpClient或Client.Default。
4、最后除了对编解码进行处理,还有http 404等请求状态作处理
整个代理的创建,以及方法调用【执行代理的invoke方法】,就完成了Feign的整个过程
以上是关于@FeignClient的代理创建和调用过程的主要内容,如果未能解决你的问题,请参考以下文章
IOC 控制反转Android 事件依赖注入 ( 事件依赖注入具体的操作细节 | 创建 事件监听器 对应的 动态代理 | 动态代理的数据准备 | 创建调用处理程序 | 创建动态代理实例对象 )(代码片
基于FeignClient的Controller自动生成注入机制