5.prometheus告警插件-alertmanager自定义webhook案例编写
Posted to.to
tags:
篇首语:本文由小常识网(cha138.com)小编为大家整理,主要介绍了5.prometheus告警插件-alertmanager自定义webhook案例编写相关的知识,希望对你有一定的参考价值。
5.prometheus告警插件-alertmanager
参考文章:
https://www.bookstack.cn/read/prometheus-book/alert-install-alert-manager.md
https://blog.csdn.net/aixiaoyang168/article/details/98474494
https://www.cnblogs.com/xiaobaozi-95/p/10740511.html (主要)
prometheus本身不支持告警功能,主要通过插件alertmanage来实现告警。AlertManager用于接收Prometheus发送的告警并对于告警进行一系列的处理后发送给指定的用户。
prometheus触发一条告警的过程:
prometheus—>触发阈值—>超出持续时间—>alertmanager—>分组|抑制|静默—>媒体类型—>邮件|钉钉|微信等。

5.1.prometheus+alertmanager+webhook实现自定义监控报警系统
以下主要参考:
https://www.cnblogs.com/leoyang63/articles/13973749.html
https://www.cnblogs.com/caizhenghui/p/9144805.html
prometheus+grafana+mtail+node_exporter实现机器负载及业务监控(https://blog.csdn.net/bluuusea/article/details/104341054)介绍了使用mtail和node_exporter实现的prometheus无埋点监控机器负载和业务的监控系统,本文是在其基础上实现自定义报警功能。
Prometheus + Alertmanager的警报分为两个部分:
Prometheus负责中配置警报规则,将警报发送到Alertmanager。
Alertmanager负责管理这些警报,包括沉默,抑制,合并和发送通知。
Alertmanager 发送通知有多种方式,其内部集成了邮箱、Slack、企业微信等三种方式,也提供了webhook的方式来扩展报警通知方式,网上也有大量例子实现对第三方软件的集成,如钉钉等。本文介绍邮件报警方式和通过使用java来搭建webhook自定义通知报警的方式。
本文内容主要分为四块:
prometheus报警规则配置
alertmanager配置及部署
关联prometheus和alertmanager
配置报警通知方式
5.1.1.Prometheus配置报警规则
Prometheus.yml属性配置
| scrpe_interval | 样本采集周期,默认为1分钟采集一次。 |
| evaluation_interval | 告警规则计算周期,默认为1分钟计算一次。 |
| rule_files | 指定告警规则的文件 |
| scrape_configs | job的配置项,里面可配多组job任务。 |
| job_name | 任务名称,需要唯一性 |
| static_configs | job_name的配置选项,一般使用file_sd_configs 热加载配置。 |
| file_sd_configs | job_name的动态配置选项,使用此配置可以实现配置文件的热加载。 |
| files | file_sd_configs配置的服务发现的文件路径列表,支持.json,.yml或.yaml,路径最后一层支持通配符* |
| refresh_interval | file_sd_configs中的files重新加载的周期,默认5分钟 |
此处我们使用rule_files属性来设置告警文件(在prometheus.yml中配置如下)
# my global config
global:
  scrape_interval: 15s # Set the scrape interval to every 15 seconds. Default is every 1 minute.
  evaluation_interval: 15s # Evaluate rules every 15 seconds. The default is every 1 minute.
  # scrape_timeout is set to the global default (10s).

# Alertmanager configuration
alerting:
  alertmanagers:
    - static_configs:
        - targets: ["172.17.0.2:9093"]

# Load rules once and periodically evaluate them according to the global 'evaluation_interval'.
# 告警规则中可以指定多个,并且可以使用通配符*
rule_files:
  - "rules/host_rules.yml"
  # - "first_rules.yml"
  # - "second_rules.yml"

# A scrape configuration containing exactly one endpoint to scrape:
# Here it's Prometheus itself.
scrape_configs:
  # The job name is added as a label `job=<job_name>` to any timeseries scraped from this config.
  - job_name: "prometheus"

    # metrics_path defaults to '/metrics'
    # scheme defaults to 'http'.

    static_configs:
      - targets: ["172.17.0.2:9090"]

  - job_name: 'node_exporter'
    static_configs:
      - targets: ['172.17.0.2:8080']


  - job_name: 'push-metrics'
    static_configs:
      - targets: ['172.17.0.2:9091']
        labels:
          instance: pushgateway
在prometheus中设置告警规则,rules/host_rules.yml
groups:
# 报警组组名称
- name: hostStatsAlert
  #报警组规则
  rules:
   #告警名称,需唯一
  - alert: hostCpuUsageAlert
    #promQL表达式
    expr: sum(avg without (cpu)(irate(node_cpu_seconds_total{mode!='idle'}[5m]))) by (instance) > 0.85
    #满足此表达式持续时间超过for规定的时间才会触发此报警
    for: 1m
    labels:
      #严重级别
      severity: page
    annotations:
     #发出的告警标题
      summary: "实例 {{ $labels.instance }} CPU 使用率过高"
      #发出的告警内容
      description: "实例{{ $labels.instance }} CPU 使用率超过 85% (当前值为: {{ $value }})"
  - alert: hostMemUsageAlert
    expr: (node_memory_MemTotal_bytes - node_memory_MemAvailable_bytes)/node_memory_MemTotal_bytes > 0.85
    for: 1m
    labels:
      severity: page
    annotations:
      summary: "实例 {{ $labels.instance }} 内存使用率过高"
      description: "实例 {{ $labels.instance }} 内存使用率 85% (当前值为: {{ $value }})"
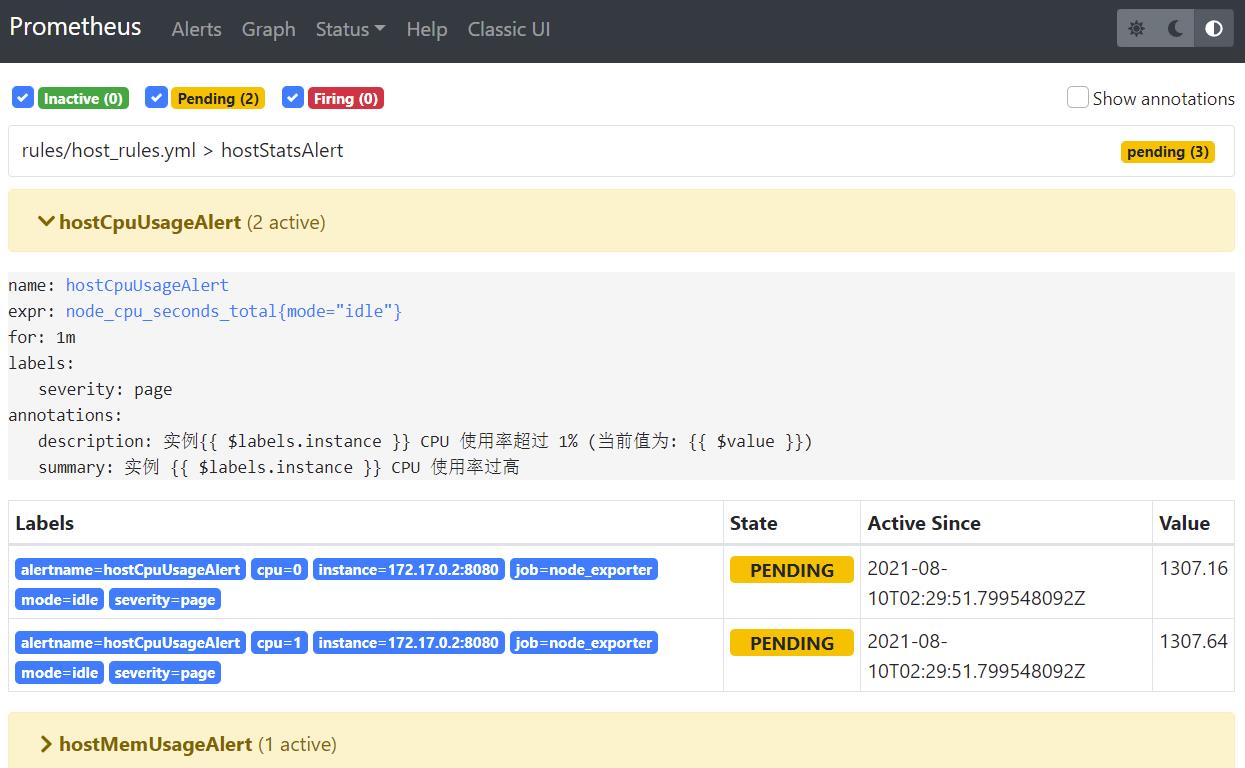
配置完规则之后,访问:http://localhost:19090/alerts,可以看到:

5.1.2.alertmanager下载、安装、启动
tar -zxvf alertmanager-0.22.2.linux-amd64.tar.gz -C /root/installed/

cd /root/installed/alertmanager
nohup ./alertmanager --config.file=alertmanager.yml > alertmanager.file 2>&1 &
服务器上访问路径:
http://localhost:9093/
本机上的访问路径:
http://localhost:19093/#/alerts

5.1.3.创建alertmanager配置文件
Alertmanager解压后会包含一个默认的alertmanager.yml配置文件,内容如下所示:
route:
  group_by: ['alertname']
  group_wait: 30s
  group_interval: 5m
  repeat_interval: 1h
  receiver: 'web.hook'
receivers:
- name: 'web.hook'
  webhook_configs:
  - url: 'http://127.0.0.1:5001/'
inhibit_rules:
  - source_match:
      severity: 'critical'
    target_match:
      severity: 'warning'
    equal: ['alertname', 'dev', 'instance']
Alertmanager的配置主要包含两个部分:路由(route)以及接收器(receivers)。所有的告警信息都会从配置中的顶级路由(route)进入路由树,根据路由规则将告警信息发送给相应的接收器。
5.1.4.关联Prometheus与Alertmanager
prometheus.yml中的alerting标签下配置上alertmanager的地址即可,配置如下(此步上面已经配置了,下面只是作为部署时的参考):
alerting:
  alertmanagers:                #配置alertmanager
    - static_configs:
        - targets:
          - 172.17.0.2:9093      # alertmanager服务器ip端口

rule_files:
  - "rules/*.yml"
5.1.5.配置报警通知方式
5.1.5.1.alertmanager邮箱报警demo
以下是alertmanager.yml中的配置:
global:
  #超时时间
  resolve_timeout: 5m
  #smtp地址需要加端口
  smtp_smarthost: 'smtp.126.com:25'
  smtp_from: 'xxx@126.com'
  #发件人邮箱账号
  smtp_auth_username: 'xxx@126.com'
  #账号对应的授权码(不是密码),阿里云个人版邮箱目前好像没有授权码,126邮箱授权码可以在“设置”里面找到
  smtp_auth_password: '1qaz2wsx'
  smtp_require_tls: false

route:
  group_by: ['alertname']
  group_wait: 10s
  group_interval: 1m
  repeat_interval: 4h
  receiver: 'mail'
receivers:
- name: 'mail'
  email_configs:
  - to: 'xxx@aliyun.com'
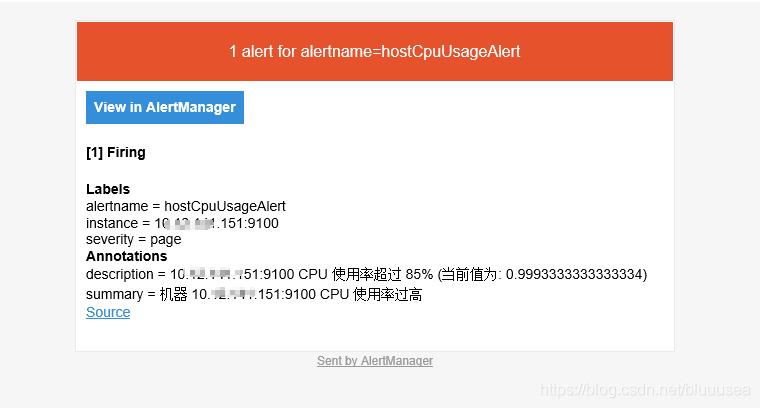
设置后如果有通知,即可收到邮件如下:

5.1.5.2.alertmanager使用webhook(java)报警demo
此时要将alertmanager.yml修改成:
global:
  resolve_timeout: 5m

route:
  group_by: ['alertname']
  group_wait: 10s
  group_interval: 10s
  repeat_interval: 1m
  receiver: 'webhook'
  routes:
    - receiver: webhook
      group_wait: 10s

receivers:
- name: 'webhook'
  webhook_configs:
  # 下面的url是自定义springboot项目中接口的访问url地址
  - url: 'http://172.17.0.2:8060/demo'
    send_resolved: true
inhibit_rules:
  - source_match:
      severity: 'critical'
    target_match:
      severity: 'warning'
    equal: ['alertname', 'dev', 'instance']
使用webhook方式,alertmanager会给配置的webhook地址发送一个http类型的post请求,参数为json字符串(字符串类型),如下(此处格式化为json了):
{
    "receiver":"webhook",
    "status":"resolved",
    "alerts":[
        {
            "status":"resolved",
            "labels":{
                "alertname":"hostCpuUsageAlert",
                "instance":"192.168.199.24:9100",
                "severity":"page"
            },
            "annotations":{
                "description":"192.168.199.24:9100 CPU 使用率超过 85% (当前值为: 0.9973333333333395)",
                "summary":"机器 192.168.199.24:9100 CPU 使用率过高"
            },
            "startsAt":"2020-02-29T19:45:21.799548092+08:00",
            "endsAt":"2020-02-29T19:49:21.799548092+08:00",
            "generatorURL":"http://localhost.localdomain:9090/graph?g0.expr=sum+by%28instance%29+%28avg+without%28cpu%29+%28irate%28node_cpu_seconds_total%7Bmode%21%3D%22idle%22%7D%5B5m%5D%29%29%29+%3E+0.85&g0.tab=1",
            "fingerprint":"368e9616d542ab48"
        }
    ],
    "groupLabels":{
        "alertname":"hostCpuUsageAlert"
    },
    "commonLabels":{
        "alertname":"hostCpuUsageAlert",
        "instance":"192.168.199.24:9100",
        "severity":"page"
    },
    "commonAnnotations":{
        "description":"192.168.199.24:9100 CPU 使用率超过 85% (当前值为: 0.9973333333333395)",
        "summary":"机器 192.168.199.24:9100 CPU 使用率过高"
    },
    "externalURL":"http://localhost.localdomain:9093",
    "version":"4",
    "groupKey":"{}:{alertname="hostCpuUsageAlert"}"
}
此时需要使用java(其他任何语言都可以,反正只要能处理http的请求就行)搭建个http的请求处理器来处理报警通知,如下(以下代码示例展示了接收host_rules.yml规则告警得到的数据的方式):
package com.demo.demo1.controller;

import com.alibaba.fastjson.JSON;
import com.alibaba.fastjson.JSONObject;
import lombok.extern.slf4j.Slf4j;
import org.apache.commons.lang3.StringUtils;
import org.springframework.stereotype.Controller;
import org.springframework.web.bind.annotation.RequestBody;
import org.springframework.web.bind.annotation.RequestMapping;
import org.springframework.web.bind.annotation.ResponseBody;

import java.util.ArrayList;
import java.util.HashMap;
import java.util.List;
import java.util.Map;


@Slf4j
@Controller
@RequestMapping("/")
public class AlertController {


    @RequestMapping(value = "/demo", produces = "application/json;charset=UTF-8")
    @ResponseBody
    public String pstn(@RequestBody String json) {
        log.debug("alert notify  params: {}", json);
        Map<String, Object> result = new HashMap<>();
        result.put("msg", "报警失败");
        result.put("code", 0);

        if(StringUtils.isBlank(json)){
            return JSON.toJSONString(result);
        }
        JSONObject jo = JSON.parseObject(json);

        JSONObject commonAnnotations = jo.getJSONObject("commonAnnotations");
        String status = jo.getString("status");
        if (commonAnnotations == null) {
            return JSON.toJSONString(result);
        }


        String subject = commonAnnotations.getString("summary");
        String content = commonAnnotations.getString("description");
        List<String> emailusers = new ArrayList<>();
        emailusers.add("xxx@aliyun.com");

        List<String> users = new ArrayList<>();
        users.add("158*****5043");


        try {
            boolean success = Util.email(subject, content, emailusers);
            if (success) {
                result.put("msg", "报警成功");
                result.put("code", 1);
            }
        } catch (Exception e) {
            log.error("=alert email notify error. json={}", json, e);
        }
        try {
            boolean success = Util.sms(subject, content, users);
            if (success) {
                result.put("msg", "报警成功");
                result.put("code", 1);
            }
        } catch (Exception e) {
            log.error("=alert sms notify error. json={}", json, e);
        }


        return JSON.toJSONString(result);
    }

}
5.1.5.3.完整简单的SpringBoot工程案例
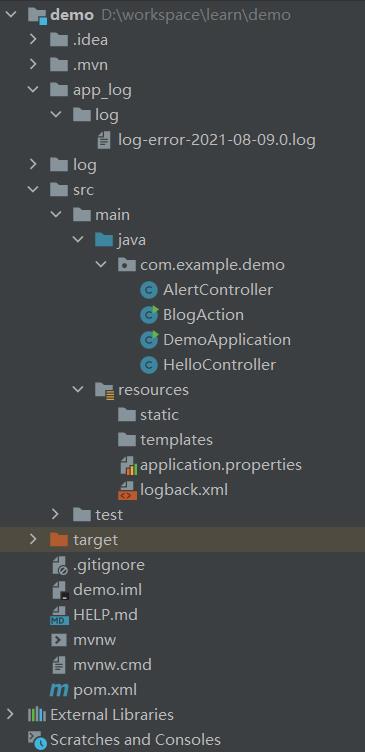
5.1.5.3.1.工程结构

5.1.5.3.2.pom.xml
<?xml version="1.0" encoding="UTF-8"?>
<project xmlns="http://maven.apache.org/POM/4.0.0" xmlns:xsi="http://www.w3.org/2001/XMLSchema-instance"
xsi:schemaLocation="http://maven.apache.org/POM/4.0.0 https://maven.apache.org/xsd/maven-4.0.0.xsd">
<modelVersion>4.0.0</modelVersion>
<parent>
<groupId>org.springframework.boot</groupId>
<artifactId>spring-boot-starter-parent</artifactId>
<version>2.3.5.RELEASE</version>
<relativePath/> <!-- lookup parent from repository -->
</parent>
<groupId>com.example</groupId>
<artifactId>demo</artifactId>
<version>0.0.1-SNAPSHOT</version>
<name>demo</name>
<description>Demo project for Spring Boot</description>
<properties>
<java.version>1.8</java.version>
</properties>
<dependencies>
<dependency>
<groupId>org.springframework.boot</groupId>
<artifactId>spring-boot-starter-web</artifactId>
</dependency>
<dependency>
<groupId>com.h2database</groupId>
<artifactId>h2</artifactId>
<scope>runtime</scope>
</dependency>
<dependency>
<groupId>org.projectlombok</groupId>
<artifactId>lombok</artifactId>
<optional>true</optional>
</dependency>
<dependency>
<groupId>org.springframework.boot</groupId>
<artifactId>spring-boot-starter-test</artifactId>
<scope>test</scope>
</dependency>
<!-- JSON Configuration -->
<dependency>
<groupId>com.alibaba</groupId>
<artifactId>fastjson</artifactId>
<version>1.2.6</version>
</dependency>
<!--<dependency>
<groupId>org.apache.commons</groupId>
<artifactId>commons-lang3</artifactId>
<version>3.11</version>
</dependency>-->
</dependencies>
<build>
<plugins>
<plugin>
<groupId>org.springframework.boot</groupId>
<artifactId>spring-boot-maven-plugin</artifactId>
<configuration>
<excludes>
<exclude>
<groupId>org.projectlombok</groupId>
<artifactId>lombok</artifactId>
</exclude>
</excludes>
</configuration>
</plugin>
</plugins>
</build>
<repositories>
<repository>
<id>spring-milestones</id>
<name>Spring Milestones</name>
<url>https://repo.spring.io/milestone</url>
<snapshots>
<enabled>false