《Keep your Eyes on the Lane:Real-time Attention-guided Lane Detection》
Posted m_buddy
tags:
篇首语:本文由小常识网(cha138.com)小编为大家整理,主要介绍了《Keep your Eyes on the Lane:Real-time Attention-guided Lane Detection》相关的知识,希望对你有一定的参考价值。
参考代码:LaneATT
1. 概述
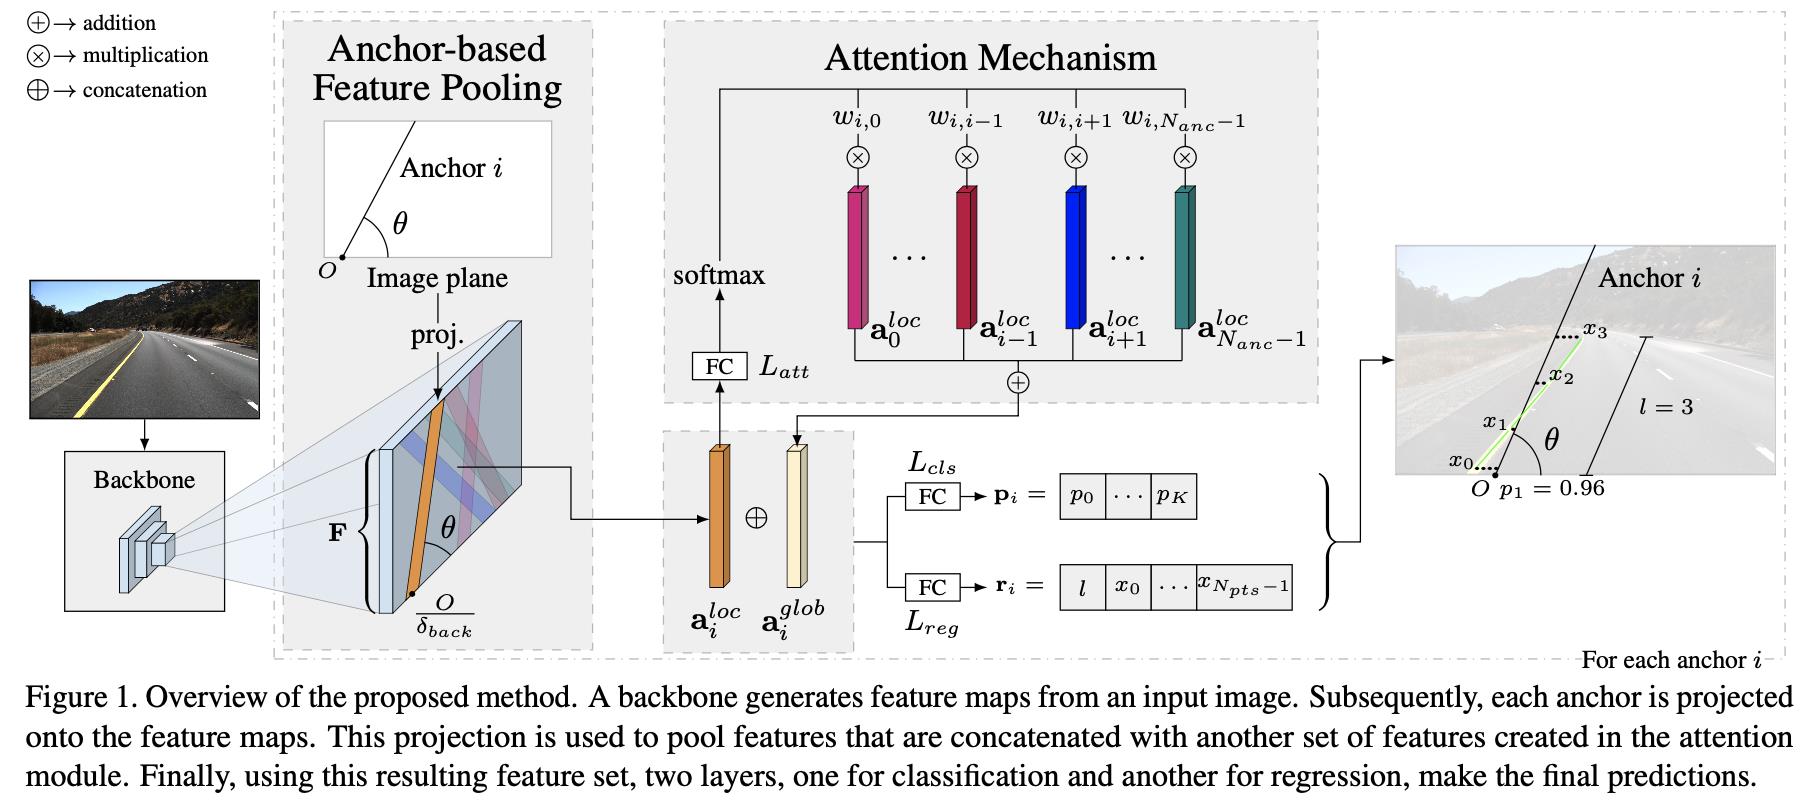
导读:这篇文章提出了一种使用anchor points进行车道线检测的算法,该算法的设计源自于Line-CNN。其在Line-CNN的基础上增加了一个global attention操作(在“RoI pooling”特征基础上)使得抽取的单个anchor的RoI特征能够感知全局范围的特征,从而利用了全局信息实现车道线更好的定位。在文中还提出在训练集上统计对预先设置anchor集合进行筛选,从而减少proposal数量,可以在原本的基础上进一步减少最后的计算量,因而文章的在保持效果的同时具有较好的车道线检测性能。不过文章的车道线检测回归的目标是车道线上的点,并没有去区分车道线的实例,要确立具体的车道线实例需要采用类似启发式算法去解决。
文章的方法很大程度上源自于Line-CNN,其来源为:
Line-CNN: End-to-End Traffic Line Detection With Line Proposal Unit
在该算法中将车道线检测归纳为左右下3个方向进行RoI proposal,产生的proposal是一系列角度的点集,之后再再这些点集上进行回归,所以按照道理来讲这样的方式是可以进行一定程度扭曲程度曲线的预测的,对此文章给出的一些图例也可以看出其预测效果。Line-CNN的网络结构见下图所示:
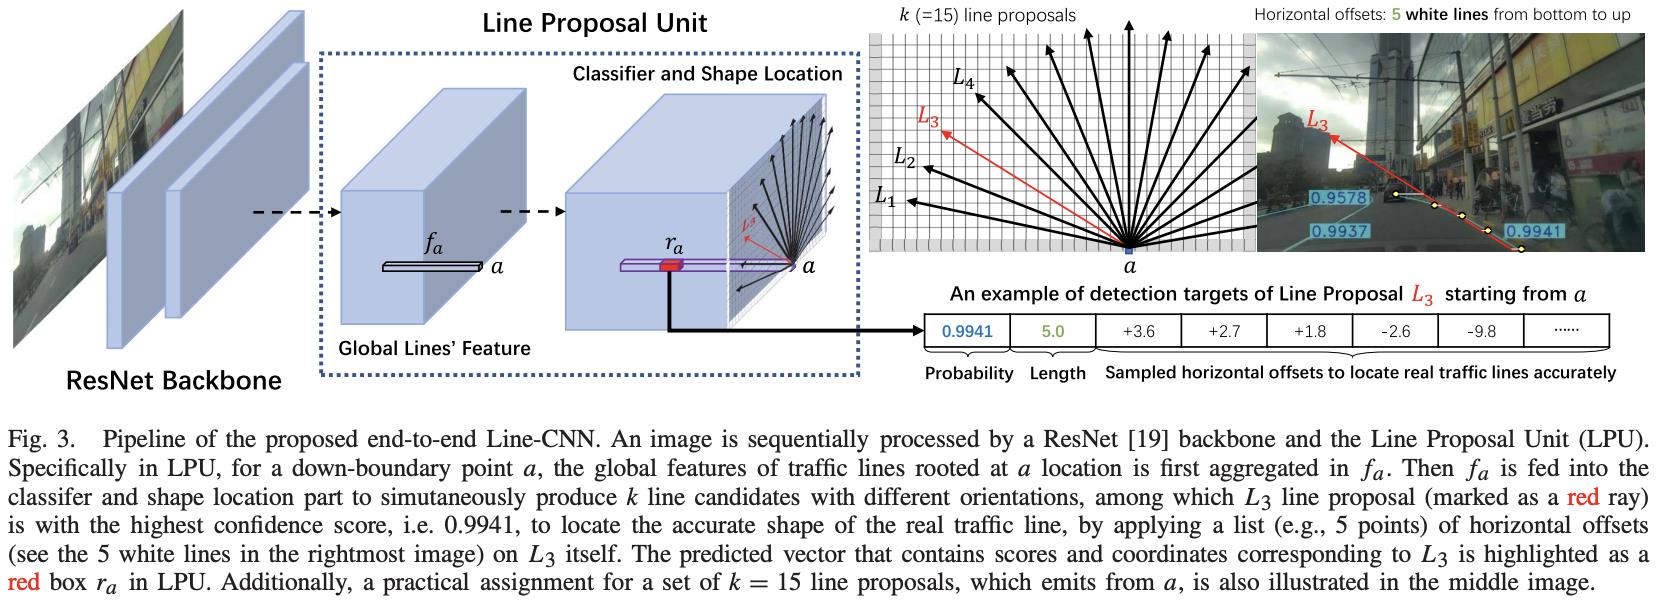
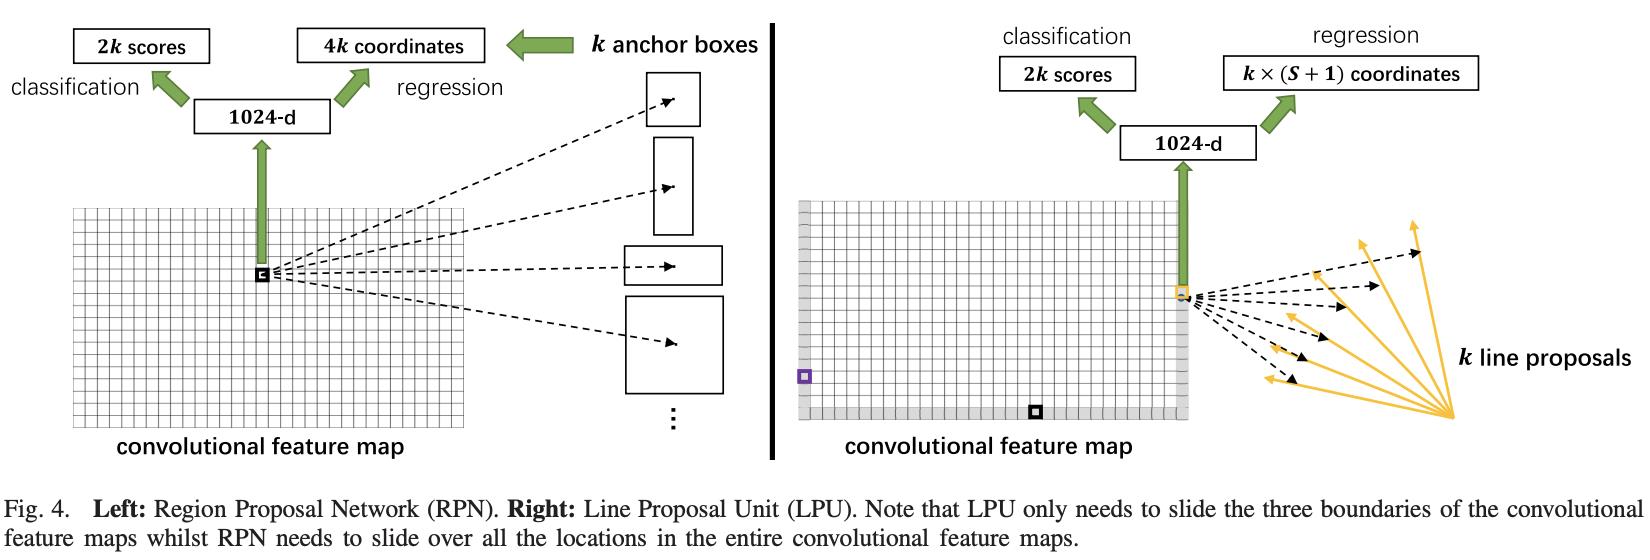
可以看到它可以看作是一个“二阶段”的检测网络,其也是先在左右下3个方向上产生RoI proposal,之后将这些proposal提出再进行分类个车道线回归,下面是传统二阶段检测网络和文章提出的检测网络的对比:
2. 方法设计
2.1 网络结构
文章的算法在Line-CNN的基础上进行改进而来,主要的差异在使用了global attention操作,从而使得RoI proposal的特征具有了感知全局的特性。文章的网络结构见下图所示:
2.2 anchor机制
2.2.1 anchor数量确定
backbone产生的特征图尺寸为
F
∈
R
C
F
∗
H
F
∗
W
F
F\\in R^{C_F*H_F*W_F}
F∈RCF∗HF∗WF,文章的anchor是在其左右下3个方向上进行设置的,其中左右分别6个角度变量,y轴方向上的72个切分点;下面包含15个角度变量和x轴方向的128个切分点(网络输入的图像尺寸是
360
∗
640
360*640
360∗640,所以自然x轴方向的切分相对多一些)。因而在左右下3个方向上的所有proposal总量为:
N
=
2
∗
6
∗
72
+
15
∗
128
=
2784
N=2*6*72+15*128=2784
N=2∗6∗72+15∗128=2784
但是这么多的数量自然带来很多的计算量,文章提出的一种解决方案是采用数据驱动的方式统计众数,之后取top-k,按照这样的思路,文章将最后取得anchor集合总数描述为
N
a
n
c
N_{anc}
Nanc。
2.2.2 anchor的种类与生成
将文章讲述的内容与实际的代码进行比较,发现代码中提出的anchor集合类型是有两个的,它们之间的区别在于使用的采样点数量不同,一个是使用
N
p
t
s
N_{pts}
Npts(代码中描述为self.anchors),另外一个为
H
F
H_F
HF(代码中描述为self.anchors_cut),这两种anchor在不同的阶段完成不同的任务。
对于最后用于生成检测结果使用的是self.anchors。其中采样的点数为
N
p
t
s
N_{pts}
Npts,则其中在y轴方向上的采样点描述为
Y
=
{
y
i
}
i
=
0
N
p
t
s
−
1
Y=\\{y_i\\}_{i=0}^{N_{pts}-1}
Y={yi}i=0Npts−1,其中的一个点为
y
i
=
i
⋅
H
I
N
p
t
s
−
1
y_i=i\\cdot\\frac{H_I}{N_{pts}-1}
yi=i⋅Npts−1HI。对应的x轴方向上的集合描述为:
X
=
{
x
i
}
i
=
0
N
p
t
s
−
1
X=\\{x_i\\}_{i=0}^{N_{pts}-1}
X={xi}i=0Npts−1,那么
x
i
x_i
xi和
y
i
y_i
yi它们之间和角度
θ
\\theta
θ关联起来可以得到下面的关系式子(PS:下面的式子与代码中的算式存在矛盾):
x
i
=
⌊
1
t
a
n
θ
(
y
i
−
y
o
r
i
g
δ
b
a
c
k
)
+
x
o
r
i
g
δ
b
a
c
k
⌋
x_i=\\lfloor\\frac{1}{tan\\theta}(y_i-\\frac{y_{orig}}{\\delta_{back}})+\\frac{x_{orig}}{\\delta_{back}}\\rfloor
xi=⌊tanθ1(yi−δbackyorig)+δbackxorig⌋
其中,
O
=
(
x
o
r
i
g
,
y
o
r
i
g
)
O=(x_{orig},y_{orig})
O=(xorig,yorig)代表的是当前anchor的起点,
δ
b
a
c
k
\\delta_{back}
δback代表的是backbone产生特征的stride。从上面的关系可以得到确定一个anchor需要两个关键属性:起点
O
O
O以及旋转角度
θ
\\theta
θ。
对于用于生成RoI proposal特征使用的是self.anchors_cut。其生成的过程与上文提到的anchor生成过程类似,只是在生成anchor的采样点数量上有所区别。
这两种anchor生成的过程可以参考下面的代码:
# lib/models/laneatt.py#L241
def generate_anchors(self, lateral_n, bottom_n):
    left_anchors, left_cut = self.generate_side_anchors(self.left_angles, x=0., nb_origins=lateral_n)
    right_anchors, right_cut = self.generate_side_anchors(self.right_angles, x=1., nb_origins=lateral_n)
    bottom_anchors, bottom_cut = self.generate_side_anchors(self.bottom_angles, y=1., nb_origins=bottom_n)

    return torch.cat([left_anchors, bottom_anchors, right_anchors]), torch.cat([left_cut, bottom_cut, right_cut])

def generate_side_anchors(self, angles, nb_origins, x=None, y=None):
    if x is None and y is not None:  # 在X/Y指定的方向上进行切分,确定起点位置
        starts = [(x, y) for x in np.linspace(1., 0., num=nb_origins)]
    elif x is not None and y is None:
        starts = [(x, y) for y in np.linspace(1., 0., num=nb_origins)]
    else:
        raise Exception('Please define exactly one of `x` or `y` (not neither nor both)')

    n_anchors = nb_origins * len(angles)  # 切分的每个点与对应边的angle数量组成anchor的数量

    # each row, first for x and second for y:
    # 2 scores, 1 start_y, start_x, 1 lenght, S coordinates, score[0] = negative prob, score[1] = positive prob
    anchors = torch.zeros((n_anchors, 2 + 2 + 1 + self.n_offsets))
    anchors_cut = torch.zeros((n_anchors, 2 + 2 + 1 + self.fmap_h))
    for i, start in enumerate(starts):
        for j, angle in enumerate(angles):
            k = i * len(angles) + j
            anchors[k] = self.generate_anchor(start, angle)  # 以起点未开始构造anchor points
            anchors_cut[k] = self.generate_anchor(start, angle, cut=True)

    return anchors, anchors_cut

def generate_anchor(self, start, angle, cut=False):
    if cut:
        anchor_ys = self.anchor_cut_ys
        anchor = torch.zeros(2 + 2 + 1 + self.fmap_h)
    else:
        anchor_ys = self.anchor_ys
        anchor = torch.zeros(2 + 2 + 1 + self.n_offsets)
    angle = angle * math.pi / 180.  # degrees to radians
    start_x, start_y = start
    anchor[2] = 1 - start_y
    anchor[3] = start_x
    anchor[5:] = (start_x + (1 - anchor_ys - 1 + start_y) / math.tan(angle)) * self.img_w

    return anchor
2.3 roi proposal的生成
在文章的检测算法中也使用了类似RoI Pooling的操作,只不过其采用的是indexing的方式,也就是按照之前生成的self.anchors_cut在特征图的
(
C
,
H
,
W
)
(C,H,W)
(C,H,W)维度上进行indexing,可以参考下面的函数实现代码:
# lib/models/laneatt.py#L208
def compute_anchor_cut_indices(self, n_fmaps, fmaps_w, fmaps_h):
    # definitions
    n_proposals = len(self.anchors_cut)  # cut范围内的anchor数量

    # indexing
    unclamped_xs = torch.flip((self.anchors_cut[:, 5:] / self.stride).round().long(), dims=(1,))
    unclamped_xs = unclamped_xs.unsqueeze(2)
    unclamped_xs = torch.repeat_interleave(unclamped_xs, n_fmaps, dim=0).reshape(-1, 1)
    cut_xs = torch.clamp(unclamped_xs, 0, fmaps_w - 1)
    unclamped_xs = unclamped_xs.reshape(n_proposals, n_fmaps, fmaps_h, 1)
    invalid_mask = (unclamped_xs < 0) | (unclamped_xs > fmaps_w)
    cut_ys = torch.arange(0, fmaps_h)以上是关于《Keep your Eyes on the Lane:Real-time Attention-guided Lane Detection》的主要内容,如果未能解决你的问题,请参考以下文章