Flutter-UI-基础控件
Posted 冯汉栩
tags:
篇首语:本文由小常识网(cha138.com)小编为大家整理,主要介绍了Flutter-UI-基础控件相关的知识,希望对你有一定的参考价值。
一直觉得自己写的不是技术,而是情怀,一个个的教程是自己这一路走来的痕迹。靠专业技能的成功是最具可复制性的,希望我的这条路能让你们少走弯路,希望我能帮你们抹去知识的蒙尘,希望我能帮你们理清知识的脉络,希望未来技术之巅上有你们也有我。
小知识
1.int _currentIndex = 0; 创建带有下划线属性 是一个私有属性
Center
作用:用于中心对齐文字
属性
child
Center(
  child: ,
)
Text
child: Text(
    'fenghanxuqwertyuiopasdfgjkgh',
    overflow: TextOverflow.clip,//ellipsis 超出一行3个点   fade 超出一行渐变  clip 超出一行裁剪
    maxLines: 3,//设置Label的行数
    textScaleFactor: 2,//字体放大两倍
    textAlign: TextAlign.center,//对齐方式
    textDirection: TextDirection.ltr,
    style: TextStyle(//设置文字样式
        decoration: TextDecoration.lineThrough,//中间有一个行横线
        decorationColor: Colors.white,//中间有一个行横线 颜色
        decorationStyle: TextDecorationStyle.dashed,//中间有一个行横线 虚线
        letterSpacing: 0.0,//字体之间的左右间距
        fontStyle: FontStyle.italic,//字体倾斜
        fontWeight: FontWeight.w900,//字体粗细(加粗)
        backgroundColor: Colors.red,//设置背景颜色
        fontSize: 20.0,//设置文字大小
        color: Color.fromRGBO(234, 123, 155, 1.0),//设置文字颜色
//          color: Colors.yellow,//设置文字颜色
   ),
),
MaterialApp
是一个跟组件 作为App的跟组件 相当于每个页面都要加的 加了之后页面默认是白色的。不然是黑色的
属性
home - 主页
title - 标题
color - 颜色
theme - 主题
routes - 路由
固定页面结构
return MaterialApp(
  home: Scaffold(
    appBar: AppBar(
      title: Text('Flutter Demol'),
    ),
    body: HomeContent(),
  ),
  theme: ThemeData(
    primarySwatch: Colors.yellow,//修改主题颜色   想导航栏的颜色
  ),
);
Scaffold
属性
appBar - 显示假面顶部的一个AppBar
body - 当前界面所显示的主要内容
drawer - 抽屉菜单控件
Container
容器组件
属性
child
height
width
decoration 设置背景颜色和边框颜色
child: Container(
  child: Text('fenghanxuqwertyuiopasdfgjkgh'),
  height: 300,
  width: 300,
  decoration: BoxDecoration(
     color: Colors.blue,//容易背景颜色
     border: Border.all(
              color: Colors.green,//边框颜色
              width: 2//边框宽度
     ),
     borderRadius: BorderRadius.all(Radius.circular(10.0),),//设置容器圆角
  ),
//padding: EdgeInsets.all(20),//容器之间的内边距
  padding: EdgeInsets.fromLTRB(20, 20, 20, 20),//容器之间的内边距
//margin: EdgeInsets.all(20), //容器之间的外距离
  margin:  EdgeInsets.fromLTRB(20, 20, 20, 20),//容器之间的外距离
//transform: Matrix4.translationValues(10, 10, 10),//容器位移
//transform: Matrix4.rotationZ(0.3),//旋转 Matrix4.rotationX(0.3), Matrix4.rotationY(0.3),
//transform: Matrix4.diagonal3Values(0.5, 0.5, 0.5),//缩放倍数
  alignment: Alignment.bottomRight,//内容相对容器的对齐方式
),
Image
网络图片加载不成功两个问题:
1.是否连接wifi
2.重新烧录需要点击是否同意访问网络
3.url是否有效
加载网络图片
child: Image.network(
  'https://www.itying.com/images/upload/Image/3333333.png',
  alignment: Alignment.bottomRight,//图片相对容器的对齐方式
  color: Colors.yellow,//图片背景颜色
  colorBlendMode: BlendMode.colorBurn,//图片混合模式
  fit: BoxFit.cover,//显示效果 cover  自适应 fill  铺满可能变形 fitWidth 宽充满 filHright 高充满 repeat 多张图片平铺
),
图片切圆方法
加载网络图片
child: Container(
  child: ClipOval(
    child: Image.asset('https://www.itying.com/images/flutter/2.png',
    width: 100,
    height: 100,
    fit: BoxFit.cover,),
  ),
),
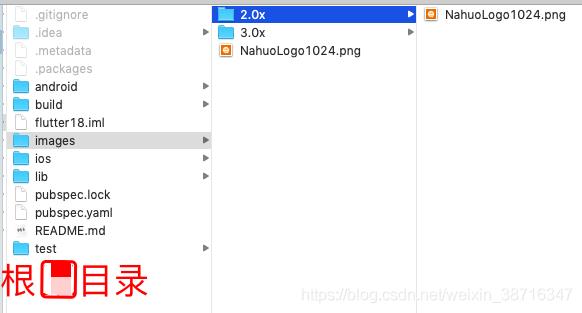
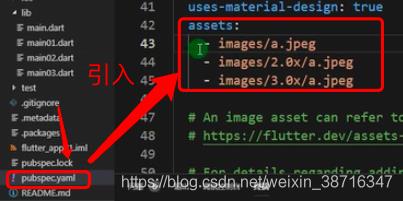
导入本地图片


child: Container(
  child: ClipOval(
    child: Image.asset('images/NahuoLogo1024.png',
    width: 100,
    height: 100,
    fit: BoxFit.cover,),
  ),
),
ListView 列表

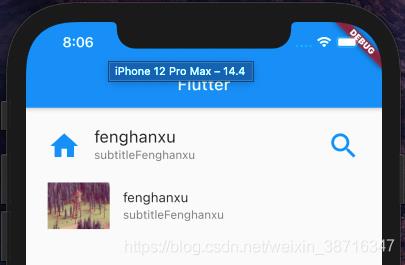
最简单的列表
    return ListView(
//      scrollDirection: Axis.horizontal,//设置水平列表
      padding: EdgeInsets.all(10),//设置上下左右间距20
      children: <Widget>[
        ListTile(
          leading: Icon(Icons.home,color: Colors.blue,size: 40,),//加载系统图标
          title: Text(
            'fenghanxu',
            style: TextStyle(
              fontSize: 20,
            ),
          ),
          subtitle: Text('subtitleFenghanxu'),
          trailing: Icon(Icons.search,color: Colors.blue,size: 40,),
        ),
        ListTile(
          leading: Image.network('https://www.itying.com/images/flutter/1.png'),//加载网络图片
          title: Text('fenghanxu'),
          subtitle: Text('subtitleFenghanxu'),
        ),
      ],
    );
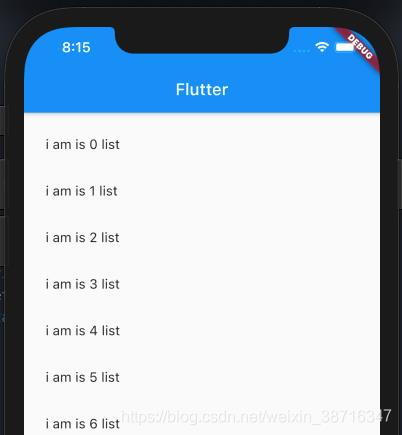
通过for循环实现动态遍历ListItem列表

class _MyHomePageState extends State<MyHomePage> {

  List<Widget> _getData(){
    List<Widget> list = new List();
    for(var i = 0; i < 20; i++){
      list.add(ListTile(
        title: Text('i am is $i list'),
      ));
    }
    return list;
  }

  @override
  Widget build(BuildContext context) {
    return Scaffold(
      appBar: AppBar(
        title: Text(widget.title),
      ),
      body: Center(
        child: ListView(
//      scrollDirection: Axis.horizontal,//设置水平列表
          padding: EdgeInsets.all(10),//设置上下左右间距20
          children: _getData(),
        ),
      ),
    );
  }
}
GridView 网格
GridView.count 静态网格布局
//GridView  for循环数据
import 'package:flutter/material.dart';
import 'res/listData.dart';

void main() => runApp(MyApp());

class MyApp extends StatelessWidget {
  @override
  Widget build(BuildContext context) {
    // TODO: implement build
    return MaterialApp(
      home: Scaffold(
        appBar: AppBar(title: Text('Flutter Demol'),),
        body: HomeContent(),
      ),
    );
  }

}


class HomeContent extends StatelessWidget {

  List<Widget> _getListData(){
    var tempList = listData.map((value){
      return Container(
        child: Column(
          children: <Widget>[
            Image.network(value['imageUrl']),
            SizedBox(
              height: 20,//图片跟文字的间距是20
            ),
            Text(
              value['title'],
              textAlign: TextAlign.center,
              style: TextStyle(
                  fontSize: 15
              ),
            )
          ],
        ),
        decoration: BoxDecoration(//添加边框
            border: Border.all(
                color: Color.fromRGBO(233, 233, 233, 0.9),
                width: 1.0
            )
        ),
      );
    });
    return tempList.toList();
  }

  @override
  Widget build(BuildContext context) {
    // TODO: implement build
    return GridView.count(
      crossAxisSpacing: 20.0,//设置cell的左右间距为20
      mainAxisSpacing: 20.0,//设置cell的上下间距为20
      padding: EdgeInsets.all(10),//设置cell的内间距为10(上下左右)
      crossAxisCount: 2,//控制列数
      childAspectRatio: 0.9,//只能调节X Y轴的比例  宽高比0.7
      children: this._getListData(),
    );

  }

}
GridView.builder 动态网格布局
//GridView  数据   GridView.count 静态网格布局
import 'package:flutter/material.dart';
import 'res/listData.dart';

void main() => runApp(MyApp());

class MyApp extends StatelessWidget {
  @override
  Widget build(BuildContext context) {
    // TODO: implement build
    return MaterialApp(
      home: Scaffold(
        appBar: AppBar(title: Text('Flutter Demol'),),
        body: HomeContent(),
      ),
    );
  }

}


class HomeContent extends StatelessWidget {

  Widget _getListData(context,index){
    return Container(
      child: Column(
        children: <Widget>[
          Image.network(listData[index]['imageUrl']),
          SizedBox(
            height: 20,//图片跟文字的间距是20
          ),
          Text(
            listData[index]['title'],
            textAlign: TextAlign.center,
            style: TextStyle(
                fontSize: 20
            ),
          )
        ],
      ),
      decoration: BoxDecoration(//添加边框
          border: Border.all(
              color: Color.fromRGBO(233, 233, 233, 0.9),
              width: 1.0
          )
      ),
    );
//    return tempList.toList();
  }

  @override
  Widget build(BuildContext context) {
    // TODO: implement build
    return GridView.builder(
      gridDelegate: SliverGridDelegateWithFixedCrossAxisCount(
        crossAxisSpacing: 10.0,//设置cell的左右间距为20
        mainAxisSpacing: 10.0,//设置cell的上下间距为20
        crossAxisCount: 2,
      ),
      itemCount: listData.length,//便利的次数是数组的次数
      itemBuilder: this._getListData,//数据方法
    );

  }

}
BoxDecoration 边框
BoxDecoration(
     color: Colors.blue,//容易背景颜色
     border: Border.all(
              color: Colors.green,//边框颜色
              width: 2//边框宽度
     ),
     borderRadius: BorderRadius.all(Radius.circular(10.0),),//设置容器圆角
  )
SizedBox 间隙
SizedBox( height: 20,)//图片跟文字的间距是20
Padding 外边框控件
return Padding(
  padding: EdgeInsets.fromLTRB(10, 10, 0, 0),
  child: Image.network(
      'https://www.itying.com/images/flutter/1.png', fit: BoxFit.cover),
);
Row 水平布局控件
return Row(
  //center start end  spaceAround 两边留固定空隙  spaceBetween 中间留空隙 spaceEvenly  两边留平均空隙
  mainAxisAlignment: MainAxisAlignment.start,//X轴的显示方式
  //crossAxisAlignment: CrossAxisAlignment.end,//Y轴的显示方式 要用一个参考物用的比较小
  children: <Widget>[
    IconContainer(Icons.search,color: Colors.blue,size: 30,),
    IconContainer(Icons.home,color: Colors.yellow,size: 30,),
    IconContainer(Icons.settings,color: Colors.green,size: 30,),
  ],
);
Column 垂直布局控件
return Container(
  width: 200,
  height: 400,
  color: Colors.pink,
  child: Column(
    //center start end  spaceAround 两边留固定空隙  spaceBetween 中间留空隙 spaceEvenly  两边留平均空隙
    mainAxisAlignment: MainAxisAlignment.spaceEvenly,//X轴的显示方式
    //crossAxisAlignment: CrossAxisAlignment.end,//Y轴的显示方式 要用一个参考物用的比较小
    children: <Widget>[
      IconContainer(Icons.search,color: Colors.blue,size: 30,),
      IconContainer(Icons.home,color: Colors.yellow,size: 30,),
      IconContainer(Icons.settings,color: Colors.orange,size: 30,),
    ],
  ),
);
Expanded 控件相对父View的宽度比例
return Container(
  width: 400,
  height: 100,
  color: Colors.pink,
  child: Row(
    //center start end  spaceAround 两边留固定空隙  spaceBetween 中间留空隙 spaceEvenly  两边留平均空隙
    mainAxisAlignment: MainAxisAlignment.spaceEvenly,//X轴的显示方式
    //crossAxisAlignment: CrossAxisAlignment.end,//Y轴的显示方式 要用一个参考物用的比较小
    children: <Widget>[
      Expanded(
        flex: 1,
        child: IconContainer(Icons.search,color: Colors.blue,size: 30,),
      ),
      Expanded(
        flex: 2,
        child: IconContainer(Icons.home,color: Colors.yellow,size: 30,),
      ),
    ],
  ),
);
Stack
Stack配合Align 使用 Stack 它可以控制子组件的位置
return  Center(
  child: Container(
    height: 400.0,
    width: 300.0,
    color: Colors.red,
    child: Stack(
      alignment: Alignment.center,
      children: <Widget>[
        Align(
          alignment: Alignment.topLeft,
          child: Icon(Icons.home,size: 40,color: Colors.white),
        ),
        Align(
          alignment: Alignment.center,
          child: Icon(Icons.search,size: 40,color: Colors.white),
        ),
        Align(
          alignment: Alignment.bottomRight,
          child: Icon(Icons.select_all,size: 40,color: Colors.white),
        ),
        Align(
          alignment: Alignment(1.0,-0.2),
          child: Icon(Icons.security,size: 40,color: Colors.white),
        ),
      ],
    ),
  ),
);
Stack配合Positioned 使用 Stack 它可以控制子组件的位置
return  Center(
  child: Container(
    height: 400.0,
    width: 300.0,
    color: Colors.red,
    child: Stack(
      alignment: Alignment.center,
      children: <Widget>[
        Positioned(
          left: 10,
          child: Icon(Icons.home,size: 40,color: Colors.white),
        ),
        Positioned(
          bottom: 0,
          left: 100,
          child: Icon(Icons.search,size: 40,color: Colors.white),
        ),
        Positioned(
          right: 10,
          top: 10,
          child: Icon(Icons以上是关于Flutter-UI-基础控件的主要内容,如果未能解决你的问题,请参考以下文章