「深度学习一遍过」必修15:PyTorch模型分析
Posted 荣仔!最靓的仔!
tags:
篇首语:本文由小常识网(cha138.com)小编为大家整理,主要介绍了「深度学习一遍过」必修15:PyTorch模型分析相关的知识,希望对你有一定的参考价值。
本专栏用于记录关于深度学习的笔记,不光方便自己复习与查阅,同时也希望能给您解决一些关于深度学习的相关问题,并提供一些微不足道的人工神经网络模型设计思路。
专栏地址:「深度学习一遍过」必修篇
目录
1 Pytorch 模型结构分析
1.1 工具1:pytorch-summary
- 可以对每一层的参数量和输入输出形状进行分析
- 可以查看每一层的类型、形状和参数量
- 模型整体的参数量和模型大小
 一次需要的内存大小,可以用来估计最佳
  _
_
import torch.nn as nn
import torch.nn.functional as F
from torchsummary import summary

class customize_model(nn.Module):
    def __init__(self):
        super(customize_model,self).__init__()
        self.conv = nn.Conv2d(1, 6, 5, 2)
        self.bn = nn.BatchNorm2d(6)
        self.fc1 = nn.Linear(1200 , 128)
        self.fc2 = nn.Linear(128 , 2)

    def forward(self , x):
        x = F.relu(self.bn(self.conv(x)))
        x = x.view(-1 , 1200)
        x = F.relu(self.fc1(x))
        x = self.fc2(x)
        return x

if __name__ == '__main__':
    model = customize_model().cuda()
    summary(model, input_size=(1, 24, 24))
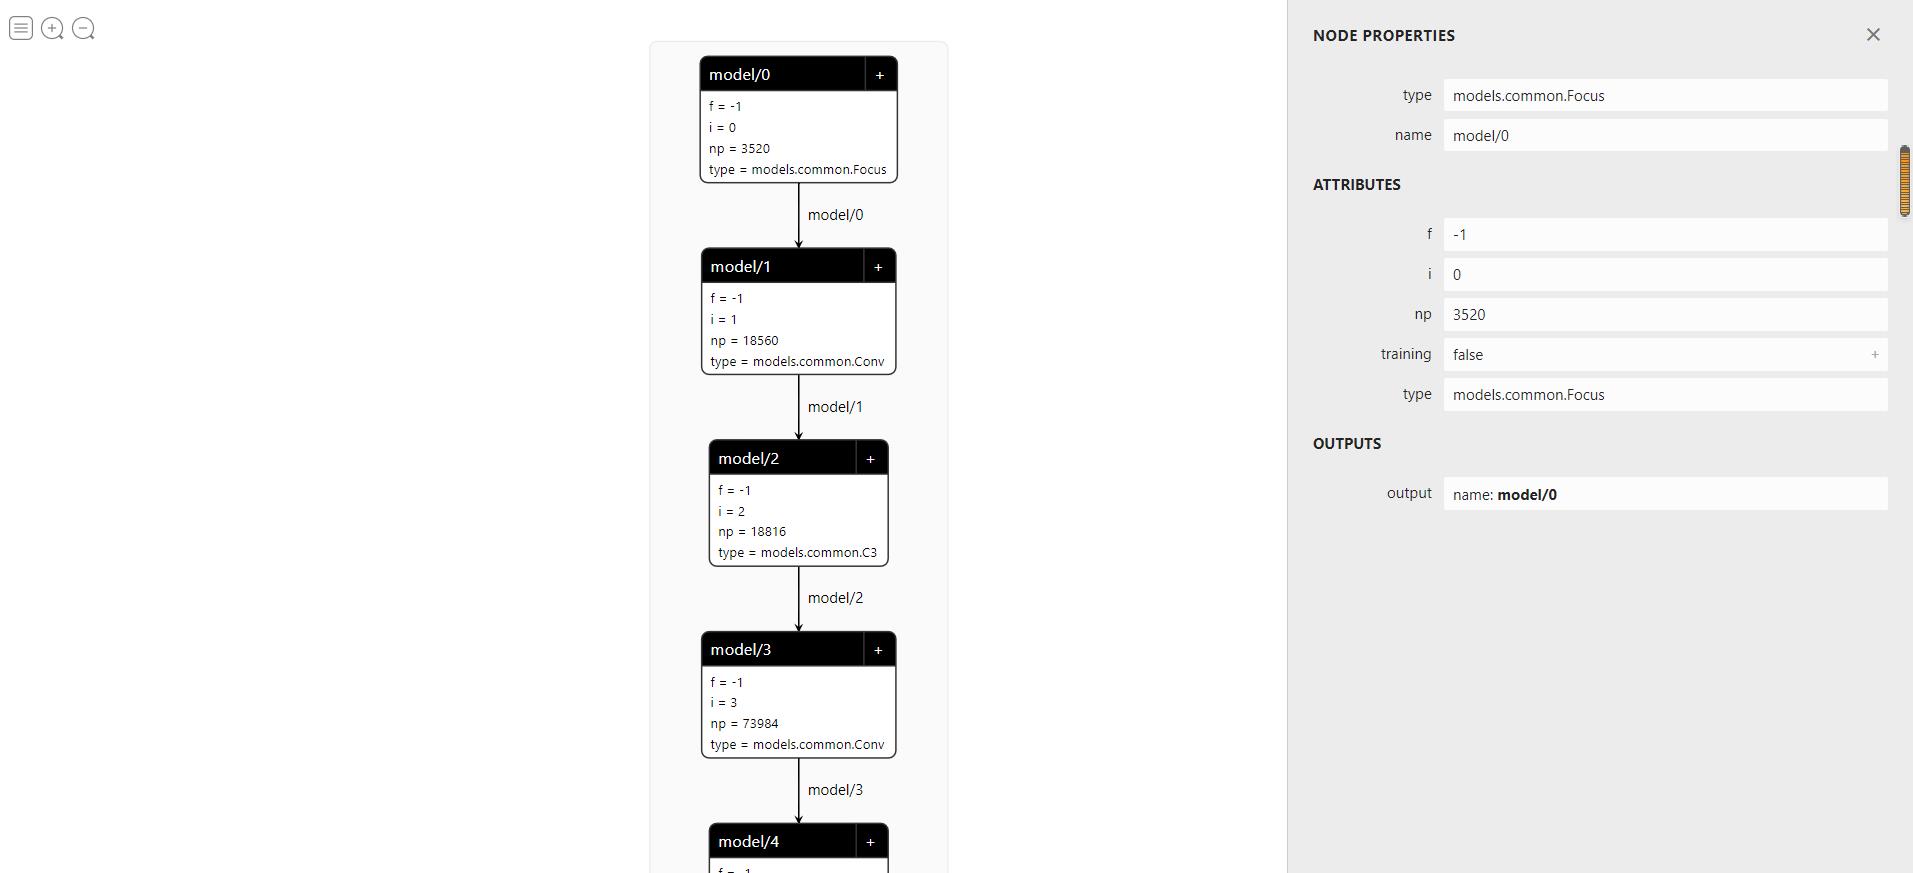
1.2 工具2:Netron
- 可以对网络结构,权重尺寸与大小进行可视化
- 可以查看网络拓扑结构与卷积核尺寸、权重等
- 支持静态框架,如:
 、
、 、
、 等
等 - 部分支持动态框架,如:
 、
、 、
、 等
等

本地版:https://github.com/lutzroeder/netron
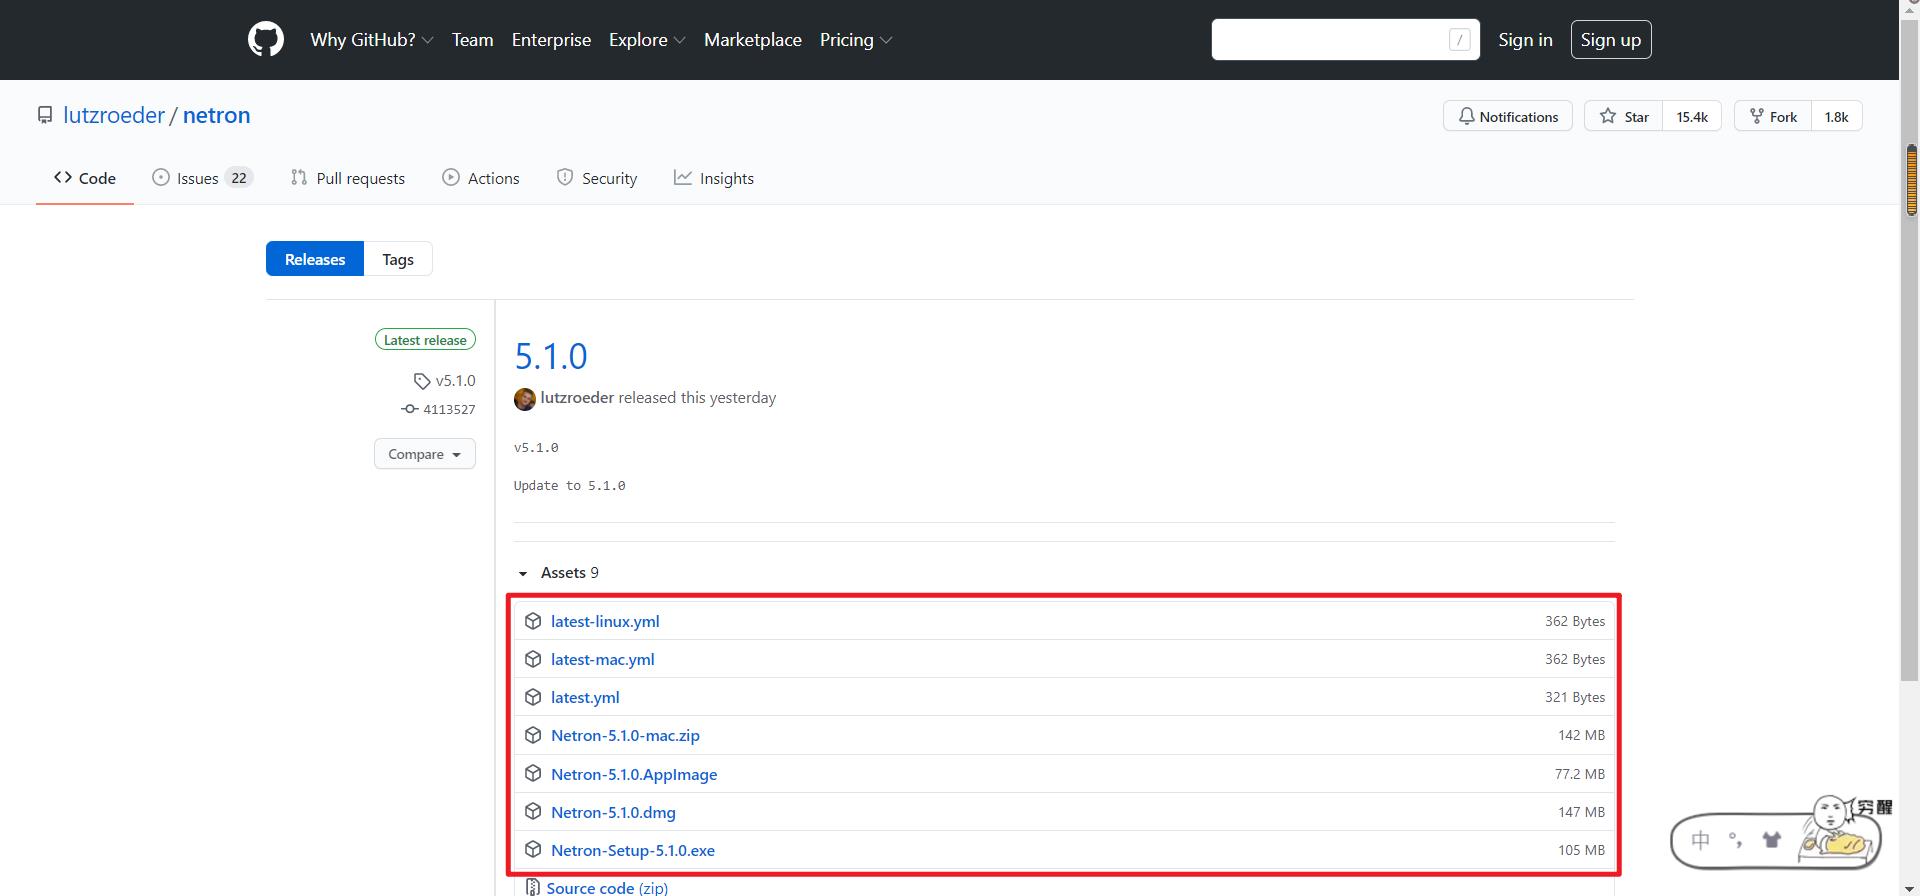
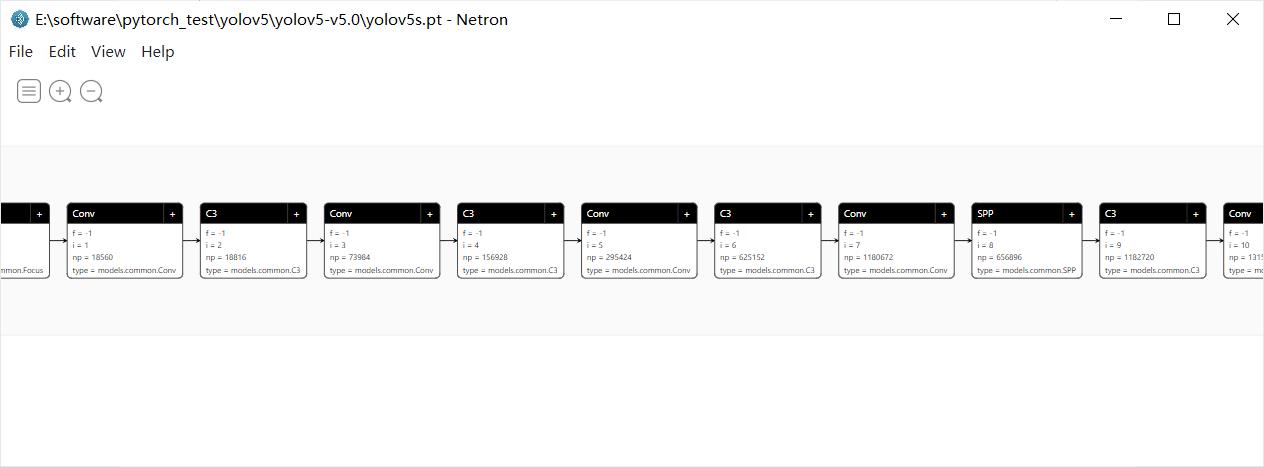
注:本地版可将网页版竖着显示的模型结构可视化为横着,根据大家习惯自行选择。
( )是一种针对机器学习所涉及的开放式的文件格式,用于存储训练好的模型。它使得不同的人工智能框架(如
 ,
, )可以采用相同格式存储模型数据并交互。
的规范及代码主要由微软,亚马逊, 和
和  等公司共同开发。
import torch
import torch.nn as nn
import torch.nn.functional as F

class customize_model(nn.Module):
    def __init__(self):
        super(customize_model,self).__init__()
        self.conv = nn.Conv2d(3, 6, 5, 2)
        self.bn = nn.BatchNorm2d(6)
        self.fc1 = nn.Linear(600 , 128)
        self.fc2 = nn.Linear(128 , 2)

    def forward(self , x):
        x = F.relu(self.bn(self.conv(x)))
        x = x.view(-1 , 600)
        x = F.relu(self.fc1(x))
        x = self.fc2(x)
        return x

if __name__ == '__main__':
    device = torch.device("cuda" if torch.cuda.is_available() else "cpu")
    model = customize_model().to(device)
    model.load_state_dict(torch.load('model.ckpt', map_location=lambda storage, loc:storage))
    model.train(False)
    model_input = torch.randn((1,3,24,24)).to(device)
torch.onnx.export(model, model_input, "model.proto", verbose=False) 
1.3 工具3:Graphviz
- 可以对网络结构进行可视化
- 通用绘图工具,查看网络拓扑结构与卷积核大小
import graphviz

# 生成图
dot = graphviz.Digraph(comment='The Round Table')

# 添加节点与边
dot.node('A', 'King Arthur')
dot.node('B', 'Sir Bedevere the Wise')
dot.node('C', 'Sir Lancelot the Brave')

dot.edges(['AB', 'AL'])
dot.edge('B', 'L', constraint='false')

# 渲染图,生成'test-output/round-table.gv.pdf'
dot.render('round-table.gv', view=True)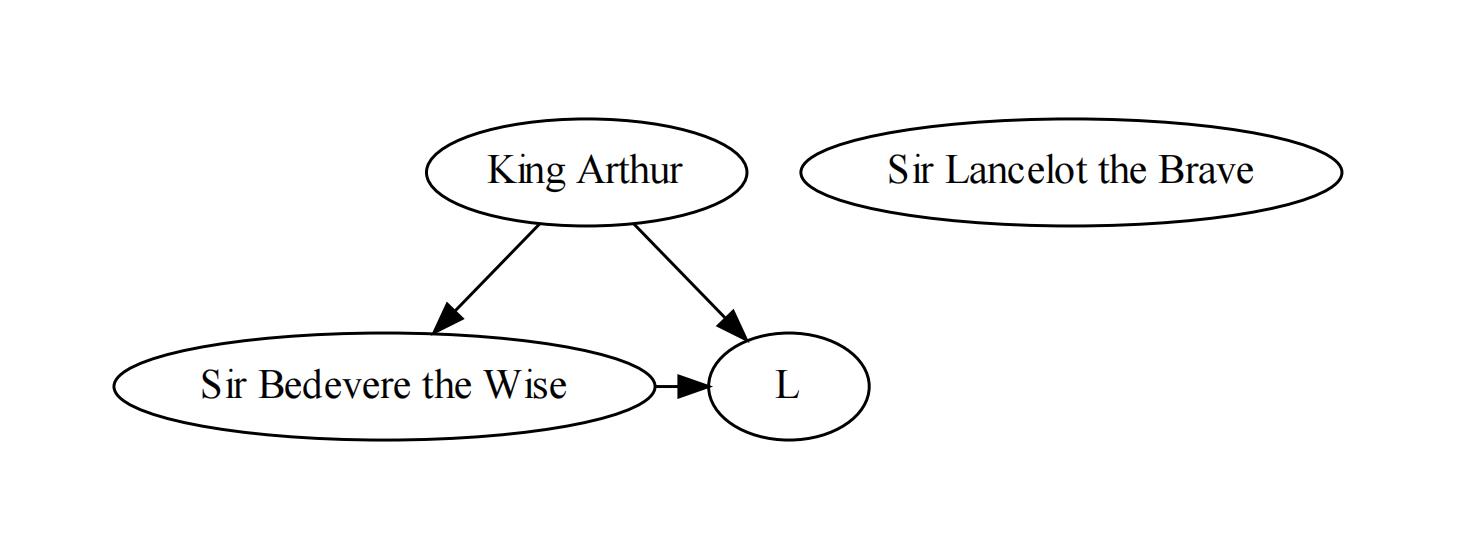
import torch
import torch.nn as nn
from torchviz import make_dot
import torch.nn.functional as F

class customize_model(nn.Module):
    def __init__(self):
        super(customize_model,self).__init__()
        self.conv = nn.Conv2d(1, 6, 5, 2)
        self.bn = nn.BatchNorm2d(6)
        self.fc1 = nn.Linear(600 , 128)
        self.fc2 = nn.Linear(128 , 2)

    def forward(self , x):
        x = F.relu(self.bn(self.conv(x)))
        x = x.view(-1 , 600)
        x = F.relu(self.fc1(x))
        x = self.fc2(x)
        return x

if __name__ == '__main__':
    device = torch.device("cuda" if torch.cuda.is_available() else "cpu")
    x = torch.randn(1, 1, 24, 24)
    model = customize_model()
    y = model(x).to(device)
    g = make_dot(y)
    g.view()
2 Pytorch 模型速度与计算量分析
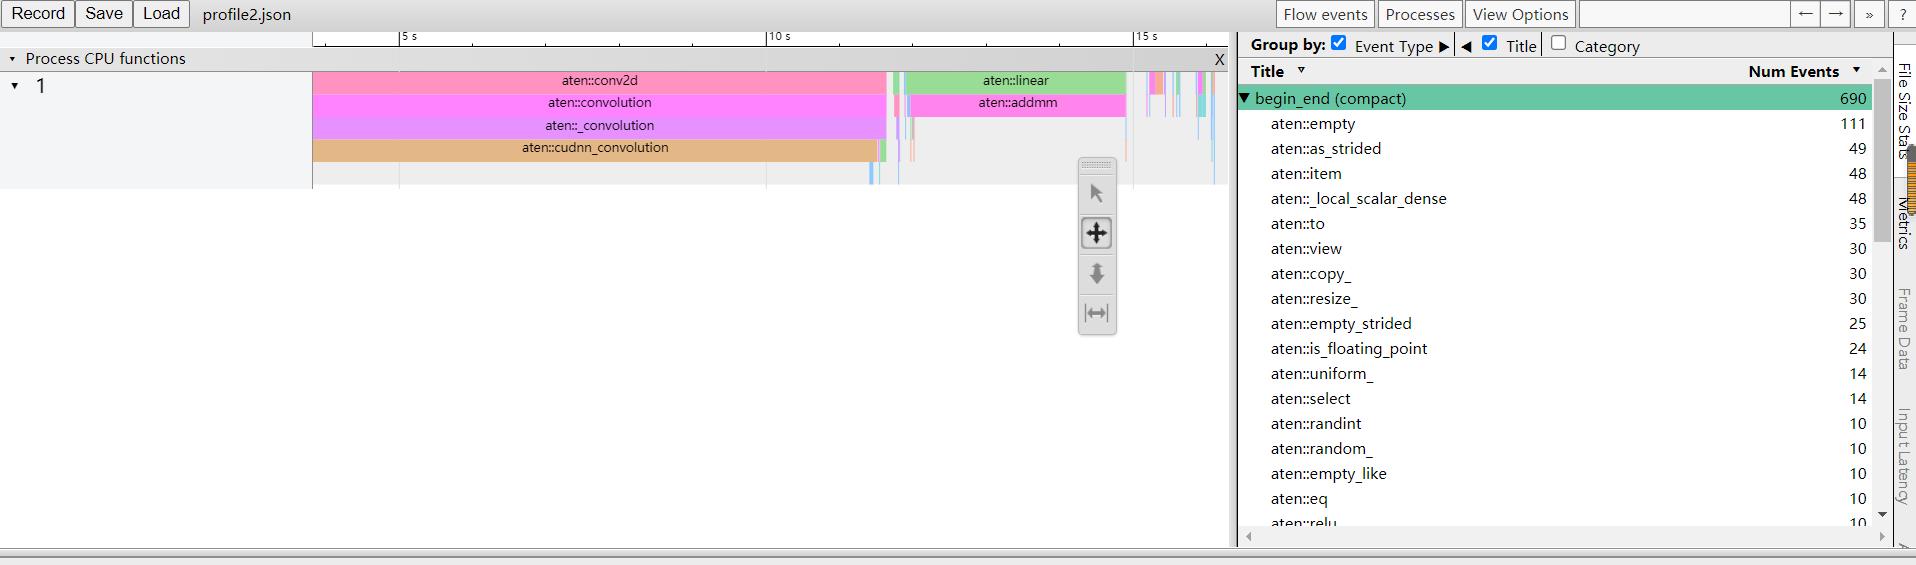
2.1 模型速度分析工具——Pytorch自带的API
torch.autograd.profiler # 分析每个算子的速度torch.autograd.profiler.profile(enabled=True, *, use_cuda=False, record_shapes=False, with_flops=False, profile_memory=False, with_stack=False, use_kineto=False, use_cpu=True) :将当前上下文设置为
  操作
操作 _
_ :是否使用
:是否使用 
 _
_ :是否统计
:是否统计 
 _
_ :是否追踪内存使用情况
 _
_ :收集其他信息,如文件与行数
- _
 :是否
:是否 - _
 :统计
:统计  事件
事件
统计  幅图的预测结果:
import torch
import os
import torch.nn as nn
from PIL import Image
from torchvision import transforms
import torch.nn.functional as F

class customize_model(nn.Module):
    def __init__(self):
        super(customize_model,self).__init__()
        self.conv = nn.Conv2d(3, 6, 5, 2)
        self.bn = nn.BatchNorm2d(6)
        self.fc1 = nn.Linear(2904 , 128)
        self.fc2 = nn.Linear(128 , 2)

    def forward(self , x):
        x = F.relu(self.bn(self.conv(x)))
        x = x.view(-1 , 2904)
        x = F.relu(self.fc1(x))
        x = self.fc2(x)
        return x

if __name__ == '__main__':
    images_path = 'E:/monkey'
    device = torch.device("cuda" if torch.cuda.is_available() else "cpu")

    data_transforms =  transforms.Compose([
                    transforms.RandomSizedCrop(48),
                    transforms.ToTensor(),
                    transforms.Normalize([0.5,0.5,0.5], [0.5,0.5,0.5])])

    model = customize_model().to(device)
    model.eval()

    with torch.autograd.profiler.profile(enabled=True, use_cuda=False, record_shapes=False, profile_memory=False) as prof:
        image_paths = os.listdir(images_path)
        for imagepath in image_paths:
            imagepath = os.path.join(images_path, imagepath)
            image = Image.open(imagepath)
            imgblob = data_transforms(image).unsqueeze(0).to(device)
            # 获得预测结果predict,得到预测的标签值label
            predict = model(imgblob)

    print(prof.table())
    prof.export_chrome_trace('profile.json')

操作数与时间统计查看:浏览器输入:chrome://tracing/
2.2 模型参数量分析工具——flops-counter
可以计算参数量和 
from ptflops import get_model_complexity_info
import torch
import torch.nn as nn
import torch.nn.functional as F

class customize_model(nn.Module):
    def __init__(self):
        super(customize_model,self).__init__()
        self.conv = nn.Conv2d(1, 6, 5, 2)
        self.bn = nn.BatchNorm2d(6)
        self.fc1 = nn.Linear(600 , 128)
        self.fc2 = nn.Linear(128 , 2)

    def forward(self , x):
        x = F.relu(self.bn(self.conv(x)))
        x = x.view(-1 , 600)
        x = F.relu(self.fc1(x))
        x = self.fc2(x)
        return x

if __name__ == '__main__':
    with torch.cuda.device(-1):
        model = customize_model()
        macs, params = get_model_complexity_info(model, (1,24,24), as_strings=True, print_per_layer_stat=True, verbose=True)
        print('{:<30} {:<8}'.format('Computational complexity:', macs))
        print('{:<30} {:<8}'.format('Number of parameters:', params))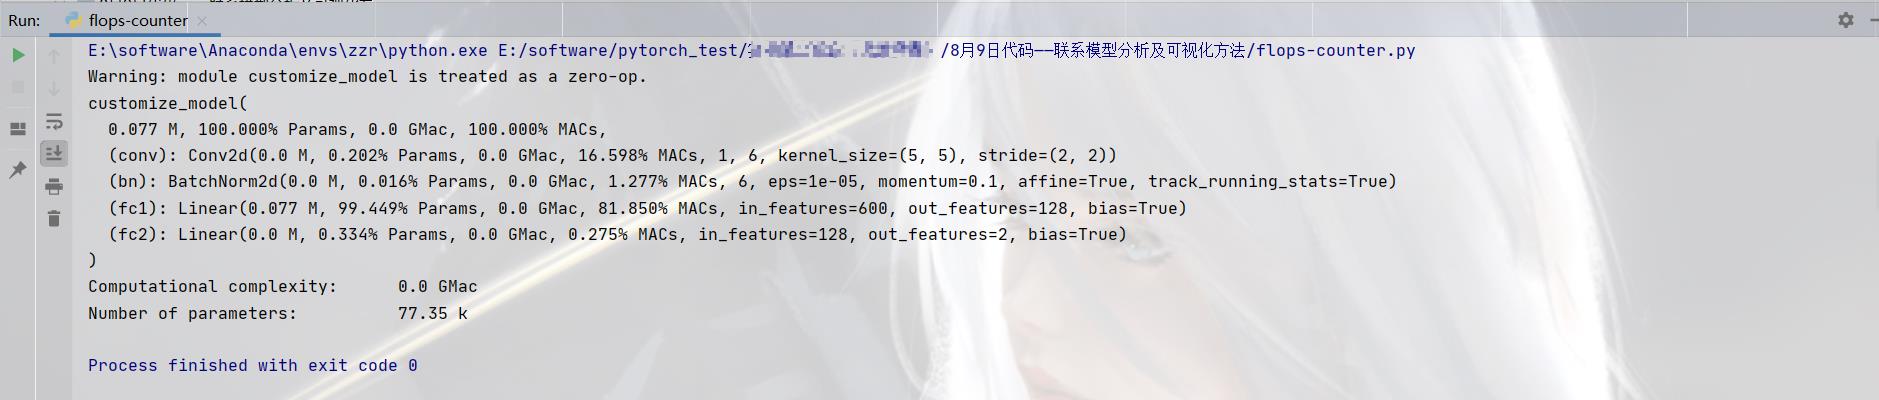
3 Pytorch 模型可视化
3.1 权重与特征可视化
- 权重可视化:对权重参数的大小进行可视化
- 特征可视化:对特征进行可视化
3.2 卷积层可视化
import torch
import torch.nn as nn
import torch.nn.functional as F

class customize_model(nn.Module):
    def __init__(self):
        super(customize_model,self).__init__()
        self.conv = nn.Conv2d(3, 6, 5, 2)
        self.bn = nn.BatchNorm2d(6)
        self.fc1 = nn.Linear(600 , 128)
        self.fc2 = nn.Linear(128 , 2)

    def forward(self , x):
        x = F.relu(self.bn(self.conv(x)))
        x = x.view(-1 , 600)
        x = F.relu(self.fc1(x))
        x = self.fc2(x)
        return x

if __name__ == '__main__':
    model = customize_model()
    modelpath = 'model.ckpt'
    model.load_state_dict(torch.load(modelpath, map_location=lambda storage, loc:storage))
    print(type(model))
    print(model)

    params = {}
    for name,parameters in model.named_parameters():
        print(name, ':', parameters.size())
        params[name] = parameters.detach().numpy()

import torch
import torchvision
import numpy as np
from matplotlib import pyplot as plt

# 使用 make_grid 进行可视化
def vis_tensor(tensor, ch=0, all_kernels=False, nrow=4, padding=2):
    '''
    :param ch: channel for visualization
    :param all_kernels: all kernels for visualization
    '''
    n, c, h, w = tensor.shape
    if all_kernels:
        tensor = tensor.view(n*c, -1, w, h)
    elif c != 3:
        tensor = tensor[:, ch, :, :].unsqueeze(dim=1)

    rows = np.min((tensor.shape[0]//nrow+1, 64))
    grid = torchvision.utils.make_grid(tensor, nrow=nrow, normalize=True, padding=padding)
    plt.figure(figsize=(nrow, rows))
    img = grid.numpy().transpose((1, 2, 0))
    plt.imshow(img)  # CHW --> HWC
    plt.savefig("model_image.png")

if __name__ == '__main__':
    x = torch.randn(1, 1, 24, 24)
    vis_tensor(x)

欢迎大家交流评论,一起学习
希望本文能帮助您解决您在这方面遇到的问题
感谢阅读
END
以上是关于「深度学习一遍过」必修15:PyTorch模型分析的主要内容,如果未能解决你的问题,请参考以下文章