vue+ vis 编写流程图,网络拓补图等
Posted 晚星@
tags:
篇首语:本文由小常识网(cha138.com)小编为大家整理,主要介绍了vue+ vis 编写流程图,网络拓补图等相关的知识,希望对你有一定的参考价值。


安装依赖
npm install vis --save
代码
 <template>
  <div>
    <div id="mynetwork"></div>
  </div>
</template>

 <script>
import vis from "vis";
export default {
  data () {
    return {
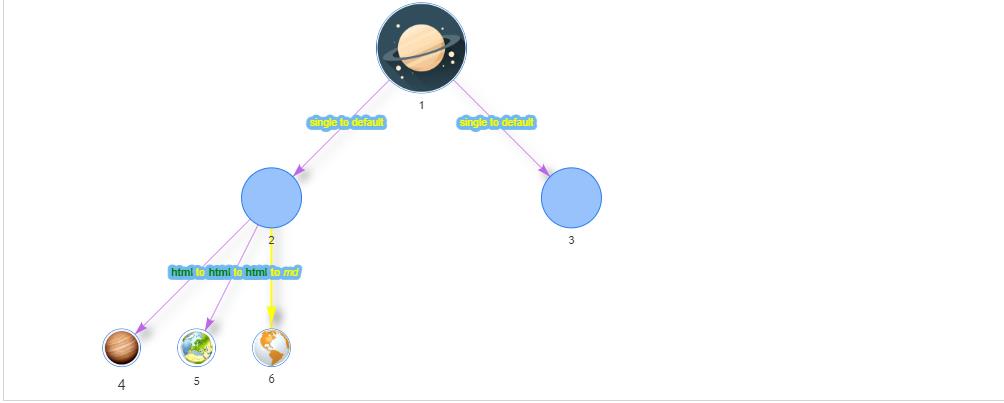
      nodes: [
        {
          id: 1,
          label: "1",
          x: 0,
          y: 0,
          image: 'https://ss0.bdstatic.com/70cFvHSh_Q1YnxGkpoWK1HF6hhy/it/u=3689173839,956040439&fm=26&gp=0.jpg',
          size: 60,
          title: 'space',
        },
        {
          id: 2,
          font: { multi: true },
          label: "2",
          x: -200,
          y: 200,
          size: 40,
          image: 'https://timgsa.baidu.com/timg?image&quality=80&size=b9999_10000&sec=1596542548144&di=362f2b36cbfe93d4f04a5b9b77e56cf0&imgtype=0&src=http%3A%2F%2Fyzhtml01.book118.com%2F2016%2F11%2F26%2F06%2F45267770%2F1.files%2Ffile0001.png',
          title: 'earth',
        },
        {
          id: 3,
          font: { multi: true },
          label: "3",
          x: 200,
          y: 200,
          size: 40,
          image: 'https://timgsa.baidu.com/timg?image&quality=80&size=b9999_10000&sec=1596542548144&di=362f2b36cbfe93d4f04a5b9b77e56cf0&imgtype=0&src=http%3A%2F%2Fyzhtml01.book118.com%2F2016%2F11%2F26%2F06%2F45267770%2F1.files%2Ffile0001.png',
          title: 'earth',
        },
        {
          id: 4,
          font: { multi: "html", size: 20 },
          label: "4",
          x: -400,
          y: 400,
          image: 'https://ss0.bdstatic.com/70cFvHSh_Q1YnxGkpoWK1HF6hhy/it/u=1924443930,1818184200&fm=26&gp=0.jpg',
          title: 'https://ss0.bdstatic.com/70cFvHSh_Q1YnxGkpoWK1HF6hhy/it/u=1924443930,1818184200&fm=26&gp=0.jpg',
        },
        {
          id: 5,
          font: { multi: "md", face: "georgia" },
          label: "5",
          x: -300,
          y: 400,
          image: 'https://ss0.bdstatic.com/70cFvHSh_Q1YnxGkpoWK1HF6hhy/it/u=2299626866,2306729894&fm=26&gp=0.jpg',
          title: 'https://ss0.bdstatic.com/70cFvHSh_Q1YnxGkpoWK1HF6hhy/it/u=2299626866,2306729894&fm=26&gp=0.jpg',
        },
        {
          id: 6,
          font: { multi: "md", face: "georgia", },
          label: "6",
          x: -200,
          y: 400,
          image: 'https://ss2.bdstatic.com/70cFvnSh_Q1YnxGkpoWK1HF6hhy/it/u=3443312632,4280189108&fm=26&gp=0.jpg',
          title: 'https://ss2.bdstatic.com/70cFvnSh_Q1YnxGkpoWK1HF6hhy/it/u=3443312632,4280189108&fm=26&gp=0.jpg',
        },
      ],
      edges: [
        { from: 1, to: 2, label: "single to default" },
        { from: 1, to: 3, label: "single to default" },
        { from: 2, to: 4, font: { multi: "md" }, label: "*html* to _md_" },
        { from: 2, to: 5, font: { multi: "md" }, label: "*html* to _md_" },
        { from: 2, to: 6, font: { multi: "md" }, label: "*html* to _md_" },
      ],
      options: {},
    }
  },

  mounted () {
    this.init();
  },

  methods: {
    init () {
      let _this = this;
      var container = document.getElementById("mynetwork");
      var data = {
        nodes: _this.nodes,
        edges: _this.edges,
      };
      _this.options = {
        edges: {
          width: 1,
          length: 60,
          shadow: true,
          smooth: {
            enabled: false
          },
          arrows: {
            to: {
              enabled: true,
              scaleFactor: 1,
              type: "arrow"
            },
          },
          color: {
            color: "#bc68e6",
            highlight: "yellow",
            hover: "#1fe1c6",
            inherit: "from",
            opacity: 1.0
          },
          font: {
            color: 'yellow',
            size: 14,
            face: 'arial',
            background: 'white',
            strokeWidth: 10,
            strokeColor: 'rgb(112, 184, 240)',
            align: 'horizontal',
            multi: false,
            vadjust: 0,
            bold: {
              color: "green",
            },
          },
        },
        nodes: {
          shape: 'circularImage',
          font: {
            bold: {
              color: "red",
            },
          },
        },
        physics: {
          enabled: false,
        },
        interaction: {
          dragNodes: false, //是否能拖动节点
          dragView: true, //是否能拖动画布
          hover: true, //鼠标移过后加粗该节点和连接线
          multiselect: true, //按 ctrl 多选
          selectable: true, //是否可以点击选择
          selectConnectedEdges: true, //选择节点后是否显示连接线
          hoverConnectedEdges: true, //鼠标滑动节点后是否显示连接线
          zoomView: true //是否能缩放画布
        },

      };
      _this.network = new vis.Network(container, data, _this.options);
    }
  }
};
  </script>

<style>
#mynetwork {
  width: 1000px;
  height: 400px;
  border: 1px solid lightgray;
}
canvas {
  cursor: pointer;
}
</style>
阶段可以借鉴https://www.freesion.com/article/9676886164/
以上是关于vue+ vis 编写流程图,网络拓补图等的主要内容,如果未能解决你的问题,请参考以下文章