MyBaitsPlus---MP代码生成器使用指南
Posted 大忽悠爱忽悠
tags:
篇首语:本文由小常识网(cha138.com)小编为大家整理,主要介绍了MyBaitsPlus---MP代码生成器使用指南相关的知识,希望对你有一定的参考价值。
MP代码生成器使用指南

1)简介
MP 提供了大量的自定义设置,生成的代码完全能够满足各类型的需求。AutoGenerator 是 MyBatis-Plus 的代码生成器,通过 AutoGenerator 可以快速生成 Entity、Mapper、Mapper XML、Service、Controller 等各个模块的代码,极大的提升了开发效率。
2)MP 的代码生成器 和 Mybatis MBG代码生成器的对比
MP 的代码生成器都是基于 java 代码来生成。MBG 基于 xml 文件代码生成
MyBatis 的代码生成器可生成: 实体类、Mapper 接口、Mapper 映射文件
MP的代码生成器可生成: 实体类(可以选择是否支持 AR)、Mapper 接口、Mapper 映射文件、 Service 层、Controller层。IDEA的EasyCode也是可以进行生成。
3)表及字段命名策略选择
在MybatisPlus中,我们建议数据库表名 和 表字段名采用驼峰命名方式, 如果采用下划线命名方式,请开启全局下划线开关(版本2.3默认开启),如果表名字段名命名方式不一致请注解指定,我们建议最好保持一致(约定大于配置)
这么做的原因是为了避免在对应实体类时产生的性能损耗,这样字段不用做映射就能直接和实体类对应。当然如果项目里不用考虑这点性能损耗,那么你采用下滑线也是没问题的,只需要在生成代码时配置dbColumnUnderline(map-underscore-to-camel-case)属性就可以。
1.使用添加依赖
MyBatis-Plus 从 3.0.3 之后移除了代码生成器与模板引擎的默认依赖,需要手动添加相关依赖:
<dependency>
    <groupId>com.baomidou</groupId>
    <artifactId>mybatis-plus-generator</artifactId>
    <version>3.4.1</version>
</dependency>
        <dependency>
            <groupId>org.apache.velocity</groupId>
            <artifactId>velocity-engine-core</artifactId>
            <version>2.0</version>
        </dependency>
如果使用的是spring而不是springboot,还需要导入slf4j的依赖,springboot在启动器中默认导入了
<!--sfl4j日志依赖-->
        <dependency>
            <groupId>org.slf4j</groupId>
            <artifactId>slf4j-api</artifactId>
            <version>1.7.7</version>
        </dependency>
        <dependency>
            <groupId>org.slf4j</groupId>
            <artifactId>slf4j-log4j12</artifactId>
            <version>1.7.7</version>
        </dependency>
2.生成器代码
    @Test
    public void testGenerator() {
        //获取当前系统的目录
        String ObjectPath = System.getProperty("user.dir");

        //1.全局策略配置
        GlobalConfig config = new GlobalConfig();
        config.setActiveRecord(true)//是否支持AR模式
                .setAuthor("大忽悠")//作者
                .setOutputDir(ObjectPath+"/src/main/java")//生成路径
                .setFileOverride(true)//文件覆盖
                .setIdType(IdType.AUTO)//主键策略
                .setServiceName("%sService")//设置生成service接口名字的首字母是否为I(默认会生成I开头的IStudentService)
                .setBaseResultMap(true)//自动SQL映射文件,生成基本的ResultMap
                .setBaseColumnList(true)//生成基本的SQL片段
                .setSwagger2(true); //实体属性 Swagger2 注解

        //2.数据源配置
        DataSourceConfig dataSourceConfig = new DataSourceConfig();
        dataSourceConfig.setDbType(DbType.mysql)//设置数据库类型
                .setDriverName("com.mysql.jdbc.Driver")//数据库驱动名
                .setUrl("jdbc:mysql://localhost:3306/tx?useUnicode=true&characterEncoding=UTF-8")//数据库地址
                .setUsername("root")//数据库名字
                .setPassword("126433");//数据库密码


        //自动填充配置
        TableFill gmtCreate=new TableFill("gmt_create", FieldFill.INSERT);
        TableFill gemModified=new TableFill("gmt_modified",FieldFill.INSERT_UPDATE);
        ArrayList<TableFill> tableFills=new ArrayList<>();
        //3.策略配置
        StrategyConfig strategy = new StrategyConfig();
        strategy.setCapitalMode(true)//全局大写命名
                .setNaming(NamingStrategy.underline_to_camel)//数据库表映射到实体的命名策略
                .setColumnNaming(NamingStrategy.underline_to_camel)//列的命名也支持驼峰命名规则
                //.setTablePrefix("tbl_")//数据库表的前缀
                .setInclude("user")//设置要映射的表名,这里可以写多个
                .setEntityLombokModel(true)  //使用Lombok开启注解
                .setLogicDeleteFieldName("deleted")//设置逻辑删除字段
                 .setTableFillList(tableFills)//设置自动填充配置
                  .setVersionFieldName("version")//乐观锁配置
                   .setRestControllerStyle(true)//开启驼峰命名格式
                   .setControllerMappingHyphenStyle(true);//controller层,开启下划线url : //localhost:8080/hello_id_2

        //4.包名策略
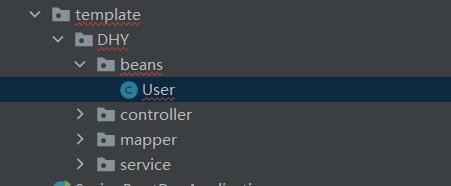
        PackageConfig packageConfig = new PackageConfig();
        packageConfig
                .setModuleName("DHY")//设置模块名
                .setParent("com.template")//所放置的包(父包)
                .setMapper("mapper")//Mapper包
                .setService("service")//服务层包
                .setController("controller")//控制层
                .setEntity("beans")//实体类
                .setXml("mapper");//映射文件
        //5.整合配置
        AutoGenerator autoGenerator = new AutoGenerator();
        autoGenerator.setGlobalConfig(config)
                .setDataSource(dataSourceConfig)
                .setStrategy(strategy)
                .setPackageInfo(packageConfig);
        //6.执行
        autoGenerator.execute();
    }

关于服务层自动注入
Service层的接口自动继承了了IService接口,里面有一些常用操作的接口
Service层的实现类不仅实现了Service层的接口,并且还继承了ServiceImpl类,该类也实现了IService接口。所以我们的serviceimpl不需要写一些简单具体操作的实现。并且也不需要自动注入mapper,在ServiceImpl中已经帮我们注入了。
//服务层接口
public interface EmployeeService extends IService<Employee> {

}
//服务层实现类
@Service
public class EmployeeServiceImpl extends ServiceImpl<EmployeeMapper, Employee> implements EmployeeService {
    //不用再进行Mapper的注入
    /**
     * EmployeeServiceImpl  集成了ServiceImpl
     * 1.在ServiceImpl中已经完成Mapper对象的注入,直接在EmployeeServiceImpl中进行使用
     * 2.在ServiceImpl中野帮我们提供了常用的CRUD方法,基本的一些CRUD方法在Service中不需要我们自己定义
     */
}
//被继承的接口
public class ServiceImpl<M extends BaseMapper<T>, T> implements IService<T> {
    @Autowired
    protected M baseMapper;//已自动注入Mapper
    //各种方法省略
}
建议去看官方文档进行相关配置,链接如下
以上是关于MyBaitsPlus---MP代码生成器使用指南的主要内容,如果未能解决你的问题,请参考以下文章