JUC-线程创建的四种方式+原理分析
Posted 滑稽404#
tags:
篇首语:本文由小常识网(cha138.com)小编为大家整理,主要介绍了JUC-线程创建的四种方式+原理分析相关的知识,希望对你有一定的参考价值。
文章目录
一、继承Thread
1、创建空线程
		Thread thread=new Thread();
        thread.start();
线程执行流程:start方法启动线程,并执行run方法,run方法为线程执行入口
Thread类里有个非常重要的属性Runnable target(线程执行目标)为空,线程创建后执行run方式的时候就无法执行,直接结束
	public Thread() {
        init(null, null, "Thread-" + nextThreadNum(), 0);
    }
target为空,什么也不执行
	 @Override
    public void run() {

        if (target != null) {
            target.run();
        }
    }
2、创建Thread线程
class MyThread extends Thread{
    @Override
    public void run() {
        for(int i=0;i<5;i++){
            System.out.println(currentThread().getName()+"&"+i);
        }
    }
}
public class DemoThread {
    public static void main(String[] args) {
        Thread thread=new MyThread();
        thread.start();
    }
}
因为是继承之类的实例,所以start启动线程后实现的是继承类的run方法
二、实现Runnable
1、代码实现
实现Runnable接口,重新run方法,编写线程逻辑
class MyRunnable implements Runnable{
    @Override
    public void run() {
        for(int i=1;i<=5;i++){
            System.out.println(Thread.currentThread().getName()+"&"+i);
        }
    }
}
public class DemoRunnable {
    public static void main(String[] args) {
        Thread thread=new Thread(new MyRunnable(),"runnableThread");
        thread.start();
    }
}
非热点代码可通过匿名类和lambda的方法来替代实现类
2、实现原理
	public Thread(Runnable target, String name) {
        init(null, target, name, 0);
    }
    public Thread(Runnable target) {
        init(null, target, "Thread-" + nextThreadNum(), 0);
    }
     @Override
    public void run() {

        if (target != null) {
            target.run();
        }
    }
通过传入Runnable类型的target构造Thread实例
调用start方法启动线程后,执行run方法,run方法判断target不为空,执行target的run方法,就是实现Runnable的run方法
3、继承Thread和实现Runnable的优缺点
- 实现Runnable的缺点:
1、因为当前类不是线程类,而是线程的target执行目标类,所以只能作为参数进行构造才能创建真正的线程
2、不是Thread。所以无法直接调用Thread的方法,只能使用Thread.staticfun()的方式调用Thread中的静态方法 - 实现Runnable的优点:
1、避免了单继承的局限性,如果一个类已经继承了,需要有多线程的场景,extend Thread显然是不行的
2、逻辑和数据更好的分离,实现Runnable适合资源共享的场景,因为多个new Thread可以传入同一个target,,可以共享计算和资源
三、实现Callable交给FutureTask
因为业务带来的返回线程结果的问题,Thread和Runnable显然是不行了,于是在java1.5的时候出现了Callable接口,能够返回线程的结果
1、Callable
泛型接口,声明是什么类型,就通过call()获取什么类型的结果
@FunctionalInterface
public interface Callable<V> {

    V call() throws Exception;
}
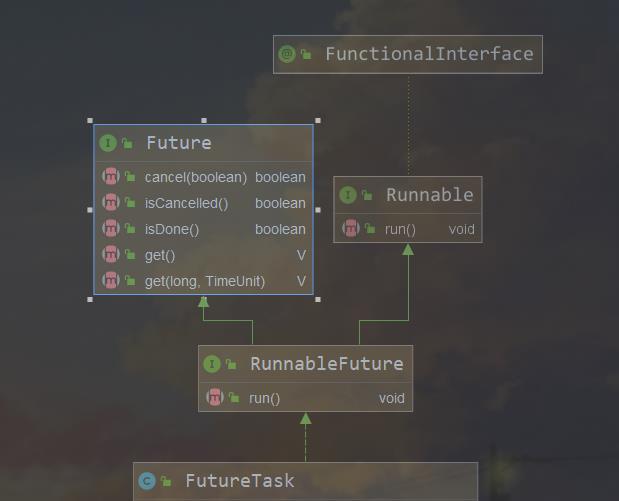
但是Thread中显然没有能够传入Callable类型的构造器,所以需要借助另一个类FutureTask
2、FutureTask
public class FutureTask<V> implements RunnableFuture<V>
实现了RunnableFuture接口,进去看看
3、RunnableFuture
RunnableFuture继承了了Runnable,所以可以作为中间者作为target替代Callable传入Thread构造器
public interface RunnableFuture<V> extends Runnable, Future<V> {

    void run();
}
4、Future
Future的三大功能
(1)能够取消异步执行中的任务。
(2)判断异步任务是否执行完成。
(3)获取异步任务完成后的执行结果。
public interface Future<V> {

    boolean cancel(boolean mayInterruptIfRunning);//取消异步任务的执行

    boolean isCancelled();//判断任务是否取消

    boolean isDone();//判断是否执行完成

    V get() throws InterruptedException, ExecutionException;//获取线程执行结果

    V get(long timeout, TimeUnit unit)
        throws InterruptedException, ExecutionException, TimeoutException;//获取结果,同时设置等待的最长时间
}
get()方法是阻塞的,如果获取到的结果为空,就会阻塞等待,直到获取到结果
而get(long timeout, TimeUnit unit)方法在get()的基础上设置了等待时间,如果timeout时间后没有获取到就结束阻塞
5、原理分析

因为FutureTask继承了RunnableFuture,RunnableFuture继承了Runnable,所以FutureTask可以作为target构造Thread
public Thread(Runnable target)
 public FutureTask(Callable<V> callable) {
        if (callable == null)
            throw new NullPointerException();
        this.callable = callable;
        this.state = NEW;       // ensure visibility of callable
    }
而且FutureTask构造器可以传入Callable来作为new Thread创建线程的中间者
再来看一下FutureTask获取结果的关键方法
public void run() {
        if (state != NEW ||
            !UNSAFE.compareAndSwapObject(this, runnerOffset,
                                         null, Thread.currentThread()))
            return;
        try {
            Callable<V> c = callable;//获取callable
            if (c != null && state == NEW) {//不为空,且为创建态
                V result;
                boolean ran;
                try {
                    result = c.call();//通过callable的call方法获取线程结果
                    ran = true;
                } catch (Throwable ex) {
                    result = null;
                    ran = false;
                    setException(ex);
                }
                if (ran)
                    set(result);//set方法为outcome结果赋值
            }
        } finally {
            // runner must be non-null until state is settled to
            // prevent concurrent calls to run()
            runner = null;
            // state must be re-read after nulling runner to prevent
            // leaked interrupts
            int s = state;
            if (s >= INTERRUPTING)
                handlePossibleCancellationInterrupt(s);
        }
    }
通过callable对象的call方法获取结果值:
result=c.call();
没有异常就调用set方法为outcome线程结果赋值:
set(result);
	 protected void set(V v) {
        if (UNSAFE.compareAndSwapInt(this, stateOffset, NEW, COMPLETING)) {
            outcome = v;
            UNSAFE.putOrderedInt(this, stateOffset, NORMAL); // final state
            finishCompletion();
        }
    }
get获取线程结果就是调用私有方法report(int s)来获取outcome
	 public V get() throws InterruptedException, ExecutionException {
        int s = state;
        if (s <= COMPLETING)
            s = awaitDone(false, 0L);
        return report(s);
    }
    private V report(int s) throws ExecutionException {
        Object x = outcome;//获取结果值
        if (s == NORMAL)
            return (V)x;
        if (s >= CANCELLED)
            throw new CancellationException();
        throw new ExecutionException((Throwable)x);
    }
6、代码实现
class MyCallable implements Callable<Integer>{
    private Integer money=1000;
    @Override
    public Integer call() throws Exception {
        for(int i=1;i<=5;i++){
            money-=100;
            System.out.println(Thread.currentThread().getName()+i+":取走了"+100);
        }
        return money;
    }
}

public class DemoCallable {
    public static void main(String[] args) {
        MyCallable myCallable=new MyCallable();
        FutureTask<Integer> futureTask=new FutureTask<>(myCallable);

        new Thread(futureTask, "callThread").start();
        try {
            System.out.println("剩余:"+futureTask.get());
        } catch (InterruptedException e) {
            e.printStackTrace();
        } catch (ExecutionException e) {
            e.printStackTrace();
        }

    }
}
7、分析结果
通过Callable类对象构造FutureTask
FutureTask作为target中间者构造Thread
start方法启动线程后执行run(),target不为空执行FutureTask对象的run方法
run方法通过调用传入的callable对象的call()方法获取结果,并通过set()方法赋值给outcome
FutureTask对象可以通过get()方法来调用report获取outcome结果值
四、线程池
以上的线程创建,执行完后就自动销毁了,不可复用,而系统创建一个线程是十分消耗资源的,在高并发场景中,肯定不能频繁的创建和销毁线程,而是要对已经提供好的线程进行复用,就是线程池技术
在这里不对不同线程池以及八大参数进行深入,只了解是怎么创建线程的
1、原理分析
Java提供了一个静态工厂来创建不同的线程池,Executors工厂类
有不同的静态工厂方法可以构建不同的线程池,例如:
public static ExecutorService newFixedThreadPool(int nThreads) {
        return new ThreadPoolExecutor(nThreads, nThreads,
                                      0L, TimeUnit.MILLISECONDS,
                                      new LinkedBlockingQueue<Runnable>());
    }
可以创建一个线程数量为nThreads的ExecutorService类型的的线程池
每次执行异步任务的时候,可以通过ExecutorService去对任务进行提交或者执行
ExecutorService提交异步执行target目标任务的常用方法有:
//执行Runnable类型的目标实例
void execute(Runnable command);

//提交Runnable类型的目标实例,并返回Future对象,可通过该对象对任务进行控制
Future<?> submit(Runnable task);

//提交Callable类型的目标实例,并返回Future对象,可通过该对象对任务进行控制
<T> Future<T> submit(Callable<T> task);
2、代码实现
public class DemoPool{
    //通过静态工厂获取线程数量为3的线程池,
    private static ExecutorService pool= Executors.newFixedThreadPool(3);

    public static void main(String[] args) throws Exception{
        pool.execute(new MyRun());
        Future<Integer> future = pool.submit(new MyCall());
        Integer res=future.get();
        System.out.println(res);
    }
}
以上是关于JUC-线程创建的四种方式+原理分析的主要内容,如果未能解决你的问题,请参考以下文章