[PyTroch系列-16]:PyTorch基础 - 张量的操作 - 变形
Posted 文火冰糖的硅基工坊
tags:
篇首语:本文由小常识网(cha138.com)小编为大家整理,主要介绍了[PyTroch系列-16]:PyTorch基础 - 张量的操作 - 变形相关的知识,希望对你有一定的参考价值。
作者主页(文火冰糖的硅基工坊):https://blog.csdn.net/HiWangWenBing
本文网址:https://blog.csdn.net/HiWangWenBing/article/details/119490985
目录
第1章 Tensor运算与操作概述
1.1 概述
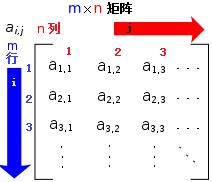
PyTorch提供了大量的张量运算与操作,基本上可以对标Numpy多维数组的运算,以支持对张量的各种复杂的运算。
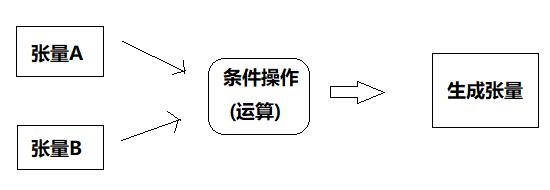
这些操作运算中大多是对数组中每个元素执行相同的函数运算,并获得每个元素函数运算的结果序列,这些序列生成一个新的同维度的数组。
https://www.runoob.com/numpy/numpy-linear-algebra.html

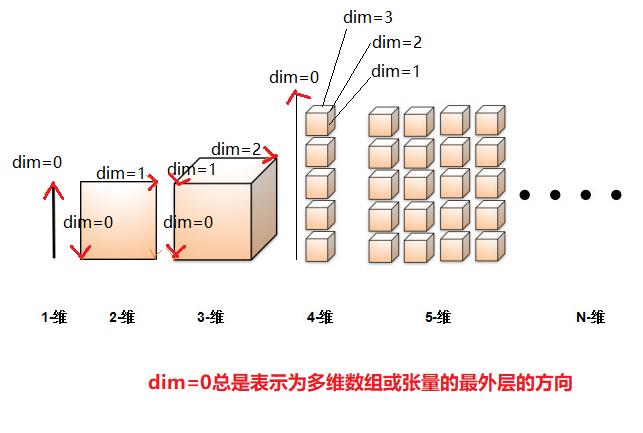
不同维度张量的维度方向标识

- 随着张量维度的增加,张量维度的标识dim的范围也在扩宽
- 在张量维度扩展的过程中,维度标识值(dim=n)的含义也在发生变化。
- dim=0总是指向张量的多维数组存储的最外层:[ ] [ ] [ ], 这与物理存储的标识是相反的。
1.2 运算分类

(1)算术运算:加、减、系数乘、系数除
(2)函数运算:sin,cos
(3)取整运算:上取整、下取整
(4)统计运算:最大值、最小值、均值
(5)比较运算:大于,等于,小于、排序
(6)线性代数运算:矩阵、点乘、叉乘
1.3 张量的操作与变换

(1)变换内容: 变换张量元素的值。
(1)变换长度:变换张量的某个方向的长度(即向量的维度或长度),长度可增加,可减少。
(3)变换维度:变化张量的维度,维度可以增加,可减少。
1.4 环境准备
import numpy as np
import torch

print("Hello World")
print(torch.__version__)
print(torch.cuda.is_available())
1.5 张量的操作 - 变形(reshape)
所谓张量的变形,就是改变张量的形状。
形状包括:张量的维度,不同维度方向上的长度。
一般情况下,变形前后,张量的总元素的个数和内容不变。
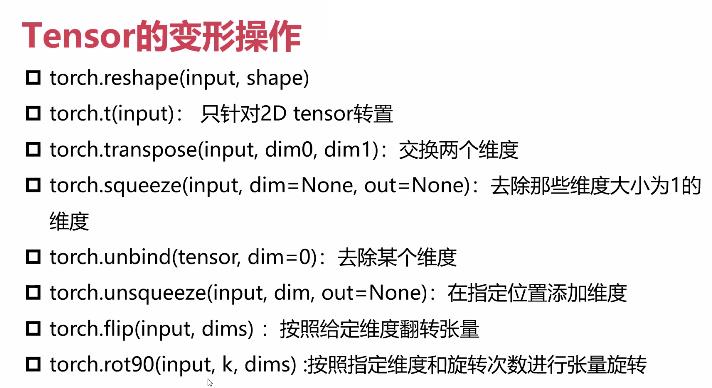
变形相关的主要操作如下:

- reshape:这是常用的变形的操作,可以直接进行维度、长度的变形。
- t:只适合与2维/2阶张量,它把行和列进行转置,对调。
- transpose:交换两个维度dim方向上的数据,而张量的维度不变,但不同维度方向上的长度发生了变化。
- squeeze:去除掉在某个dim方向上,向量长度为1的维度,实际上会导致降维。
- unblind:直接去除某个维度。
- unsqueeze:在某个dim方向上增加一个维度
- flip:以某个维度方向为中心翻转向量。
- rot90:以某个维度方向为中心转账90度。
第2章 基本变形:reshape
1. 原理

2. 函数解读
功能:reshape函数将指定的张量变换成特定维数张量一种函数,且张量中元素个数不变,函数可以重新调整张量的维度数、不同维度方向的元素长度。
原型:reshape(input, chunks,shape)
输入参数:
input: 输入张量
shape:新的张量的形状(包括维度和维度方向的长度),需要注意的时,在变换的过程中,要确保张量元素的总数不变,即X*Y*M*N........的总数是不变的. 可以进行任意维度的变化,维度越多,每个维度方向上的长度可能就越短。
3. 代码示例
# reshape变形
print("源张量:")
a = torch.Tensor([[1,3,5,7,9,11],[2,4,6,8,10,12]])
print(a)
print(a.shape)

print("\\n张量变形1")
b = a.reshape(1,12)
print(b)
print(b.shape)

print("\\n张量变形2")
b = a.reshape(3,4)
print(b)
print(b.shape)

print("\\n张量变形3")
b = a.reshape(2,2,3)
print(b)
print(b.shape)

print("\\n源张量:")
print(a)
print(a.shape)
输出:
源张量:
tensor([[ 1., 3., 5., 7., 9., 11.],
[ 2., 4., 6., 8., 10., 12.]])
torch.Size([2, 6])
张量变形1
tensor([[ 1., 3., 5., 7., 9., 11., 2., 4., 6., 8., 10., 12.]])
torch.Size([1, 12])
张量变形2
tensor([[ 1., 3., 5., 7.],
[ 9., 11., 2., 4.],
[ 6., 8., 10., 12.]])
torch.Size([3, 4])
张量变形3
tensor([[[ 1., 3., 5.],
[ 7., 9., 11.]],
[[ 2., 4., 6.],
[ 8., 10., 12.]]])
torch.Size([2, 2, 3])
源张量:
tensor([[ 1., 3., 5., 7., 9., 11.],
[ 2., 4., 6., 8., 10., 12.]])
torch.Size([2, 6])第3章 2维矩阵的行列置换:t
1. 原理
转置是针对二维矩阵,实现行列互换。
2. 函数解读
功能:
原型:reshape(input)
输入参数:
input: 输入张量
3. 代码示例
# reshape变形
print("源张量:")
a = torch.Tensor([[1,3,5],[2,4,6]])
print(a)
print(a.shape)

print("\\n张量转置")
print(a.t())
print(torch.t(a))
输出:
源张量:
tensor([[1., 3., 5.],
        [2., 4., 6.]])
torch.Size([2, 3])

张量转置
tensor([[1., 2.],
        [3., 4.],
        [5., 6.]])
tensor([[1., 2.],
        [3., 4.],
        [5., 6.]])
第4章 任意维度方向上的置换:transpose
1. 原理
2. 函数解读
功能:该操作,实现张量的任意两个维度方向上数据的互换,互换前后,张量的维度不变。
原型:transpose(input, dim0,dim1)
输入参数:
input: 输入张量
dim0:待互换的张量维度方向1
dim1:待互换的张量维度方向2
3. 代码示例
# transpose变形
print("源张量:")
a = torch.Tensor([[1,3,5,7,9,11],[2,4,6,8,10,12]])
print(a)
print(a.shape)

print("\\n张量转置1:")
b = torch.transpose(a,dim0=0,dim1=1)
print(b)

print("\\n张量reshape:")
b=a.reshape(1,2,6)
print(b)
print(b.shape)

print("\\n张量转置2:")
c = torch.transpose(b,dim0=0,dim1=2)
print(c)
print(c.shape)
输出:
源张量:
tensor([[ 1., 3., 5., 7., 9., 11.],
[ 2., 4., 6., 8., 10., 12.]])
torch.Size([2, 6])
张量转置1:
tensor([[ 1., 2.],
[ 3., 4.],
[ 5., 6.],
[ 7., 8.],
[ 9., 10.],
[11., 12.]])
张量reshape:
tensor([[[ 1., 3., 5., 7., 9., 11.],
[ 2., 4., 6., 8., 10., 12.]]])
torch.Size([1, 2, 6])
张量转置2:
tensor([[[ 1.],
[ 2.]],
[[ 3.],
[ 4.]],
[[ 5.],
[ 6.]],
[[ 7.],
[ 8.]],
[[ 9.],
[10.]],
[[11.],
[12.]]])
torch.Size([6, 2, 1])
第5章 挤压掉向量长度为1的维度:squeeze
1. 原理
在多维张量中,在某个张量方向上,如果向量的长度为1,除了增加向量的维度,实际没有任何用处,squeeze就是要挤压那些向量长度为1的维度,进行降维。使得张量的维度更加的紧凑。如
1*4的二维张量:[ [1,2,3,4] ] => 一维的向量[1,2,3,4]
1*1*4的三维张量:[ [ [1,2,3,4] ] ] => 一维的向量[1,2,3,4]
2. 函数解读
功能:挤压掉向量长度为1的维度。
原型:squeeze(input)
输入参数:
input: 输入张量
3. 代码示例
# squeeze剔除张量维度方向上长度为1的维度
print("源张量:")
a = torch.Tensor([[1,3,5,7,9,11],[2,4,6,8,10,12]])
print(a)
print(a.shape)

print("\\n张量reshape:")
b = a.reshape(2,1,6)
print(b)
print(b.shape)

print("\\n张量squeeze:")
c = torch.squeeze(a)
print(c)
print(c.shape)
输出:
源张量:
tensor([[ 1.,  3.,  5.,  7.,  9., 11.],
        [ 2.,  4.,  6.,  8., 10., 12.]])
torch.Size([2, 6])

张量reshape:
tensor([[[ 1.,  3.,  5.,  7.,  9., 11.]],

        [[ 2.,  4.,  6.,  8., 10., 12.]]])
torch.Size([2, 1, 6])

张量squeeze:
tensor([[ 1.,  3.,  5.,  7.,  9., 11.],
        [ 2.,  4.,  6.,  8., 10., 12.]])
torch.Size([2, 6])
第6章 直接增加某个维度:unsqueeze
1. 原理
2. 函数解读
功能:这是squeeze操作的反向操作。增加一个维度方向,但由于没有数据,新增的维度方向上,向量长度为1.
原型:unsqueeze(input, dim)
输入参数:
input: 输入张量
dim:新增维度的维度方向
3. 代码示例
# unsqueeze 新增一个维度方向,新增维度的向量长度为1
print("源张量:")
a = torch.Tensor([[1,3,5],[2,4,6]])
print(a)
print(a.shape)

print("\\n张量unsqueeze:")
c = torch.unsqueeze(a,dim=0)
print(c)
print(c.shape)

print("\\n张量unsqueeze:")
c = torch.unsqueeze(a,dim=1)
print(c)
print(c.shape)

print("\\n张量unsqueeze:")
c = torch.unsqueeze(a,dim=2)
print(c)
print(c.shape)
输出:
源张量:
tensor([[1., 3., 5.],
[2., 4., 6.]])
torch.Size([2, 3])
张量unsqueeze:
tensor([[[1., 3., 5.],
[2., 4., 6.]]])
torch.Size([1, 2, 3])
张量unsqueeze:
tensor([[[1., 3., 5.]],
[[2., 4., 6.]]])
torch.Size([2, 1, 3])
张量unsqueeze:
tensor([[[1.],
[3.],
[5.]],
[[2.],
[4.],
[6.]]])
torch.Size([2, 3, 1])
第7章 直接在某个方向拆分张量:unbind
1. 原理
2. 函数解读
功能:在某个维度方向上,拆分张量,实现降维,一个张量被分解成多个张量,张量的总元素保持不变。注意的事,并不是删除张量的元素,而是拆分。
原型:unbind(input,dim)
输入参数:
input: 输入张量
dim:需要去除的维度方向
3. 代码示例
(1)案例1:
# unblind在某个维度方向上,解体张量,实现降维,
# 一个张量被分解成多个张量,张量的总元素保持不变
print("源张量:")
a = torch.Tensor([[1,3,5,7,9,11],[2,4,6,8,10,12]])
print(a)
print(a.shape)

print("\\n降维1:")
b = torch.unbind(a,dim=0)
print(b)

print("\\n降维2:")
b = torch.unbind(a,dim=1)
print(b)
输出:
源张量:
tensor([[ 1.,  3.,  5.,  7.,  9., 11.],
        [ 2.,  4.,  6.,  8., 10., 12.]])
torch.Size([2, 6])

降维1:
(tensor([ 1.,  3.,  5.,  7.,  9., 11.]), tensor([ 2.,  4.,  6.,  8., 10., 12.]))

降维2:
(tensor([1., 2.]), tensor([3., 4.]), tensor([5., 6.]), tensor([7., 8.]), tensor([ 9., 10.]), tensor([11., 12.]))
(2)案例2:
# unblind在某个维度方向上,解体张量,实现降维,
# 一个张量被分解成多个张量,张量的总元素保持不变
print("源张量:")
a = torch.Tensor([[1,3,5,7,9,11],[2,4,6,8,10,12]])
print(a)
print(a.shape)

print("\\nreshape:")
a = a.reshape(2,2,3)
print(a)
print(a.shape)

print("\\n降维1:")
b = torch.unbind(a,dim=0)
print(b[0])
print(b[1])

print("\\n降维2:")
b = torch.unbind(a,dim=1)
print(b[0])
print(b[1])

print("\\n降维3:")
b = torch.unbind(a,dim=2)
print(b[0])
print(b[1])
输出:
源张量:
tensor([[ 1.,  3.,  5.,  7.,  9., 11.],
        [ 2.,  4.,  6.,  8., 10., 12.]])
torch.Size([2, 6])

reshape:
tensor([[[ 1.,  3.,  5.],
         [ 7.,  9., 11.]],

        [[ 2.,  4.,  6.],
         [ 8., 10., 12.]]])
torch.Size([2, 2, 3])

降维1:
tensor([[ 1.,  3.,  5.],
        [ 7.,  9., 11.]])
tensor([[ 2.,  4.,  6.],
        [ 8., 10., 12.]])

降维2:
tensor([[1., 3., 5.],
        [2., 4., 6.]])
tensor([[ 7.,  9., 11.],
        [ 8., 10., 12.]])

降维3:
tensor([[1., 7.],
        [2., 8.]])
tensor([[ 3.,  9.],
        [ 4., 10.]])
第8章 以指定的dim方向进行维度旋转:flip
1. 原理
2. 函数解读
功能:对张量按照指定的维度方向进行对称交换(翻转)。
原型:flip(input, dims)
输入参数:
input: 输入张量
dims:向量维度方向列表[,], 这是一个列表,也就是说,可以依次进行多次不同方向的翻转。
3. 代码示例
# flip
print("源张量:")
a = torch.Tensor([[1,2,3],[4,5,6], [7,8,9]])
print(a)
print(a.shape)

print("\\n张量 flip1:")
c = torch.flip(a,dims=[0])
print(c)
print(c.shape)

print("\\n张量 flip2:")
c = torch.flip(a,dims=[0,1])
print(c)
print(c.shape)
输出:
源张量:
tensor([[1., 2., 3.],
        [4., 5., 6.],
        [7., 8., 9.]])
torch.Size([3, 3])

张量 flip1:
tensor([[7., 8., 9.],
        [4., 5., 6.],
        [1., 2., 3.]])
torch.Size([3, 3])

张量 flip2:
tensor([[9., 8., 7.],
        [6., 5., 4.],
        [3., 2., 1.]])
torch.Size([3, 3])
备注:
dim=[0,1], 表示:
先按照维度=0的方向翻转,因此向量[1,2,3]与[7,8,9]进行了对调翻转。
再按照dim=1的方向翻转。因此向量[9,6,3]与[7,4,1]进行了对调翻转。
第9章 以指定的dim方向选择90°:rot90
1. 原理
2. 函数解读
功能:对张量按照指定的维度方向进行K次旋转90°。1次90度,2次180度,3次270度,4次360°,与原图像重合。旋转在二维图形时,应用广泛,也比较直观。
旋转与翻转的区别:
原型:rot90(input, k, dims)
输入参数:
input: 输入张量
k: 旋转的次数,每次旋转90度,k为正时,逆时针旋转,K为负数时,为顺时针旋转。
dims:旋转需要指定至少两个dim方向。
3. 代码示例
# rot90
print("源张量:")
a = torch.Tensor([[1,2,3],[4,5,6], [7,8,9]])
print(a)
print(a.shape)

print("\\n张量 flip1:")
c = torch.rot90(a, -1, dims=[0,1])
print(c)
print(c.shape)

print("\\n张量 flip2:")
c = torch.rot90(a,1, dims=[0,1])
print(c)
print(c.shape)
输出:
源张量:
tensor([[1., 2., 3.],
[4., 5., 6.],
[7., 8., 9.]])
torch.Size([3, 3])
张量 flip1:
tensor([[7., 4., 1.],
[8., 5., 2.],
[9., 6., 3.]])
torch.Size([3, 3])
张量 flip2:
tensor([[3., 6., 9.],
[2., 5., 8.],
[1., 4., 7.]])
torch.Size([3, 3])
作者主页(文火冰糖的硅基工坊):https://blog.csdn.net/HiWangWenBing
本文网址:https://blog.csdn.net/HiWangWenBing/article/details/119490985

以上是关于[PyTroch系列-16]:PyTorch基础 - 张量的操作 - 变形的主要内容,如果未能解决你的问题,请参考以下文章