Vue整合ElementUI,组件使用教程,适合新手
Posted Cs 挽周
tags:
篇首语:本文由小常识网(cha138.com)小编为大家整理,主要介绍了Vue整合ElementUI,组件使用教程,适合新手相关的知识,希望对你有一定的参考价值。
- 官网:Element
文章目录
Vue整合ElementUI
提示:这里我使用的Vue是2.0版本
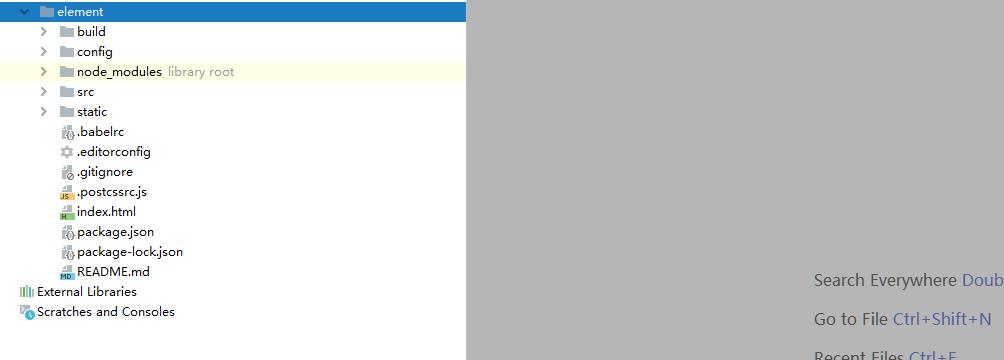
推荐使用 npm 的方式安装,它能更好地和 webpack 打包工具配合使用。
- 下载elementui的依赖
npm i element-ui -S
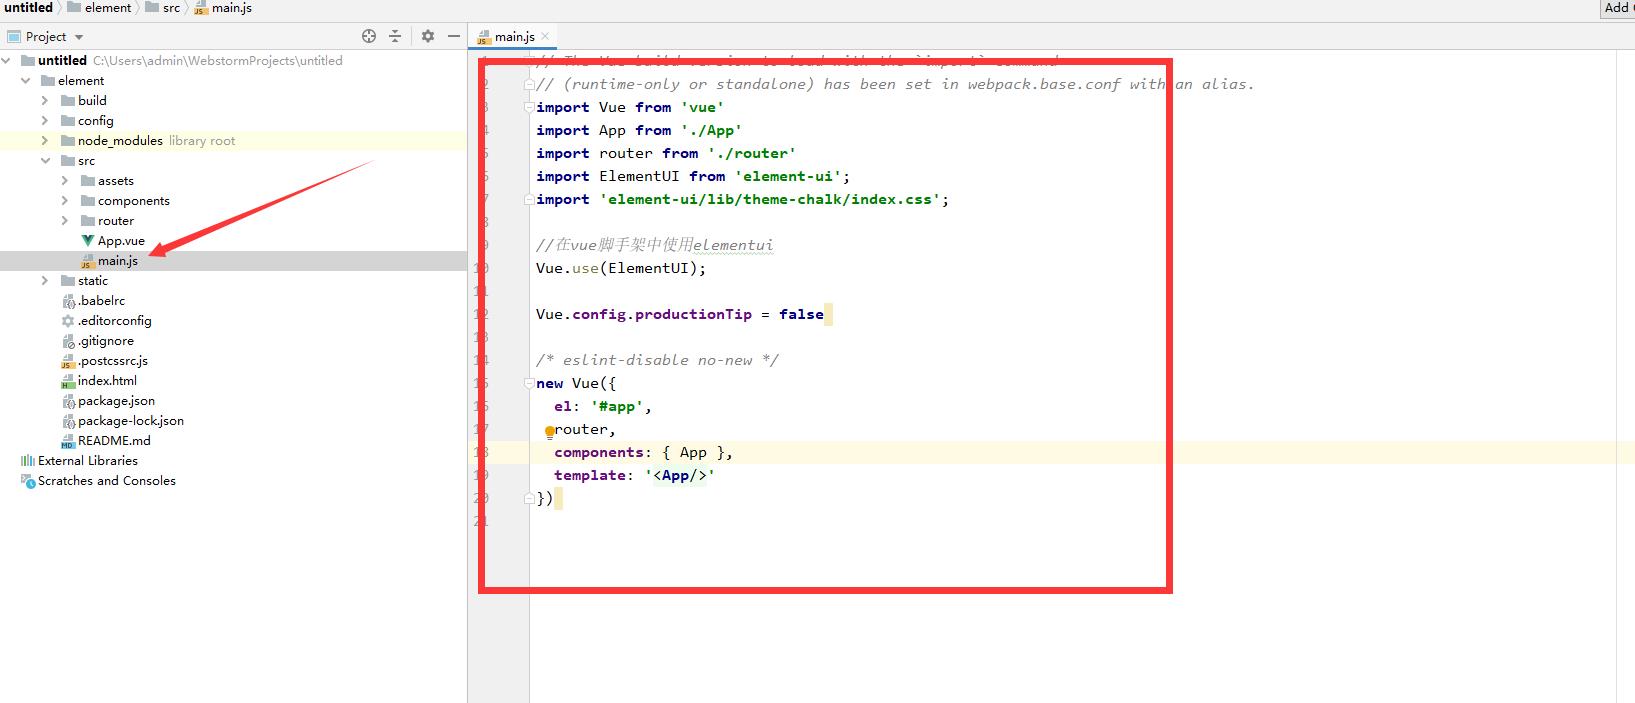
- 在src下的main.js中指定当前项目中使用elementui
import ElementUI from 'element-ui';
import 'element-ui/lib/theme-chalk/index.css';
- 将elementui注册到vue实例上
Vue.use(ElementUI);
一. 按钮组件
1.默认样式按钮
  <el-row>
    <el-button>默认按钮</el-button>
    <el-button type="primary">主要按钮</el-button>
    <el-button type="success">成功按钮</el-button>
    <el-button type="info">信息按钮</el-button>
    <el-button type="warning">警告按钮</el-button>
    <el-button type="danger">危险按钮</el-button>
  </el-row>

2.简洁按钮 plain 鼠标移动上去才会显示背景颜色
  <el-row>
    <el-button plain>朴素按钮</el-button>
    <el-button type="primary" plain>主要按钮</el-button>
    <el-button type="success" plain>成功按钮</el-button>
    <el-button type="info" plain>信息按钮</el-button>
    <el-button type="warning" plain>警告按钮</el-button>
    <el-button type="danger" plain>危险按钮</el-button>
  </el-row>

3.使用圆角按钮 round
  <el-row>
    <el-button round>圆角按钮</el-button>
    <el-button type="primary" round>主要按钮</el-button>
    <el-button type="success" round>成功按钮</el-button>
    <el-button type="info" round>信息按钮</el-button>
    <el-button type="warning" round>警告按钮</el-button>
    <el-button type="danger" round>危险按钮</el-button>
  </el-row>

4.图标按钮  idco:具体要显示的图标
  <el-row>
    <el-button icon="el-icon-search" circle></el-button>
    <el-button type="primary" icon="el-icon-edit" circle></el-button>
    <el-button type="success" icon="el-icon-check" circle></el-button>
    <el-button type="info" icon="el-icon-message" circle></el-button>
    <el-button type="warning" icon="el-icon-star-off" circle></el-button>
    <el-button type="danger" icon="el-icon-delete" circle></el-button>
  </el-row>

按钮组件的详细使用
- 日后使用element ui的相关组件时需要注意的是 所有组件都是
el-组件名称开头
创建按钮:<el-button>默认按钮</el-button>
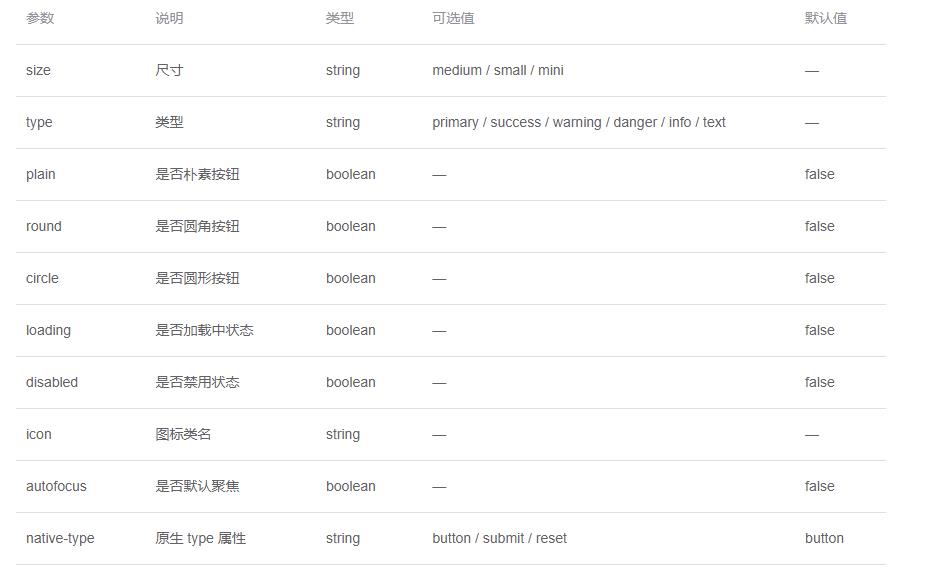
组件属性使用
- 总结:在element中所有的组件的属性使用都是直接将
属性名=属性值方式写在对应的组件标签上,boolean类型的属性默认为false可以简写一个属性名字表示为true。
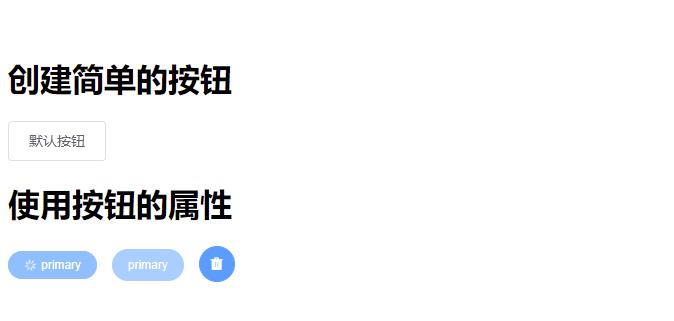
示例
    <div>
      <h1>创建简单的按钮</h1>
      <el-button>默认按钮</el-button>

      <h1>使用按钮的属性</h1>
      <el-button type="primary" size="mini" round="true"  loading>primary</el-button>
      <el-button type="primary" size="small" round="true" disabled>primary</el-button>
      <el-button type="primary" size="medium" circle icon="el-icon-delete-solid"></el-button>
    </div>
按钮组的使用
- 按钮组的使用就是通过
<el-button-group>把多个按钮包裹起来
 	  <el-button-group>
        <el-button type="primary" plain round icon="el-icon-back"></el-button>
        <el-button type="primary" plain round icon="el-icon-right"></el-button>
      </el-button-group>

二. Link 文件链接组件
文字链接组件的创建
<el-link>默认链接</el-link>
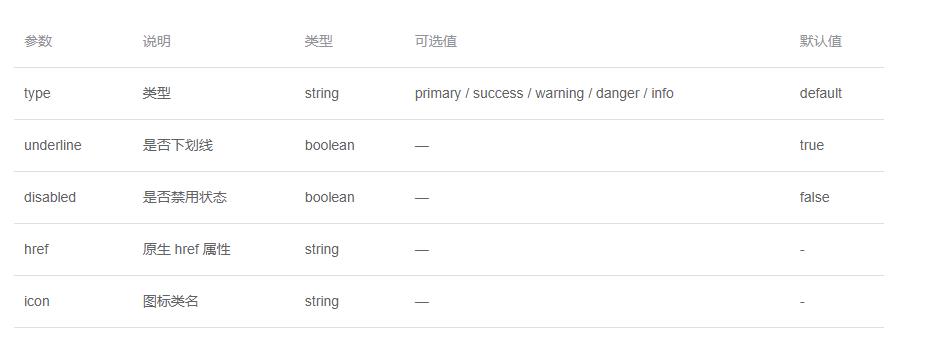
文字链接组件属性的使用
示例
  <div>
    <h1>使用文字链接组件</h1>
    <el-link type="primary" disabled icon="el-icon-eleme">默认链接</el-link>
    <el-link type="success" icon="el-icon-eleme">默认链接</el-link>
    <el-link type="warning" icon="el-icon-eleme">默认链接</el-link>
    <el-link type="info" :underline="false" icon="el-icon-eleme">默认链接</el-link>
  </div>
- 注意:有些属性需要通过Vue的绑定语法给组件赋值
:underline="false"否则则会抛出异常

三. Layout(栅格) 布局组件的使用
- 通过基础的 24 分栏,迅速简便地创建布局。
在element ui中布局组件将页面划分为多个行(row),每行最多分为24栏(列)
使用Layout组件
el-row代表一行,行里面放的自然就是列el-col,span代表栅格占据的列数,是el-col的一个属性由于它是我们elementui中的一个属性这个属性必须要求我们写数字所以赋值的时候需要带上:。如果span等于8表示一列占用8份如果超过8份则会换行显示。
<el-row>
	<el-col span="8">占用8份</el-col>
	<el-col span="8">占用8份</el-col>
	<el-col span="8">占用8份</el-col>
</el-row>

<el-row>
      <el-col :span="6"><div style="border: 1px red solid">占用6份</div></el-col>
      <el-col :span="6"><div style="border: 1px red solid">占用6份</div></el-col>
      <el-col :span="6"><div style="border: 1px red solid">占用6份</div></el-col>
      <el-col :span="6"><div style="border: 1px red solid">占用6份</div></el-col>
    </el-row>

    <el-row>
      <el-col :span="7"><div style="border: 1px red solid">占用6份</div></el-col>
      <el-col :span="8"><div style="border: 1px red solid">占用6份</div></el-col>
      <el-col :span="5"><div style="border: 1px red solid">占用6份</div></el-col>
      <el-col :span="4"><div style="border: 1px red solid">占用6份</div></el-col>
    </el-row>

    <el-row>
      <el-col :span="3"><div style="border: 1px red solid">占用6份</div></el-col>
      <el-col :span="1"><div style="border: 1px red solid">占用6份</div></el-col>
      <el-col :span="6"><div style="border: 1px red solid">占用6份</div></el-col>
      <el-col :span="14"><div style="border: 1px red solid">占用6份</div></el-col>
 </el-row>

注意:
- 在一个布局组件好 是由
row和col组合而成 - 在使用时要区分
row属性和col属性
行属性的使用
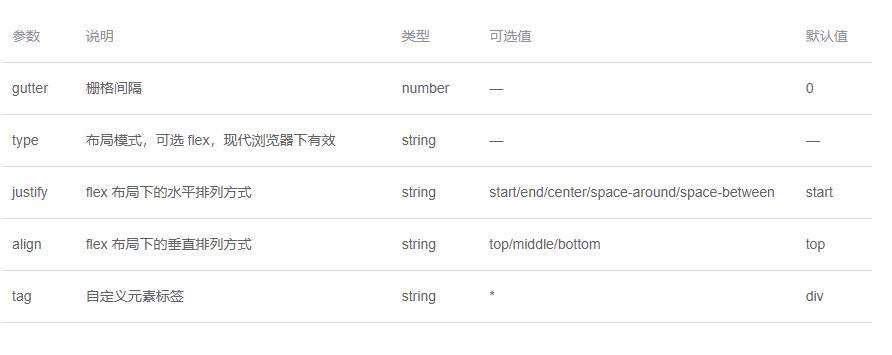
    <el-row :gutter="10" tag="span">
      <el-col :span="6" ><div style="border: 1px red solid">占用6份</div></el-col>
      <el-col :span="6"><div style="border: 1px red solid">占用6份</div></el-col>
      <el-col :span="6"><div style="border: 1px red solid">占用6份</div></el-col>
      <el-col :span="6"><div style="border: 1px red solid">占用6份</div></el-col>
    </el-row>
:gutter=“10”:表示格栅间隔

:tag=“span”:表示当前行使用哪种标签去构建

列属性的使用
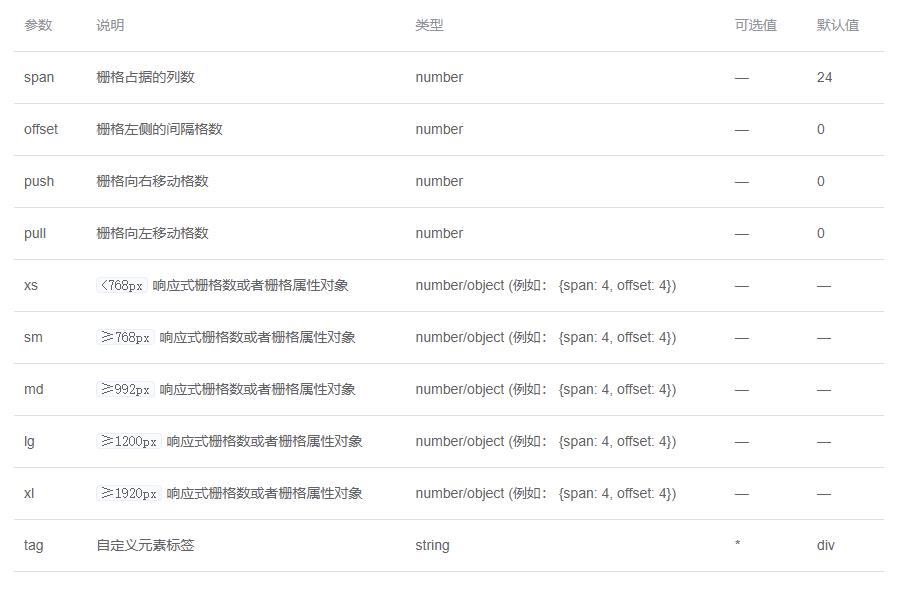
偏移属性offset
   <el-row>
      <el-col :span="12" offset="4"><div style="border: 1px blue solid">我是占用12份</div></el-col>
      <el-col :span="12"><div style="border: 1px blue solid">我是占用12份</div></el-col>
    </el-row>

向右移动push
    <el-row>
      <el-col :span="12" push="6"><div style="border: 1px blue solid">我是占用12份</div></el-col>
      <el-col :span="12" push="0"><div style="border: 1px red solid">我是占用12份</div></el-col以上是关于Vue整合ElementUI,组件使用教程,适合新手的主要内容,如果未能解决你的问题,请参考以下文章