ModBus(RTU TCP UDP通信)及利用socket通信(DTU)实现Modbus-RTU通信协议
Posted 捡黄金的少年
tags:
篇首语:本文由小常识网(cha138.com)小编为大家整理,主要介绍了ModBus(RTU TCP UDP通信)及利用socket通信(DTU)实现Modbus-RTU通信协议相关的知识,希望对你有一定的参考价值。
目录
因为项目要用到连接传感器的业务需求,所以学习了这几种协议,并记录下来,下面所有的代码,我都使用过,并且能够拿取数据。(下面是我参考网上代码做的学习测试总结)
MODBUS-RTU
1、Modbus Slave连接串口
一、简单说一下:
(1)、Modbus Slave是模拟传感器,连接串口的,相当于模拟的传感器
(2)、Configure Virtual Serial Port Driver这个软件是,开启串口的软件,可以在电脑开模拟串口

二、Modbus Slave以 Serial Port串口的方式连接,并且连接到COM2端口下面
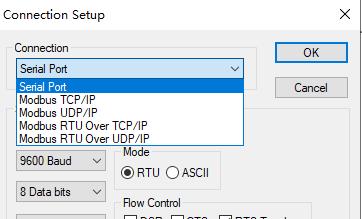
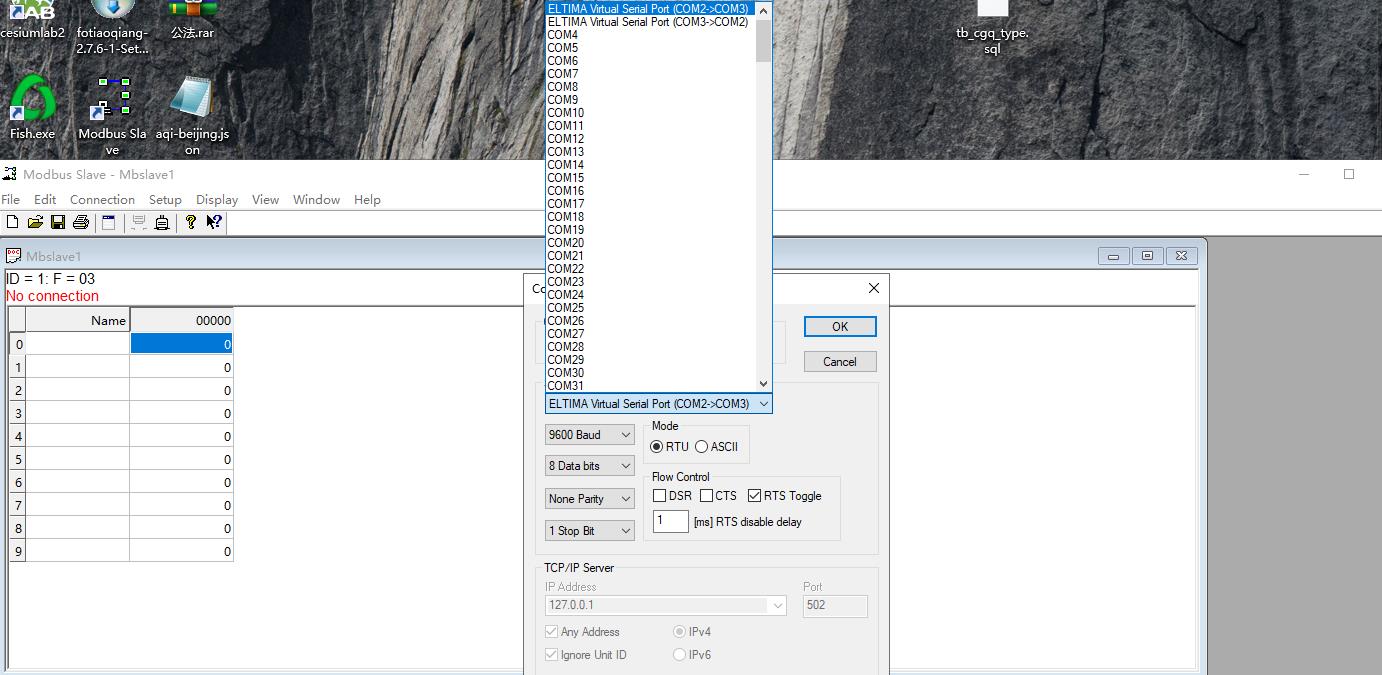
三、查看配置传感器参数
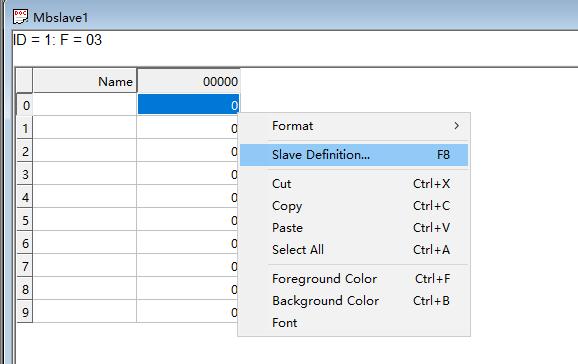
点击传感器,右键Slave Definition ,配置传感器ID,配置(03 Holding Register),线圈方式读取传感器的值

2、MODBUS-RTU配置环境
由于当时,第一次学习弄得就是RTU的环境,所以出现的坑,我也给大家说明,当时遇到报错连接
1、如果出现下面报错,则是缺少RXTX的脚本文件

资源我放在这里:配套资源

将文件拷贝到java的JDK的bin目录就行了

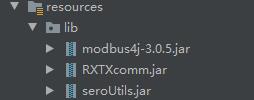
2、引入包
拷贝上面资源中的三个包,并把它引入SpringBoot项目中(这样基础的环境已经配置完成)
3、ModBus-RTU的通信代码
1、封装实体类
public class SerialPortWrapperImpl implements SerialPortWrapper {

    private final Logger log = LoggerFactory.getLogger(this.getClass());

    /**
     * 串口对象
     */
    private SerialPort serialPort;

    /**
     * 串口
     */
    private String port;

    /**
     * 波特率
     */
    private Integer baudRate;

    /**
     * 数据位的位数,RTU是8位,ASCII是7位
     */
    private Integer dataBits;

    /**
     * 停止位的位数,如果无奇偶校验为2,有奇偶校验为1
     */
    private Integer stopBits;

    /**
     * 奇偶校验位,无校验是0,奇校验是1,偶校验是2
     */
    private Integer parity;

    /**
     * 硬件之间输入流应答控制
     */
    private Integer flowControlIn;

    /**
     * 硬件之间输出流应答控制
     */
    private Integer flowControlOut;

    public SerialPortWrapperImpl() {
        super();
    }

    public SerialPortWrapperImpl(String port, int baudRate, int dataBits, int stopBits, int parity,
                                 int flowControlIn, int flowControlOut) {
        this.port = port;
        this.baudRate = baudRate;
        this.dataBits = dataBits;
        this.stopBits = stopBits;
        this.parity = parity;
        this.flowControlIn = flowControlIn;
        this.flowControlOut = flowControlOut;
    }

    @Override
    public void close() throws Exception {
        SerialPortUtils.close(serialPort);
    }

    @Override
    public void open() throws Exception {
        serialPort = SerialPortUtils.open(port, baudRate, dataBits, stopBits, parity);
    }

    @Override
    public InputStream getInputStream() {
        InputStream in = null;
        try {
            in = serialPort.getInputStream();
        } catch (IOException e) {
            log.error("获取串口输入流错误", e);
        }

        return in;
    }

    @Override
    public OutputStream getOutputStream() {
        OutputStream out = null;
        try {
            out = serialPort.getOutputStream();
        } catch (IOException e) {
            log.error("获取串口输出流错误", e);
        }

        return out;
    }

    @Override
    public int getBaudRate() {
        return this.baudRate;
    }

    @Override
    public int getDataBits() {
        return this.dataBits;
    }

    @Override
    public int getStopBits() {
        return this.stopBits;
    }

    @Override
    public int getParity() {
        return this.parity;
    }

    public int getFlowControlIn() {
        return this.flowControlIn;
    }

    public int getFlowControlOut() {
        return this.flowControlOut;
    }

    public SerialPort getSerialPort() {
        return serialPort;
    }

    public void setSerialPort(SerialPort serialPort) {
        this.serialPort = serialPort;
    }

    public String getPort() {
        return port;
    }

    public void setPort(String port) {
        this.port = port;
    }

    public void setBaudRate(Integer baudRate) {
        this.baudRate = baudRate;
    }

    public void setDataBits(Integer dataBits) {
        this.dataBits = dataBits;
    }

    public void setStopBits(Integer stopBits) {
        this.stopBits = stopBits;
    }

    public void setParity(Integer parity) {
        this.parity = parity;
    }

    public void setFlowControlIn(Integer flowControlIn) {
        this.flowControlIn = flowControlIn;
    }

    public void setFlowControlOut(Integer flowControlOut) {
        this.flowControlOut = flowControlOut;
    }
}
2、方法类的封装
public class SerialPortUtils implements SerialPortEventListener {
    // 检测系统中可用的通讯端口类
    private CommPortIdentifier commPortId;
    // 枚举类型
    private Enumeration<CommPortIdentifier> portList;
    // RS232串口
    private SerialPort serialPort;
    // 输入流
    private InputStream inputStream;
    // 输出流
    private OutputStream outputStream;
    // 保存串口返回信息
    private String data;
    // 保存串口返回信息十六进制
    private String dataHex;

    /**
     * 初始化串口
     *
     * @throws
     * @author LinWenLi
     * @date 2018年7月21日下午3:44:16
     * @Description: TODO
     * @param: paramConfig 存放串口连接必要参数的对象(会在下方给出类代码)
     * @return: void
     */
    @SuppressWarnings("unchecked")
    public void init() throws SerialPortException {
        // 获取系统中所有的通讯端口
        portList = CommPortIdentifier.getPortIdentifiers();
        // 记录是否含有指定串口
        boolean isExsist = false;
        // 循环通讯端口
        while (portList.hasMoreElements()) {
            commPortId = portList.nextElement();
            // 判断是否是串口
            if (commPortId.getPortType() == CommPortIdentifier.PORT_SERIAL) {
                // 比较串口名称是否是指定串口
                if ("COM7".equals(commPortId.getName())) {
                    // 串口存在
                    isExsist = true;
                    // 打开串口
                    try {
                        // open:(应用程序名【随意命名】,阻塞时等待的毫秒数)
                        serialPort = (SerialPort) commPortId.open(Object.class.getSimpleName(), 2000);
                        // 设置串口监听
                        serialPort.addEventListener(this);
                        // 设置串口数据时间有效(可监听)
                        serialPort.notifyOnDataAvailable(true);
                        // 设置串口通讯参数:波特率,数据位,停止位,校验方式
                        serialPort.setSerialPortParams(9600, 8,
                                1, 0);
                    } catch (PortInUseException e) {
                        throw new SerialPortException("端口被占用");
                    } catch (TooManyListenersException e) {
                        throw new SerialPortException("监听器过多");
                    } catch (UnsupportedCommOperationException e) {
                        throw new SerialPortException("不支持的COMM端口操作异常");
                    }
                    // 结束循环
                    break;
                }
            }
        }
        // 若不存在该串口则抛出异常
        if (!isExsist) {
            throw new SerialPortException("不存在该串口!");
        }
    }

    /**
     * 实现接口SerialPortEventListener中的方法 读取从串口中接收的数据
     */
    @Override
    public void serialEvent(SerialPortEvent event) {
    }


    /**
     * 读取串口返回信息
     *
     * @author LinWenLi
     * @date 2018年7月21日下午3:43:04
     * @return: void
     */
    public void readCommPort() throws SerialPortException {
    }

    /**
     * 发送信息到串口
     *
     * @throws
     * @author LinWenLi
     * @date 2018年7月21日下午3:45:22
     * @param: data
     * @return: void
     */
    public void sendComm(String data) throws SerialPortException {
        byte[] writerBuffer = null;
        try {
//            writerBuffer = hexToByteArray(data);
            writerBuffer = data.getBytes(StandardCharsets.UTF_8);
        } catch (NumberFormatException e) {
            throw new SerialPortException("命令格式错误!");
        }
        try {
            outputStream = serialPort.getOutputStream();
            outputStream.write(writerBuffer);
            outputStream.flush();
        } catch (NullPointerException e) {
            throw new SerialPortException("找不到串口。");
        } catch (IOException e) {
            throw new SerialPortException("发送信息到串口时发生IO异常");
        }
    }

    /**
     * 关闭串口
     *
     * @throws
     * @author LinWenLi
     * @date 2018年7月21日下午3:45:43
     * @Description: 关闭串口
     * @param:
     * @return: void
     */
    public void closeSerialPort() throws SerialPortException {
        if (serialPort != null) {
            serialPort.notifyOnDataAvailable(false);
            serialPort.removeEventListener();
            if (inputStream != null) {
                try {
                    inputStream.close();
                    inputStream = null;
                } catch (IOException e) {
                    throw new SerialPortException("关闭输入流时发生IO异常");
                }
            }
            if (outputStream != null) {
                try {
                    outputStream.close();
                    outputStream = null;
                } catch (IOException e) {
                    throw new SerialPortException("关闭输出流时发生IO异常");
                }
            }
            serialPort.close();
            serialPort = null;
        }
    }

    /**
     * 十六进制串口返回值获取
     */
    public String getDataHex() {
        String result = dataHex;
        // 置空执行结果
        dataHex = null;
        // 返回执行结果
        return result;
    }

    /**
     * 串口返回值获取
     */
    public String getData() {
        String result = data;
        // 置空执行结果
        data = null;
        // 返回执行结果
        return result;
    }

    /**
     * Hex字符串转byte
     *
     * @param inHex 待转换的Hex字符串
     * @return 转换后的byte
     */
    public static byte hexToByte(String inHex) {
        return (byte) Integer.parseInt(inHex, 16);
    }

    /**
     * hex字符串转byte数组
     *
     * @param inHex 待转换的Hex字符串
     * @return 转换后的byte数组结果
     */
    public static byte[] hexToByteArray(String inHex) {
        int hexlen = inHex.length();
        byte[] result;
        if (hexlen % 2 == 1) {
            // 奇数
            hexlen++;
            result = new byte[(hexlen / 2)];
            inHex = "0" + inHex;
        } else {
            // 偶数
            result = new byte[(hexlen / 2)];
        }
        int j = 0;
        for (int i = 0; i < hexlen; i += 2) {
            result[j] = hexToByte(inHex.substring(i, i + 2));
            j++;
        }
        return result;
    }

    /**
     * 数组转换成十六进制字符串
     *
     * @param bArray
     * @return HexString
     */
    public static final String bytesToHexString(byte[] bArray) {
        StringBuffer sb = new StringBuffer(bArray.length);
        String sTemp;
        for (int i = 0; i < bArray.length; i++) {
            sTemp = Integer.toHexString(0xFF & bArray[i]);
            if (sTemp.length() < 2)
                sb.append(0);
            sb.append(sTemp.toUpperCase());
        }
        return sb.toString();
    }

    /**
     * 打卡串口
     * @param portName 串口名
     * @param baudRate 波特率
     * @param dataBits 数据位
     * @param stopBits 停止位
     * @param parity 校验位
     * @return 串口对象
     */
    public static SerialPort open(String portName, Integer baudRate, Integer dataBits,
                                  Integer stopBits, Integer parity) {
        SerialPort result = null;
        try {
            // 通过端口名识别端口
            CommPortIdentifier identifier = CommPortIdentifier.getPortIdentifier(portName);
            // 打开端口,并给端口名字和一个timeout(打开操作的超时时间)
            if(identifier.isCurrentlyOwned()) {
                return null;
            }
            CommPort commPort = identifier.open(portName, 2000);
            // 判断是不是串口
            if (commPort instanceof SerialPort) {
                result = (SerialPort) commPort;
                // 设置一下串口的波特率等参数
                result.setSerialPortParams(baudRate, dataBits, stopBits, parity);
            }else{
            }
        } catch (Exception e) {
            e.printStackTrace();
        }
        return result;
    }

    /**
     * 关闭串口
     * @param serialPort
     */
    public static void close(SerialPort serialPort) {
        if (serialPort != null) {
            serialPort.close();
        }
    }
3、通讯的方法
@Component
public class ModbusRtuMaster {
    // 检测系统中可用的通讯端口类
    private static SerialPortWrapperImpl wrapper;

    private static ModbusMaster master;

    private static ModbusFactory modbusFactory;


    //private static ModbusRtuMaster modbusRtuMaster;

    public ModbusRtuMaster() {

    }

    /*
     * public static synchronized ModbusRtuMaster getInstance() { if(modbusRtuMaster
     * == null) { modbusRtuMaster = new ModbusRtuMaster(); } return modbusRtuMaster;
     * }
     */

    /**
     * 端口是否在使用
     *
     * @param serialNumber
     * @return
     */
    public boolean inUse(String serialNumber) {
        boolean bl = false;
        if (this.wrapper == null) {
            return bl;
        }
        if (this.wrapper.getPort() != null && this.wrapper.getPort().equalsIgnoreCase(serialNumber)) {
            bl = master.isInitialized();
        }
        return bl;
    }

    public void createRtuMaster(String serialNumber, int baudRate, int dataBit, int stopBit, int checkoutBit) throws Exception {//relayParamConfig.getSerialNumber(), relayParamConfig.getBaudRate(),
        //relayParamConfig.getDataBit(),relayParamConfig.getStopBit(), relayParamConfig.getCheckoutBit()
        // 设置串口参数,串口是COM1,波特率是9600
        wrapper = new SerialPortWrapperImpl(serialNumber, baudRate,
                dataBit, stopBit, checkoutBit, 0, 0);//SerialPort.PARITY_NONE
        modbusFactory = new ModbusFactory();
//        System.out.println("relayParamConfig.getSerialNumber()->"+relayParamConfig.getSerialNumber());
        master = modbusFactory.createRtuMaster(wrapper);
        master.init();
        // 从站设备ID是1
//        int slaveId = 1;

        // 读取保持寄存器
//        readHoldingRegisters(master, slaveId, 0, 3);
        // 将地址为0的保持寄存器数据修改为0
//        writeRegister(master, slaveId, offset, value);
        // 再读取保持寄存器
//        readHoldingRegisters(master, slaveId, 0, 3);
//        short[] s = {00};
//        controlRelay(master, slaveId, 0, s);
//        RtuMasterTest.writeRegistersTest(master, slaveId, 0, s);
    }

    /*
     * public void init(RelayParamConfig relayParamConfig) throws Exception {
     * this.relayParamConfig = relayParamConfig;
     * if(!this.inUse(relayParamConfig.getSerialNumber())) { this.createRtuMaster();
     * } }
     */

    public void closeRtuMaster() throws Exception {
        wrapper.close();
    }

    public void controlRelay(int slaveId, int offset, int value) throws Exception {
        writeRegister(master, slaveId, offset, value);
        readHoldingRegisters(master, slaveId, 1, 3);
//        this.closeRtuMaster();
    }

    public short[] readRelay(int slaveId, int start, int len) throws Exception {

        short[] shorts = readHoldingRegisters(master, slaveId, start, len);
        return shorts;

    }
    // 读取保持寄存器
//    readHoldingRegisters(master, slaveId, 0, 3);
    // 将地址为0的保持寄存器数据修改为0
//    writeRegister(master, slaveId, offset, value);

    private short[] readHoldingRegisters(ModbusMaster master, int slaveId, int start, int len) throws Exception {
        ReadHoldingRegistersRequest request = new ReadHoldingRegistersRequest(slaveId, start, len);
        ReadHoldingRegistersResponse response = (ReadHoldingRegistersResponse) master.send(request);
        if (response.isException()) {
            System.out.println("读取保持寄存器错误,错误信息是" + response.getExceptionMessage());
        } else {
            System.out.println("读取保持寄存器=" + Arrays.toString(response.getShortData()));
        }
        return response.getShortData();
    }

    private void writeRegister(ModbusMaster master, int slaveId, int offset, int value) throws Exception {
        WriteRegisterRequest request = new WriteRegisterRequest(slaveId, offset, value);
        ByteQueue queue = new ByteQueue();

        WriteRegisterResponse response = (WriteRegisterResponse) master.send(request);
        if (response.isException()) {
            System.out.println("写保持寄存器错误,错误信息是" + response.getExceptionMessage());
        } else {
            System.out.println("指令发送成功!");
        }
    }

    public void writeRegistersTest(ModbusMaster master, int slaveId, int start, short[] values) {
        try {
            WriteRegistersRequest request = new WriteRegistersRequest(slaveId, start, values);
            System.out.println("request:" + request);
            System.out.println("FunctionCode:" + request.getFunctionCode());
            System.out.println("SlaveId:" + request.getSlaveId());
            WriteRegistersResponse response = (WriteRegistersResponse) master.send(request);

            if (response.isException())
                System.out.println("Exception response: message=" + response.getExceptionMessage());
            else {
                System.out.println("Success");
            }
        } catch (ModbusTransportException e) {
            e.printStackTrace();
        }
    }

    public static void main(String[] args) {
        ModbusRtuMaster rmt = new ModbusRtuMaster();
        try {
            rmt.createRtuMaster("COM3", 9600, 8, 1, 0);
            for (int i = 0; i < 10; i++) {
                rmt.controlRelay(1, 2, 3);
            }


        } catch (Exception e) {
            // TODO Auto-generated catch block
            e.printStackTrace();
        }
    }
4、ModBus-RTU执行的方法细节,简说
1、就执行的代码而言,简单讲解一下,具体自己分析
public static void main(String[] args) {
        ModbusRtuMaster rmt = new ModbusRtuMaster();
        try {
            rmt.createRtuMaster("COM3", 9600, 8, 1, 0);
            for (int i = 0; i < 10; i++) {
                rmt.controlRelay(1, 2, 3);
            }


        } catch (Exception e) {
            // TODO Auto-generated catch block
            e.printStackTrace();
        }
    }
2、因为上面传感器连接的串口是(com2-com3),所以相当于传感器连接的是com2,我们要通过com3来访问传感器数据,一个串口,可以连接多个 传感器
rmt.createRtuMaster("COM3", 9600, 8, 1, 0);这个是连接传感器状态(四个参数分别是:串口,波特率,停止位数,奇偶效验)
 /**
     * 串口
     */
    private String port;

    /**
     * 波特率
     */
    private Integer baudRate;

    /**
     * 数据位的位数,RTU是8位,ASCII是7位
     */
    private Integer dataBits;

    /**
     * 停止位的位数,如果无奇偶校验为2,有奇偶校验为1
     */
    private Integer stopBits;

    /**
     * 奇偶校验位,无校验是0,奇校验是1,偶校验是2
     */
    private Integer parity;
3、下面这个是main函数中,for循环的调用的函数,
第一个方法: writeRegister()是写线圈(03)的方法,传入四个参数salveID(传感器的ID值),offset(写入第几位,从零开始数),value(写入的值)
第二个方法:readHoldingRegisters()是读取线圈(03)的方法,传入slaveID(传感器ID),以及读取的开始长度(我写的是1),读取长度(我写的是3)返回的是一个数组
    public void controlRelay(int slaveId, int offset, int value) throws Exception {
        writeRegister(master, slaveId, offset, value);
        readHoldingRegisters(master, slaveId, 1, 3);
//        this.closeRtuMaster();
    }
4、写入传感器线圈的方法
  private void writeRegister(ModbusMaster master, int slaveId, int offset, int value) throws Exception {
        WriteRegisterRequest request = new WriteRegisterRequest(slaveId, offset, value);
        ByteQueue queue = new ByteQueue();

        WriteRegisterResponse response = (WriteRegisterResponse) master.send(request);
        if (response.isException()) {
            System.out.println("写保持寄存器错误,错误信息是" + response.getExceptionMessage());
        } else {
            System.out.println("指令发送成功!");
        }
    }
5、读取线圈的方法,返回一个short数组
  private short[] readHoldingRegisters(ModbusMaster master, int slaveId, int start, int len) throws Exception {
        ReadHoldingRegistersRequest request = new ReadHoldingRegistersRequest(slaveId, start, len);
        ReadHoldingRegistersResponse response = (ReadHoldingRegistersResponse) master.send(request);
        if (response.isException()) {
            System.out.println("读取保持寄存器错误,错误信息是" + response.getExceptionMessage());
        } else {
            System.out.println("读取保持寄存器=" + Arrays.toString(response.getShortData()));
        }
        return response.getShortData();
    }
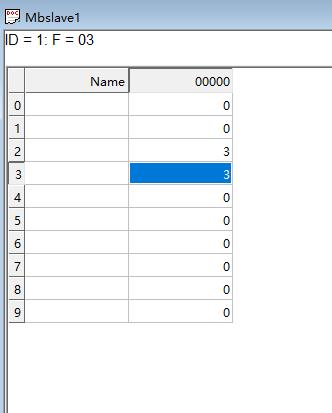
执行代码运行如下,ModBus-RTU,读写都是分开的,可以单独读,也可以单独写,一般都是读

6、我把写的方法注释了,然后打开软件查看读的报文记录
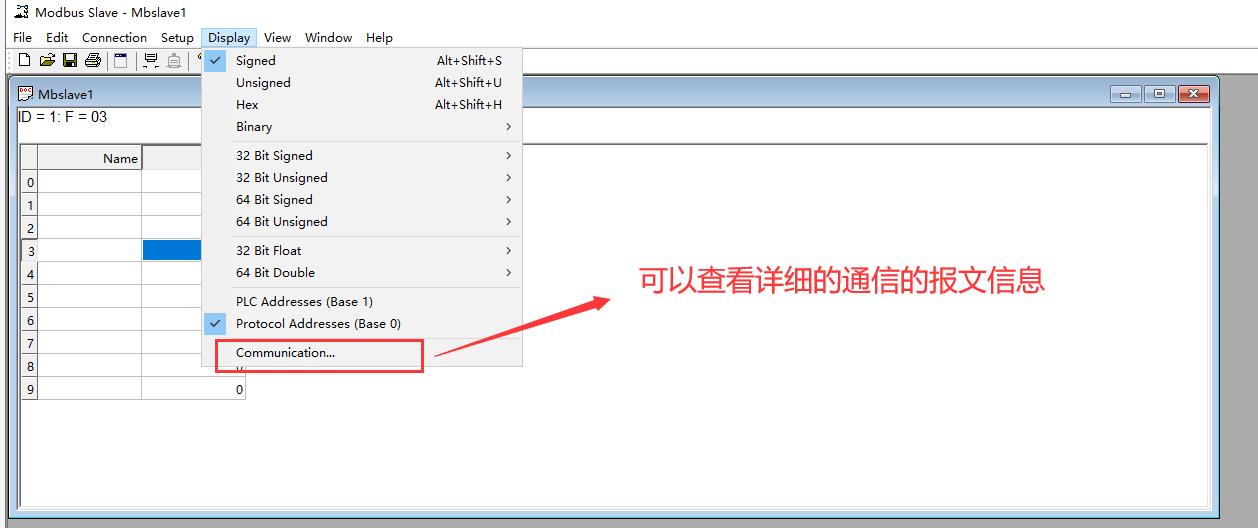
报文如下

读取的方法如下,上面是返回的报文信息
readHoldingRegisters(master, slaveId, 1, 3);蓝色的第一行表示读的报文
读的报文:01:表示读取传感器的ID为1;
03:表示读取传感器种类03是线圈类型
00 01:表示读取的开始长度(从0开始算起)第一个
00 03:表示读取的传感器长度为3
后面的两位是校验码:54 0B
第二行是返回的数据
返回的报文:01:表示读取传感器的ID为1;
03:表示读取传感器种类03是线圈类型
06:表示返回的有效数字长度;(总共三组,两个一组)
00 00:表示一组数据
00 03:表示一组数据
00 03:表示一组数据
后面的两位是校验码:91 74
MODBUS-TCP 与UDP
modbus-tcp比起RTU要简单点,不用配置额外的java环境,大部分使用的是MODBUS4j的方法包
1、 配置模拟传感器TCP方法连接

2、引入TCP连接需要的包
1、添加modbus4j依赖
  <dependency>
            <groupId>com.infiniteautomation</groupId>
            <artifactId>modbus4j</artifactId>
            <version>3.0.3</version>
  </dependency>
2、注意,还要添加下面一段,指定网上下包的网址,不然使用以前maven配置的阿里云的仓库,下载不到modbus4j的包
<repositories>
        <repository>
            <releases>
                <enabled>false</enabled>
            </releases>
            <snapshots>
                <enabled>true</enabled>
            </snapshots>
            <id>ias-snapshots</id>
            <name>Infinite Automation Snapshot Repository</name>
            <url>https://maven.mangoautomation.net/repository/ias-snapshot/</url>
        </repository>
        <repository>
            <releases>
                <enabled>true</enabled>
            </releases>
            <snapshots>
                <enabled>false</enabled>
            </snapshots>
            <id>ias-releases</id>
            <name>Infinite Automation Release Repository</name>
            <url>https://maven.mangoautomation.net/repository/ias-release/</url>
        </repository>
    </repositories>
3、主要的代码如下
Component
public class ReadAWriteUtil {

    /**
     * 批量写数据到保持寄存器
     * @param ip 从站IP
     * @param port modbus端口
     * @param slaveId 从站ID
     * @param start 起始地址偏移量
     * @param values 待写数据
     */
    public static void modbusWTCP(String ip, int port, int slaveId, int start, short[] values) {
        ModbusFactory modbusFactory = new ModbusFactory();
        // 设备ModbusTCP的Ip与端口,如果不设定端口则默认为502
        IpParameters params = new IpParameters();
        params.setHost(ip);
        // 设置端口,默认502
        if (502 != port) {
            params.setPort(port);
        }
        ModbusMaster tcpMaster = null;
        // 参数1:IP和端口信息 参数2:保持连接激活
        tcpMaster = modbusFactory.createTcpMaster(params, true);
        try {
            tcpMaster.init();
            System.out.println("=======初始化成功========");
        } catch (ModbusInitException e) {
            System.out.println("初始化异常");
        }
        try {
            WriteRegistersRequest request = new WriteRegistersRequest(slaveId, start, values);
            WriteRegistersResponse response = (WriteRegistersResponse) tcpMaster.send(request);
            if (response.isException()){
                System.out.println("Exception response: message=" + response.getExceptionMessage());
            }else{
                System.out.println("Success");
            }
        } catch (ModbusTransportException e) {
            e.printStackTrace();
        }
    }


    /**
     * 读保持寄存器上的内容
     * @param ip 从站IP
     * @param port modbus端口
     * @param start 起始地址偏移量
     * @param readLenth 待读寄存器个数
     * @return
     */
    public static Integer modbusTCP(String ip, int slaveId, int port, int start, int readLenth) {
        ModbusFactory modbusFactory = new ModbusFactory();
        // 设备ModbusTCP的Ip与端口,如果不设定端口则默认为502
        IpParameters params = new IpParameters();
        params.setHost(ip);
        //设置端口,默认502
        if(502!=port){
            params.setPort(port);
        }
        ModbusMaster tcpMaster = null;
        tcpMaster = modbusFactory.createTcpMaster(params, true);
        try {
            tcpMaster.init();
            System.out.println("========初始化成功=======");
        } catch (ModbusInitException e) {
            return null;
        }
        ModbusRequest modbusRequest=null;
        try {
            //功能码03   读取保持寄存器的值
            modbusRequest = new ReadHoldingRegistersRequest(slaveId, start, readLenth);

        } catch (ModbusTransportException e) {
            e.printStackTrace();
            return null;
        }
        ModbusResponse modbusResponse=null;

        try {
            modbusResponse = tcpMaster.send(modbusRequest);
        } catch (ModbusTransportException e) {
            e.printStackTrace();
            return null;
        }
        ByteQueue byteQueue= new ByteQueue(1024);
        modbusResponse.write(byteQueue);
//        System.out.println(modbusRequest());
        System.out.println("功能码:"+modbusRequest.getFunctionCode());
        System.out.println("从站地址:"+modbusRequest.getSlaveId());
        System.out.println("收到的响应信息大小:"+byteQueue.size());
        System.out.println("收到的响应信息值:"+byteQueue);
        int i = byteQueue.size() - 1;
        int i2 = byteQueue.size() - 2;
        byte peek = byteQueue.peek(i);
        byte peek2 = byteQueue.peek(i2);
        String s = hex10To16(peek);
        String s2 = hex10To16(peek2);
        String tt=s2+s;
//        System.out.println(tt);
        Integer b=Integer.parseInt(tt,16);
//        System.out.println(b);
//      for()
        return b;
    }
    public static String hex10To16(int valueTen) {
        return String.format("%02x", valueTen);
    }

    public static void main(String[] args) {
        String ip="127.0.0.1";
        int port=502;
        int start=2;
        int readLenth=2;
        int slaveId=1;
        Integer byteQueue = modbusTCP(ip,slaveId, port, start, readLenth);


        System.out.println("打印的值为"+byteQueue);
    }
运行代码收到的报文如下
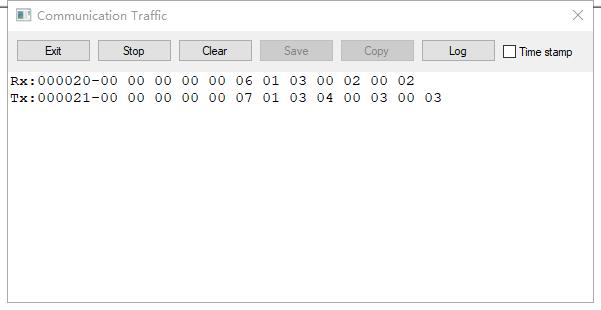
和RTU报文类似,但是有效的报文就第七位开始
01 表示传感器ID
03 表示读取线圈的类型
00 02 开始读取的值的地址
00 02 读取的长度(为2)
3、UDP的读的方式修改如下,其他如TCP一样
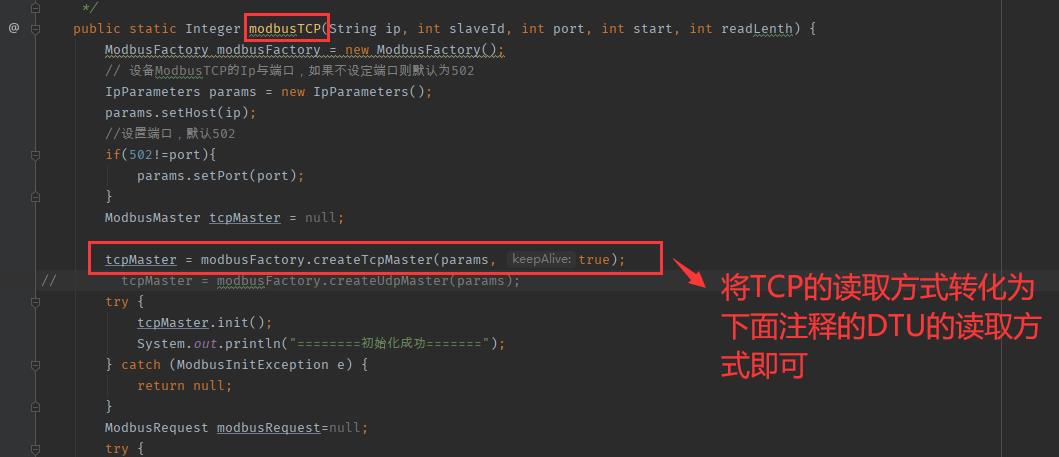
        tcpMaster = modbusFactory.createTcpMaster(params, true);
//        tcpMaster = modbusFactory.createUdpMaster(params);
基于Socket通信(DTU设备连接)
因为以前从来没有搞过这些东西,突然甲方说用DTU进行通信,网上查找资料,学习之后,发现其实就是Socket的东西,与ModBus关系已经很小了。
基本的逻辑是,设备厂商,将传感器通过串口绑定到DTU上,DTU相当于Socket的客户端,连接服务器的IP和端口,服务器通过端口与客户端通信(DTU),向客户端(DTU)发送指令,客户端回复有效值
我服务端设计的逻辑如下:
1、服务端监听5502端口
2、用while(true)的逻辑来不断监听客户端的连接,并开启线程来执行指令,我这边有7个DTU,也就是要开7个线程;
3、socket的accept方法来监听客户端连接
Socket client = server.accept();这个方法在接收不到客户端的请求时候,会一直处于阻塞状态4、获取客户端发送的注册包(客户端第一次连接时候,输出流会发送一个注册包,相当于认证码)
InputStream is = client.getInputStream();

System.out.println(client.getInetAddress() + "已成功连接到此台服务器上。");
byte[] bytes = ModBusUtils.readInputStream(is);
5、解析注册包信息,也就是将上面客户端的字节流,转化为byte字节数组,
               String str = "";
                for (int i = 0; i < bytes.length; i++) {
                    int uu = bytes[i];
                    if (i == 0) {
                        System.out.print("十进制:" + bytes[i] + " ");
                    } else {
                        System.out.print(bytes[i] + " ");
                    }
                    if ((uu >= 48 && uu <= 57) || (uu >= 65 && uu <= 90) || (uu >= 97
                   &&uu<= 122)) {
                        str = str + ModBusUtils.byteToASCLL(bytes[i]);
                    }
                }
                System.out.println("十六进制:" + ModBusUtils.bytes2HexString(bytes));
                System.out.println("注册包:" + str);
封装在自定义的ModBusUtils这个类中byteToASCLL方法如下
 public static char byteToASCLL(byte b){
            return (char) b;
    }
请不要小看这个if判断, 我在这里踩了半天的坑
 if ((uu >= 48 && uu <= 57) || (uu >= 65 && uu <= 90) || (uu >= 97
                   &&uu<= 122)) {}
为了拿到注册包名称信息(方便后面线程内使用):上面的for循环通过byteToASCLL方法,将字节数组byte[ ],转化为char的UNICOEDE字符,但是有些字符是日志中看不到
这就导致我迷茫了一下午,为什么服务器日志中名称相同,SQL相同,但是返回的结果不同,服务器日志入下:


表如下,我照着表,过滤其他一些特殊字符
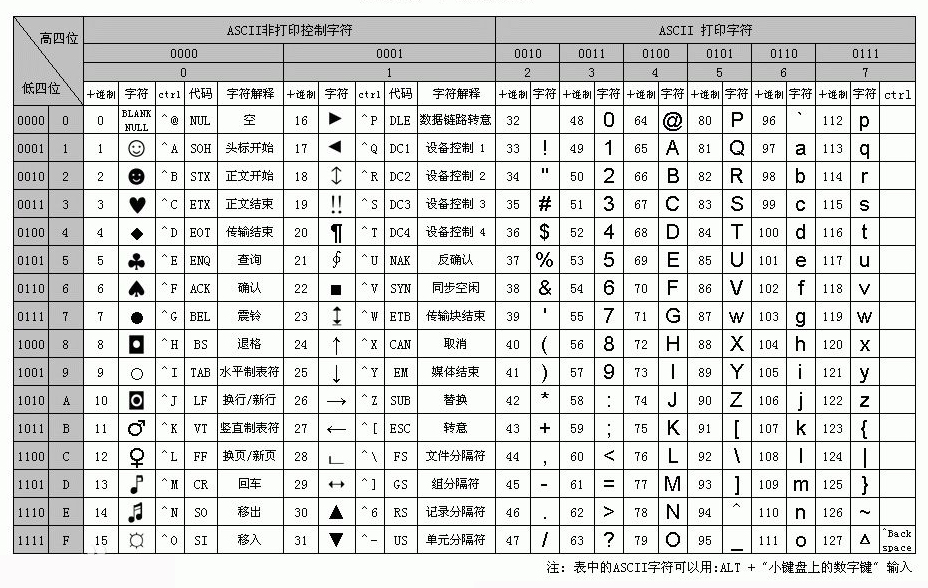
下面是我服务器拷贝的真实的字节数组测试
 public static void main(String[] args) {
        byte[] bytes = {116, 98, 7, 4, 49, 51, 48, 54, 54, 54, 54, 56, 56, 56, 56};
        String str = "";
        String str2="";
        for (int i = 0; i < bytes.length; i++) {
            int uu=bytes[i];
            if (i == 0) {
                System.out.print("十进制:" + bytes[i] + " ");
            } else {
                System.out.print(bytes[i] + " ");
            }
            if((uu>=48&&uu<=57)||(uu>=65&&uu<=90)||(uu>=97&&uu<=122)){
                str = str + ModBusUtils.byteToASCLL(bytes[i]);
            }
            str2 = str2 + ModBusUtils.byteToASCLL(bytes[i]);
        }
        System.out.println("十六进制:" + ModBusUtils.bytes2HexString(bytes));
        System.out.println("Str为:" + str);
        System.out.println("未转化的Str2为:" + str2);
    }
中间的两个问号乱码,但是日志不会显示,这就解释了为什么,看起来明明一样的日志,但是数据库返回结果却不同。
6、将注册包和客户端连接信息传入线程中,并开启线程
       Service service = new Service(client, str);
        service.start();
服务器端代码如下
@Component
public class SocketServer extends Thread {


    public void run() {
        try {
            //创建socket服务端
            @SuppressWarnings("resource")
            ServerSocket server = new ServerSocket(5502);
            System.out.println("执行了这个");
            while (true) {
                System.out.println("建立监听");
                Socket client = server.accept();

                System.out.println("建立连接");
                //获取客户端发送注册包
                InputStream is = client.getInputStream();

                System.out.println(client.getInetAddress() + "已成功连接到此台服务器上。");
                byte[] bytes = ModBusUtils.readInputStream(is);
                String str = "";
                for (int i = 0; i < bytes.length; i++) {
                    int uu = bytes[i];
                    if (i == 0) {
                        System.out.print("十进制:" + bytes[i] + " ");
                    } else {
                        System.out.print(bytes[i] + " ");
                    }
                    if ((uu >= 48 && uu <= 57) || (uu >= 65 && uu <= 90) || (uu >= 97 && uu <= 122)) {
                        str = str + ModBusUtils.byteToASCLL(bytes[i]);
                    }
                }
                System.out.println("十六进制:" + ModBusUtils.bytes2HexString(bytes));
                System.out.println("注册包:" + str);
                //添加客户端
//                clientMap.put(str,client);
                Service service = new Service(client, str);
                service.start();
            }
        } catch (Exception e) {
            e.printStackTrace();
        }
    }
}
用到的工具类代码
package com.nswi.socketTest;

import java.io.ByteArrayOutputStream;
import java.io.IOException;
import java.io.InputStream;

/**
 * @program: modbus
 * @ClassName ModBusUtils
 * @description:
 * @author:蒋皓洁
 * @create: 2021-07-31 09:57
 * @Version 1.0
 **/
public class ModBusUtils {
    public static byte[] readInputStream(InputStream inputStream) throws  IOException {
        byte[] buffer = new byte[1024];
        int len = 0;
        ByteArrayOutputStream bos = new ByteArrayOutputStream();
        if((len = inputStream.read(buffer)) != -1) {
            bos.write(buffer, 0, len);
        }
        bos.close();
        return bos.toByteArray();
    }

    public static char byteToASCLL(byte b){

            return (char) b;

    }
//Integer x = Integer.parseInt(hex,16);
    /*
     * 字节数组转16进制字符串
     */
    public static String bytes2HexString(byte[] b) {
        String r = "";
        for (int i = 0; i < b.length; i++) {
            String hex = Integer.toHexString(b[i] & 0xFF);
            if (hex.length() == 1) {
                hex = '0' + hex;
            }
            r += hex.toUpperCase()+" ";
        }
        return r;
    }
    public static String bytes2HexStringOne(byte b) {
        String r = "";
//        for (int i = 0; i < b.length; i++) {
        String hex = Integer.toHexString(b & 0xFF);
        if (hex.length() == 1) {
            hex = '0' + hex;
        }
        r += hex.toUpperCase()+" ";
//        }
        return r;
    }

    /**
     * @TODO : 计算CRC校验码
     * @AUTH : linfeng
     * @DATE : 2020年8月27日 下午2:11:30
     * @return_type : String
     * @param data
     * @return
     */
    public static String getCRC3(byte[] data) {
        byte[] crc16_h = {
                (byte) 0x00, (byte) 0xC1, (byte) 0x81, (byte) 0x40, (byte) 0x01, (byte) 0xC0, (byte) 0x80, (byte) 0x41, (byte) 0x01, (byte) 0xC0, (byte) 0x80, (byte) 0x41, (byte) 0x00, (byte) 0xC1, (byte) 0x81, (byte) 0x40,
                (byte) 0x01, (byte) 0xC0, (byte) 0x80, (byte) 0x41, (byte) 0x00, (byte) 0xC1, (byte) 0x81, (byte) 0x40, (byte) 0x00, (byte) 0xC1, (byte) 0x81, (byte) 0x40, (byte) 0x01, (byte) 0xC0, (byte) 0x80, (byte) 0x41,
                (byte) 0x01, (byte) 0xC0, (byte) 0x80, (byte) 0x41, (byte) 0x00, (byte) 0xC1, (byte) 0x81, (byte) 0x40, (byte) 0x00, (byte) 0xC1, (byte) 0x81, (byte) 0x40, (byte) 0x01, (byte) 0xC0, (byte) 0x80, (byte) 0x41,
                (byte) 0x00, (byte) 0xC1, (byte) 0x81, (byte) 0x40, (byte) 0x01, (byte) 0xC0, (byte) 0x80, (byte) 0x41, (byte) 0x01, (byte) 0xC0, (byte) 0x80, (byte) 0x41, (byte) 0x00, (byte) 0xC1, (byte) 0x81, (byte) 0x40,
                (byte) 0x01, (byte) 0xC0, (byte) 0x80, (byte) 0x41, (byte) 0x00, (byte) 0xC1, (byte) 0x81, (byte) 0x40, (byte) 0x00, (byte) 0xC1, (byte) 0x81, (byte) 0x40, (byte) 0x01, (byte) 0xC0, (byte) 0x80, (byte) 0x41,
                (byte) 0x00, (byte) 0xC1, (byte) 0x81, (byte) 0x40, (byte) 0x01, (byte) 0xC0, (byte) 0x80, (byte) 0x41, (byte) 0x01, (byte) 0xC0, (byte) 0x80, (byte) 0x41, (byte) 0x00, (byte) 0xC1, (byte) 0x81, (byte) 0x40,
                (byte) 0x00, (byte) 0xC1, (byte) 0x81, (byte) 0x40, (byte) 0x01, (byte) 0xC0, (byte) 0x80, (byte) 0x41, (byte) 0x01, (byte) 0xC0, (byte) 0x80, (byte) 0x41, (byte) 0x00, (byte) 0xC1, (byte) 0x81, (byte) 0x40,
                (byte) 0x01, (byte) 0xC0, (byte) 0x80, (byte) 0x41, (byte) 0x00, (byte) 0xC1, (byte) 0x81, (byte) 0x40, (byte) 0x00, (byte) 0xC1, (byte) 0x81, (byte) 0x40, (byte) 0x01, (byte) 0xC0, (byte) 0x80, (byte) 0x41,
                (byte) 0x01, (byte) 0xC0, (byte) 0x80, (byte) 0x41, (byte) 0x00, (byte) 0xC1, (byte) 0x81, (byte) 0x40, (byte) 0x00, (byte) 0xC1, (byte) 0x81, (byte) 0x40, (byte) 0x01, (byte) 0xC0, (byte) 0x80, (byte) 0x41,
                (byte) 0x00, (byte) 0xC1, (byte) 0x81, (byte) 0x40, (byte) 0x01, (byte) 0xC0, (byte) 0x80, (byte) 0x41, (byte) 0x01, (byte) 0xC0, (byte) 0x80, (byte) 0x41, (byte) 0x00, (byte) 0xC1, (byte) 0x81, (byte) 0x40,
                (byte) 0x00, (byte) 0xC1, (byte) 0x81, (byte) 0x40, (byte) 0x01, (byte) 0xC0, (byte) 0x80, (byte) 0x41, (byte) 0x01, (byte) 0xC0, (byte) 0x80, (byte) 0x41, (byte) 0x00, (byte) 0xC1, (byte) 0x81, (byte) 0x40,
                (byte) 0x01, (byte) 0xC0, (byte) 0x80, (byte) 0x41, (byte) 0x00, (byte) 0xC1, (byte) 0x81, (byte) 0x40, (byte) 0x00, (byte) 0xC1, (byte) 0x81, (byte) 0x40, (byte) 0x01, (byte) 0xC0, (byte) 0x80, (byte) 0x41,
                (byte) 0x00, (byte) 0xC1, (byte) 0x81, (byte) 0x40, (byte) 0x01, (byte) 0xC0, (byte) 0x80, (byte) 0x41, (byte) 0x01, (byte) 0xC0, (byte) 0x80, (byte) 0x41, (byte) 0x00, (byte) 0xC1, (byte) 0x81, (byte) 0x40,
                (byte) 0x01, (byte) 0xC0, (byte) 0x80, (byte) 0x41, (byte) 0x00, (byte) 0xC1, (byte) 0x81, (byte) 0x40, (byte) 0x00, (byte) 0xC1, (byte) 0x81, (byte) 0x40, (byte) 0x01, (byte) 0xC0, (byte) 0x80, (byte) 0x41,
                (byte) 0x01, (byte) 0xC0, (byte) 0x80, (byte) 0x41, (byte) 0x00, (byte) 0xC1, (byte) 0x81, (byte) 0x40, (byte) 0x00, (byte) 0xC1, (byte) 0x81, (byte) 0x40, (byte) 0x01, (byte) 0xC0, (byte) 0x80, (byte) 0x41,
                (byte) 0x00, (byte) 0xC1, (byte) 0x81, (byte) 0x40, (byte) 0x01, (byte) 0xC0, (byte) 0x80, (byte) 0x41, (byte) 0x01, (byte) 0xC0, (byte) 0x80, (byte) 0x41, (byte) 0x00, (byte) 0xC1, (byte) 0x81, (byte) 0x40
        };

        byte[] crc16_l = {
                (byte) 0x00, (byte) 0xC0, (byte) 0xC1, (byte) 0x01, (byte) 0xC3, (byte) 0x03, (byte) 0x02, (byte) 0xC2, (byte) 0xC6, (byte) 0x06, (byte) 0x07, (byte) 0xC7, (byte) 0x05, (byte) 0xC5, (byte) 0xC4, (byte) 0x04,
                (byte) 0xCC, (byte) 0x0C, (byte) 0x0D, (byte) 0xCD, (byte) 0x0F, (byte) 0xCF, (byte) 0xCE, (byte) 0x0E, (byte) 0x0A, (byte) 0xCA, (byte) 0xCB, (byte) 0x0B, (byte) 0xC9, (byte) 0x09, (byte) 0x08, (byte) 0xC8,
                (byte) 0xD8, (byte) 0x18, (byte) 0x19, (byte) 0xD9, (byte) 0x1B, (byte) 0xDB, (byte) 0xDA, (byte) 0x1A, (byte) 0x1E, (byte) 0xDE, (byte) 0xDF, (byte) 0x1F, (byte) 0xDD, (byte) 0x1D, (byte) 0x1C, (byte) 0xDC,
                (byte) 0x14, (byte) 0xD4, (byte) 0xD5, (byte) 0x15, (byte) 0xD7, (byte) 0x17, (byte) 0x16, (byte) 0xD6, (byte) 0xD2, (byte) 0x12, (byte) 0x13, (byte) 0xD3, (byte) 0x11, (byte) 0xD1, (byte) 0xD0, (byte) 0x10,
                (byte) 0xF0, (byte) 0x30, (byte) 0x31, (byte) 0xF1, (byte) 0x33, (byte) 0xF3, (byte) 0xF2, (byte) 0x32, (byte) 0x36, (byte) 0xF6, (byte) 0xF7, (byte) 0x37, (byte) 0xF5, (byte) 0x35, (byte) 0x34, (byte) 0xF4,
                (byte) 0x3C, (byte) 0xFC, (byte) 0xFD, (byte) 0x3D, (byte) 0xFF, (byte) 0x3F, (byte) 0x3E, (byte) 0xFE, (byte) 0xFA, (byte) 0x3A, (byte) 0x3B, (byte) 0xFB, (byte) 0x39, (byte) 0xF9, (byte) 0xF8, (byte) 0x38,
                (byte) 0x28, (byte) 0xE8, (byte) 0xE9, (byte) 0x29, (byte) 0xEB, (byte) 0x2B, (byte) 0x2A, (byte) 0xEA, (byte) 0xEE, (byte) 0x2E, (byte) 0x2F, (byte) 0xEF, (byte) 0x2D, (byte) 0xED, (byte) 0xEC, (byte) 0x2C,
                (byte) 0xE4, (byte) 0x24, (byte) 0x25, (byte) 0xE5, (byte) 0x27, (byte) 0xE7, (byte) 0xE6, (byte) 0x26, (byte) 0x22, (byte) 0xE2, (byte) 0xE3, (byte) 0x23, (byte) 0xE1, (byte) 0x21, (byte) 0x20, (byte) 0xE0,
                (byte) 0xA0, (byte) 0x60, (byte) 0x61, (byte) 0xA1, (byte) 0x63, (byte) 0xA3, (byte) 0xA2, (byte) 0x62, (byte) 0x66, (byte) 0xA6, (byte) 0xA7, (byte) 0x67, (byte) 0xA5, (byte) 0x65, (byte) 0x64, (byte) 0xA4,
                (byte) 0x6C, (byte) 0xAC, (byte) 0xAD, (byte) 0x6D, (byte) 0xAF, (byte) 0x6F, (byte) 0x6E, (byte) 0xAE, (byte) 0xAA, (byte) 0x6A, (byte) 0x6B, (byte) 0xAB, (byte) 0x69, (byte) 0xA9, (byte) 0xA8, (byte) 0x68,
                (byte) 0x78, (byte) 0xB8, (byte) 0xB9, (byte) 0x79, (byte) 0xBB, (byte) 0x7B, (byte) 0x7A, (byte) 0xBA, (byte) 0xBE, (byte) 0x7E, (byte) 0x7F, (byte) 0xBF, (byte) 0x7D, (byte) 0xBD, (byte) 0xBC, (byte) 0x7C,
                (byte) 0xB4, (byte) 0x74, (byte) 0x75, (byte) 0xB5, (byte) 0x77, (byte) 0xB7, (byte) 0xB6, (byte) 0x76, (byte) 0x72, (byte) 0xB2, (byte) 0xB3, (byte) 0x73, (byte) 0xB1, (byte) 0x71, (byte) 0x70, (byte) 0xB0,
                (byte) 0x50, (byte) 0x90, (byte) 0x91, (byte) 0x51, (byte) 0x93, (byte) 0x53, (byte) 0x52, (byte) 0x92, (byte) 0x96, (byte) 0x56, (byte) 0x57, (byte) 0x97, (byte) 0x55, (byte) 0x95, (byte) 0x94, (byte) 0x54,
                (byte) 0x9C, (byte) 0x5C, (byte) 0x5D, (byte) 0x9D, (byte) 0x5F, (byte) 0x9F, (byte) 0x9E, (byte) 0x5E, (byte) 0x5A, (byte) 0x9A, (byte) 0x9B, (byte) 0x5B, (byte) 0x99, (byte) 0x59, (byte) 0x58, (byte) 0x98,
                (byte) 0x88, (byte) 0x48, (byte) 0x49, (byte) 0x89, (byte) 0x4B, (byte) 0x8B, (byte) 0x8A, (byte) 0x4A, (byte) 0x4E, (byte) 0x8E, (byte) 0x8F, (byte) 0x4F, (byte) 0x8D, (byte) 0x4D, (byte) 0x4C, (byte) 0x8C,
                (byte) 0x44, (byte) 0x84, (byte) 0x85, (byte) 0x45, (byte) 0x87, (byte) 0x47, (byte) 0x46, (byte) 0x86, (byte) 0x82, (byte) 0x42, (byte) 0x43, (byte) 0x83, (byte) 0x41, (byte) 0x81, (byte) 0x80, (byte) 0x40
        };

        int crc = 0x0000ffff;
        int ucCRCHi = 0x00ff;
        int ucCRCLo = 0x00ff;
        int iIndex;
        for (int i = 0; i < data.length; ++i) {
            iIndex = (ucCRCLo ^ data[i]) & 0x00ff;
            ucCRCLo = ucCRCHi ^ crc16_h[iIndex];
            ucCRCHi = crc16_l[iIndex];
        }

        crc = ((ucCRCHi & 0x00ff) << 8) | (ucCRCLo & 0x00ff) & 0xffff;
        //高低位互换,输出符合相关工具对Modbus CRC16的运算
        crc = ((crc & 0xFF00) >> 8) | ((crc & 0x00FF) << 8);
        return String.format("%04X", crc);
    }

    /**
     * 16进制表示的字符串转换为字节数组
     *
     * @param hexString 16进制表示的字符串
     * @return byte[] 字节数组
     */
    public static byte[] hexStringToByteArray(String hexString) {
        hexString = hexString.replaceAll(" ", "");
        int len = hexString.length();
        byte[] bytes = new byte[len / 2];
        for (int i = 0; i < len; i += 2) {
            // 两位一组,表示一个字节,把这样表示的16进制字符串,还原成一个字节
            bytes[i / 2] = (byte) ((Character.digit(hexString.charAt(i), 16) << 4) + Character
                    .digit(hexString.charAt(i + 1), 16));
        }
        return bytes;
    }
}
Socket连接的线程如下
package com.nswi.socketTest;

import com.baomidou.mybatisplus.core.conditions.query.LambdaQueryWrapper;
import com.nswi.entity.CgqCall;
import com.nswi.entity.CgqNumber;
import com.nswi.entity.CgqType;
import com.nswi.entity.CgqTypeDetails;
import com.nswi.mapper.CgqCallMapper;
import com.nswi.mapper.CgqNumberMapper;
import com.nswi.mapper.CgqTypeDetailsMapper;
import com.nswi.mapper.CgqTypeMapper;
import com.nswi.service.ICgqCallService;
import com.nswi.service.ICgqTypeDetailsService;
//import com.nswi.utils.test.SpringContextJobUtil;
import com.nswi.utils.test.SpringContextJobUtil;
import org.springframework.beans.factory.annotation.Autowired;

import java.io.InputStream;
import java.io.OutputStream;
import java.lang.reflect.Type;
import java.net.Socket;
import java.text.SimpleDateFormat;
import java.util.*;

/**
 * @program: modbus
 * @ClassName Service
 * @description:
 * @author:蒋皓洁
 * @create: 2021-07-31 10:03
 * @Version 1.0
 **/

public class Service extends Thread {


    //    传感器
    @Autowired
    CgqTypeMapper cgqTypeMapper;


    //传感器的细节存入
    @Autowired
    CgqTypeDetailsMapper cgqTypeDetailsMapper;
    //    传感器使用
    @Autowired
    CgqCallMapper cgqCallMapper;

    @Autowired
    CgqNumberMapper cgqNumberMapper;

    private int numberTime = 0;


    private Socket clientMap;
    private String jiedianbao;

    public Service() {

    }

    public Service(Socket clientMap, String uuu) {
        this.clientMap = clientMap;
        this.jiedianbao = uuu;
    }

    private static String getType(Object a) {
        return a.getClass().toString();

    }


    public void run() {
        while (true) {
            long start = System.currentTimeMillis();
            System.out.println(jiedianbao);

            try {
                //注册包 节点编号
                String registrationPacket = jiedianbao;
                String getThreadName = Thread.currentThread().getName();
                Socket socket = clientMap;
                assert socket != null;
                OutputStream os = socket.getOutputStream();
                cgqTypeMapper = (CgqTypeMapper) SpringContextJobUtil.getBean("cgqTypeMapper");
                LambdaQueryWrapper<CgqType> cgqTypeLambdaQueryWrapper = new LambdaQueryWrapper<>();
                cgqTypeLambdaQueryWrapper.eq(CgqType::getRtuId, jiedianbao);
                List<CgqType> cgqTypes = cgqTypeMapper.selectList(cgqTypeLambdaQueryWrapper);
                System.out.println(jiedianbao + "的长度为:" + cgqTypes.size());
                for (CgqType cgt : cgqTypes
                ) {
                    int id = cgt.getTypeId();
                    int startLength = cgt.getCodeStart();
                    int endLength = cgt.getCodeLength();
                    byte[] by = new byte[6];
                    by[0] = (byte) id;
                    by[1] = 3;
                    by[2] = 0;
                    by[3] = (byte) startLength;
                    by[4] = 0;
                    by[5] = (byte) endLength;
                    //crc3校验
                    String crc = ModBusUtils.getCRC3(by);
                    byte[] crcByte = ModBusUtils.hexStringToByteArray(crc);
                    byte[] data = new byte[8];
                    data[6] = crcByte[0];
                    data[7] = crcByte[1];
                    for (int i = 0; i < by.length; i++) {
                        data[i] = by[i];
                    }
                    os.write(data);
                    System.out.println(registrationPacket + ":往DTU写入数据为:" + Arrays.toString(data));
                    InputStream is2 = socket.getInputStream();
                    long et2 = System.currentTimeMillis();
                    boolean enterTT = true;
                    while (is2.available() == 0 && enterTT) {
                        is2 = socket.getInputStream();
                        long et3 = System.currentTimeMillis();
//                        大于一秒结束请求
                        if (et3 - et2 > 1000) {
                            enterTT = false;
                            System.out.println("没有请求到数据包");
                        }
                    }
                    Date date = new Date();//获得系统时间.
                    SimpleDateFormat sdf = new SimpleDateFormat(" yyyy-MM-dd HH:mm:ss");
                    String nowTime = sdf.format(date);
                    Date time = sdf.parse(nowTime);
                    System.out.println(time);
                    if (numberTime == 0) {
                        if (is2.available() != 0) {
                            System.out.println("能拿到数据");
                            byte[] b以上是关于ModBus(RTU TCP UDP通信)及利用socket通信(DTU)实现Modbus-RTU通信协议的主要内容,如果未能解决你的问题,请参考以下文章