Android应用中如何自定义弹框?
Posted kaolagirl
tags:
篇首语:本文由小常识网(cha138.com)小编为大家整理,主要介绍了Android应用中如何自定义弹框?相关的知识,希望对你有一定的参考价值。
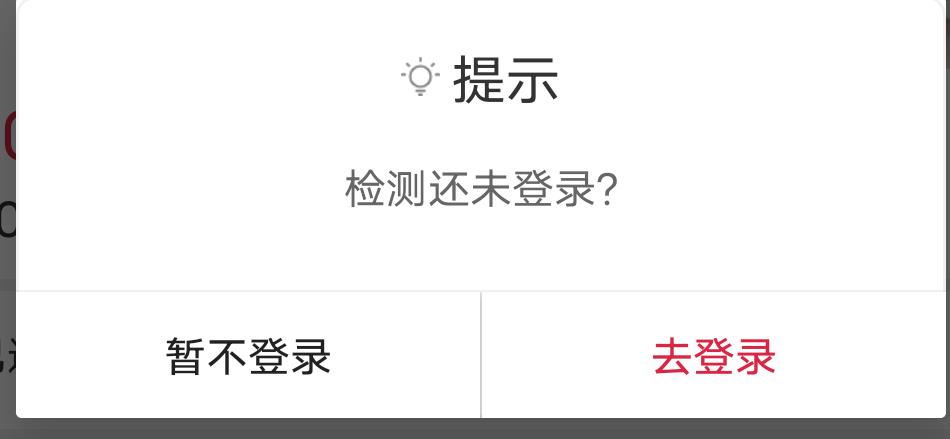
在我们应用开发过程中,系统自带的弹框效果不是很好看,所以我们就得自己去自定义,下面就来简单说说吧
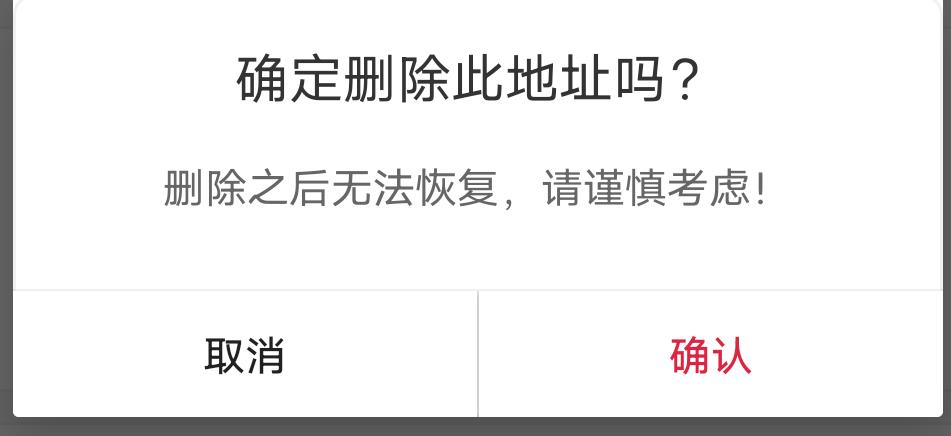
1.效果

2.自定义弹框布局(alert_dialog_defaut.xml)
<LinearLayout xmlns:android="http://schemas.android.com/apk/res/android"
    android:layout_width="match_parent"
    android:layout_height="wrap_content"
    android:orientation="vertical">
    <LinearLayout
        android:orientation="vertical"
        android:layout_width="match_parent"
        android:layout_height="wrap_content"
        android:background="@drawable/content_corner">
        <LinearLayout
            android:gravity="center"
            android:layout_marginTop="15dp"
            android:orientation="horizontal"
            android:layout_width="match_parent"
            android:layout_height="wrap_content">
            <ImageView
                android:id="@+id/iv_dialog_tip"
                android:visibility="gone"
                android:layout_marginRight="4dp"
                android:layout_gravity="center"
                android:src="@drawable/dialog_tip"
                android:layout_width="13dp"
                android:layout_height="13dp"/>
            <TextView
                android:id="@+id/title"
                android:text="标题"
                android:gravity="center"
                android:textColor="@color/theme_defaultText"
                android:textSize="@dimen/larMax_size"
                android:layout_width="wrap_content"
                android:layout_height="wrap_content"/>
        </LinearLayout>

        <TextView
            android:id="@+id/content"
            android:layout_margin="15dp"
            android:gravity="center"
            android:text="内容"
            android:textSize="@dimen/order1"
            android:lineHeight="20dp"
            android:textColor="@color/theme_textColor"
            android:layout_width="match_parent"
            android:layout_height="wrap_content"/>
        <TextView
            android:layout_marginTop="10dp"
            android:background="@color/banner_backColor"
            android:layout_width="match_parent"
            android:layout_height="0.8dp"/>
        <LinearLayout
            android:layout_width="match_parent"
            android:layout_height="wrap_content">
            <Button
                android:id="@+id/cancel_btn"
               android:background="@color/white"
                android:textSize="@dimen/order1"
                android:text="取消"
                android:layout_weight="1.0"
                android:layout_width="wrap_content"
                android:layout_height="42dp"/>
            <TextView
                android:background="@color/banner_backColor"
                android:layout_width="0.5dp"
                android:layout_height="match_parent"/>
            <Button
                android:id="@+id/comfirm_btn"
                android:background="@color/white"
                android:text="确认"
                android:textSize="@dimen/order1"
                android:textColor="@color/theme_color"
                android:layout_weight="1.0"
                android:layout_width="wrap_content"
                android:layout_height="42dp"/>
        </LinearLayout>
    </LinearLayout>

</LinearLayout>
2.自定义一个弹框工具类(AlertDialogUtils.java)
// 自定义dialog对话框
public class AlertDialogUtils {
    private static View view_custom;
    public static AlertDialog.Builder builder;
    public  static AlertDialog alert ;
    public static TextView tv_dialog_title, tv_dialog_content;
    public static Button dialog_cancelBtn,dialog_confirmBtn;

    public static AlertDialogUtils getInstance() {
        return new AlertDialogUtils();
    }

    /**
     * todo 带有确认取消按钮的自定义dialog
     * @param context 上下文对象
     * @param title 标题
     * @param content 内容
     */
    public static void showConfirmDialog(Context context, String title, String content){
        builder = new AlertDialog.Builder(context);
        alert = builder.create();
        alert.show();

         //引入布局
        view_custom =LayoutInflater.from(context).inflate(R.layout.alert_dialog_defaut,null,false);
        tv_dialog_title = view_custom.findViewById(R.id.title);
        tv_dialog_title.setText(title);
        tv_dialog_content =  view_custom.findViewById(R.id.content);
        tv_dialog_content.setText(content);

        alert.setCancelable(false); //点击空白处不关闭弹窗

         //为取消按钮设置点击监听
        view_custom.findViewById(R.id.cancel_btn).setOnClickListener(new View.OnClickListener() {
            @Override
            public void onClick(View v) {
             if(mOnDialogButtonClickListener !=null){
                 mOnDialogButtonClickListener.onNegativeButtonClick(alert);
             }
            }
        });
        //为确认按钮设置点击监听
        view_custom.findViewById(R.id.comfirm_btn).setOnClickListener(new View.OnClickListener() {
            @Override
            public void onClick(View v) {
                if(mOnDialogButtonClickListener !=null){
                    mOnDialogButtonClickListener.onPositiveButtonClick(alert);
                }
            }
        });
        //使用布局
        alert.getWindow().setContentView(view_custom);
    }


    //todo 按钮点击回调接口
    public static OnDialogButtonClickListener mOnDialogButtonClickListener;

    public void setMonDialogButtonClickListener(OnDialogButtonClickListener listener){
        this.mOnDialogButtonClickListener = listener;
    }
    public interface OnDialogButtonClickListener{
        void onPositiveButtonClick(AlertDialog dialog); //确认
        void onNegativeButtonClick(AlertDialog dialog); //取消
    }

}
3.在activity/Fragment中使用
使用工具类方便,就是哪里用到直接调用就可以了,而不用每次需要时都要重新引入布局,创建一大堆
        AlertDialogUtils dialogUtils =AlertDialogUtils.getInstance();
        AlertDialogUtils.showConfirmDialog(GoodAddress.this,"确定删除此地址吗?","删除之后无法恢复,请谨慎考虑!");
        dialogUtils.setMonDialogButtonClickListener(new AlertDialogUtils.OnDialogButtonClickListener() {
            @Override
            public void onPositiveButtonClick(androidx.appcompat.app.AlertDialog dialog) {
                //点击确认按钮要做的事情
            }

            @Override
            public void onNegativeButtonClick(androidx.appcompat.app.AlertDialog dialog) {
               //点击取消按钮关闭弹框
                dialog.dismiss();
            }
        });
这样子就已经完成啦!!!!!最后,附上效果图

以上是关于Android应用中如何自定义弹框?的主要内容,如果未能解决你的问题,请参考以下文章