OpenCV学习笔记 - DNN模块使用(含源码详细解释)
Posted 薛定猫
tags:
篇首语:本文由小常识网(cha138.com)小编为大家整理,主要介绍了OpenCV学习笔记 - DNN模块使用(含源码详细解释)相关的知识,希望对你有一定的参考价值。
最近翻了翻以前做的一些笔记,碰巧翻到了2019年刚开始学习OpenCV时候做的笔记,不知不觉已经过去两年了,这两年从一个小白到现在不是太小白的小白o(╥﹏╥)o,在此分享一下,希望能帮助到更多的人。
相关视频:https://www.bilibili.com/video/BV1FJ411T7W5?p=2
文章目录
DNN模块
Googlenet模型实现图像分类
介绍:
论文:https://github.com/SnailTyan/deep-learning-papers-translation
这里有很多翻译好的论文,很方便。
所需文件:二进制模型文件,模型参数描述文件,分类label文件。
模型下载:
http://dl.caffe.berkeleyvision.org/bvlc_googlenet.caffemodel

卷积层提取特征,全连接层进行分类。
描述文件:bvlc_googlenet.prototxt
这个在opencv的源码里边有opencv-3.3.1\\samples\\data\\dnn
模型输出为一个1000维的向量,代表1000个分类的概率。
代码:
#include <opencv2/core.hpp>
#include <opencv2/imgproc.hpp>
#include <opencv2/highgui.hpp>
#include <opencv2/dnn.hpp>
#include <iostream>
#include <fstream>
using namespace cv;
using namespace std;
using namespace cv::dnn;
String model_bin_file = "model/bvlc_googlenet.caffemodel";
String model_txt_file = "model/bvlc_googlenet.prototxt";
String labels_txt_file = "model/synset_words.txt";
vector<String> readLabels();
int main(int argc, char** argv)
{
	Mat src = imread("pictures/girl.jpg");
	if (src.empty())
	{
		cout << "could not open image……" << endl;
		return -1;
	}
	namedWindow("src", WINDOW_FREERATIO);
	imshow("src", src);
	// 读取labels
	vector<String> labels = readLabels();
	// 读取网络 包括模型描述文件和和模型文件
	Net net = readNetFromCaffe(model_txt_file, model_bin_file);
	if (net.empty())
	{
		cout << "net could not load……" << endl;
		return -1;
	}
	Mat inputBlob = blobFromImage(src, 1.0, Size(224, 224), Scalar(104, 117, 123));
	Mat prob;
	for (size_t i = 0; i < 10; i++)
	{
		net.setInput(inputBlob, "data");
		prob = net.forward("prob");	// 输出为1×1000 1000类的概率
	}
	Mat proMat = prob.reshape(1, 1);	// 单通道 一行
	Point classNumber;
	double classProb;
	minMaxLoc(proMat, NULL, &classProb, NULL, &classNumber);
	int classidx = classNumber.x;
	cout << "current image classification:" << labels.at(classidx).c_str()
		 << "possible:" << classProb <<  endl;
	putText(src, labels.at(classidx), Point(20, 20), FONT_HERSHEY_PLAIN, 1.5, Scalar(0, 0, 255), 1, 8);
	imshow("image", src);
	waitKey(0);
	return 0;
}
vector<String> readLabels()
{
	vector<String> classNames;
	ifstream fin(labels_txt_file.c_str());
	if (!fin.is_open())
	{
		cout << "could not open the file……" << endl;
		exit(-1);
	}
	string name;
	while (!fin.eof())
	{
		getline(fin, name);
		if (name.length())
		{
			classNames.push_back(name.substr(name.find(" " + 1)));// 按空格的位置往后移一位进行分割

		}
	}
	fin.close();
	return classNames;
}
结果展示:

SSD模型实现对象检测
介绍:

模型下载:
https://github.com/weiliu89/caffe/tree/ssd#models
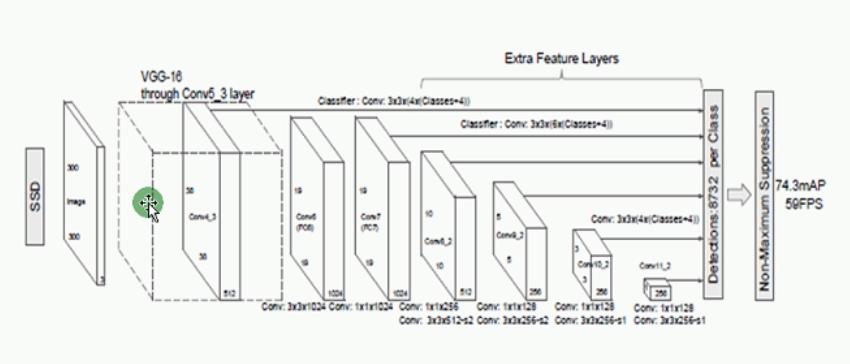
结构:

比传统的R-CNN要好很多。把两步和为一步,帧率得到了提高。
模型文件:还是有三个 二进制模型文件,模型参数描述文件,分类label文件
 模型输出为一个7维向量 后四维为检测出来目标框的矩形坐标 倒数第5维为置信度
代码:
#include <opencv2/core.hpp>
#include <opencv2/imgproc.hpp>
#include <opencv2/highgui.hpp>
#include <opencv2/dnn.hpp>
#include <iostream>
#include <fstream>

using namespace std;
using namespace cv;
using namespace cv::dnn;

const size_t width = 300;
const size_t height = 300;
String labelFile = "model\\\\models_VGGNet_ILSVRC2016_SSD_300x300\\\\models\\\\VGGNet\\\\ILSVRC2016\\\\SSD_300x300\\\\labelmap_ilsvrc_det.prototxt";
String modelFile = "model\\\\models_VGGNet_ILSVRC2016_SSD_300x300\\\\models\\\\VGGNet\\\\ILSVRC2016\\\\SSD_300x300\\\\VGG_ILSVRC2016_SSD_300x300_iter_440000.caffemodel";
String model_text_file = "model\\\\models_VGGNet_ILSVRC2016_SSD_300x300\\\\models\\\\VGGNet\\\\ILSVRC2016\\\\SSD_300x300\\\\deploy.prototxt";
const int meanValues[3] = { 104, 117, 123 };

vector<String> readLabels();
static Mat getMean(const size_t &w, const size_t &h);
static Mat preprocess(const Mat& frame);
int main(int argc, char** argv)
{
	Mat frame = imread("pictures/cat.jpg");
	if (frame.empty())
	{
		cout << "could not open image……" << endl;
		return -1;
	}
	namedWindow("input image", WINDOW_FREERATIO);
	imshow("input image", frame);

	vector<String> objNames = readLabels();
	// import Caffe SSD model
	Net net = readNetFromCaffe(model_text_file, modelFile);
	if (net.empty())
	{
		cout << "read caffe model data failure..." << endl;
		return -1;
	}

	Mat input_image = preprocess(frame);
	Mat blobImage = blobFromImage(input_image);

	net.setInput(blobImage, "data");
	Mat detection = net.forward("detection_out");
	Mat detectionMat(detection.size[2], detection.size[3], CV_32F, detection.ptr<float>());
	float confidence_threshold = 0.1;
	for (int i = 0; i < detectionMat.rows; i++)
	{
        // 输出为一个7维向量 后四维为检测出来目标框的矩形坐标 倒数第5维为置信度
		float confidence = detectionMat.at<float>(i, 2);
		if (confidence > confidence_threshold)
		{
			size_t objIndex = (size_t)(detectionMat.at<float>(i, 1));
			float tl_x = detectionMat.at<float>(i, 3) * frame.cols;
			float tl_y = detectionMat.at<float>(i, 4) * frame.rows;
			float br_x = detectionMat.at<float>(i, 5) * frame.cols;
			float br_y = detectionMat.at<float>(i, 6) * frame.rows;

			Rect object_box((int)tl_x, (int)tl_y, (int)(br_x - tl_x), (int)(br_y - tl_y));
			rectangle(frame, object_box, Scalar(0, 0, 255), 2, 8, 0);
			putText(frame, format("%s", objNames[objIndex].c_str()), Point(tl_x, tl_y), FONT_HERSHEY_SIMPLEX, 1.0, Scalar(255, 0, 0), 2);
		}
	}
	imshow("ssd-demo", frame);

	waitKey(0);
	return 0;
}

vector<String> readLabels()
{
	vector<String> objNames;
	ifstream fin(labelFile);
	if (!fin.is_open())
	{
		cout << "could not load labeFile……" << endl;
		exit(-1);
	}
	string name;
	while (!fin.eof())
	{
		getline(fin, name);
		if (name.length() && (name.find("display_name:") == 2))
		{
			string temp = name.substr(17);
			temp.replace(temp.end() - 1, temp.end(), "");
			objNames.push_back(temp);
		}
	}
	return objNames;
}

Mat getMean(const size_t& w, const size_t& h)
{
	Mat mean;
	vector<Mat> channels;
	for (size_t i = 0; i < 3; i++)
	{
		Mat channel(h, w, CV_32F, Scalar(meanValues[i]));
		channels.push_back(channel);
	}
	merge(channels, mean);
	return mean;
}

Mat preprocess(const Mat& frame)
{
	Mat preprocessed;
	frame.convertTo(preprocessed, CV_32F);
	resize(preprocessed, preprocessed, Size(width, height));	// 300*300 image
	Mat mean = getMean(width, height);
	subtract(preprocessed, mean, preprocessed);
	return preprocessed;
}
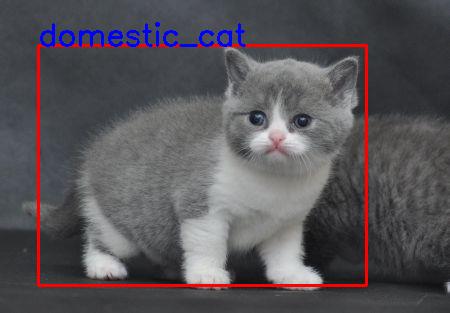
结果展示:

MobileNetSSD模型实时对象检测
介绍:
对SSD模型进行了简化,从1000个分类缩减为20个。

还是模型二进制文件,模型描述文件,label文件。
模型下载地址:https://github.com/PINTO0309/MobileNet-SSD-RealSense/blob/master/caffemodel/MobileNetSSD/MobileNetSSD_deploy.caffemodel
注意要使用deploy版本的。
模型输出也为一个7维向量 后四维为检测出来目标框的矩形坐标 倒数第5维为置信度
代码:
#include <opencv2/core.hpp>
#include <opencv2/imgproc.hpp>
#include <opencv2/highgui.hpp>
#include <opencv2/dnn.hpp>
#include <iostream>
#include <fstream>

using namespace std;
using namespace cv;
using namespace cv::dnn;

const size_t width = 300;
const size_t height = 300;
// 下面这两个参数是官方的参数
const float meanVal = 127.5;
const float scaleFactor = 0.0078;
String labelFile = "model/mobileNetSSD/pascal-classes.txt";
String modelFile = "model/mobileNetSSD/MobileNetSSD_deploy.caffemodel";
String model_text_file = "model/mobileNetSSD/MobileNetSSD_deploy.prototxt";

vector<String> readLabels();
int main(int argc, char** argv)
{
	VideoCapture capture;
	capture.open("pictures/vtest.avi");
	namedWindow("input", CV_WINDOW_FREERATIO);
	namedWindow("ssd-video-demo", CV_WINDOW_FREERATIO);
	int w = capture.get(CAP_PROP_FRAME_WIDTH);
	int h = capture.get(CAP_PROP_FRAME_HEIGHT);
	printf("frame width:%d, frame height:%d\\n", w, h);

	// set up net
	Net net = readNetFromCaffe(model_text_file, modelFile);
	if (net.empty())
	{
		cout << "could not load NetModel……" << endl;
		return -1;
	}

	// read the label
	vector<String> classNames = readLabels();
	Mat frame;
	int i = 0;
	while (capture.read(frame))
	{
		i++;
		imshow("input", frame);
		// 预测
		double t1 = (double)getTickCount();
		Mat inputblob = blobFromImage(frame, scaleFactor, Size(width, height), meanVal, false);
		net.setInput(inputblob, "data");
		Mat detection = net.forward("detection_out");
		double t2 = (double)getTickCount();
		cout << "第" << i << "帧" << "耗费时间:" << (t2 - t1) / getTickFrequency() << "s\\n" << endl;
		// 绘制
		Mat detectionMat(detection.size[2], detection.size[3], CV_32F, detection.ptr<float>());
		float confidence_threshold = 0.25;
		for (int i = 0; i < detectionMat.rows; i++) {
			float confidence = detectionMat.at<float>(i, 2);
			if (confidence > confidence_threshold) {
				size_t objIndex = (size_t)(detectionMat.at<float>(i, 1));
				float tl_x = detectionMat.at<float>(i, 3) * frame.cols;
				float tl_y = detectionMat.at<float>(i, 4) * frame.rows;
				float br_x = detectionMat.at<float>(i, 5) * frame.cols;
				float br_y = detectionMat.at<float>(i, 6) * frame.rows;

				Rect object_box((int)tl_x, (int)tl_y, (int)(br_x - tl_x), (int)(br_y - tl_y));
				rectangle(frame以上是关于OpenCV学习笔记 - DNN模块使用(含源码详细解释)的主要内容,如果未能解决你的问题,请参考以下文章