自然语言处理:word2vec
Posted 悠哉的咸鱼
tags:
篇首语:本文由小常识网(cha138.com)小编为大家整理,主要介绍了自然语言处理:word2vec相关的知识,希望对你有一定的参考价值。
word2vec的作用
在自然语言处理中,我们需要输入数据才能完成文本生成和机器翻译等任务。我们的所拥有的初始数据一般是从大量文章中抽取出来的单词序列,而单词无法作为输入数据进行文本分析。
首先想到的是用onehot编码表示单词,这样确实初步解决了文本数据的输入问题,但是会引入两个新问题。
   1. 文本数据中单词数量达到百万级以上时,onehot编码占用大量计算资源和存储资源。
   2. 文本中上下文单词是有内在联系的,onehot无法表示单词相似度等关系。
为了解决这两个问题,文本达到一定数量级(如百万)时,我们可以用长度为几十到几百的词向量表示单词,减少资源浪费。word2vec的作用正在生成这些词向量,word2vec通过embedding生成词向量,这些词向量能够表示单词间的内在联系。
基本操作及其原理解释
1.onehot编码
我们使用onehot编码作为embedding的输入,编码长度即为文本中去重单词的数量。
以下述文本为例
   sentences = [ "i like dog", "i like cat", "i like animal",
              "dog cat animal", "apple cat dog like", "dog fish milk like",
              "dog cat eyes like", "i like apple", "apple i hate",
              "apple i movie book music like", "cat dog hate", "cat dog like
我们首先进行去重操作,得到无重复单词序列:
['cat','animal', 'eyes', 'hate','apple','milk','fish','movie','book','i','dog','like','music']
此时,单词序列长度为13,以该长度进行编码,结果为:
| 单词 | onehot编码 |
|---|---|
| cat | [1, 0, 0, 0, 0, 0, 0, 0, 0, 0, 0, 0, 0] |
| animal | [0, 1, 0, 0, 0, 0, 0, 0, 0, 0, 0, 0, 0] |
| eyes | [0, 0,1, 0, 0, 0, 0, 0, 0, 0, 0, 0, 0] |
| hate | [0, 0, 0, 1, 0, 0, 0, 0, 0, 0, 0, 0, 0] |
| apple | [0, 0, 0, 0, 1, 0, 0, 0, 0, 0, 0, 0, 0] |
| milk | [0, 0, 0, 0, 0, 1, 0, 0, 0, 0, 0, 0, 0] |
| fish | [0, 0, 0, 0, 0, 0,1, 0, 0, 0, 0, 0, 0] |
| movie | [0, 0, 0, 0, 0, 0, 0,1, 0, 0, 0, 0, 0] |
| book | [0, 0, 0,0, 0, 0, 0, 0,1, 0, 0, 0, 0] |
| i | [0, 0, 0, 0, 0, 0, 0, 0, 0, 1, 0, 0, 0] |
| dog | [0, 0, 0, 0, 0, 0, 0, 0, 0, 0, 1, 0, 0] |
| like | [0, 0, 0, 0, 0, 0, 0, 0, 0, 0, 0,1, 0] |
| music | [0, 0, 0, 0, 0, 0, 0, 0, 0, 0, 0, 0,1] |
2.训练方法和训练数据生成
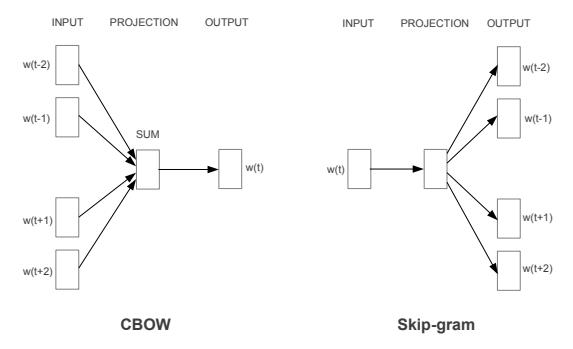
训练方法主要有两种:cbow和skip-gram。模型如下图所示,cbow使用上下文预测中间词,skip-gram使用中间词预测上下文。以经验来说,skip-gram效果更好,所以本文主要使用skip-gram进行讲解和代码编写。
为什么用中间词预测上下文,效果会更好呢,我的理解是这样的,当某两词邻近的上下文单词相同或相似时,更新参数后其词向量也会相似。
以下面两个句子为例:
1.The cat stayed well out of range of the children.
2.The dog stayed well out of range of the children.
用cat和dog作为数据分别预测the、stayed、well 这三个单词,当反向传播更新参数时,因为其预测的单词相同,更新参数后其词向量也会更加相似。cbow使用上下文预测中间词,无法对中间词的词向量参数进行有效更新。

skip-gram方法使用中间词预测上下文,此时中间词预测的文本不宜过长,因为词与词在文本中的距离越大,相关关系越小。
数据生成方法如下:
我们以句子:apple i movie book music like.的单词book为例,设置向前和向后看的单词个数为2,用skip-gram方法构建训练数据。
首先查看词表(每个单词对应的数字):
{'cat': 0, 'animal': 1, 'eyes': 2, 'hate': 3, 'apple': 4, 'milk': 5, 'fish': 6, 'movie': 7, 'book': 8, 'i': 9, 'dog': 10, 'like': 11, 'music': 12}
接下来我们将中间词(此处为book)的onehot编码作为输入,上下文单词对应的词表数字(‘i’: 9,‘movie’: 7,‘music’: 12,‘like’: 11)作为label:
| input | label |
|---|---|
| [0, 0, 0,0, 0, 0, 0, 0,1, 0, 0, 0, 0] | 9 |
| [0, 0, 0,0, 0, 0, 0, 0,1, 0, 0, 0, 0] | 7 |
| [0, 0, 0,0, 0, 0, 0, 0,1, 0, 0, 0, 0] | 12 |
| [0, 0, 0,0, 0, 0, 0, 0,1, 0, 0, 0, 0] | 11 |
最后每次随机取出batch个数据作为输入即可。
3.网络构建
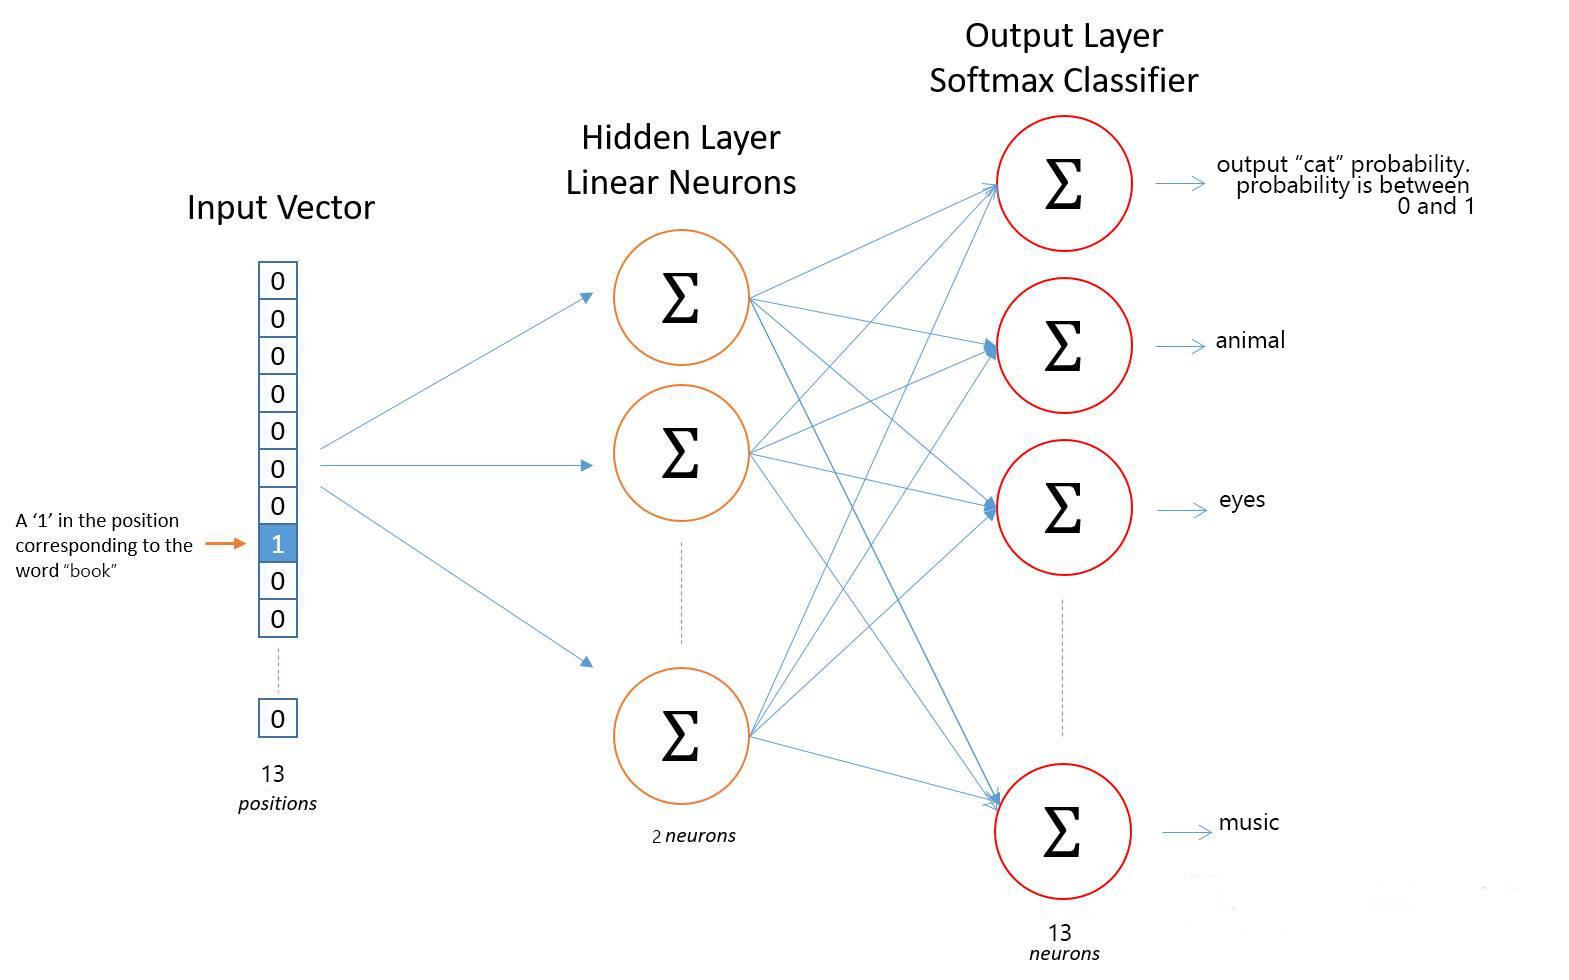
如下图所示,我们构建两层神经网络:

我们并不直接使用全连接层,而是使用矩阵相乘的方式让词向量直接显示。我们假设embedding后词向量长度为2,第一层神经网络参数矩阵大小为[13,2],第二层神经网络参数矩阵大小为[2,13]。
算法流程如下:
- 输入大小为[batchSize,13]的矩阵
- 该矩阵与第一层神经网络参数矩阵相乘,得到大小为[batchSize,2]的隐藏层输出。
- 与第二层神经网络参数矩阵相乘,得到[batchSize,13]大小的矩阵
- 对[batchSize,13]的第二维进行softmax,输出概率值
- 使用交叉熵计算损失值,反向传播更新参数。
在本文的示例中,去重复后词数为13,输入大小为[13,13](第一维为词数,第二维为每个单词对应的onehot编码)的矩阵。[13,13]和第一层网络大小为[13,2]的参数矩阵相乘,得到大小为[13,2]的矩阵,此矩阵即为每个词对应的词向量矩阵。实际上因为采用onehot编码,每个词只有一位为1,其余为0,神经网络第一层网络参数矩阵即为词向量。
完整代码
import torch
import torch.nn as nn#torch.nn:torch的网络包模块,主要对网络进行处理
import torch.optim as optim#优化器
from torch.autograd import Variable
import matplotlib.pyplot as plt
import numpy as np
#数据处理模块,将单词转为onehot编码,每一单词与其前面和后面的n个单词组成数据inputs和labels对
class DataProcess():
    def __init__(self,lookSize,wordSize,sentences):
        self.lookSize=lookSize#向前看和向后看的个数
        self.wordSize=wordSize#单词总数
        self.sentences=sentences#输入的语句
        self.data_gnerate()
    #数据生成
    def data_gnerate(self):
        self.data=[]
        for i in range(len(self.sentences)):#将句子逐一取出
            sentence=self.sentences[i].split(" ")
            for j in range(len(sentence)):#取出该句子的每个单词
                lookFrontSize=self.lookSize if j>=2 else j#如果句子中该单词前面的单词数大于等于2,则取2,否则取前面的所有单词
                distanceToLast=len(sentence)-1-j#如果句子中该单词后面的单词数大于等于2,则取2,否则取后面的所有单词
                lookBehindSize=lookSize if distanceToLast>=2 else distanceToLast
                oneHotTransform=np.eye(self.wordSize)[wordDict[sentence[j]]]#将数字转为onehot编码
                #形成onehot输入和labal的数据对,方便后边使用交叉熵进行训练
                for Front in range(lookFrontSize):
                    self.data.append([oneHotTransform,wordDict[sentence[j-1-Front]]])
                for Behin in range(lookBehindSize):
                    self.data.append([oneHotTransform,wordDict[sentence[j+1+Behin]]])
    #随机取出大小为batchSize的训练数据
    def batch_data(self,batchSize):
        inputs=[]
        labels=[]
        #随机取数
        randomIndex = np.random.choice(range(len(self.data)), batchSize, replace=False)
        for i in randomIndex:
            inputs.append(self.data[i][0])
            labels.append(self.data[i][1])
        return inputs,labels
# Training
class Word2vec(nn.Module):
    def __init__(self,wordSize,embeddingSize):
        super(Word2vec,self).__init__()
        """
        神经网络有两层,weightLayer1为第一层的参数,weightLayer2为第二层的参数
        weightLayer1即为词向量,采用矩阵的方式表示词向量,使之便于观察
        """
        self.weightLayer1=nn.Parameter(2*torch.rand(wordSize, embeddingSize)-1).type(torch.FloatTensor)
        self.weightLayer2 = nn.Parameter(2*torch.rand(embeddingSize, wordSize)-1).type(torch.FloatTensor)
    #前向传播
    def forward(self,inputs):
        middle=torch.matmul(inputs, self.weightLayer1)
        outputs=torch.matmul(middle, self.weightLayer2)
        return outputs
    #训练模型
    def train(self,epochs):
        criterion = nn.CrossEntropyLoss()#使用交叉熵
        optimizer = optim.Adam(model.parameters(), lr=0.001)#使用Adam优化算法更新参数
        dataProcess=DataProcess(lookSize,wordSize,sentences)
        for epoch in range(epochs):
            inputs,labels=dataProcess.batch_data(batchSize)#获取数据
            inputs = Variable(torch.Tensor(inputs))
            labels = Variable(torch.LongTensor(labels))
            outputs = model(inputs)
            optimizer.zero_grad()
            loss = criterion(outputs, labels)
            #每100个回合打印一次loss
            if (epoch + 1)%100 == 0:
                print('Epoch:', '%04d' % (epoch + 1), 'cost =', '{:.6f}'.format(loss))
            loss.backward()
            optimizer.step()
if __name__=="__main__":
    sentences = [ "i like dog", "i like cat", "i like animal",
                  "dog cat animal", "apple cat dog like", "dog fish milk like",
                  "dog cat eyes like", "i like apple", "apple i hate",
                  "apple i movie book music like", "cat dog hate", "cat dog like"]
    words=list(set(" ".join(sentences).split()))
    wordDict={x:i for i,x in enumerate(words)}
    wordSize=len(words)#输入尺寸,这里为无重复词汇总数
    embeddingSize=2#embeding词向量长度
    lookSize=2#取每个单词的前和后lokSize个单词作为labels
    batchSize=30#每次训练的单词个数
    epochs=800
    model = Word2vec(wordSize,embeddingSize)
    model.train(epochs)
    #绘图演示结果
    for i,label in enumerate(words):
        weightLayer1,weightLayer2 = model.parameters()
        x,y = float(weightLayer1[i][0]), float(weightLayer1[i][1])
        plt.scatter(x, y)
        plt.annotate(label, xy=(x, y), xytext=(5, 2), textcoords='offset points', ha='right', va='bottom')
    plt.show()
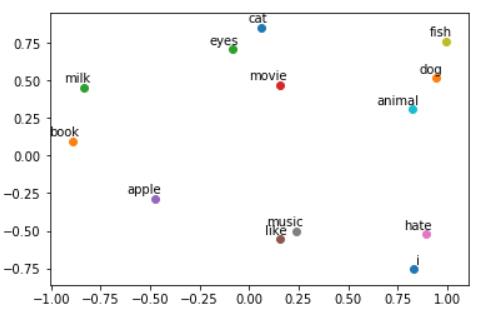
运行结果
从图中可以看出,每个单词都用二维词向量进行表示。因为数据量较小,效果并不好,这里只作为演示。

参考资料
1、https://www.bilibili.com/video/BV17y4y1m737?from=search&seid=16275505917373064546(黑马程序员视频,对自然语言处理的基础知识进行了讲解)
2、https://zhuanlan.zhihu.com/p/352281413(代码参考)
3、https://blog.csdn.net/zhang2010hao/article/details/86616401(基本原理和公式讲解)
以上是关于自然语言处理:word2vec的主要内容,如果未能解决你的问题,请参考以下文章