小白学习tensorflow教程三TF2新特性@tf.function和AutoGraph
Posted 刘润森!
tags:
篇首语:本文由小常识网(cha138.com)小编为大家整理,主要介绍了小白学习tensorflow教程三TF2新特性@tf.function和AutoGraph相关的知识,希望对你有一定的参考价值。
@Author:Runsen
19年接触tensorflow1.X,看过1.X的官方文档、到19年暑假的时候,我记得tensorflow2的发布。tensorflow2抛弃了tf.seesion,tf.placeholder。
AutoGraph 是 Tensorflow 2.0 新功能之一。
function or seesion
在tensorflow1.X,计算任何东西,必须在会话中启动图。Tensorflow 最大的思想是将所有的数值计算都表达为一个计算图。
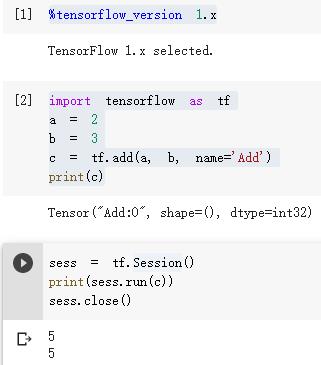
下面的代码在1.X更常用。唯一的区别是不需要在最后关闭会话,因为它会自动关闭。
with tf.Session() as sess:
    print(sess.run(c))
但是到了tensorflow2,没有了tf.seesion,
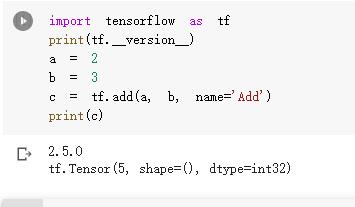
Tensorflow 2.0 的主要变化之一是删除了tf.Session对象。
这种变化迫使用户以更好的方式组织代码:不再tf.Session需要传递对象,而只是可以通过简单的修饰加速的 Python 函数。
请参考:官方文档 Functions,而不是 Sessions
为了在 Tensorflow 2.0 中定义图形,我们需要定义一个 Python 函数并用@tf.function.
import tensorflow as tf

@tf.function
def compute_z1(x, y):
  return tf.add(x, y)

@tf.function
def compute_z0(x):
  return compute_z1(x, tf.square(x))

z0 = compute_z0(2.)
z1 = compute_z1(2., 2.)
print(z0,z1)
# tf.Tensor(6.0, shape=(), dtype=float32) tf.Tensor(4.0, shape=(), dtype=float32)
@tf.function是函数的装饰器。“TensorFlow 函数”将计算定义为 TensorFlow 操作图,具有命名参数和显式返回值。
AutoGraph
在TensorFlow 2.0中,默认情况下启用了eager 模式。 对于用户而言直观且灵活(运行一次性操作更容易,更快
AutoGraph主要是可以将一些常用的Python代码转化为TensorFlow支持的Graph代码
下面是官方代码
def square_if_positive(x):
    if x > 0:
        x = x * x
    else:
        x = 0.0
    return x
# eager 模式
print('Eager results: %2.2f, %2.2f' % (square_if_positive(tf.constant(9.0)),
                                       square_if_positive(tf.constant(-9.0))))

# graph 模式
tf_square_if_positive = tf.autograph.to_graph(square_if_positive)
with tf.Graph().as_default():
  # The result works like a regular op: takes tensors in, returns tensors.
  # You can inspect the graph using tf.get_default_graph().as_graph_def()
    g_out1 = tf_square_if_positive(tf.constant( 9.0))
    g_out2 = tf_square_if_positive(tf.constant(-9.0))
    with tf.compat.v1.Session() as sess:
        print('Graph results: %2.2f, %2.2f' % (sess.run(g_out1), sess.run(g_out2)))
上面定义了一个square_if_positive函数,TensorFlow 2.0的eager先执行,
然而这是TensorFlow 1.x所不支持的eager模式,但是使用AutoGraph可以将这个函数转为Graph函数,其可以在Graph模式下运行(tf2 没有Session,Graph模式是tf1.x的特性,想使用tf1.x的话需要调用tf.compat.v1)。
在tensorflow中,Graph execution or eager execution ?
eager模式和Graph模式的结果是一样的,但是官方说明Graph模式更高效,并给出具体的示例:
def huber_loss(a):
  if tf.abs(a) <= delta:
    loss = a * a / 2
  else:
    loss = delta * (tf.abs(a) - delta / 2)
  return loss
上面代码默认使用 Eager Execution,但是操作会比较慢。
为了给图执行做好准备,你需要重写代码,使用 tf.cond() 等语句,但是这很繁琐且难以实现。AutoGraph 可以自动完成该转换,保持 Eager 编程的简易性,同时还提升了计算图执行的性能。
@autograph.convert()
def huber_loss(a):
  if tf.abs(a) <= delta:
    loss = a * a / 2
  else:
    loss = delta * (tf.abs(a) - delta / 2)
  return loss
对应官方链接:https://blog.tensorflow.org/2018/07/autograph-converts-python-into-tensorflow-graphs.html
以上是关于小白学习tensorflow教程三TF2新特性@tf.function和AutoGraph的主要内容,如果未能解决你的问题,请参考以下文章