SpringBoot2——指标监控actuator多环境切换Profile和自定义starter
Posted AC_Jobim
tags:
篇首语:本文由小常识网(cha138.com)小编为大家整理,主要介绍了SpringBoot2——指标监控actuator多环境切换Profile和自定义starter相关的知识,希望对你有一定的参考价值。
SpringBoot2——指标监控actuator、多环境切换Profile和自定义starter
一、SpringBoot Actuator
Actuator是Springboot提供的用来对应用系统进行自省和监控的功能模块,借助于Actuator开发者可以很方便地对应用系统某些监控指标进行查看、统计等
好的博客:SpringBoot Actuator 模块 详解:健康检查,度量,指标收集和监控
1.1 SpringBoot Actuator的使用
1、引入场景依赖
<!--actuator监控-->
<dependency>
    <groupId>org.springframework.boot</groupId>
    <artifactId>spring-boot-starter-actuator</artifactId>
</dependency>
2、测试访问http://localhost:8080/actuator,查看暴露出来的端点

1.2 Endpoints
1.2.1 端点暴露配置
端点支持的暴露方式:
HTTP:默认只暴露health- JMX:默认暴露所有Endpoint

使用JMX查看所暴露的端点:

配置通过JMX 和 HTTP 暴露的端点:
| Property | 默认 |
|---|---|
management.endpoints.jmx.exposure.exclude | |
management.endpoints.jmx.exposure.include | * |
management.endpoints.web.exposure.exclude | |
management.endpoints.web.exposure.include | info, healt |
-
可以打开web方式所有的监控点
management.endpoints.web.exposure.include=* -
也可以选择打开部分,"
*" 代表暴露所有的端点,如果指定多个端点,用","分开management.endpoints.web.exposure.exclude=beans,trace -
Actuator 默认所有的监控点路径都在
/actuator/*,当然如果有需要这个路径也支持定制。management.endpoints.web.base-path=/minitor设置完重启后,再次访问地址就会变成
/minitor/*。
enabled-by-default用来设置是否开启全部监控端点,默认true,全部开启。关闭所有端点启用情况时,可以单独的通过设置enabled属性启用端点。
# management 是所有actuator的配置
# management.endpoint.端点名.xxxx  对某个端点的具体配置
management:
  endpoints:
    enabled-by-default: false  #默认开启所有监控端点,默认为true
    web:
      exposure:
        include: '*' # 以web方式暴露所有端点

  endpoint:   #对某个端点的具体配置
    health:
      show-details: always
      enabled: true

    info:
      enabled: true

    beans:
      enabled: true

    metrics:
      enabled: true
http://localhost:8080/actuator,查看暴露出来的端点:

1.2.2 重要端点解析
常用端点介绍:
| ID | 描述 |
|---|---|
auditevents | 暴露当前应用程序的审核事件信息。需要一个AuditEventRepository组件。 |
beans | 显示应用程序中所有Spring Bean的完整列表。 |
caches | 暴露可用的缓存。 |
conditions | 显示自动配置的所有条件信息,包括匹配或不匹配的原因。 |
configprops | 显示所有@ConfigurationProperties。 |
env | 暴露Spring的属性ConfigurableEnvironment |
flyway | 显示已应用的所有Flyway数据库迁移。 需要一个或多个Flyway组件。 |
health | 显示应用程序运行状况信息。 |
httptrace | 显示HTTP跟踪信息(默认情况下,最近100个HTTP请求-响应)。需要一个HttpTraceRepository组件。 |
info | 显示应用程序信息。 |
integrationgraph | 显示Spring integrationgraph 。需要依赖spring-integration-core。 |
loggers | 显示和修改应用程序中日志的配置。 |
liquibase | 显示已应用的所有Liquibase数据库迁移。需要一个或多个Liquibase组件。 |
metrics | 显示当前应用程序的“指标”信息。 |
mappings | 显示所有@RequestMapping路径列表。 |
scheduledtasks | 显示应用程序中的计划任务。 |
sessions | 允许从Spring Session支持的会话存储中检索和删除用户会话。需要使用Spring Session的基于Servlet的Web应用程序。 |
shutdown | 使应用程序正常关闭。默认禁用。 |
startup | 显示由ApplicationStartup收集的启动步骤数据。需要使用SpringApplication进行配置BufferingApplicationStartup。 |
threaddump | 执行线程转储。 |
1、 /health端点
/health端点会聚合你程序的健康指标,来检查程序的健康情况。端点公开的应用健康信息取决于:
management.endpoint.health.show-details=always
该属性可以使用以下值之一进行配置:
| Name | Description |
|---|---|
never | 不展示详细信息,up或者down的状态,默认配置 |
when-authorized | 详细信息将会展示给通过认证的用户。授权的角色可以通过management.endpoint.health.roles配置 |
always | 对所有用户暴露详细信息 |
按照上述配置,配置成always之后,我们启动项目,访问http://localhost:8080/actuator/health端口,可以看到这样的信息:

/health端点有很多自动配置的健康指示器:如redis、rabbitmq、db等组件。当你的项目有依赖对应组件的时候,这些健康指示器就会被自动装配,继而采集对应的信息。如上面的 diskSpace 节点信息就是DiskSpaceHealthIndicator 在起作用。
注意:当如上的组件有一个状态异常,应用服务的整体状态即为down。我们也可以通过配置禁用某个组件的健康监测。
2、 /metrics端点
/metrics端点用来返回当前应用的各类重要度量指标,比如:内存信息、线程信息、垃圾回收信息、tomcat、数据库连接池等。
{
    "names": [
        "tomcat.threads.busy",
        "jvm.threads.states",
        "jdbc.connections.active",
        "jvm.gc.memory.promoted",
        "http.server.requests",
        "hikaricp.connections.max",
        "hikaricp.connections.min",
        "jvm.memory.used",
        "jvm.gc.max.data.size",
        "jdbc.connections.max",
         ....
    ]
}
为了获取到某个指标的详细信息,我们可以请求具体的指标信息,像这样:
http://localhost:8080/actuator/metrics/{MetricName}
比如我访问/actuator/metrics/jvm.memory.max,返回信息如下:

4、 /info端点
/info端点可以用来展示你程序的信息。你可以按照自己的需求在配置文件application.yml中个性化配置(默认情况下,该端点只会返回一个空的json内容。):
info:
  appName: boot-admin
  appVersion: 1.0.0
  mavenProjectName: @project.artifactId@
  mavenProjectVersion: @project.version@
启动项目,访问http://localhost:8080/actuator/info:

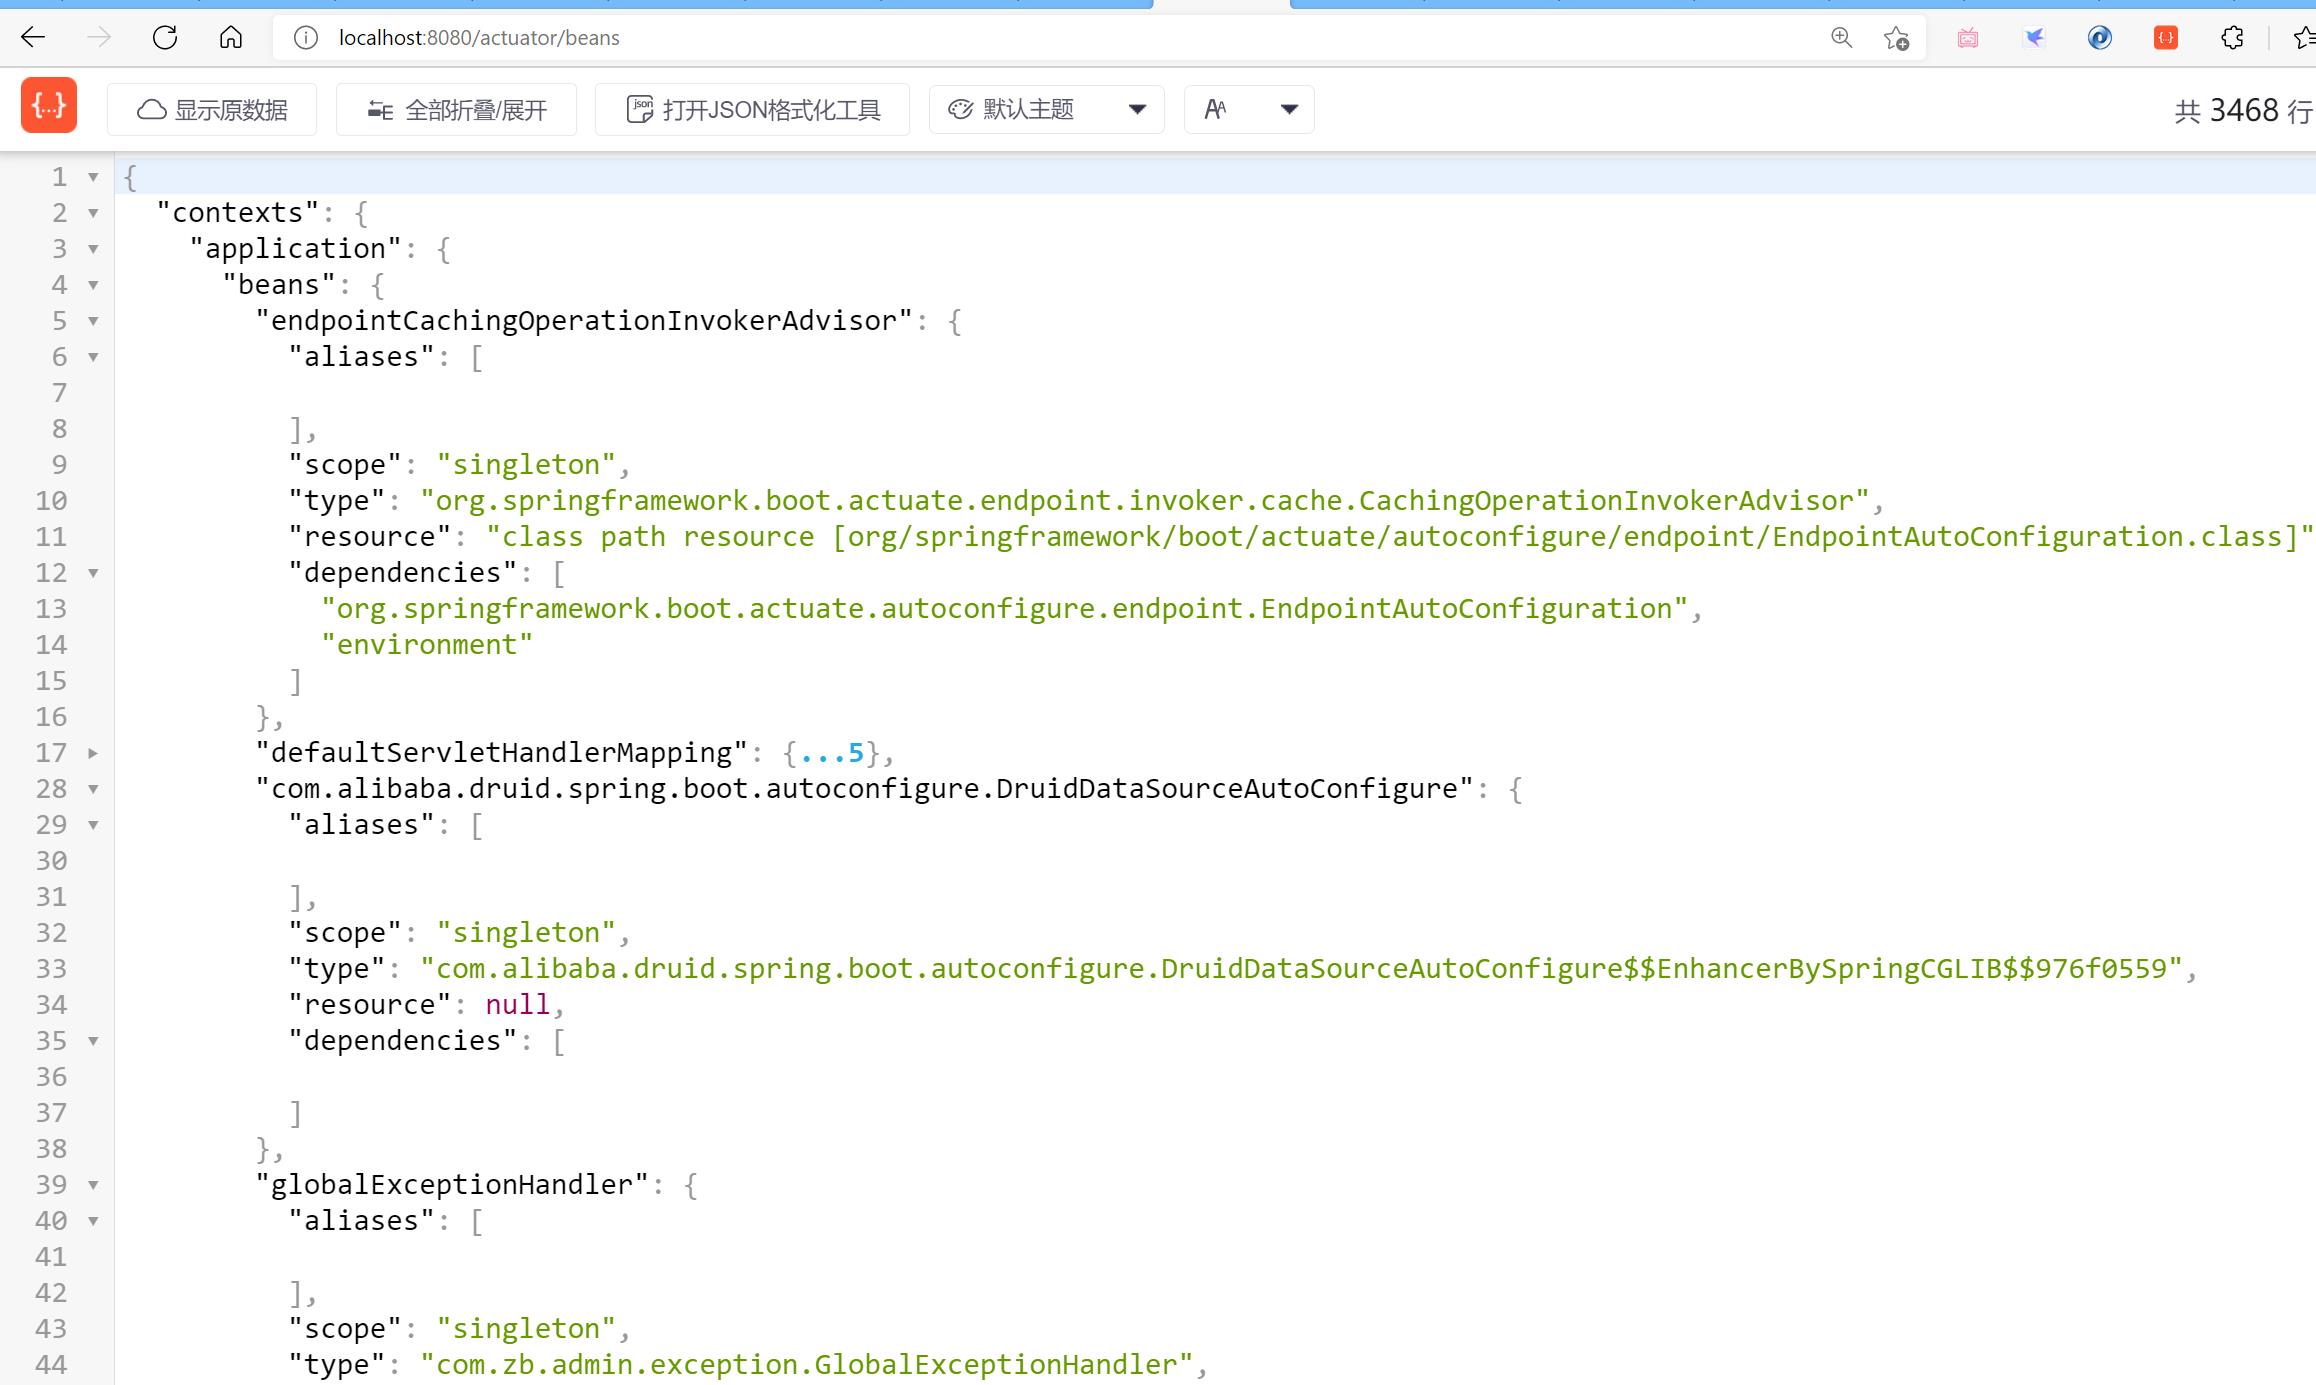
4、 /beans端点
/beans端点会返回Spring 容器中所有bean的别名、类型、是否单例、依赖等信息。
访问http://localhost:8080/actuator/beans,返回如下:

可视化:https://github.com/codecentric/spring-boot-admin
具体可以参考p80
二、多环境切换Profile
Spring Boot 也为我们提供了 profile 多环境支持。 profile 可以满足 Spring 对不同的环境提供不同配置的功能,通过激活、指定参数等方式来快速切换环境
2.1 多配置文件
假设,一个应用的工作环境有:dev、test、prod
那么,我们可以添加 4 个配置文件:
applcation.properties- 公共配置application-dev.yaml- 开发环境配置,可以使yaml文件也可以使properties文件application-test.yaml- 测试环境配置application-prod.yaml- 生产环境配置

激活指定环境:
-
方法一:在
applcation.properties文件中可以通过以下配置来激活 profile:# 指定激活的环境。默认配置文件和指定环境的配置文件都会生效,且指定环境的配置文件会覆盖默认配置文件 spring.profiles.active = test -
方法二:使用命令行通过
java -jar xxx.jar --spring.profiles.active=prod激活

-
方法三:在配置中传入命令行参数(在Program arguments中,添加
--spring.profiles.active=dev)

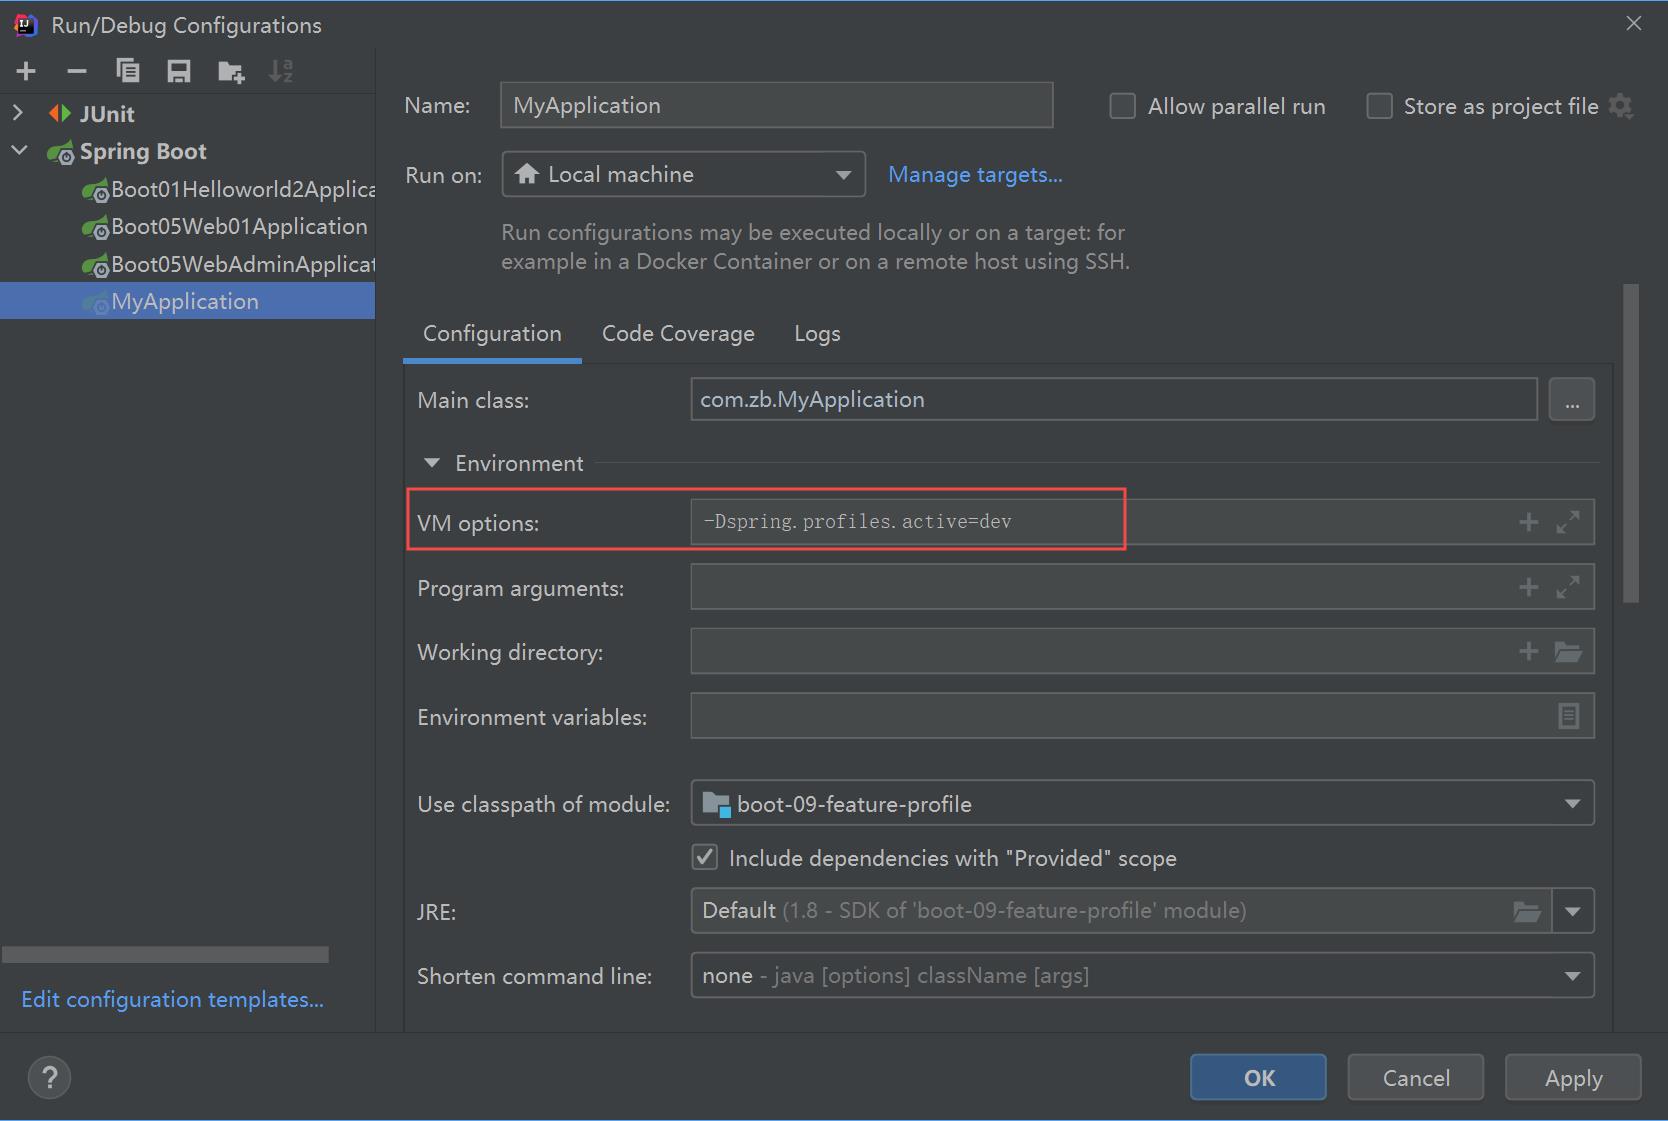
-
方法四:在配置中传入虚拟机参数(在 VM options中,添加
-Dspring.profiles.active=dev)

补充:@Profile条件装配功能
@Profile可以标记在类上也可以标记在方法上,表明只有在指定的环境下类或者方法才生效
@Profile("test") //指定只有在test的环境下才生效
@Component
@ConfigurationProperties("person")
@Data
public class Worker implements Person {

    private String name;
    private Integer age;
}
2.2 yaml的多文档块
2.3 配置文件的加载顺序
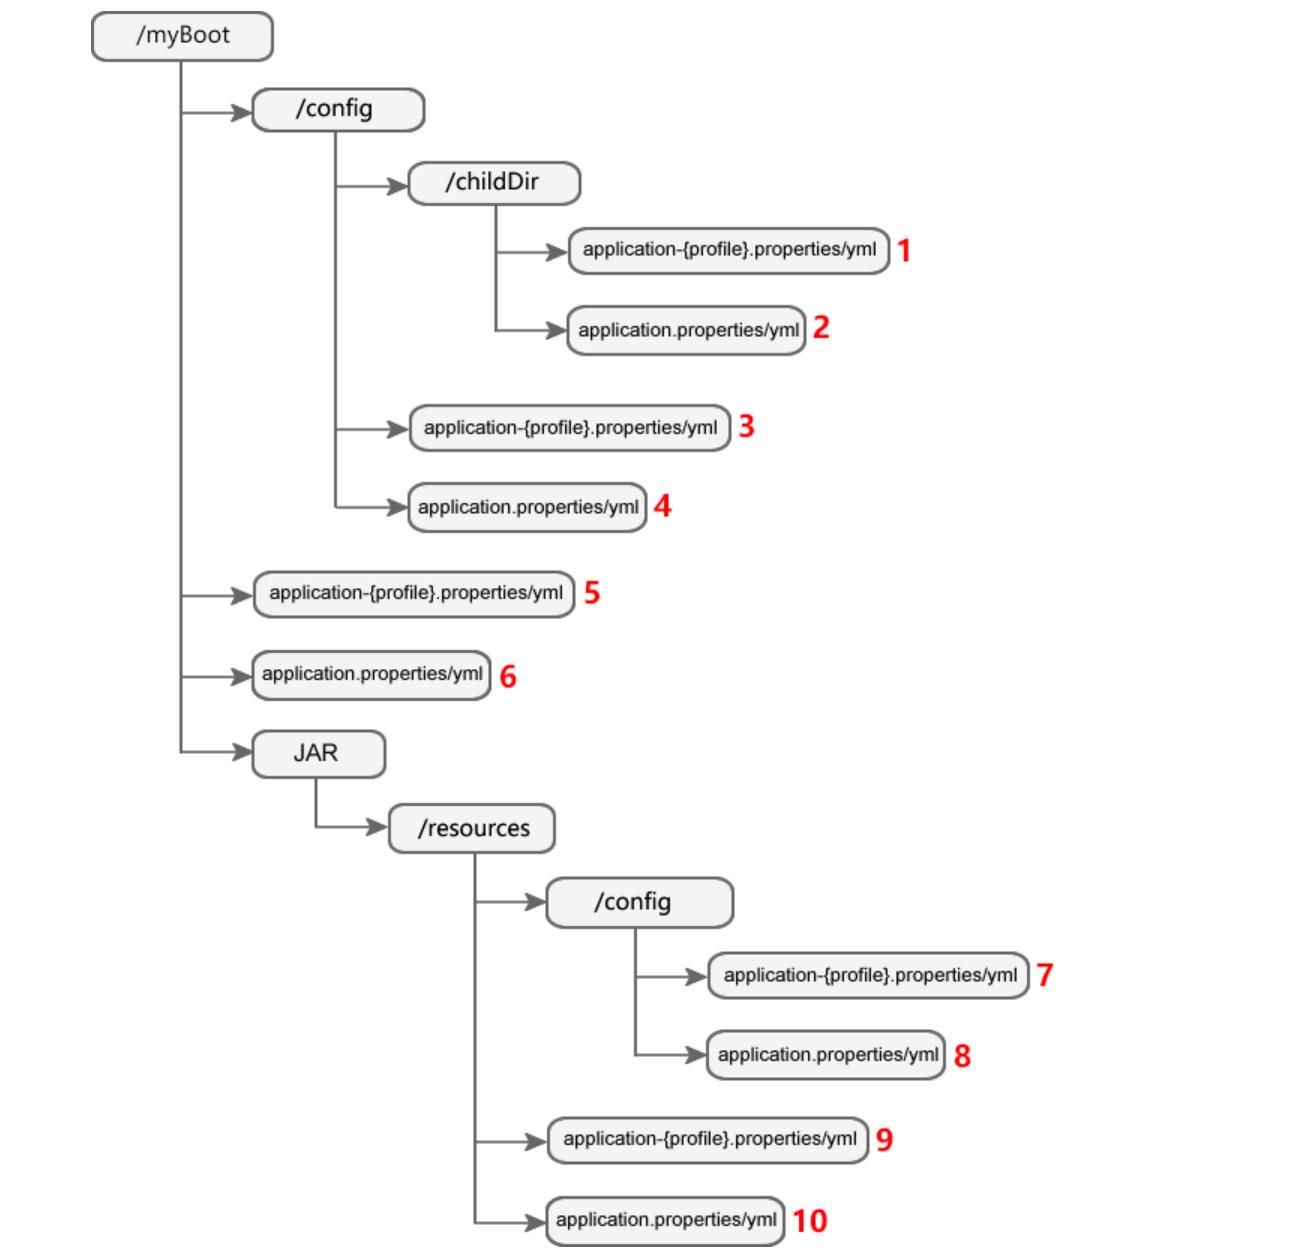
配置文件的加载优先级:
- jar包/config子目录的直接子目录
- jar包当前目录的config目录
- jar包当前目录
- classpath 根路径下config目录
- classpath 根路径
以上所有位置的配置文件都会被加载,且它们优先级依次降低,序号越小优先级越高。其次,位于相同位置的 application.properties 的优先级高于 application.yml。
所有位置的文件都会被加载,高优先级配置会覆盖低优先级配置,形成互补配置,即:
- 存在相同的配置内容时,高优先级的内容会覆盖低优先级的内容;
- 存在不同的配置内容时,高优先级和低优先级的配置内容取并集。

三、自定义starter
一个完整的Spring Boot Starter可能包含以下组件:
- autoconfigure模块:包含自动配置的代码
- starter模块:提供对autoconfigure模块的依赖,以及一些其它的依赖
自定义starter结构:

1、创建autoconfigure模块
-
新建一个Maven项目命名为hello-spring-boot-starter-autoconfigure
pom文件
<?xml version="1.0" encoding="UTF-8"?> <project xmlns="http://maven.apache.org/POM/4.0.0" xmlns:xsi="http://www.w3.org/2001/XMLSchema-instance" xsi:schemaLocation="http://maven.apache.org/POM/4.0.0 https://maven.apache.org/xsd/maven-4.0.0.xsd"> <modelVersion>4.0.0</modelVersion> <parent> <groupId>org.springframework.boot</groupId> <artifactId>spring-boot-starter-parent</artifactId> <version>2.4.0</version> <relativePath/> <!-- lookup parent from repository --> </parent> <groupId>com.zb</groupId> <artifactId>hello-spring-boot-starter-autoconfigure</artifactId> <version>0.0.1-SNAPSHOT</version> <name>hello-spring-boot-starter-autoconfigure</name> <description>Demo project for Spring Boot</description> <properties> <java.version>1.8</java.version> </properties> <dependencies> <!-- 引入spring-boot-starter; 所有starter的基本配置 --> <dependency> <groupId>org.springframework.boot</groupId> <artifactId>spring-boot-starter</artifactId> </dependency> <!--可以生成配置类提示文件--> <dependency> <groupId>org.springframework.boot</groupId> <artifactId>spring-boot-configuration-processor</artifactId> <optional>true</optional> </dependency> </dependencies> </project> -
创建配置类和自动配置类
配置类:
@ConfigurationProperties("zb.hello")
public class HelloProperties {

    private String prefix;
    private String suffix;

    public String getPrefix() {
        return prefix;
    }

    public void setPrefix(String prefix) {
        this.prefix = prefix;
    }

    public String getSuffix() {
        return suffix;
    }

    public void setSuffix(String suffix) {
        this.suffix = suffix;
    }
}
自动配置类:
@Configuration
@EnableConfigurationProperties(HelloProperties.class) //让配置类生效,(注入到容器中)
public class HelloServiceAutoConfigure {

    @Bean
    @ConditionalOnMissingBean(HelloService.class)
    public HelloService helloService(){
        return new HelloService();
    }

}
HelloService类:
public class HelloService { @Autowired HelloProperties helloProperties; public String sayHello(String userName) { return helloProperties.getPrefix() + "-" + userName + "-" + helloProperties.getSuffix(); } } -
在
resources文件夹下创建META-INF/spring.factories# Auto Configure org.springframework.boot.autoconfigure.EnableAutoConfiguration=\\ com.zb.auto.HelloServiceAutoConfigure -
安装到本地仓库

2、创建starter模块
-
创建starter,选择maven工程即可,只是用于管理依赖,添加对
AutoConfiguration模块的依赖<?xml version="1.0" encoding="UTF-8"?> <project xmlns="http://maven.apache.org/POM/4.0.0" xmlns:xsi="http://www.w3.org/2001/XMLSchema-instance" xsi:schemaLocation="http://maven.apache.org/POM/4.0.0 http://maven.apache.org/xsd/maven-4.0.0.xsd"> <modelVersion>4.0.0</modelVersion> <groupId>com.zb</groupId> <artifactId>hello-spring-boot-starter</artifactId> <version>1.0-SNAPSHOT</version> <dependencies> <!--依赖autoconfigure模块--> <dependency> <groupId>com.zb</groupId> <artifactId>hello-spring-boot-starter-autoconfigure</artifactId> <version>0.0.1-SNAPSHOT</version> </dependency> </dependencies> </project> -
安装到本地仓库

3、创建SpringBoot测试项目
-
引入自定义的启动器
<!-- 引入自定义的starter --> <dependency> <groupId>com.zb</groupId> <artifactId>hello-spring-boot-starter</artifactId> <version>1.0-SNAPSHOT</version> </dependency> -
创建Controller
@RestController public class HelloController { @Autowired HelloService helloService; @GetMapping("/hello") public String sayHello(){ return helloService.sayHello("张三"); } } -
在
application.properties配置文件中可以配置zb.hello.prefix=hello zb.hello.suffix=world -
测试

四、SpringBoot的启动流程(待补)
P84-86
以上是关于SpringBoot2——指标监控actuator多环境切换Profile和自定义starter的主要内容,如果未能解决你的问题,请参考以下文章
Spring Boot 2 Actuator 不发布 jvm 指标
Spring boot 2.3.4 - Kafka 指标在 /actuator/prometheus 中不可见
SpringBoot - 构建监控体系02_定义度量指标和 Actuator 端点
SpringBoot——四大核心之指标监控(actuator)