FastDFS + nginx 整合
Posted 思想空间
tags:
篇首语:本文由小常识网(cha138.com)小编为大家整理,主要介绍了FastDFS + nginx 整合相关的知识,希望对你有一定的参考价值。
1.首先安装解压各个压缩包(略过)
2.然后安装完统一编译安装各个依赖(略过)
3.开始安装nginx
 ./configure --add-module=/opt/fastdfs-nginx-module/src/    #整合了fatdfs的模块
  make
  make install
ps:根据自己的情况修改模块的地址。
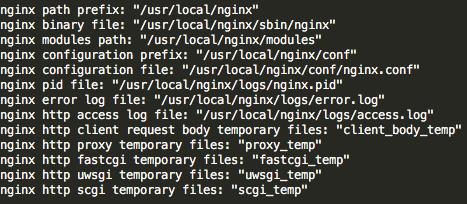
安装完nginx后,会出现几行字,这是nginx的安装后所在的目录

4.修改nginx.conf
nginx.conf 的更改

 user root   避免权限的问题

 location /group1/M00 {                                       #url映射
            root /mnt/xfsd/fastdfs/storage/data;              #指向的目录
            ngx_fastdfs_module;                                  #调用的模块
        }
5.修改 fastdfs-nignx模块的配置文件 mod_fastdfs.conf
bash_path
tracker_server=             #与tracker 的地址要相同
url_have_group_name=            #可选 ,是否访问资源带上组名 group_name
store_path0=                   #和store服务的store_path0需要相同

把mod_fastdfs.conf  cope到/etc/fdfs/下
6.将mod_fastdfs.conf 复制到/etc/fdfs/下
cp mod_fastdfs.conf /etc/fdfs/
7.修改storage.conf
http.server_port=80 #端口号和nginx的一致
8.之前修改nginx.conf中建立了url的映射,现在要把映射的地址建立软连接到storage的data目录
ln -s /mnt/xfsd/fastdfs/storage/data /mnt/xfsd/fastdfs/storage/data/M00
9.开始使用nginx
/usr/local/nginx/sbin/nginx #启动nginx
10.上传文件测试
/usr/bin/fdfs_test /etc/fdfs/client.conf upload 上传文件的地址
11.通过文件的地址就可以在浏览器中访问到了
有可能会报错:
***[2017-03-23 16:50:14] ERROR - file: ini_file_reader.c, line: 631, include file "http.conf" not exists, line: "#include http.conf"
[2017-03-23 16:50:14] ERROR - file: /opt/fastdfs-nginx-module/src/common.c, line: 155, load conf file "/etc/fdfs/mod_fastdfs.conf" fail, ret code: 2
2017/03/23 16:50:14 [alert] 16970#0: worker process 18289 exited with fatal code 2 and cannot be respawned
这个是由于缺少 http.conf
在nginx/conf/目录下有 http.conf , 把它复制到 fastdfs-nginx-module/src/ 目录下。重新编译并安装nginx。
****
[2017-03-23 16:29:26] DEBUG - file: storage_service.c, line: 3384, client ip: 119.29.154.224, storage server id: 10.104.99.138
[2017-03-23 16:30:01] ERROR - file: trunk_mgr/trunk_client.c, line: 108, no trunk server
[2017-03-23 16:30:03] ERROR - file: storage_service.c, line: 8069, client ip: 119.29.154.224, unkown cmd: 79
# if use a trunk file to store several small files
# default value is false
# since V3.00
use_trunk_file = false    #改为false 将不会使用 trunk server
以上是关于FastDFS + nginx 整合的主要内容,如果未能解决你的问题,请参考以下文章