Android实现阿里云短信业务获取验证码-后端SSM+redis
Posted hequnwang10
tags:
篇首语:本文由小常识网(cha138.com)小编为大家整理,主要介绍了Android实现阿里云短信业务获取验证码-后端SSM+redis相关的知识,希望对你有一定的参考价值。
这里想实现的功能是android前端通过后端接口获取验证码,五分钟有效,将验证码保存至redis中。
一、开通阿里云短信业务
实现阿里云短信业务获取验证码流程如下:
- 进入阿里云控制台找到短信服务,点击免费开通


2. 国内消息,有签名管理和模板管理,这里请自行搜索教程申请。现在阿里云的申请很麻烦,如果没有上线APP或者备过案的网站很难通过。估计这一步就会劝退很多人,而且阿里云的短信还是收费的。

完成之后就可以进行使用了阿里云的短信业务了。
二、官方代码实现
阿里云给了代码示例,打开链接地址就可以查看怎么使用,这里有升级版和原版SDK,都可以使用。

三、后端代码
1、MsmService
import java.util.Map;
public interface MsmService {
    //发送短信的方法
    boolean send(Map<String, Object> param, String phone);
}
2、MsmServiceImpl.java
import java.util.Map;

@Service
public class MsmServiceImpl implements MsmService {

    //发送短信的方法
    @Override
    public boolean send(Map<String, Object> param, String phone) {
        if(StringUtils.isEmpty(phone)) return false;

        DefaultProfile profile =
                DefaultProfile.getProfile("default", "<accessKeyId>", "<accessSecret>");
        IAcsClient client = new DefaultAcsClient(profile);

        //设置相关固定的参数
        CommonRequest request = new CommonRequest();
        //request.setProtocol(ProtocolType.HTTPS);
        request.setMethod(MethodType.POST);
        request.setDomain("dysmsapi.aliyuncs.com");
        request.setVersion("2017-05-25");
        request.setAction("SendSms");

        //设置发送相关的参数
        request.putQueryParameter("PhoneNumbers",phone); //手机号
        request.putQueryParameter("SignName","####"); //申请阿里云 签名名称
        request.putQueryParameter("TemplateCode","#####"); //申请阿里云 模板code
        request.putQueryParameter("TemplateParam", JSONObject.toJSONString(param)); //验证码数据,转换json数据传递

        try {
            //最终发送
            CommonResponse response = client.getCommonResponse(request);
            boolean success = response.getHttpResponse().isSuccess();
            return success;
        }catch(Exception e) {
            e.printStackTrace();
            return false;
        }

    }
}
注意:
- accessKeyId和accessSecret是阿里云自己的key值,填写自己的。阿里云的accessKeyId地址
- SignName和TemplateCode是自己获取的模板

3、UserController.java
public class UserController {
    @Autowired
    private MsmService msmService;

    @Autowired
    private RedisTemplate<String,String> redisTemplate;
    /**
     * 发送短信的方法
     * @param phone
     * @return
     */
    @GetMapping("send/{phone}")
    public R sendMsm(@PathVariable String phone) {
        //1 从redis获取验证码,如果获取到直接返回
        String code = redisTemplate.opsForValue().get(phone);
        if(!StringUtils.isEmpty(code)) {
            return R.ok();
        }
        //2 如果redis获取 不到,进行阿里云发送
        //生成随机值,传递阿里云进行发送
        code = RandomUtil.getFourBitRandom();
        Map<String,Object> param = new HashMap<>();
        param.put("code",code);
        //调用service发送短信的方法
        boolean isSend = msmService.send(param,phone);
        if(isSend) {
            //发送成功,把发送成功验证码放到redis里面
            //设置有效时间
            redisTemplate.opsForValue().set(phone,code,5, TimeUnit.MINUTES);
            return R.ok();
        } else {
            return R.error().message("短信发送失败");
        }
    }
}
4、MainApplication.java
import org.springframework.boot.SpringApplication;
import org.springframework.boot.autoconfigure.SpringBootApplication;
import org.springframework.context.annotation.ComponentScan;
@SpringBootApplication
@ComponentScan(basePackages = {"com.message"})
public class MainApplication {
    public static void main(String[] args) {
        SpringApplication.run(MainApplication.class, args);
    }
}
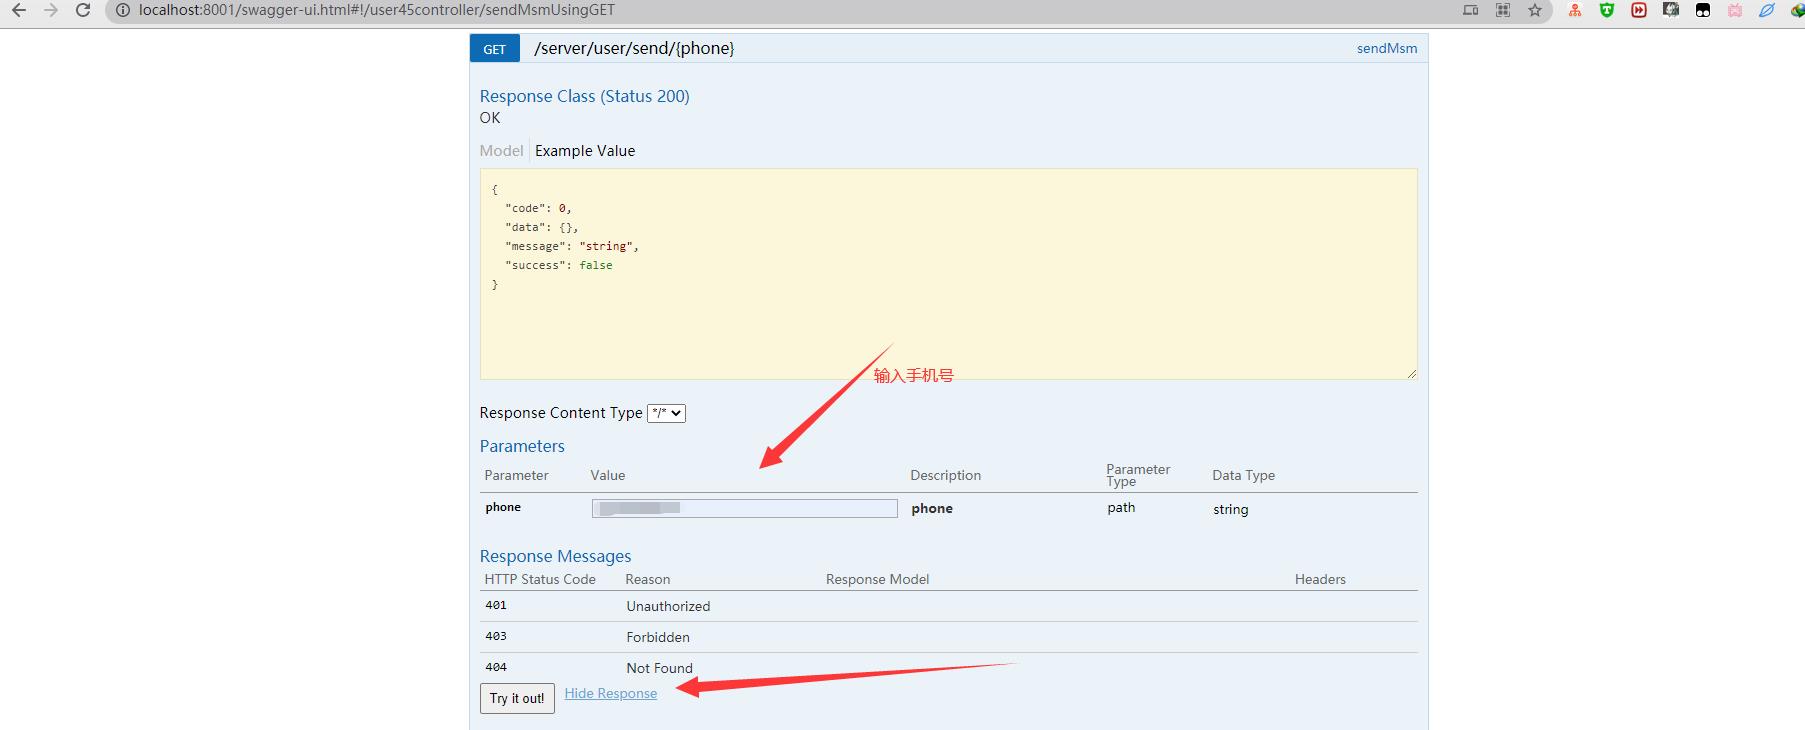
启动项目,打开swagger进行测试。


到这里说明后端已经实现了。将项目使用maven打包部署到服务器。
四、Android 代码
1、布局文件activity_main.xml
<?xml version="1.0" encoding="utf-8"?>
<androidx.constraintlayout.widget.ConstraintLayout xmlns:android="http://schemas.android.com/apk/res/android"
    xmlns:app="http://schemas.android.com/apk/res-auto"
    xmlns:tools="http://schemas.android.com/tools"
    android:layout_width="match_parent"
    android:layout_height="match_parent"
    tools:context=".MainActivity">

    <EditText
        android:id="@+id/username"
        android:layout_width="wrap_content"
        android:layout_height="wrap_content"
        android:hint="用户名"
        android:textSize="34sp"
        app:layout_constraintBottom_toBottomOf="parent"
        app:layout_constraintEnd_toEndOf="parent"
        app:layout_constraintStart_toStartOf="parent"
        app:layout_constraintTop_toTopOf="parent"
        app:layout_constraintVertical_bias="0.046" />

    <EditText
        android:id="@+id/password"
        android:layout_width="wrap_content"
        android:layout_height="wrap_content"
        android:hint="密码"
        android:textSize="34sp"
        app:layout_constraintBottom_toBottomOf="parent"
        app:layout_constraintEnd_toEndOf="parent"
        app:layout_constraintStart_toStartOf="parent"
        app:layout_constraintTop_toBottomOf="@+id/username"
        app:layout_constraintVertical_bias="0.072" />

    <Button
        android:id="@+id/button"
        android:layout_width="wrap_content"
        android:layout_height="wrap_content"
        android:onClick="register"
        android:text="注册"
        android:textSize="24sp"
        app:backgroundTint="#E91E63"
        app:layout_constraintBottom_toBottomOf="parent"
        app:layout_constraintEnd_toEndOf="parent"
        app:layout_constraintHorizontal_bias="0.501"
        app:layout_constraintStart_toStartOf="parent"
        app:layout_constraintTop_toBottomOf="@+id/password"
        app:layout_constraintVertical_bias="0.058" />

    <Button
        android:id="@+id/button4"
        android:layout_width="wrap_content"
        android:layout_height="wrap_content"
        android:onClick="getNickname"
        android:text="昵称"
        android:textSize="24sp"
        app:backgroundTint="#E91E63"
        app:layout_constraintBottom_toBottomOf="parent"
        app:layout_constraintEnd_toEndOf="parent"
        app:layout_constraintHorizontal_bias="0.501"
        app:layout_constraintStart_toStartOf="parent"
        app:layout_constraintTop_toBottomOf="@+id/getUser"
        app:layout_constraintVertical_bias="0.302" />

    <Button
        android:id="@+id/getUser"
        android:layout_width="wrap_content"
        android:layout_height="wrap_content"
        android:onClick="getUser"
        android:text="获取"
        android:textSize="24sp"
        app:backgroundTint="#E91E63"
        app:layout_constraintBottom_toBottomOf="parent"
        app:layout_constraintEnd_toEndOf="parent"
        app:layout_constraintHorizontal_bias="0.501"
        app:layout_constraintStart_toStartOf="parent"
        app:layout_constraintTop_toBottomOf="@+id/button3"
        app:layout_constraintVertical_bias="0.176" />

    <Button
        android:id="@+id/button3"
        android:layout_width="wrap_content"
        android:layout_height="wrap_content"
        android:onClick="login"
        android:text="登录"
        android:textSize="24sp"
        app:backgroundTint="#E91E63"
        app:layout_constraintBottom_toBottomOf="parent"
        app:layout_constraintEnd_toEndOf="parent"
        app:layout_constraintHorizontal_bias="0.501"
        app:layout_constraintStart_toStartOf="parent"
        app:layout_constraintTop_toBottomOf="@+id/button"
        app:layout_constraintVertical_bias="0.115" />

    <EditText
        android:id="@+id/phone"
        android:layout_width="wrap_content"
        android:layout_height="wrap_content"
        android:layout_marginEnd="17dp"
        android:ems="10"
        android:inputType="phone"
        app:layout_constraintBottom_toBottomOf="parent"
        app:layout_constraintEnd_toStartOf="@+id/button2"
        app:layout_constraintHorizontal_chainStyle="packed"
        app:layout_constraintStart_toStartOf="parent"
        app:layout_constraintTop_toBottomOf="@+id/button4"
        app:layout_constraintVertical_bias="0.411" />

    <Button
        android:id="@+id/button2"
        android:layout_width="wrap_content"
        android:layout_height="wrap_content"
        android:backgroundTint="#E91E63"
        android:onClick="getcode"
        android:text="验证码"
        android:textSize="24sp"
        app:layout_constraintBaseline_toBaselineOf="@+id/phone"
        app:layout_constraintEnd_toEndOf="parent"
        app:layout_constraintStart_toEndOf="@+id/phone" />

</androidx.constraintlayout.widget.ConstraintLayout>

2、MainActivity.java
public class MainActivity extends AppCompatActivity {
private EditText username;
private EditText password;
private User user;
private LoginUser loginUser;
private Retrofit retrofit;
private OkHttpClient client;
@Override
protected void onCreate(Bundle savedInstanceState) {
super.onCreate(savedInstanceState);
setContentView(R.layout.activity_main);
username = findViewById(R.id.username);
password = findViewById(R.id.password);
}
public void getcode(View view){
EditText editphone = findViewById(R.id.phone);
String phone = editphone.getText().toString();
OkHttpClient httpClient = new OkHttpClient();
String baseurl = "http://ip:8001/server/user/send";
String url = String.format("%s/%s", baseurl,phone);
Request getRequest = new Request.Builder()
.url(url)
.get()
.build();
Call call = httpClient.newCall(getRequest);
new Thread(new Runnable() {
@Override
public void run() {
try {
//同步请求,要放到子线程执行
Response response = call.execute();
Log.i("whq登录", "okHttpGet run: response:"+ response.body().string());
Log.i("whq登录", "okHttpGet run: response:"+ response);
Log.i("whq登录", "okHttpGet run: response:"+ response.message());
Log.i("whq登录", "okHttpGet run: response:"android拓展之使用bmob后端云来实现短信验证码