Webpack构建多页应用Mpa:提取公共jscsshtml代码,实现图片字体单独打包,拆分多环境配置文件
Posted IT飞牛
tags:
篇首语:本文由小常识网(cha138.com)小编为大家整理,主要介绍了Webpack构建多页应用Mpa:提取公共jscsshtml代码,实现图片字体单独打包,拆分多环境配置文件相关的知识,希望对你有一定的参考价值。
上一节教程Webpack构建多页应用Mpa(三):文件结构和自动化打包中,我们完成了Mpa的文件结构和自动化打包,这一节我们继续完善,完成公共html代码的提取。例如:将A.html、B.html、C.html三个页面都有头部代码,统一放到header.html中。
一、概述
多页面应用中,会有很多公共的重复使用的代码,例如:头部、底部、侧边栏这类公共的html代码,以及对应的css样式和js交互代码,这节教程将会给出方法。
二、开发
1、分离 业务模块代码 和 公共代码
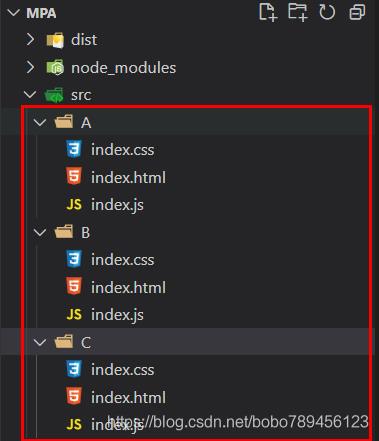
截止到目前,整个项目的文件结构如下图:

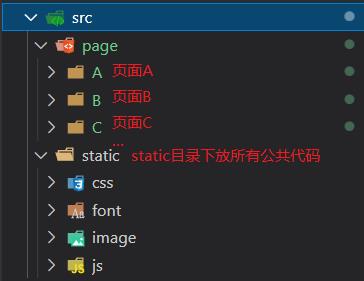
- 我们对src下的文件结构调整如下:

- 修改
webpack.config.js文件
将自动化方法中,检索目录由src改为src/page。
function getMpa() {
    const entry = {},
        htmlwebpackplugins = [];
    const entryfiles = glob.sync(path.resolve(__dirname, "./src/page/*/index.js"));
    entryfiles.forEach(function (item) {
        const folder = item.match(/\\/src\\/page\\/(\\w+)\\/index\\.js$/)[1];

        entry[folder] = `./page/${folder}/index.js`;

        htmlwebpackplugins.push(new HtmlWebpackPlugin({
            title: `${folder}页面`,
            filename: `./${folder}/index.html`,
            template: `./page/${folder}/index.html`,
            chunks: [folder],//以数组的形式指定由html-webpack-plugin负责加载的chunk文件(打包后生成的js文件),不指定的话就会加载所有的chunk。
            inject: "body",//指示把加载js文件用的<script>插入到哪里,默认是插到<body>的末端,如果设置为'head',则把<script>插入到<head>里。
            minify: true,//生成压缩后的HTML代码。
        }));
    });
    return { entry, htmlwebpackplugins };
}
2、支持公共js、css代码
新建如下文件,

src/static/css/common.css
/* common.css */
body {
    border: 2px solid red;
}
src/static/js/util.js
// util.js
const Util = {
    getNow: function () {
        console.log("util.js:公共方法getNow()");
    }
};

module.exports = Util;
src/static/js/launch.js
// launch.js
const run = {
    init: function () {
        console.log("launch.js:启动时自动运行");
    }
};
$(function () {
    run.init();
})
- 修改
webpack.config.js文件
几处重要修改:
- 新增resolve配置项,配置公共文件别名;
resolve: {
       alias: {
           '@': path.resolve(__dirname, ''),           //将@定位到项目根目录,require、import引入外部文件时注意
           'jqueryMin': path.resolve(__dirname, 'src/static/js/jquery.min.js'),
           'utilJs': path.resolve(__dirname, 'src/static/js/util.js'),
       }
   },
- 新增ProvidePlugin插件,自动化引入jquery、com;
    plugins: [
        new webpack.ProvidePlugin({//代码中如果引用,则自动导入对应文件;未引入则不导入;
            $: "jqueryMin",
            'util': 'utilJs'		//调用方法:util.funcname(param);
        })
    ],
- 修改getMpa方法,给entry入口添加公共css、js
其实即使在将entry各入口的值改成包含公共文件路径的数组;这样最终打包的时候,每个chunk就会包含公共代码;
function getMpa(param) {
    const entry = {},
        htmlwebpackplugins = [];
    const entryfiles = glob.sync(path.resolve(__dirname, "./src/page/*/index.js"));
    entryfiles.forEach(function (item) {
        const folder = item.match(/\\/src\\/page\\/(\\w+)\\/index\\.js$/)[1];

        entry[folder] = (param && param.mustIncludeFile) ? param.mustIncludeFile.slice() : [];
        entry[folder].push(`./page/${folder}/index.js`);

        htmlwebpackplugins.push(new HtmlWebpackPlugin({
            title: `${folder}页面`,
            filename: `./${folder}/index.html`,
            template: `./page/${folder}/index.html`,
            chunks: [folder],//以数组的形式指定由html-webpack-plugin负责加载的chunk文件(打包后生成的js文件),不指定的话就会加载所有的chunk。
            inject: "body",//指示把加载js文件用的<script>插入到哪里,默认是插到<body>的末端,如果设置为'head',则把<script>插入到<head>里。
            minify: true,//生成压缩后的HTML代码。
        }));
    });
    return { entry, htmlwebpackplugins };
}

//@表示src目录
const { entry, htmlwebpackplugins } = getMpa({
    mustIncludeFile: ["/static/js/launch.js", "/static/css/common.css"]
});
到这里就完成了,执行打包后,打开A页面时,预测会有以下效果:
- 控制台输出:“A页面”
- 控制台输出:“util.js:公共方法getNow()”
- 控制台输出:“launch.js:启动时自动运行”
- common.css作用域页面,body会出现边框

3、自动识别html、css中引入的图片、字体文件
- 写html时,会用
<img src="***">、style="background:***"引入静态资源; - 写css时,会用
background、font-face引入图片和字体资源 - 写js时,同样可以引入图片和字体外部资源
我们可以使用html-loader、url-loader 这两个loader来识别和配置图片和字体的打包工作;
安装loader
npm i -D html-loader@0.5.5 url-loader@4.1.1

//file-loader是url-loader的穷人版,file-loader中支持的功能,url-loader都原样支持;
//url-loader基于file-loader开发,所以file-loader必须安装;
//未解之谜:url-loader为什么不直接指定安装file-loader;
npm i -D file-loade
只装url-loader,不装file-loader时,控制台给出报错提示:

添加图片和字体文件:

在src/a/index.html加入图片:
<body>
    A页面
    <img src="/image/beauty.jpg" alt="" width="100">
</body>
在src/a/index.css加入字体:
@font-face {
    font-family: alibaba;
    src: url("/static/font/Alibaba-PuHuiTi-Light.ttf");
}

body{
    font-family: alibaba;
    background-color: white;
}
修改webpack.config.js文件
上面安装了url-loader、html-loader两个loader,前者用于识别图片和字体,并指定导出到哪个目录下;后者用于解释html代码,并提取出静态资源的路径;
添加配置代码:
module.exports = {
	context: path.resolve(__dirname, 'src'),
	...
	module: {
        rules: [
            {
                test: /\\.html$/,
                use: [
                    {
                        loader: "html-loader",
                        options: {
                            root: path.resolve(__dirname, 'src/static'),
                            attrs: [":src"]
                        }
                    }
                ]
            },
            {
                test: /\\.(png|gif|jpe?g)$/i,
                use: [
                    {
                        loader: 'url-loader',
                        options: {
                            name: '[name].[ext]',
                            outputPath: "/static/image",
                            publicPath: '/static/image',
                            esModule: false,
                            limit: 1e3,
                        },
                    }
                ]
            },
            {
                test: /\\.(ttf|eot|woff2?|svg)$/i,
                use: [
                    {
                        loader: "url-loader",
                        options: {
                            name: "[name].[ext]",
                            outputPath: "/static/font",
                            publicPath: "/static/font",
                            esModule: false,
                            limit: 1e3
                        }
                    }
                ]
            }
        ]
    },
}
html-loader规则中的options.root用于设置默认的上下文路径,如果不设置,系统默认以上一层基础配置项中的context为准,用于配置img.src属性中的路径。url-loader规则中,options.outputPath用于设置文件输出到哪个目录,这里是设置输出到/dist/static/image和/dist/static/font;options.publicPaht用于替换代码中原来的路径,例如:
老代码:
@font-face {
    font-family: alibaba;
    src: url("../../static/font/Alibaba-PuHuiTi-Light.ttf");
}
新代码:
@font-face {
    font-family: alibaba;
    src: url(/static/font/Alibaba-PuHuiTi-Light.ttf);
}
最后打包后,图片和字体都会被放到src/static目录下,文件如图:

4、取消使用html-loader识别html中图片(啪啪打脸)
上面 3.自动识别html、css中引入的图片、字体文件 刚说用html-loader来做图片img标签路径提取,但是发现会对html代码做字符串化,导致ejs标签失效;
html-webpack-plugin默认支持ejs模板代码,在ejs中支持<%= htmlWebpackPlugin.options.title %>,可以直接获取配置项中的title属性值,但是在html-loader之后,对模板进行了字符串化,导致<%= *** %>不被解释。虽然html-loader有ignoreCustomFragments属性,可以跳过指定的tag标签,但如果我们就使用ejs写了整个html模板,总不能跳过全部代码吧。
所以弃用html-loader,html中图片改用·require·方式引入,例如:
<img src="<%= require('/static/image/beauty.jpg') %> " alt="" width="100">
我们可以在webpack.config.js配置文件中,新增@img、@font这类别名,来简化路径;
//webpack.config.js代码
	...
	resolve: {
        alias: {
            '@': path.resolve(__dirname, 'src'),
            '@img': path.resolve(__dirname, 'src/static/image'),
            '@font': path.resolve(__dirname, 'src/static/font'),
            'jqueryMin': path.resolve(__dirname, 'src/static/js/jquery.min.js'),
            'utilJs': path.resolve(__dirname, 'src/static/js/util.js'),
        }
    },

//html代码
<img src="<%= require('@img/beauty.jpg')  %> " alt="" width="100">

//css代码
@font-face {
    font-family: alibaba;
    src: url("@font/Alibaba-PuHuiTi-Light.ttf");
}
5、提取公共html代码,引入模板的概念
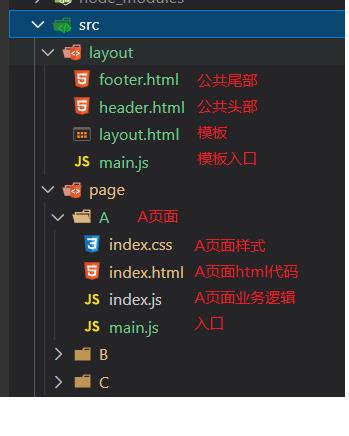
先上一张改造完成后的文件结构:

引入layout布局模板,主要借助htmlWebpackPlugin插件中的template属性。想法就是动态生成返回各个页面的字符串,填充到template属性。
- 新增
layout目录存放模板代码,可以放头部、尾部、侧边栏、快捷方式等等,根据需要自由创建;layout/main.js是模板入口,用于渲染模板,返回模板字符串型代码,填充到template属性; - page目录下每个页面都添加一个
main.js入口文件。
文件关系如下:
webpack.config.js通过htmlWebpackPlugin插件指定各页面入口文件,a/main.js、b/main.js等;a.main通过layout/main.js中render方法,返回模板字符串代码;
layout/main.js代码:
const layout = require('./layout.html');

module.exports = {
    render(content, data) {
        return layout({
            content: content(data),
            header: require('./header.html')(data),
            footer: require('./footer.html')(data)
        });
    },
};
layout/layout.html代码:
<%= header %>
<%= content %>
<%= footer %>
layout/header.html代码:
<!DOCTYPE html>
<html lang="en">

<head>
    <meta charset="UTF-8">
    <meta http-equiv="X-UA-Compatible" content="IE=edge">
    <meta name="viewport" content="width=device-width, initial-scale=1.0">
    <title>
        <%= pageTitle  %>
    </title>
</head>
<body>
    <div>头部</div>
layout/footer.html代码:
	<div>底部</div>
</body>
</html>
page/A/main.js代码:
const content = require('./index.html');
const layout = require('layout');
const pageTitle = 'A页面';

module.exports = layout.render(content, { pageTitle });
webpack.config.js代码:
配置文件需要设置.html文件的loader,记得安装:npm i -D ejs-loader
module:{
	rules:{
		{
                test: /\\.html$/,
                use: [{
                    loader: "ejs-loader",
                    options: {
                        esModule: false
                    }
                }]
            },
	}
}
page/A/index.html、page/A/index.js、page/A/index.css文件代码不变,和原来一样。
到这里就完成整体实现。打包后,打开A页面如下:

到这里就基本实现了用模板方式,提取公共html代码的功能;
6、设置webpack.config.js多环境配置文件
- package.json新增命令行设置
  "scripts": {
    "dev": "npx webpack --config webpack.dev.js",	//开发环境
    "prod": "npx webpack --config webpack.prod.js"	//生产环境
  },
- 新建
webpack.dev.js、webpack.prod.js
这里需要先安装webpack-merge,用于代码合并,npm i -D webpack-merge。
webpack.dev.js代码
const merge = require("webpack-merge");
const baseConfig = require("./webpack.base.js");
module.exports = merge(baseConfig, {
    mode: "development"
});
webpack.prod.js代码
const merge = require("webpack-merge");
const baseConfig = require("./webpack.base.js");

module.exports = merge(baseConfig, {
    mode: "production"
});
webpack.config.js代码
const path = require("path");
const HtmlWebpackPlugin = require("html-webpack-plugin");
const { CleanWebpackPlugin } = require("clean-webpack-plugin");
const MiniCssExtractPlugin = require('mini-css-extract-plugin');
const glob = require("glob");
const webpack = require("webpack");

function getMpa(param) {
    const entry = {},
        htmlwebpackplugins = [];
    const entryfiles = glob.sync(path.resolve(__dirname, "./src/page/*/index.js"));
    entryfiles.forEach(function (item) {
        const folder = item.match(/\\/src\\/page\\/(\\w+)\\/index\\.js$/)[1];

        entry[folder] = (param && param.mustIncludeFile) ? param.mustIncludeFile.slice() : [];
        entry[folder].push(`./page/${folder}/index.js`);

        htmlwebpackplugins.push(new HtmlWebpackPlugin({
            title: `${folder}页面`,
            filename: `./${folder}/index.html`,
            template: `./page/${folder}/main.js`,
            chunks: [folder],//以数组的形式指定由html-webpack-plugin负责加载的chunk文件(打包后生成的js文件),不指定的话就会加载所有的chunk。
            inject: "body",//指示把加载js文件用的<script>插入到哪里,默认是插到<body>的末端,如果设置为'head',则把<script>插入到<head>里。
            minify: true,//生成压缩后的HTML代码。
        }));
    });
    return { entry, htmlwebpackplugins };
}

const { entry, htmlwebpackplugins } = getMpa({
    mustIncludeFile: ["/static/js/launch.js", "/static/css/common.css"]
});

module.exports = {
    context: path.resolve(__dirname, 'src'),
    entry,
    output: {
        filename: "[name]/index.js",
        path: path.resolve(__dirname, "dist"),
        chunkFilename: "[name]/index.js"
    },
    module: {
        rules: [
            {
                test: /\\.css$/,
                use: [MiniCssExtractPlugin.loader, "css-loader"]
            },
            {
                test: /\\.(png|gif|jpe?g)$/i,
                use: [
                    {
                        loader: 'url-loader',
                        options: {
                            name: '[name].[ext]',
                            outputPath: "/static/image",
                            publicPath: '/static/image',
                            esModule: false,
                            limit: 1e3,
                        },
                    }
                ]
            },
            {
                test: /\\.(ttf|eot|woff2?|svg)$/i,
                use: [
                    {
                        loader: "url-loader",
                        options: {
                            name: "[name].[ext]",
                            outputPath: "/static/font",
                            publicPath: "/static/font",
                            esModule: false,
                            limit: 1e3
                        }
                    }
                ]
            },
            {
                test: /\\.html$/,
                use: [{
                    loader: "ejs-loader",
                    options: {
                        esModule: false
                    }
                }]
            },
        ]
    },
    plugins: [
        ...htmlwebpackplugins,
        new CleanWebpackPlugin(),
        new webpack.ProvidePlugin({//代码中如果引用,则自动导入对应文件;未引入则不导入;
            $: "jqueryMin",
            'util': 'utilJs'
        }),
        new MiniCssExtractPlugin({
            filename: "[name]/index.css",
            chunkFilename: "[name]/index.css"
        })
    ],
    resolve: {
        // extensions: ['.js', '.vue', '.json'],
        alias: {
            '@': path.resolve(__dirname, 'src'),           //将@定位到项目根目录,require、import引入外部文件时注意
            '@img': path.resolve(__dirname, 'src/static/image'),
            '@font': path.resolve(__dirname, 'src/static/font'),
            'jqueryMin': path.resolve(__dirname, 'src/static/js/jquery.min.js'),
            "layout": path.resolve(__dirname, 'src/layout/main.js'),
            'utilJs': path.resolve(__dirname, 'src/static/js/util.js'),
            // 'commonCss': path.resolve(__dirname, 'src/static/css/common.css'),
        }
    },
};
执行npm run dev开发模式打包,npm run prod生产模式打包。
两种模式的配置文件,可以按照es语法、文件压缩模式、各个包浏览器支持程度等进行不同的配置,具体参考webpack官网优化项目:Optimization
三、结束
开发过程有一些功能未完成和遇到的问题,记录在这里,后面继续完善:
- ejs本身支持include引入功能,但是实测无效,后面要排查实现include功能;
- css-loader开启modules:true后,css实现了class哈希,但是html中的classname还是原来名字;
- 尝试将多页面Mpa项目中的某一个页面做成SPA;
- babel-loader、postcss-loader对js和css进行优化;
以上是关于Webpack构建多页应用Mpa:提取公共jscsshtml代码,实现图片字体单独打包,拆分多环境配置文件的主要内容,如果未能解决你的问题,请参考以下文章