Linux环境 安装elasticsearch-6.4.3 单机版不能以root用户运行es 及 max_map_count 问题解决(含 安装包+分词插件 云盘资源)
Posted シ風箏
tags:
篇首语:本文由小常识网(cha138.com)小编为大家整理,主要介绍了Linux环境 安装elasticsearch-6.4.3 单机版不能以root用户运行es 及 max_map_count 问题解决(含 安装包+分词插件 云盘资源)相关的知识,希望对你有一定的参考价值。
百度云盘资源包含【elasticsearch-6.4.3.tar.gz】【elasticsearch-analysis-ik-6.4.3.zip】
链接:https://pan.baidu.com/s/11IWoOXe1oCNjyWC6ZH_CaQ
提取码:7mb6
一下安装过程是针对 elasticsearch-6.4.3.tar.gz 版本的,不同版本的安装配置可能存在差异。官网也有安装方法,官网安装的是 6.0.1 版本的。
1.环境
elasticsearch 的运行依赖 jdk,支持的最低版本为 Java 8。
Elasticsearch requires at least Java 8.
Specifically as of this writing,
it is recommended that you use the Oracle JDK version 1.8.0_131.
我用的就是jdk1.8。
[root@tcloud logs]# java -version
java version "1.8.0_251"
Java(TM) SE Runtime Environment (build 1.8.0_251-b08)
Java HotSpot(TM) 64-Bit Server VM (build 25.251-b08, mixed mode)
2.安装
- 解压并移动到 /usr/local/elasticsearch 下
[root@tcloud es]# tar -zxvf ./elasticsearch-6.4.3.tar.gz
[root@tcloud es]# mv ./elasticsearch-6.4.3/ /usr/local/elasticsearch
- 用户添加及权限授予
ES跟mysql类似,不能使用root用户启动,否在会报异常:
Caused by: java.lang.RuntimeException: can not run elasticsearch as root
添加 elasticsearch 用户组和用户:
[root@tcloud ~]# groupadd elasticsearch
[root@tcloud ~]# useradd -g elasticsearch elasticsearch
# 设置密码
[root@tcloud ~]# echo "elasticsearch" | passwd elasticsearch --stdin
将ES的文件转到 elasticsearch 下:
[root@tcloud ~]# cd /usr/local/elasticsearch
[root@tcloud ~]# chown -R elasticsearch .
[root@tcloud ~]# chgrp -R elasticsearch .
[root@tcloud elasticsearch]# ll
total 448
drwxr-xr-x  3 elasticsearch elasticsearch   4096 Jul 31 11:22 bin
drwxr-xr-x  2 elasticsearch elasticsearch   4096 Jul 31 12:16 config
drwxr-xr-x  3 elasticsearch elasticsearch   4096 Oct 31  2018 lib
-rw-r--r--  1 elasticsearch elasticsearch  13675 Oct 31  2018 LICENSE.txt
drwxr-xr-x  2 elasticsearch elasticsearch   4096 Jul 31 12:01 logs
drwxr-xr-x 27 elasticsearch elasticsearch   4096 Oct 31  2018 modules
-rw-r--r--  1 elasticsearch elasticsearch 401465 Oct 31  2018 NOTICE.txt
drwxr-xr-x  2 elasticsearch elasticsearch   4096 Oct 31  2018 plugins
-rw-r--r--  1 elasticsearch elasticsearch   8519 Oct 31  2018 README.textile
修改 sudoers 文件,给用户 elasticsearch 添加 sudo 权限:
[root@tcloud ~]# vim /etc/sudoers
## Allow root to run any commands anywhere
root    ALL=(ALL)       ALL
# 添加elasticsearch
elasticsearch ALL=(ALL)       ALL
- 系统参数配置【vm.max_map_count】
否则会报错:
ERROR: [1] bootstrap checks failed
[1]: max virtual memory areas vm.max_map_count [65530] is too low, increase to at least [262144]
# 查看系统环境变量vm.max_map_count
[root@tcloud ~]# sysctl -a | grep vm.max_map_count
vm.max_map_count = 65530

# 修改系统环境变量vm.max_map_count
[root@tcloud ~]# vim /etc/sysctl.conf
	# 末尾添加
	vm.max_map_count = 262144

# 配置文件修改完后需要重启才能生效 可使用下面命令使得本次启动有效
[root@tcloud ~]# sysctl -w vm.max_map_count=262144
vm.max_map_count = 262144
- 单机版配置【修改两个文件】
[root@tcloud ~]# vim /usr/local/elasticsearch/config/elasticsearch.yml
# 添加一下配置 【关掉bootstrap的自检测程序,启动会更快】
bootstrap.memory_lock: false
bootstrap.system_call_filter: false
# Network配置修改
network.host: 0.0.0.0
es运行在Java虚拟机环境下,默认占用1G内存,【我使用的是腾讯云低端主机1核2G内存的,这里调小一些,非生产环境也可以调小使用,生产环境要根据需求进行调整。】
[root@tcloud ~]# vim /usr/local/elasticsearch/config/jvm.options
# 初始化堆空间
-Xms256m
# 最大堆空间
-Xmx256m
- 启动
# 启动要使用elasticsearch用户
[root@tcloud ~]# su elasticsearch
bash-4.2$ /usr/local/elasticsearch/bin/elasticsearch

# 后台启动
bash-4.2$ /usr/local/elasticsearch/bin/elasticsearch -d
3. 验证
[root@tcloud ~]# jps
10800 Jps
9618 Elasticsearch
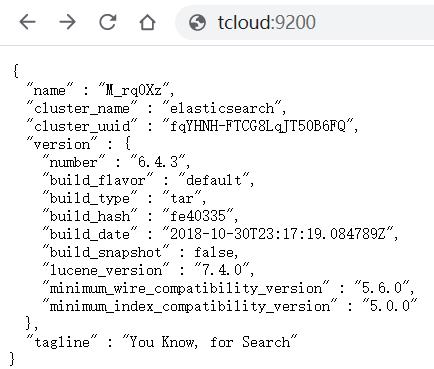
也可以通过 IP:9200 进行验证:

至此,单机版本的 elasticsearch 安装配置启动完成。
以上是关于Linux环境 安装elasticsearch-6.4.3 单机版不能以root用户运行es 及 max_map_count 问题解决(含 安装包+分词插件 云盘资源)的主要内容,如果未能解决你的问题,请参考以下文章