使用vagrant搭建k8s节点六-----安装可视化界面KubeSphere
Posted lovoo
tags:
篇首语:本文由小常识网(cha138.com)小编为大家整理,主要介绍了使用vagrant搭建k8s节点六-----安装可视化界面KubeSphere相关的知识,希望对你有一定的参考价值。
参考文档:https://cloud.tencent.com/developer/article/1696689
一、安装默认 dashboard
1、部署 dashboard
kubectl apply -f https://raw.githubusercontent.com/kubernetes/dashboard/v1.10.1/src/deploy/recommended/kubernetes-dashboard.yaml
2、暴露 dashboard 为公共访问
默认 Dashboard 只能集群内部访问,修改 Service 为 NodePort 类型,暴露到外部:
kind: Service
apiVersion: v1
metadata:
labels:
 k8s-app: kubernetes-dashboard
name: kubernetes-dashboard
namespace: kube-system
spec:
type: NodePort
ports:
 - port: 443
   targetPort: 8443
   nodePort: 30001
selector:
 k8s-app: kubernetes-dashboard
访问地址:http://192.168.16.151:30001
二、安装KubeSphere环境准备
默认的 dashboard 没啥用,我们用 kubesphere 可以打通全部的 devops 链路。
Kubesphere 集成了很多套件,集群要求较高
网址:https://kubesphere.com.cn/
1、简介
KubeSphere 是一款面向云原生设计的开源项目,在目前主流容器调度平台 Kubernetes 之上构建的分布式多租户容器管理平台,提供简单易用的操作界面以及向导式操作方式,在降低用户使用容器调度平台学习成本的同时,极大降低开发、测试、运维的日常工作的复杂度。
2、安装
2.1、前提条件
https://kubesphere.io/docs/v2.1/zh-CN/installation/prerequisites/
2.2、安装前提环境
安装 helm(master 节点执行)----------------------------------------------------
Helm 是 Kubernetes 的包管理器。包管理器类似于我们在 Ubuntu 中使用的 apt、Centos中使用的 yum 或者 Python 中的 pip 一样,能快速查找、下载和安装软件包。Helm 由客户端组件 helm 和服务端组件 Tiller 组成, 能够将一组 K8S 资源打包统一管理, 是查找、共享和使用为 Kubernetes 构建的软件的最佳方式。
安装:
curl -L https://git.io/get_helm.sh | bash
不能安装解决办法:
上传我们给定的 get_helm.sh,chmod 700 然后./get_helm.sh
可能有文件格式兼容性问题,用 vi 打开该 sh 文件,输入:
:set ff
回车,显示 fileformat=dos,重新设置下文件格式:
:set ff=unix
保存退出:
:wq
上述都不能安装解决办法
下载安装包
下载地址:https://github.com/helm/helm/releases/tag/v2.16.6
wget https://github.com/helm/helm/releases/tag/v2.16.6
tar -zxvf  helm-v2.16.6-linux-amd64.tar.gz
mv linux-amd64/helm /usr/local/bin
helm version
安装 helm(master 节点执行)----------------------------------------------------
mv linux-amd64/tiller /usr/local/bin
helm init --upgrade --tiller-image registry.cn-hangzhou.aliyuncs.com/google_containers/tiller:v2.16.6  --stable-repo-url https://kubernetes.oss-cn-hangzhou.aliyuncs.com/charts
授权
kubectl create serviceaccount --namespace kube-system tiller
kubectl create clusterrolebinding tiller-cluster-rule --clusterrole=cluster-admin --serviceaccount=kube-system:tiller
为 Tiller 设置帐号
kubectl patch deploy --namespace kube-system tiller-deploy -p '{"spec":{"template":{"spec":{"serviceAccount":"tiller"}}}}'
查看授权是否成功
kubectl get deploy --namespace kube-system tiller-deploy --output yaml|grep serviceAccount
三、安装 OpenEBS(master 执行)
1、去除污点
#查看节点
kubectl get node -o wide
kubectl describe node k8s-node1 | grep Taint
kubectl taint nodes k8s-node1 node-role.kubernetes.io/master:NoSchedule-
#查看效果
kubectl get sc -n openebs
2、创建名称空间
kubectl create ns openebs
3、安装
helm install --namespace openebs --name openebs stable/openebs --version 1.5.0
安装不成功,解决办法
helm repo remove stable
helm repo add stable https://kubernetes-charts.storage.googleapis.com
helm repo add stable https://kubernetes.oss-cn-hangzhou.aliyuncs.com/charts
#目前唯一有用的
helm repo add stable https://charts.helm.sh/stable

helm repo update
helm search mysql
4、查看安装进度
#查看进度
kubectl get pods --all-namespaces
#查看效果
kubectl get sc -n openebs

5、修改存储类型
kubectl patch storageclass openebs-hostpath -p \\
'{"metadata": {"annotations":{"storageclass.kubernetes.io/is-default-class":"true"}}}'
6、将 master 节点 Taint 加上
kubectl taint nodes k8s-node1 node-role.kubernetes.io=master:NoSchedule
四、KubeSphere 最小化安装:
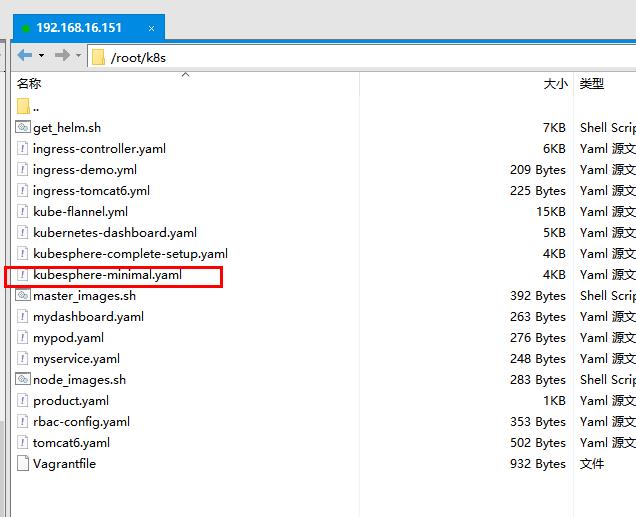
1、下载kubesphere-minimal.yaml:
地址:https://gitee.com/learning1126/ks-installer/blob/master/kubesphere-minimal.yaml
将 kubesphere-minimal.yaml 拷贝到k8s文件夹

2、部署
kubectl apply -f kubesphere-minimal.yaml

3、查看安装日志
需要十多分钟
kubectl logs -n kubesphere-system $(kubectl get pod -n kubesphere-system -l app=ks-install -o jsonpath='{.items[0].metadata.name}') -f
4、安装完成
显示:

Console: http://10.0.2.4:30880
Account: admin
Password: P@88w0rd
访问时地址:192.168.16.151:30880
分布式技术QQ群:722865146
分布式商城下载:https://gitee.com/charlinchenlin/wysmall
以上是关于使用vagrant搭建k8s节点六-----安装可视化界面KubeSphere的主要内容,如果未能解决你的问题,请参考以下文章