linux-网络相关配置,ssh服务,bash命令及优先级,元字符
Posted xuaijun
tags:
篇首语:本文由小常识网(cha138.com)小编为大家整理,主要介绍了linux-网络相关配置,ssh服务,bash命令及优先级,元字符相关的知识,希望对你有一定的参考价值。
-
二:临时配置网络(ip,网关,dns)+永久配置
临时配置:
|
[root@nfs-server ~]# ifconfig ens32: flags=4163<UP,BROADCAST,RUNNING,MULTICAST> mtu 1500 inet 192.168.152.134 netmask 255.255.255.0 broadcast 192.168.152.255 inet6 fe80::e33a:cec4:b0d4:c884 prefixlen 64 scopeid 0x20<link> ether 00:0c:29:f7:dc:59 txqueuelen 1000 (Ethernet) RX packets 241828 bytes 275307222 (262.5 MiB) RX errors 0 dropped 0 overruns 0 frame 0 TX packets 7200 bytes 1083100 (1.0 MiB) TX errors 0 dropped 0 overruns 0 carrier 0 collisions 0
lo: flags=73<UP,LOOPBACK,RUNNING> mtu 65536 inet 127.0.0.1 netmask 255.0.0.0 inet6 ::1 prefixlen 128 scopeid 0x10<host> loop txqueuelen 1 (Local Loopback) RX packets 327 bytes 33260 (32.4 KiB) RX errors 0 dropped 0 overruns 0 frame 0 TX packets 327 bytes 33260 (32.4 KiB) TX errors 0 dropped 0 overruns 0 carrier 0 collisions 0
[root@nfs-server ~]# ifconfig ens32 192.168.152.135 [root@nfs-server ~]# route -n Kernel IP routing table Destination Gateway Genmask Flags Metric Ref Use Iface 192.168.152.0 0.0.0.0 255.255.255.0 U 0 0 0 ens32 [root@nfs-server ~]# route add default gw 192.168.152.2 [root@nfs-server ~]# route -n Kernel IP routing table Destination Gateway Genmask Flags Metric Ref Use Iface 0.0.0.0 192.168.152.2 0.0.0.0 UG 0 0 0 ens32 192.168.152.0 0.0.0.0 255.255.255.0 U 0 0 0 ens32 [root@nfs-server ~]# cat /etc/resolv.conf # Generated by NetworkManager search localdomain nameserver 192.168.152.2 nameserver 202.106.0.20 |
永久配置:
|
[root@nfs-server ~]# cat /etc/sysconfig/network-scripts/ifcfg-ens32 TYPE=Ethernet BOOTPROTO=dhcp IPADDR=192.168.152.134 NETMASK=255.255.255.0 GATEWAY=192.168.152.2 DNS1=192.168.152.2 DNS2=202.106.0.20 DEFROUTE=yes PEERDNS=yes PEERROUTES=yes IPV4_FAILURE_FATAL=no IPV6INIT=yes IPV6_AUTOCONF=yes IPV6_DEFROUTE=yes IPV6_PEERDNS=yes IPV6_PEERROUTES=yes IPV6_FAILURE_FATAL=no IPV6_ADDR_GEN_MODE=stable-privacy NAME=ens32 UUID=9eff3909-2614-4df9-80c9-a6a7d9f1be28 DEVICE=ens32 ONBOOT=yes
[root@nfs-server ~]# systemctl restart network |
三:为集群内的机器设定主机名,利用/etc/hosts文件来解析自己的集群中所有的主机名,相应的,集群的配置应该改成使用主机名的方式
修改主机名:
hostname python_web1
cat /etc/hostname
python_web1
修改host文件:
[root@python_web1 ~]# cat /etc/hosts
192.168.2.3 python_web1
[root@python_web1 ~]# ping python_web1
四:ssh登录,scp上传、下载,ssh秘钥登录,修改ssh
server端的端口为8888然后进行登录和scp测试
SSH登录:
|
[root@proxy-nfs ~]# scp /etc/hosts web01:/tmp The authenticity of host \'web01 (192.168.152.135)\' can\'t be established. ECDSA key fingerprint is 4c:ee:a3:f1:5c:37:43:32:bd:06:4e:cc:3f:5a:0a:04. Are you sure you want to continue connecting (yes/no)? yes Warning: Permanently added \'web01,192.168.152.135\' (ECDSA) to the list of known hosts. root@web01\'s password: hosts 100% 274 0.3KB/s 00:00 [root@proxy-nfs ~]# scp web01:/tmp/hosts . root@web01\'s password: hosts 100% 274 0.3KB/s 00:00 [root@proxy-nfs ~]# ls -l hosts -rw-r--r-- 1 root root 274 Mar 21 15:05 hosts |
秘钥登录:
|
[root@proxy-nfs ~]# ssh-keygen Generating public/private rsa key pair. Enter file in which to save the key (/root/.ssh/id_rsa): Enter passphrase (empty for no passphrase): Enter same passphrase again: Your identification has been saved in /root/.ssh/id_rsa. Your public key has been saved in /root/.ssh/id_rsa.pub. The key fingerprint is: 29:90:f7:3a:24:0a:e2:f9:22:ec:f4:07:75:7c:10:6b root@proxy-nfs The key\'s randomart image is: +--[ RSA 2048]----+ | .. | | . .. | | o oE. | | +.+ o | |o o + S | |o..o o o | |.+. . o | |ooo . . | |o..o. | +-----------------+ [root@proxy-nfs ~]# ssh-copy-id -i web01 /usr/bin/ssh-copy-id: INFO: attempting to log in with the new key(s), to filter out any that are already installed /usr/bin/ssh-copy-id: INFO: 1 key(s) remain to be installed -- if you are prompted now it is to install the new keys root@web01\'s password:
Number of key(s) added: 1
Now try logging into the machine, with: "ssh \'web01\'" and check to make sure that only the key(s) you wanted were added. [root@proxy-nfs ~]# [root@proxy-nfs ~]# ssh-copy-id -i web02 The authenticity of host \'web02 (192.168.152.136)\' can\'t be established. ECDSA key fingerprint is 4c:ee:a3:f1:5c:37:43:32:bd:06:4e:cc:3f:5a:0a:04. Are you sure you want to continue connecting (yes/no)? yes /usr/bin/ssh-copy-id: INFO: attempting to log in with the new key(s), to filter out any that are already installed /usr/bin/ssh-copy-id: INFO: 1 key(s) remain to be installed -- if you are prompted now it is to install the new keys root@web02\'s password:
Number of key(s) added: 1
Now try logging into the machine, with: "ssh \'web02\'" and check to make sure that only the key(s) you wanted were added.
[root@proxy-nfs ~]# ssh-copy-id -i web03 The authenticity of host \'web03 (192.168.152.137)\' can\'t be established. ECDSA key fingerprint is 4c:ee:a3:f1:5c:37:43:32:bd:06:4e:cc:3f:5a:0a:04. Are you sure you want to continue connecting (yes/no)? yes /usr/bin/ssh-copy-id: INFO: attempting to log in with the new key(s), to filter out any that are already installed /usr/bin/ssh-copy-id: INFO: 1 key(s) remain to be installed -- if you are prompted now it is to install the new keys root@web03\'s password:
Number of key(s) added: 1
Now try logging into the machine, with: "ssh \'web03\'" and check to make sure that only the key(s) you wanted were added.
# 修改SSH端口 [root@proxy-nfs ~]# ssh web01 Last login: Tue Mar 21 15:08:30 2017 from proxy-nfs [root@web01 ~]# sed -i s\'/^#Port 22/Port 8888/g\' /etc/ssh/sshd_config [root@web01 ~]# grep 8888 /etc/ssh/sshd_config Port 8888 [root@web01 ~]# exit logout Connection to web01 closed. [root@proxy-nfs ~]# ssh web02 Last login: Tue Mar 21 14:53:19 2017 from 192.168.152.1 [root@web02 ~]# sed -i s\'/^#Port 22/Port 8888/g\' /etc/ssh/sshd_config [root@web02 ~]# grep 8888 /etc/ssh/sshd_config Port 8888 [root@web02 ~]# exit logout Connection to web02 closed. [root@proxy-nfs ~]# ssh web03 Last login: Tue Mar 21 14:53:20 2017 from 192.168.152.1 [root@web03 ~]# sed -i s\'/^#Port 22/Port 8888/g\' /etc/ssh/sshd_config [root@web03 ~]# grep 8888 /etc/ssh/sshd_config Port 8888 [root@web03 ~]# exit logout Connection to web03 closed. [root@proxy-nfs ~]#
# SCP 远程拷贝文件 [root@proxy-nfs ~]# touch oldgirl.txt [root@proxy-nfs ~]# scp oldgirl.txt web01:/tmp oldgirl.txt 100% 0 0.0KB/s 00:00 [root@proxy-nfs ~]# scp web01:/etc/passwd . passwd 100% 2375 2.3KB/s 00:00 |
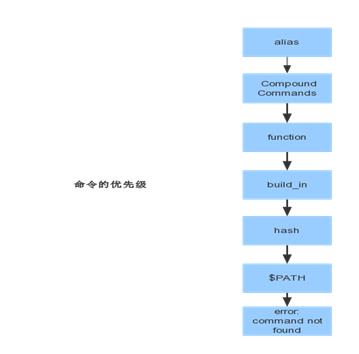
五:整理bash命令类型,验证寻找一个命令的优先级

# 以ls命令为例
命令分为:
==> alias
==> Compound Commands
==> function
==> build_in
==> hash
==> $PATH
==> error: command not found
获取一个命令会按照上述优先级取寻找,先找同名的alias命令,再找compound命令。。。
以上是关于linux-网络相关配置,ssh服务,bash命令及优先级,元字符的主要内容,如果未能解决你的问题,请参考以下文章