SpringBoot2之web开发(下)——数据响应模板引擎拦截器文件上传和异常处理(未完成)
Posted AC_Jobim
tags:
篇首语:本文由小常识网(cha138.com)小编为大家整理,主要介绍了SpringBoot2之web开发(下)——数据响应模板引擎拦截器文件上传和异常处理(未完成)相关的知识,希望对你有一定的参考价值。
SpringBoot2之web开发(下)——数据响应、模板引擎、拦截器、文件上传和异常处理
一、数据响应和内容协商
1.1 响应json数据
使用jackson.jar+@ResponseBody注解
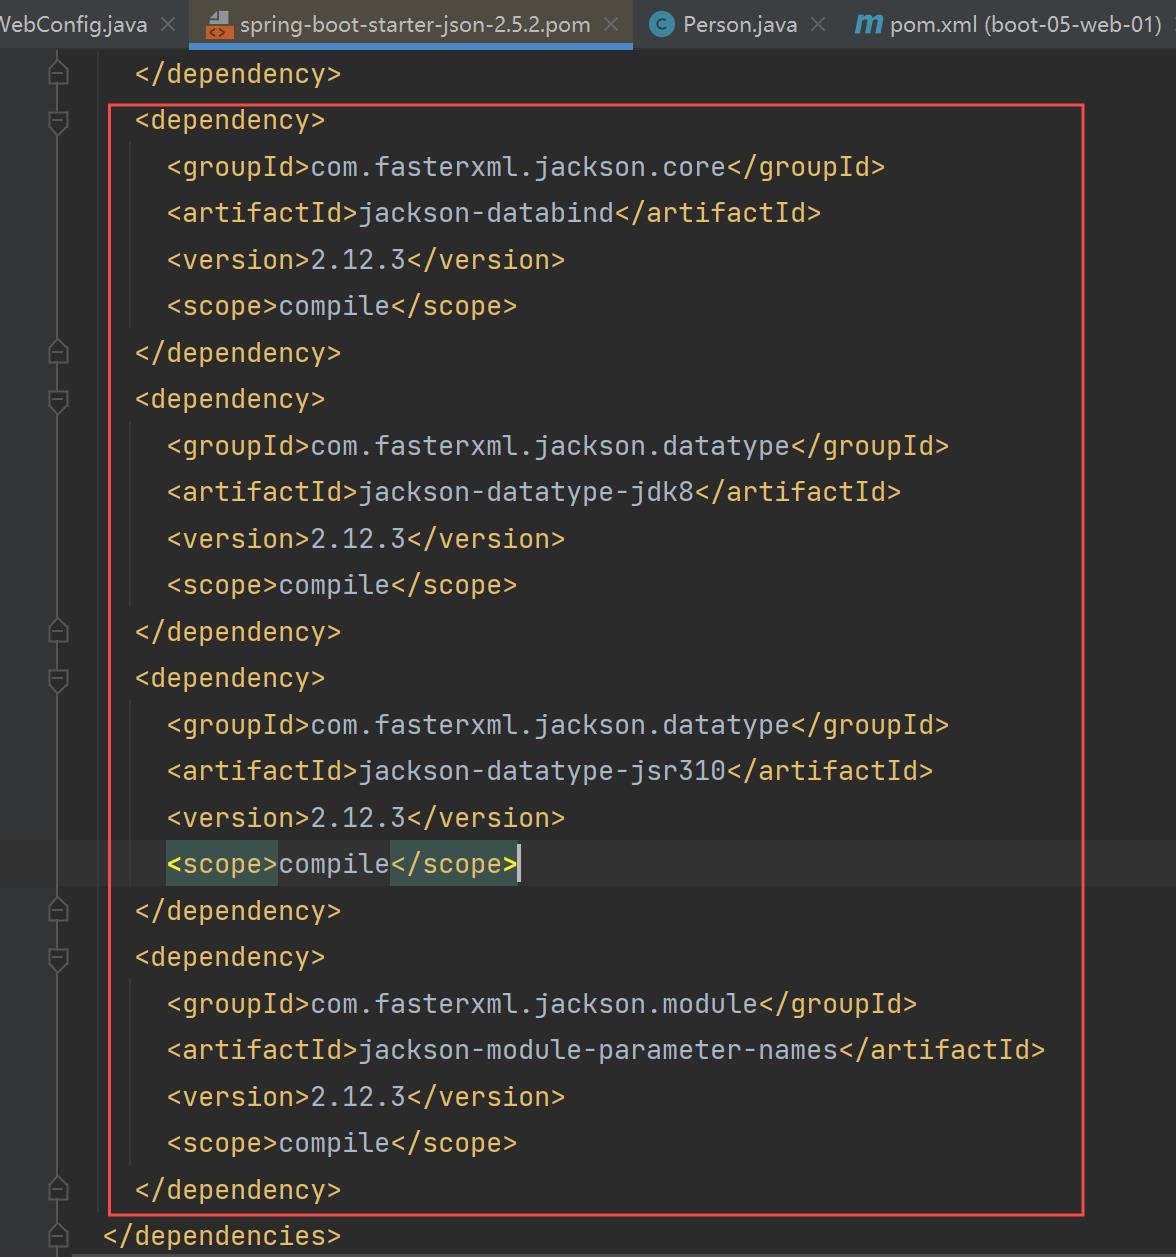
web场景自动引入了json的相关依赖spring-boot-starter-json,所有我们只需要在方法或者类上添加@ResponseBody注解即可,点进spring-boot-starter-json可以看到如下代码:

即:Spring Boot 中默认使用的JSON解析框架是 Jackson
代码示例:
@Controller
public class ResponseTestController {

    /**
     * 处理器方法返回一个Student,通过框架转为json,响应请求
     * @return
     */
    @ResponseBody  //利用返回值处理器里面的消息转换器进行处理
    @GetMapping(value = "/test/person")
    public Person getPerson(){
        Person person = new Person();
        person.setAge(28);
        person.setBirth(new Date());
        person.setUserName("zhangsan");
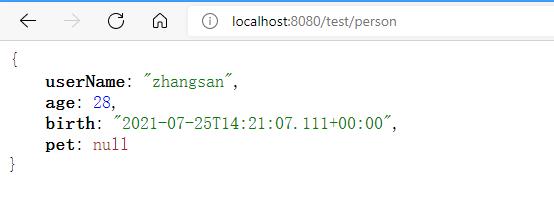
        return person; //会被框架转为json
    }
}
结果:

1.2 内容协商(待写)
P39-40
二、模板引擎(Thymeleaf )
2.1 模板引擎介绍
-
模板引擎的作用就是我们来写一个页面模板,比如有些值呢,是动态的,我们写一些表达式。而这些值,从哪来呢,就是我们在后台封装一些数据。然后把这个模板和这个数据交给我们模板引擎,模板引擎按照我们这个数据帮你把这表达式解析、填充到我们指定的位置,然后把这个数据最终生成一个我们想要的内容给我们写出去,这就是模板引擎。
-
jsp就是一个模板引擎,支持非常强大的功能,包括能写Java代码,但是呢,我们现在的这种情况.SpringBoot这个项目首先是以jar的方式,不是war,我们用的还是嵌入式的Tomcat,所以他现在默认是不支持jsp的。
-
常见的模板引擎有
JSP、Velocity、Freemarker、Thymeleaf -
SpringBoot推荐使用
Thymeleaf
2.2 Thymeleaf 语法
Thymeleaf官网:https://www.thymeleaf.org/
注意:在使用Thymeleaf时页面要引入名称空间: xmlns:th="http://www.thymeleaf.org"
2.2.1 常用th属性:
- th:text :设置当前元素的文本内容,相同功能的还有th:utext,两者的区别在于前者不会转义html标签,后者会。
- th:value:设置当前元素的value值,类似修改指定属性的还有th:src,th:href。
- th:each:遍历循环元素,和th:text或th:value一起使用。注
- th:if:条件判断,类似的还有th:unless,th:switch,th:case。
- th:insert:代码块引入,类似的还有th:replace,th:include,三者的区别较大,若使用不恰当会破坏html结构,常用于公共代码块提取的场景。
- th:fragment:定义代码块,方便被th:insert引用。
代码示例:
<!DOCTYPE html>
<!--名称空间-->
<html lang="en" xmlns:th="http://www.thymeleaf.org">
<head>
    <meta charset="UTF-8">
    <title>Thymeleaf 语法</title>
</head>
<body>
<h2>ITDragon Thymeleaf 语法</h2>
<!--th:text 设置当前元素的文本内容,常用,优先级不高-->
<p th:text="${thText}"></p>
<p th:utext="${thUText}" ></p>

<!--th:value 设置当前元素的value值,常用,优先级仅比th:text高-->
<input type="text" th:value="${thValue}" />

<!--th:each 遍历列表,常用,优先级很高,仅此于代码块的插入-->
<!--th:each 修饰在div上,则div层重复出现,若只想p标签遍历,则修饰在p标签上-->
<div th:each="message : ${thEach}"> <!-- 遍历整个div-p,不推荐-->
    <p th:text="${message}" />
</div>
<p>---------</p>
<div> <!--只遍历p,推荐使用-->
    <p th:text="${message}" th:each="message : ${thEach}" />
</div>

<!--th:if 条件判断,类似的有th:switch,th:case, 其中#strings是变量表达式的内置方法-->
<p th:text="${thIf}" th:if="${#strings.isEmpty(thIf)}"></p>
<p>==========</p>
<p th:text="${thIf}" th:if="${not #strings.isEmpty(thIf)}"></p>
</body>
</html>
Controller代码:
@Controller
public class ThymeleafController {

    @RequestMapping("thymeleaf")
    public String thymeleaf(ModelMap map) {
        map.put("thText", "th:text 设置文本内容 <b>加粗</b>");
        map.put("thUText", "th:utext 设置文本内容 <b>加粗</b>");
        map.put("thValue", "thValue 设置当前元素的value值");
        map.put("thEach", Arrays.asList("th:each", "遍历列表"));
        map.put("thIf", "msg is not null");
        return "test";
    }
}
执行结果:

2.2.2 标准表达式语法
${...} 变量表达式,Variable Expressions
@{...} 链接表达式,Link URL Expressions
#{...} 消息表达式,Message Expressions
~{...} 代码块表达式,Fragment Expressions
*{...} 选择变量表达式,Selection Variable Expressions
-
${…}变量表达式
变量表达式功能:1、可以获取对象的属性和方法 2、可以使用ctx,vars,locale,request,response,session,servletContext内置对象 1)ctx :上下文对象。 2)vars :上下文变量。 3)locale:上下文的语言环境。 4)request:(仅在web上下文)的 HttpServletRequest 对象。 5)response:(仅在web上下文)的 HttpServletResponse 对象。 6)session:(仅在web上下文)的 HttpSession 对象。 7)servletContext:(仅在web上下文)的 ServletContext 对象 3、可以使用dates,numbers,strings,objects,arrays,lists,sets,maps等内置方法
这里以常用的Session举例,用户刊登成功后,会把用户信息放在Session中,Thymeleaf通过内置对象将值从session中获取。
// java 代码将用户名放在session中
session.setAttribute("userinfo",username);
// Thymeleaf通过内置对象直接获取
th:text="${session.userinfo}"
-
@{…} 链接表达式
不管是静态资源的引用,form表单的请求,凡是链接都可以用
@{...}。这样可以动态获取项目路径,即便项目名变了,依然可以正常访问#修改项目名,链接表达式会自动修改路径,避免资源文件找不到 server.context-path=/itdragon链接表达式的使用:
无参:
@{/xxx}
有参:@{/xxx(k1=v1,k2=v2)}对应url结构:xxx?k1=v1&k2=v2
引入本地资源:@{/项目本地的资源路径}
引入外部资源:@{/webjars/资源在jar包中的路径}代码示例:
<link th:href="@{/webjars/bootstrap/4.0.0/css/bootstrap.css}" rel="stylesheet"> <link th:href="@{/main/css/itdragon.css}" rel="stylesheet"> <form class="form-login" th:action="@{/user/login}" th:method="post" > <a class="btn btn-sm" th:href="@{/login.html(l='zh_CN')}">中文</a> <a class="btn btn-sm" th:href="@{/login.html(l='en_US')}">English</a> -
~{…} 代码块表达式
推荐:
~{templatename::fragmentname}
支持:~{templatename::#id}
templatename:模版名,Thymeleaf会根据模版名解析完整路径:/resources/templates/templatename.html,要注意文件的路径。
fragmentname:片段名,Thymeleaf通过th:fragment声明定义代码块,即:
th:fragment="fragmentname"
id:HTML的id选择器,使用时要在前面加上#号,不支持class选择器。
代码块表达式的使用:
代码块表达式需要配合th属性(th:insert,th:replace,th:include)一起使用。
th:insert:将代码块片段整个插入到使用了th:insert的HTML标签中,
th:replace:将代码块片段整个替换使用了th:replace的HTML标签中,
th:include:将代码块片段包含的内容插入到使用了th:include的HTML标签中,
代码示例:
<!--th:fragment定义代码块标识-->
<footer th:fragment="copy">
© 2011 The Good Thymes Virtual Grocery
</footer>
<!--三种不同的引入方式-->
<div th:insert="common :: copy"></div><!--common表示所定义代码块的路径-->
<div th:replace="common :: copy"></div>
<div th:include="common :: copy"></div>
<!--th:insert是在div中插入代码块,即多了一层div-->
<div>
<footer>
© 2011 The Good Thymes Virtual Grocery
</footer>
</div>
<!--th:replace是将代码块代替当前div,其html结构和之前一致-->
<footer>
© 2011 The Good Thymes Virtual Grocery
</footer>
<!--th:include是将代码块footer的内容插入到div中,即少了一层footer-->
<div>
© 2011 The Good Thymes Virtual Grocery
</div>
2.2.3 springBoot中使用thymeleaf
1、引入Starter
<!--thymeleaf-->
<dependency>
    <groupId>org.springframework.boot</groupId>
    <artifactId>spring-boot-starter-thymeleaf</artifactId>
</dependency>
2、springboot自动配置好了thymeleaf
@Configuration(proxyBeanMethods = false)
@EnableConfigurationProperties(ThymeleafProperties.class)
@ConditionalOnClass({ TemplateMode.class, SpringTemplateEngine.class })
@AutoConfigureAfter({ WebMvcAutoConfiguration.class, WebFluxAutoConfiguration.class })
public class ThymeleafAutoConfiguration { }
Thymeleaf的自动配置类:ThymeleafProperties

我们可以在其中看到默认的前缀和后缀! 我们只需要把我们的html页面放在类路径下的templates下,thymeleaf就可以帮我们自动渲染了。
3、代码示例
<!DOCTYPE html>
<html lang="en" xmlns:th="http://www.thymeleaf.org">
<head>
    <meta charset="UTF-8">
    <title>Title</title>
</head>
<body>
<h1 th:text="${msg}">哈哈</h1>
<a th:href="@{/link}">去百度2</a>
<table >
    <tr>
        <th>#</th>
        <th>用户名</th>
        <th>密码</th>
    </tr>
    <tr class="gradeX" th:each="user,status:${users}">
        <td th:text="${status.count}">Trident</td>
        <td th:text="${user.userName}"></td>
        <td>[[${user.password}]]</td>
    </tr>
</table>
</body>
</html>
Controller方法:
@Controller
public class ViewTestController {

    @RequestMapping("hello")
    public String goSuccess(Model model){
        //model中的数据会被放在请求域中 request.setAttribute("a",aa)
        model.addAttribute("msg","你好");
        model.addAttribute("link","https://www.baidu.com");
        //表格内容的遍历
        List<User> users = Arrays.asList(new User("zhangsan", "123456"),
                new User("lisi", "123444"),
                new User("haha", "aaaaa"),
                new User("hehe ", "aaddd"));
        model.addAttribute("users", users);
        return "success";
    }
}
结果:

三、拦截器
3.1 拦截器的使用
- 用户可以自定义拦截器来实现特定的功能,
自定义的拦截器必须实现HandlerInterceptor接口preHandle(request,response,Object handler):这个方法在业务处理器处理请求之前被调用,在该方法中对用户请求 request 进行处理。如果程序员决定该拦截器对请求进行拦截处理后还要调用其他的拦截器,或者是业务处理器去进行处理,则返回true;如果程序员决定不需要再调用其他的组件去处理请求,则返回false。postHandle(request,response, Object handler,modelAndView):这个方法在业务处理器处理完请求后,但是DispatcherServlet 向客户端返回响应前被调用,在该方法中对用户请求request进行处理。该方法参数中包含 ModelAndView,所以该方法可以修改处理器方法的处理结果数据,且可以修改跳转方向afterCompletion(request,response, Object handler, Exception ex):这个方法在 DispatcherServlet完全处理完请求后被调用,可以在该方法中进行一些资源清理的操作。
即:
preHandle:在目标方法运行之前调用;返回boolean;return true;(chain.doFilter())放行; return false;不放行
postHandle:在目标方法运行之后调用:目标方法调用之后
afterCompletion:在请求整个完成之后;来到目标页面之后;chain.doFilter()放行;资源响应之后;
代码示例:(以登录检查功能为例)
- 实现HandlerInterceptor接口
/**
 * 登录检查
 * 1、配置好拦截器要拦截哪些请求
 * 2、把这些配置放在容器中
 */
@Slf4j
public class LoginInterceptor implements HandlerInterceptor {
    /**
     * 目标方法执行之前
     * @param request
     * @param response
     * @param handler
     * @return
     * @throws Exception
     */
    @Override
    public boolean preHandle(HttpServletRequest request, HttpServletResponse response, Object handler) throws Exception {
        String requestURI = request.getRequestURI();
        log.info("拦截的请求路径是:"+requestURI);

        //登录检查逻辑
        HttpSession session = request.getSession();

        Object loginUser = session.getAttribute("loginUser");
        if(loginUser != null){
            //放行
            return true;
        }
        //拦截住,未登录跳转到登录页面
//        response.sendRedirect("/");
        session.setAttribute("msg","请先登录");
        request.getRequestDispatcher("/").forward(request,response);
        return false;
    }

    /**
     * 目标方法执行完成以后
     * @param request
     * @param response
     * @param handler
     * @param modelAndView
     * @throws Exception
     */
    @Override
    public void postHandle(HttpServletRequest request, HttpServletResponse response, Object handler, ModelAndView modelAndView) throws Exception {
        log.info("postHandle执行{}",modelAndView);
    }

    /**
     * 页面渲染以后
     * @param request
     * @param response
     * @param handler
     * @param ex
     * @throws Exception
     */
    @Override
    public void afterCompletion(HttpServletRequest request, HttpServletResponse response, Object handler, Exception ex) throws Exception {
        log.info("afterCompletion执行异常{}",ex);
    }
}
- 将配置好的拦截器放到容器里
/**
 * 1、编写一个拦截器实现HandlerInterceptor接口
 * 2、拦截器注册到容器中(实现WebMvcConfigurer的addInterceptors)
 * 3、指定拦截规则【如果是拦截所有,静态资源也会被拦截】
 *
 */
@Configuration
public class AdminWebConfig implements WebMvcConfigurer { //定值web功能都需要实现该接口

    @Override
    public void addInterceptors(InterceptorRegistry registry) {
        registry.addInterceptor(new LoginInterceptor())
                .addPathPatterns("/**") //所有请求都被拦截包括静态资源
                .excludePathPatterns("/","/login","/css/**","/fonts/**","/images/**",
                        "/js/**","/aa/**"); //放行的请求

    }
}
注意:拦截器对于静态资源也会拦截,所以需要我们排除静态资源的路径
3.2 拦截器方法执行顺序
-
当个拦截器正常的执行顺序


正常运行流程:
拦截器的preHandle------目标方法-----拦截器postHandle-----页面-------拦截器的afterCompletion; -
多拦截器正常执行
——数据响应模板引擎拦截器文件上传和异常处理(未完成)的主要内容,如果未能解决你的问题,请参考以下文章</p>
</article> </div> </div> </div> </section>
</div>
</div>
<script type=)