Android 使用Kotlin来实现水波纹的自定义View
Posted Adan0520
tags:
篇首语:本文由小常识网(cha138.com)小编为大家整理,主要介绍了Android 使用Kotlin来实现水波纹的自定义View相关的知识,希望对你有一定的参考价值。
这篇文章比较简单,主要是记录一下自定义View实现水波纹。
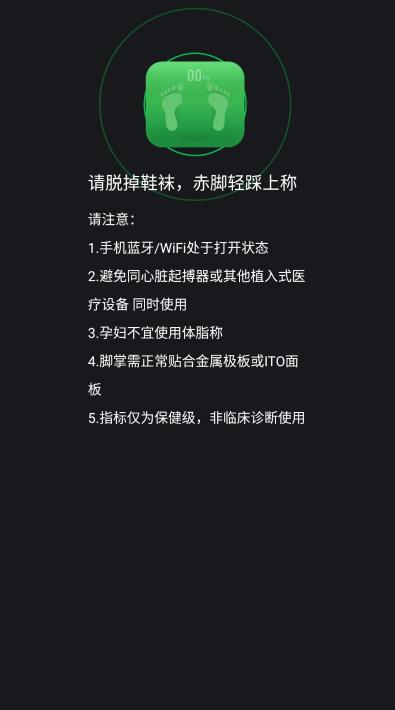
按照惯例,先来看看效果图

一、先总结下自定义View的步骤:
1、自定义View的属性
2、在View的构造方法中获得我们自定义的属性
3、重写onMesure
4、重写onDraw
其中onMesure方法不一定要重写,但大部分情况下还是需要重写的
二、View 的几个构造函数
1、constructor(mContext: Context)
—>java代码直接new一个PPScaleRippleView实例的时候,会调用这个只有一个参数的构造函数;
2、constructor(mContext: Context, attrs: AttributeSet)
—>在默认的XML布局文件中创建的时候调用这个有两个参数的构造函数。AttributeSet类型的参数负责把XML布局文件中所自定义的属性通过AttributeSet带入到View内;
3、constructor(mContext: Context, attrs: AttributeSet,defStyleAttr:Int)
—>构造函数中第三个参数是默认的Style,这里的默认的Style是指它在当前Application或者Activity所用的Theme中的默认Style,且只有在明确调用的时候才会调用
4、constructor(mContext: Context, attrs: AttributeSet,defStyleAttr:Int,defStyleRes:Int)
—>该构造函数是在API21的时候才添加上的
三、下面就是我们的代码实现
1、布局文件
<?xml version="1.0" encoding="utf-8"?>
<RelativeLayout xmlns:android="http://schemas.android.com/apk/res/android"
    android:layout_width="match_parent"
    android:layout_height="match_parent"
    android:gravity="center_horizontal"
    android:background="#18191D">

    <co.per.rippleviewdome.PPScaleRippleView
        android:id="@+id/layout_ripple"
        android:layout_width="220dp"
        android:layout_height="220dp"
        android:layout_gravity="center_horizontal"
        android:background="#18191D">

        <ImageView
            android:id="@+id/iv_plus"
            android:layout_width="102dp"
            android:layout_height="88dp"
            android:layout_centerInParent="true"
            android:src="@mipmap/ico_ppscale_measure" />

    </co.per.rippleviewdome.PPScaleRippleView>

    <TextView
        android:id="@+id/tv_title"
        android:layout_width="wrap_content"
        android:layout_height="wrap_content"
        android:layout_marginTop="177dp"
        android:text="请脱掉鞋袜,赤脚轻踩上称"
        android:textColor="@android:color/white"
        android:textSize="18dp" />

    <TextView
        android:id="@+id/tv_content"
        android:layout_width="227dp"
        android:layout_height="wrap_content"
        android:layout_marginTop="16dp"
        android:lineSpacingExtra="8dp"
        android:layout_below="@+id/tv_title"
        android:text="请注意: \\n1.手机蓝牙/WiFi处于打开状态 \\n2.避免同心脏起搏器或其他植入式医疗设备 同时使用 \\n3.孕妇不宜使用体脂称 \\n4.脚掌需正常贴合金属极板或ITO面板 \\n5.指标仅为保健级,非临床诊断使用"
        android:textColor="@android:color/white"
        android:textSize="14dp" />

</RelativeLayout>
2、自定义View:PPScaleRippleView
package co.per.rippleviewdome

import android.content.Context
import android.content.res.Resources
import android.graphics.*
import android.util.AttributeSet
import android.view.WindowManager
import android.widget.RelativeLayout

/**
 * 水波纹动画引导view
 * Created by juan on 2021/07/17.
 */
class PPScaleRippleView @JvmOverloads constructor(
    context: Context?,
    attrs: AttributeSet? = null,
    defStyleAttr: Int = 0
) :
    RelativeLayout(context, attrs, defStyleAttr), Runnable {
    private val mMinRadius = dpToPx(52f) //半径
    private val mMaxRadius = dpToPx(248f) / 2 - mMinRadius
    private val mInterval = 120
    private var count = 0
    private var mCacheBitmap: Bitmap? = null
    private var mRipplePaint: Paint? = null
    private var mArcPath: Path? = null
    private fun init() {
        mRipplePaint = Paint()
        mRipplePaint!!.isAntiAlias = true
        mRipplePaint!!.style = Paint.Style.STROKE
        mRipplePaint!!.color = Color.parseColor("#0BB852")
        mRipplePaint!!.strokeWidth = 4f
        mArcPath = Path()
    }

    /**
     * view大小变化时系统调用
     *
     * @param w
     * @param h
     * @param oldw
     * @param oldh
     */
    override fun onSizeChanged(w: Int, h: Int, oldw: Int, oldh: Int) {
        super.onSizeChanged(w, h, oldw, oldh)
        if (mCacheBitmap != null) {
            mCacheBitmap!!.recycle()
            mCacheBitmap = null
        }
    }

    override fun onDraw(canvas: Canvas) {
        //获取中间图片view
        val mPlusChild = getChildAt(0)

        //获取中间图片大小
        val pw = mPlusChild.width
        val ph = mPlusChild.height
        if (ph == 0) return

        //中间图片中心点坐标
        val px = mPlusChild.x + pw / 2
        val py = mPlusChild.y + ph / 2
        if (mCacheBitmap == null) {
            mCacheBitmap = Bitmap.createBitmap(width, height, Bitmap.Config.ARGB_8888)
            val cv = Canvas(mCacheBitmap!!)
            super.onDraw(cv)

            //清空所有已经画过的path至原始状态
            mArcPath!!.reset()

            //起始轮廓点移至x,y坐标点,即中间图片正下方再往下20位置
            mArcPath!!.moveTo(px, py + mMinRadius)
            //0~255,数值越小越透明
            mRipplePaint!!.alpha = 255
            cv.drawPath(mArcPath!!, mRipplePaint!!)
        }

        //保存画布当前的状态
        val save = canvas.save()
        var step = count
        while (step <= mMaxRadius) {

            //step越大越靠外就越透明
            mRipplePaint!!.alpha = 255 * (mMaxRadius - step) / mMaxRadius
            canvas.drawCircle(px, py, (mMinRadius + step).toFloat(), mRipplePaint!!)
            step += mInterval
        }
        //恢复Canvas的状态
        canvas.restoreToCount(save)
        //延迟80毫秒后开始运行
        postDelayed(this, 5)
    }

    override fun run() {
        //把run对象的引用从队列里拿出来,这样,他就不会执行了,但 run 没有销毁
        removeCallbacks(this)
        count += 2
        count %= mInterval
        invalidate() //重绘
    }

    /**
     * 销毁view时调用,收尾工作
     */
    override fun onDetachedFromWindow() {
        super.onDetachedFromWindow()
        if (mCacheBitmap != null) {
            mCacheBitmap!!.recycle()
            mCacheBitmap = null
        }
    }

    companion object {
        /**
         * dp转换为px
         */
        fun dpToPx(dp: Float): Int {
            return (dp * Resources.getSystem().displayMetrics.density + 0.5f).toInt()
        }

        fun getScreenWidth(context: Context): Int {
            return (context.getSystemService(Context.WINDOW_SERVICE) as WindowManager).defaultDisplay.width
        }
    }

    init {
        init()
    }
}
以上是关于Android 使用Kotlin来实现水波纹的自定义View的主要内容,如果未能解决你的问题,请参考以下文章