Java SSM 项目实战 day04 功能介绍,订单的操作,订单的增删改查,实现登录功能
Posted 蓝盒子bluebox
tags:
篇首语:本文由小常识网(cha138.com)小编为大家整理,主要介绍了Java SSM 项目实战 day04 功能介绍,订单的操作,订单的增删改查,实现登录功能相关的知识,希望对你有一定的参考价值。
一、创建数据库
1、用户表
1.1.1 用户表信息描述users

1.1.2 sql语句
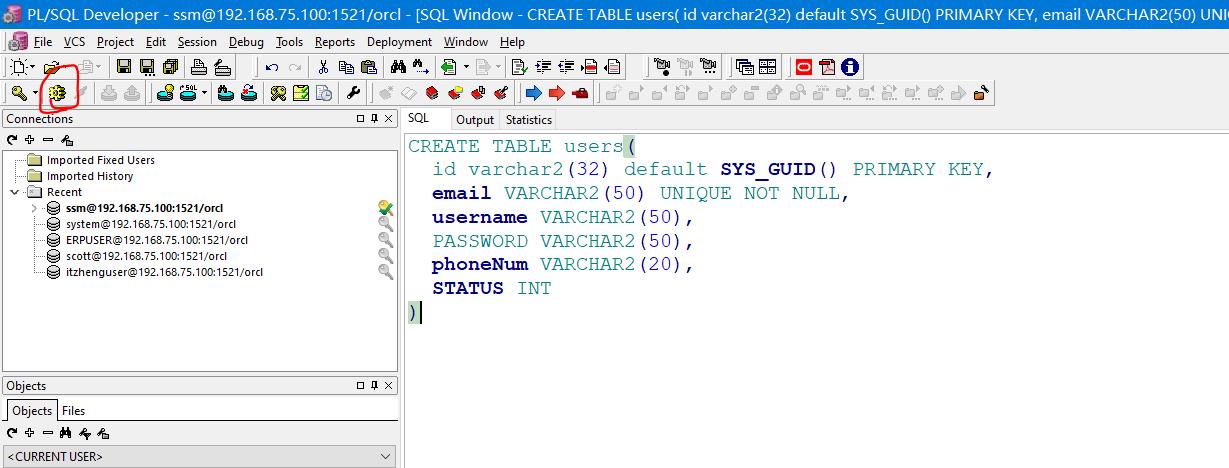
CREATE TABLE users(
  id varchar2(32) default SYS_GUID() PRIMARY KEY,
  email VARCHAR2(50) UNIQUE NOT NULL,
  username VARCHAR2(50),
  PASSWORD VARCHAR2(50),
  phoneNum VARCHAR2(20),
  STATUS INT
)
1.2 角色表
1.2.1 角色表信息描述role
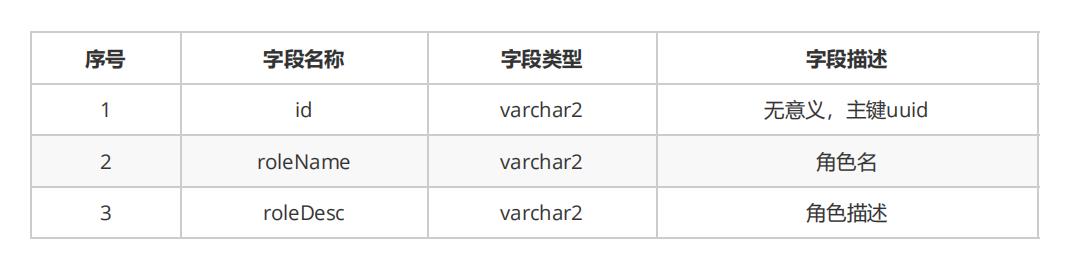
1.2.2 sql语句

CREATE TABLE role(
  id varchar2(32) default SYS_GUID() PRIMARY KEY,
   roleName VARCHAR2(50) ,
   roleDesc VARCHAR2(50)
)
1.2.4 用户与角色关联关系
用户与角色之间是多对多关系,我们通过user_role表来描述其关联,在实体类中User中存在List,在Role中有List.
而角色与权限之间也存在关系,我们会在后面介绍。

CREATE TABLE users_role(

    userId varchar2(32),
    roleId varchar2(32),
    PRIMARY KEY(userId,roleId),
    FOREIGN KEY (userId) REFERENCES users(id),
    FOREIGN KEY (roleId) REFERENCES role(id)

)
1.3 资源权限表
1.3.1 权限资源表描述permission

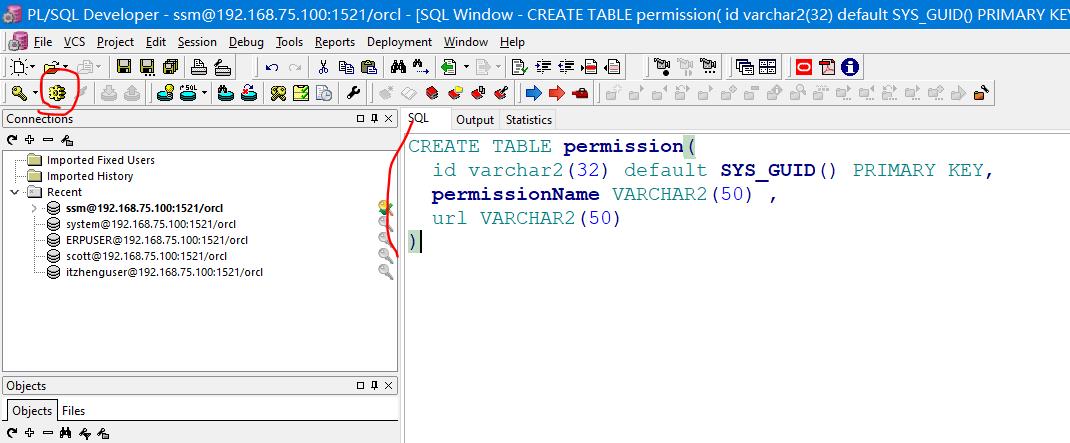
CREATE TABLE permission(
  id varchar2(32) default SYS_GUID() PRIMARY KEY,
  permissionName VARCHAR2(50) ,
  url VARCHAR2(50)
)
1.3.4.权限资源与角色关联关系
权限资源与角色是多对多关系,我们使用role_permission表来描述。在实体类Permission中存在List,在Role类中
有List
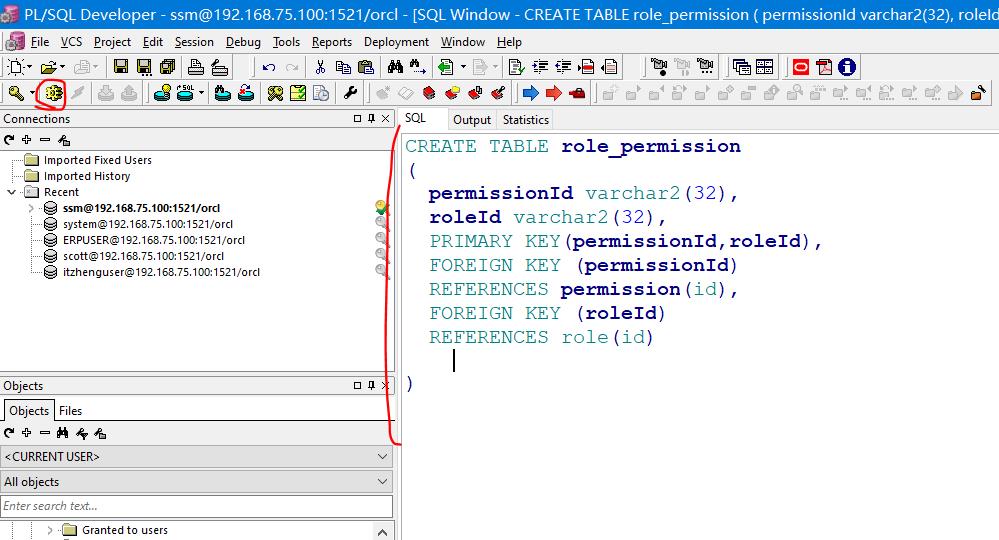
CREATE TABLE role_permission
(
  permissionId varchar2(32),
  roleId varchar2(32),
  PRIMARY KEY(permissionId,roleId),
  FOREIGN KEY (permissionId)
  REFERENCES permission(id),
  FOREIGN KEY (roleId)
  REFERENCES role(id)

)
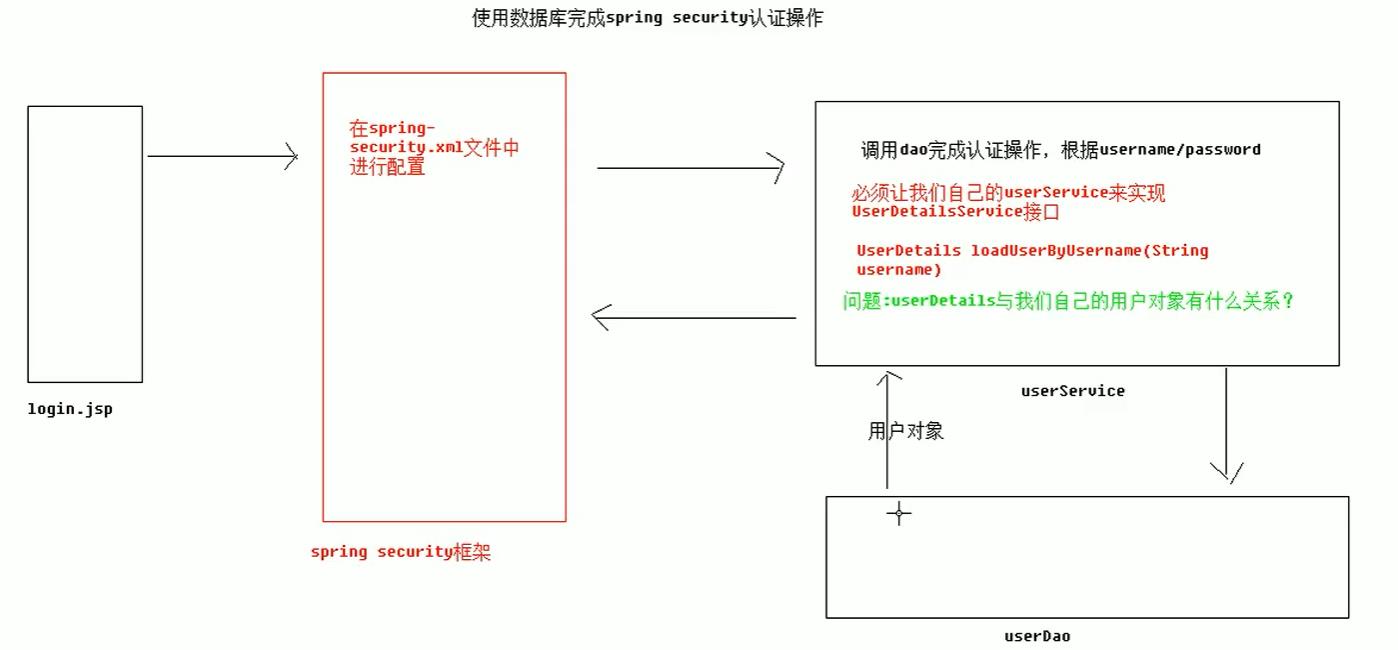
二、Spring Security
2.1 Spring Security介绍
Spring Security 的前身是 Acegi Security ,是 Spring 项目组中用来提供安全认证服务的框架。
(https://projects.spring.io/spring-security/) Spring Security 为基于J2EE企业应用软件提供了全面安全服务。特别
是使用领先的J2EE解决方案-Spring框架开发的企业软件项目。
人们使用Spring Security有很多种原因,不过通常吸引他们的是在J2EE Servlet规范或EJB规范中找不到典型企业应用场景的解决方案。 特别要指出的是他们不能再
WAR 或 EAR 级别进行移植。
这样,如果你更换服务器环境,就要,在新的目标环境进行大量的工作,对你的应用
系统进行重新配 置安全。
使用Spring Security 解决了这些问题,也为你提供很多有用的,完全可以指定的其他安
全特性。 安全包括两个主要操作。
“认证”,是为用户建立一个他所声明的主体。主题一般式指用户,设备或可以在你系 统中执行动作的其他系
统。
“授权”指的是一个用户能否在你的应用中执行某个操作,在到达授权判断之前,身份的主题已经由 身份验证
过程建立了。
这些概念是通用的,不是Spring Security特有的。
在身份验证层面,Spring Security广泛支持各种身份验证模式,
这些验证模型绝大多数都由第三方提供,或则正在开发的有关标准机构提供的,例如 Internet Engineering Task
Force.作为补充,Spring Security 也提供了自己的一套验证功能。
Spring Security 目前支持认证一体化如下认证技术:
HTTP BASIC authentication headers (一个基于IEFT RFC 的
标准) HTTP Digest authentication headers (一个基于IEFT RFC 的标准)
HTTP X.509 client certificate exchange
(一个基于IEFT RFC 的标准) LDAP (一个非常常见的跨平台认证需要做法,特别是在大环境)
Form-based
authentication (提供简单用户接口的需求) OpenID authentication Computer Associates Siteminder JA-SIG
Central Authentication Service (CAS,这是一个流行的开源单点登录系统) Transparent authentication context
propagation for Remote Method Invocation and HttpInvoker (一个Spring远程调用协议)
二、实现登录工程
1、创建login.jsp
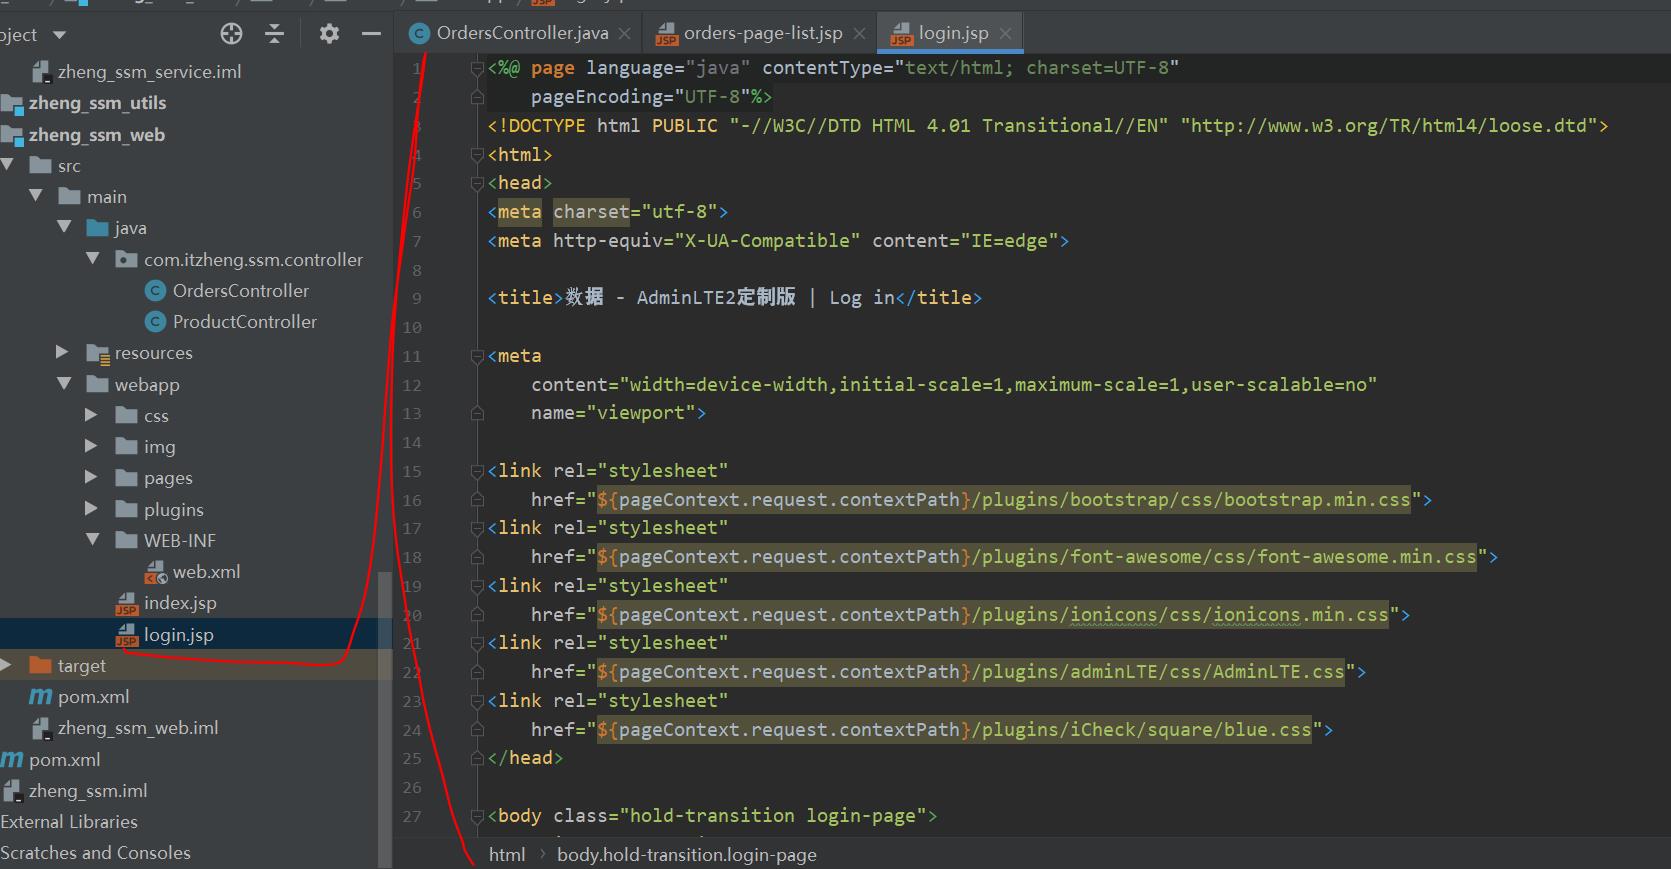
<%@ page language="java" contentType="text/html; charset=UTF-8"
	pageEncoding="UTF-8"%>
<!DOCTYPE html PUBLIC "-//W3C//DTD HTML 4.01 Transitional//EN" "http://www.w3.org/TR/html4/loose.dtd">
<html>
<head>
<meta charset="utf-8">
<meta http-equiv="X-UA-Compatible" content="IE=edge">

<title>数据 - AdminLTE2定制版 | Log in</title>

<meta
	content="width=device-width,initial-scale=1,maximum-scale=1,user-scalable=no"
	name="viewport">

<link rel="stylesheet"
	href="${pageContext.request.contextPath}/plugins/bootstrap/css/bootstrap.min.css">
<link rel="stylesheet"
	href="${pageContext.request.contextPath}/plugins/font-awesome/css/font-awesome.min.css">
<link rel="stylesheet"
	href="${pageContext.request.contextPath}/plugins/ionicons/css/ionicons.min.css">
<link rel="stylesheet"
	href="${pageContext.request.contextPath}/plugins/adminLTE/css/AdminLTE.css">
<link rel="stylesheet"
	href="${pageContext.request.contextPath}/plugins/iCheck/square/blue.css">
</head>

<body class="hold-transition login-page">
	<div class="login-box">
		<div class="login-logo">
			<a href="all-admin-index.html"><b>ITCAST</b>后台管理系统</a>
		</div>
		<!-- /.login-logo -->
		<div class="login-box-body">
			<p class="login-box-msg">登录系统</p>

			<form action="${pageContext.request.contextPath}/login.do" method="post">
				<div class="form-group has-feedback">
					<input type="text" name="username" class="form-control"
						placeholder="用户名"> <span
						class="glyphicon glyphicon-envelope form-control-feedback"></span>
				</div>
				<div class="form-group has-feedback">
					<input type="password" name="password" class="form-control"
						placeholder="密码"> <span
						class="glyphicon glyphicon-lock form-control-feedback"></span>
				</div>
				<div class="row">
					<div class="col-xs-8">
						<div class="checkbox icheck">
							<label><input type="checkbox"> 记住 下次自动登录</label>
						</div>
					</div>
					<!-- /.col -->
					<div class="col-xs-4">
						<button type="submit" class="btn btn-primary btn-block btn-flat">登录</button>
					</div>
					<!-- /.col -->
				</div>
			</form>

			<a href="#">忘记密码</a><br>


		</div>
		<!-- /.login-box-body -->
	</div>
	<!-- /.login-box -->

	<!-- jQuery 2.2.3 -->
	<!-- Bootstrap 3.3.6 -->
	<!-- iCheck -->
	<script
		src="${pageContext.request.contextPath}/plugins/jQuery/jquery-2.2.3.min.js"></script>
	<script
		src="${pageContext.request.contextPath}/plugins/bootstrap/js/bootstrap.min.js"></script>
	<script
		src="${pageContext.request.contextPath}/plugins/iCheck/icheck.min.js"></script>
	<script>
		$(function() {
			$('input').iCheck({
				checkboxClass : 'icheckbox_square-blue',
				radioClass : 'iradio_square-blue',
				increaseArea : '20%' // optional
			});
		});
	</script>
</body>

</html>
2、创建登录失败的页面:failer.jsp
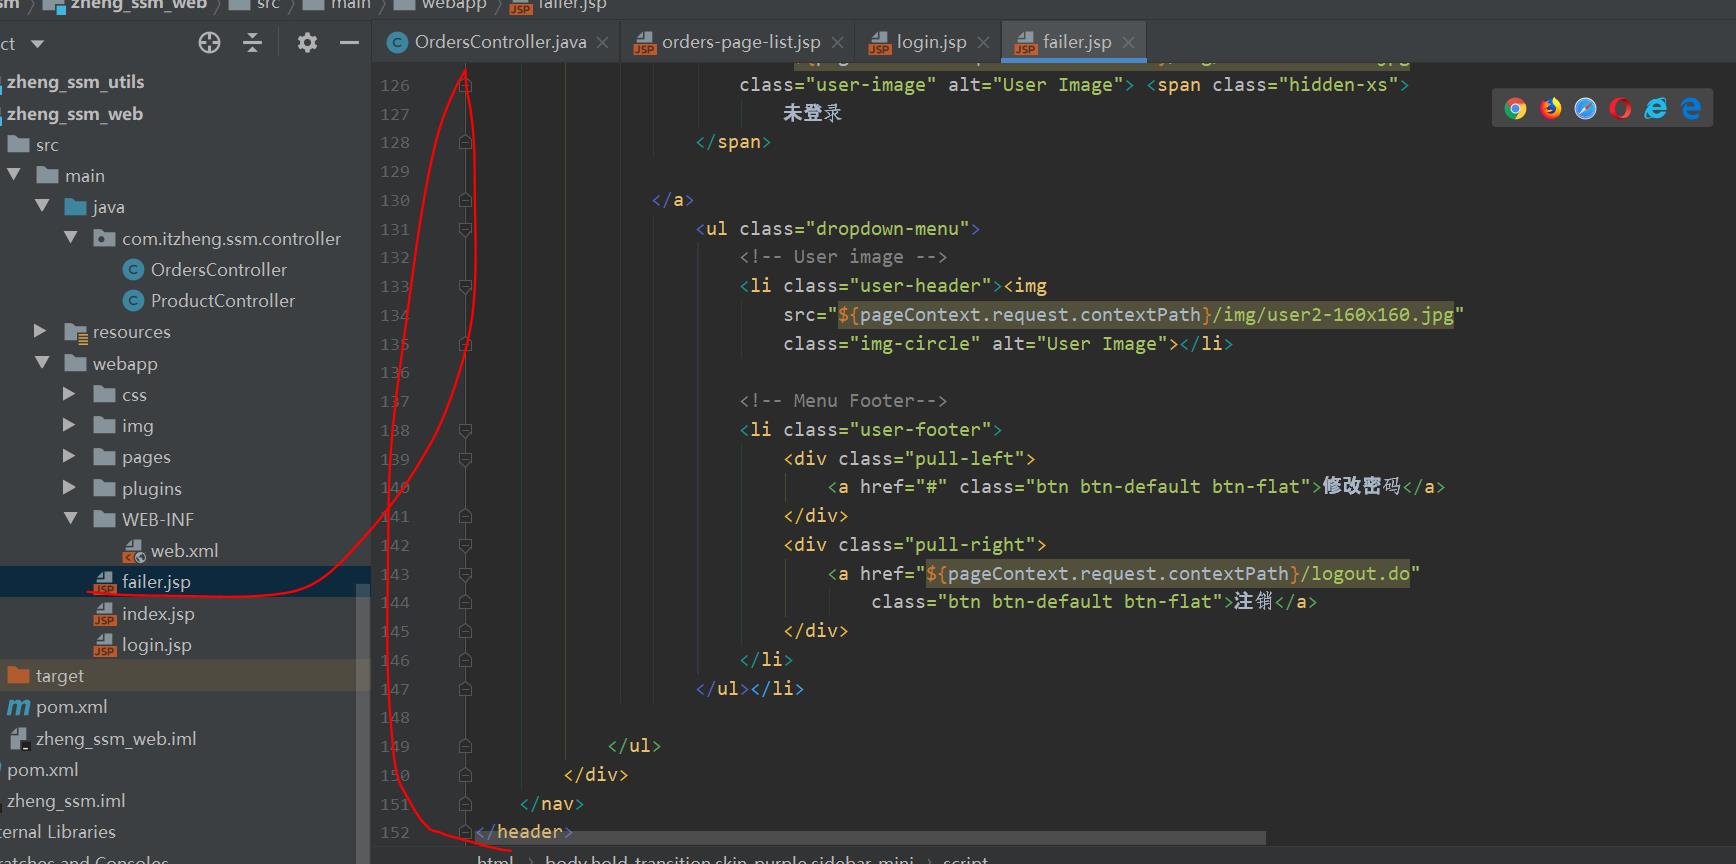
<%@ page language="java" contentType="text/html; charset=UTF-8"
	pageEncoding="UTF-8"%>
<!DOCTYPE html>
<html>

<head>
<!-- 页面meta -->
<meta charset="utf-8">
<meta http-equiv="X-UA-Compatible" content="IE=edge">

<title>数据 - AdminLTE2定制版</title>
<meta name="description" content="AdminLTE2定制版">
<meta name="keywords" content="AdminLTE2定制版">

<!-- Tell the browser to be responsive to screen width -->
<meta
	content="width=device-width,initial-scale=1,maximum-scale=1,user-scalable=no"
	name="viewport">

<!-- jQuery 2.2.3 -->
<!-- jQuery UI 1.11.4 -->
<!-- Resolve conflict in jQuery UI tooltip with Bootstrap tooltip -->
<!-- Bootstrap 3.3.6 -->
<!-- Morris.js charts -->
<!-- Sparkline -->
<!-- jvectormap -->
<!-- jQuery Knob Chart -->
<!-- daterangepicker -->
<!-- datepicker -->
<!-- Bootstrap WYSIHTML5 -->
<!-- Slimscroll -->
<!-- FastClick -->
<!-- iCheck -->
<!-- AdminLTE App -->
<!-- 表格树 -->
<!-- select2 -->
<!-- bootstrap color picker -->
<!-- bootstrap time picker -->
<!--<script src="${pageContext.request.contextPath}/${pageContext.request.contextPath}/${pageContext.request.contextPath}/plugins/timepicker/bootstrap-timepicker.min.js"></script>-->
<!-- Bootstrap WYSIHTML5 -->
<!--bootstrap-markdown-->
<!-- CK Editor -->
<!-- InputMask -->
<!-- DataTables -->
<!-- ChartJS 1.0.1 -->
<!-- FLOT CHARTS -->
<!-- FLOT RESIZE PLUGIN - allows the chart to redraw when the window is resized -->
<!-- FLOT PIE PLUGIN - also used to draw donut charts -->
<!-- FLOT CATEGORIES PLUGIN - Used to draw bar charts -->
<!-- jQuery Knob -->
<!-- Sparkline -->
<!-- Morris.js charts -->
<!-- Ion Slider -->
<!-- Bootstrap slider -->
<!-- 页面meta /-->

<link rel="stylesheet"
	href="${pageContext.request.contextPath}/plugins/bootstrap/css/bootstrap.min.css">
<link rel="stylesheet"
	href="${pageContext.request.contextPath}/plugins/font-awesome/css/font-awesome.min.css">
<link rel="stylesheet"
	href="${pageContext.request.contextPath}/plugins/ionicons/css/ionicons.min.css">
<link rel="stylesheet"
	href="${pageContext.request.contextPath}/plugins/iCheck/square/blue.css">
<link rel="stylesheet"
	href="${pageContext.request.contextPath}/plugins/morris/morris.css">
<link rel="stylesheet"
	href="${pageContext.request.contextPath}/plugins/jvectormap/jquery-jvectormap-1.2.2.css">
<link rel="stylesheet"
	href="${pageContext.request.contextPath}/plugins/datepicker/datepicker3.css">
<link rel="stylesheet"
	href="${pageContext.request.contextPath}/plugins/daterangepicker/daterangepicker.css">
<link rel="stylesheet"
	href="${pageContext.request.contextPath}/plugins/bootstrap-wysihtml5/bootstrap3-wysihtml5.min.css">
<link rel="stylesheet"
	href="${pageContext.request.contextPath}/plugins/datatables/dataTables.bootstrap.css">
<link rel="stylesheet"
	href="${pageContext.request.contextPath}/plugins/treeTable/jquery.treetable.css">
<link rel="stylesheet"
	href="${pageContext.request.contextPath}/plugins/treeTable/jquery.treetable.theme.default.css">
<link rel="stylesheet"
	href="${pageContext.request.contextPath}/plugins/select2/select2.css">
<link rel="stylesheet"
	href="${pageContext.request.contextPath}/plugins/colorpicker/bootstrap-colorpicker.min.css">
<link rel="stylesheet"
	href="${pageContext.request.contextPath}/plugins/bootstrap-markdown/css/bootstrap-markdown.min.css">
<link rel="stylesheet"
	href="${pageContext.request.contextPath}/plugins/adminLTE/css/AdminLTE.css">
<link rel="stylesheet"
	href="${pageContext.request.contextPath}/plugins/adminLTE/css/skins/_all-skins.min.css">
<link rel="stylesheet"
	href="${pageContext.request.contextPath}/css/style.css">
<link rel="stylesheet"
	href="${pageContext.request.contextPath}/plugins/ionslider/ion.rangeSlider.css">
<link rel="stylesheet"
	href="${pageContext.request.contextPath}/plugins/ionslider/ion.rangeSlider.skinNice.css">
<link rel="stylesheet"
	href="${pageContext.request.contextPath}/plugins/bootstrap-slider/slider.css">
</head>

<body class="hold-transition skin-purple sidebar-mini">

	<div class="wrapper">

		<!-- 页面头部 -->
		<!-- 页面头部 -->
<header class="main-header">
	<!-- Logo -->
	<a href="all-admin-index.html" class="logo"> <!-- mini logo for sidebar mini 50x50 pixels -->
		<span class="logo-mini"><b>数据</b></span> <!-- logo for regular state and mobile devices -->
		<span class="logo-lg"><b>数据</b>后台管理</span>
	</a>
	<!-- Header Navbar: style can be found in header.less -->
	<nav class="navbar navbar-static-top">
		<!-- Sidebar toggle button-->
		<a href="#" class="sidebar-toggle" data-toggle="offcanvas"
			role="button"> <span class="sr-only">Toggle navigation</span>
		</a>

		<div class="navbar-custom-menu">
			以上是关于Java SSM 项目实战 day04 功能介绍,订单的操作,订单的增删改查,实现登录功能的主要内容,如果未能解决你的问题,请参考以下文章