关于从入门three.js到做出3d地球这件事(第三篇: 光与影)
Posted lulu_up
tags:
篇首语:本文由小常识网(cha138.com)小编为大家整理,主要介绍了关于从入门three.js到做出3d地球这件事(第三篇: 光与影)相关的知识,希望对你有一定的参考价值。
关于从入门three.js到做出3d地球这件事(第三篇: 光与影)
本篇介绍
通过前面几篇我们了解了坐标系、相机、物体等概念, 这一篇我们要让3d世界里的物体, 更像我们的现实世界的物体, 我们要为3d世界绘制光与影。
1. 高级材料
如果你看过前两篇文章, 你会发现在生成物体材质的时候我们用的是MeshBasicMaterial, basic这单词意思是基本的,那也就是说与其相对还会有高级属性, MeshLambertMaterial就是高级属性中的一种。
使用这个属性创建出来的物体, 会产生暗淡不光亮的表面(你可以理解为需要光照时, 它的颜色才会被看到), 本篇我们一起看看它的神奇之处。
2. 物体、墙面、地面
绘制光源之前, 我们先搭建一套环境, 这个环境很简单有物体、墙面、地面, 我们通过上一篇已经学过如何绘制一个长方体, 那么我们就以薄薄的长方体作为墙面, 最终效果如下。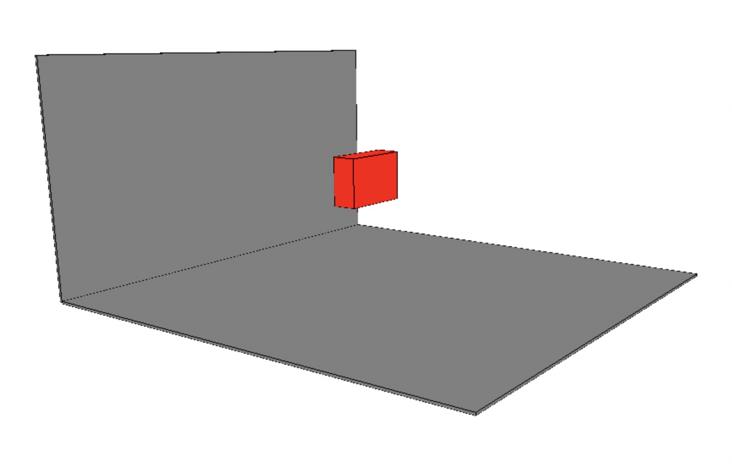
物体、墙面、地面他们身上会有辅助线, 这个是使用的:
const edges = new THREE.BoxHelper(cube, 0x00000);
scene.add(edges);BoxHelper给立方体设置边框。cube需要设置边框的物体, 后面紧跟着边框的颜色。edges将实例放入场景中。
全部代码如下(../utils/OrbitControls.js的内容在我笔记里):
<html>
<body>
    <script src="https://cdn.bootcdn.net/ajax/libs/three.js/r122/three.min.js"></script>
    <script src="../utils/OrbitControls.js"></script>
    <script>
        const scene = new THREE.Scene();
        const camera = new THREE.PerspectiveCamera(35, window.innerWidth / window.innerHeight, 1, 1000);
        camera.position.z = 40;
        const renderer = new THREE.WebGLRenderer();
        renderer.setSize(window.innerWidth, window.innerHeight);
        renderer.setClearColor(0xffffff)
        orbitControls = new THREE.OrbitControls(camera, renderer.domElement);
        document.body.appendChild(renderer.domElement);

        const cube = initCube({
            color: \'red\',
            len: [1, 2, 3],
            position: [-0.5, 5, 1.5]
        })
        const wall = initCube({
            color: \'gray\',
            len: [0.1, 10, 20],
            position: [-10.1, 5, 0]
        })
        const land = initCube({
            color: \'gray\',
            len: [20, 0.1, 20],
            position: [0, 0, 0]
        })
        scene.add(cube);
        scene.add(wall);
        scene.add(land);

        var animate = function () {
            requestAnimationFrame(animate);
            renderer.render(scene, camera);
        };
        animate();

        function initCube(options) {
            const geometry = new THREE.BoxGeometry(...options.len);
            const material = new THREE.MeshBasicMaterial({ color: options.color });
            const cube = new THREE.Mesh(geometry, material);
            cube.position.add(new THREE.Vector3(...options.position))
            scene.add(new THREE.BoxHelper(cube, 0x00000));
            return cube
        }
    </script>
</body>
</html>
代码与之前几篇的代码没什么区别, 就是封装了一个initCube方法来创建立方体。
当我们把代码里的MeshBasicMaterial替换为``时如图: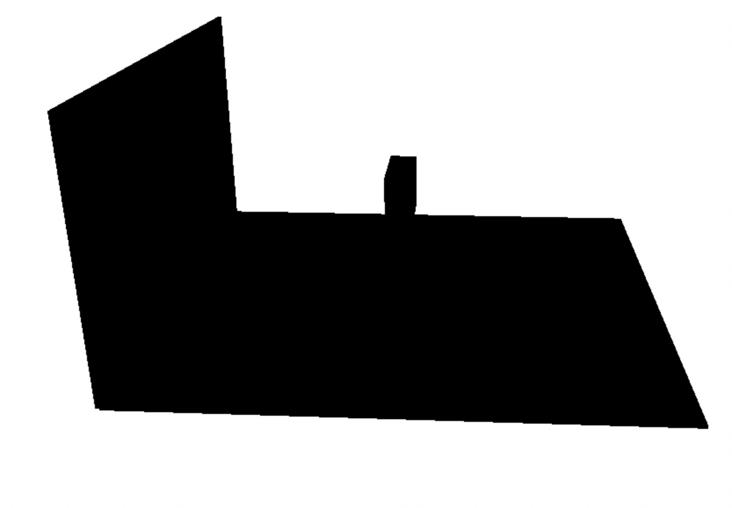
3. AmbientLight 自然光 or 环境光
我们的第一个主角终于登场了, 下面介绍把光源加入场景的方法。
const light = new THREE.AmbientLight(\'blue\');
scene.add(light)
new THREE.AmbientLight(\'blue\')生成实例时传入光的颜色, 上面是蓝色的光。- 放入场景中。
效果就变成了下面怪异的样子:
地面与墙壁变为了蓝色, 但是在蓝色的光照耀下红色的立方体却是黑色的。
光的颜色符合物理学
红色的物体不能反射蓝色的光, 灰色的物体却能反射蓝色的光。
- 自然光符合物理学, 不好计算。
- 自然光源没有特别的来源方向,不会产生阴影。
- 不能将其作为场景中唯一的光源, 但可以配合其他光源, 起到弱化阴影或给场景添加一些额外的颜色的作用。
- 自然光不需要指定位置它会应用到全局。
我们使用红光的时候: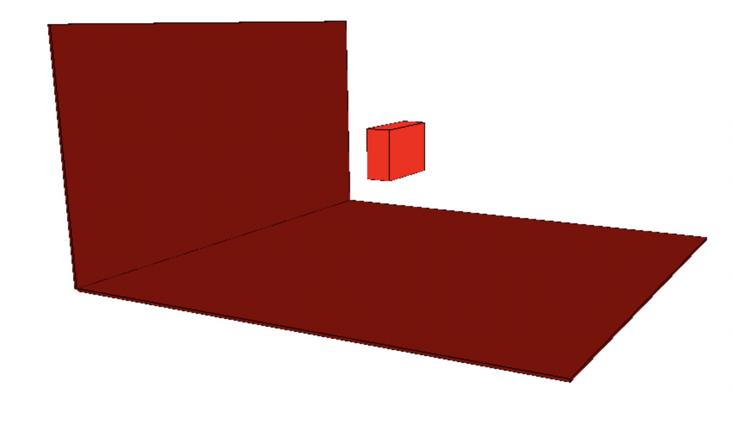
所以要记住, 一些文章说与自然光颜色不同的物体都变为黑色是错的!!!
4. PointLight点光源
顾名思义他是一个光点, 有人把它比喻成引火虫或是小灯泡, 它向四面八方发射光芒, 光源本身是不可见的所以在我们绘制的时候会在点光源的位置放置一个立方体表示其位置信息。
const light = new THREE.PointLight(\'white\');
light.intensity = 1.8;
light.distance = 30;
light.position.set(2, 8, -5);
scene.add(light)
点光源的属性介绍:
intensity光强, 想要成为最亮的星。distance光源照射的距离, 默认值为0也就是无限。visible布尔值, 是否打开光源。decay衰减值, 越大衰减速度越快。
面上代码的效果如图: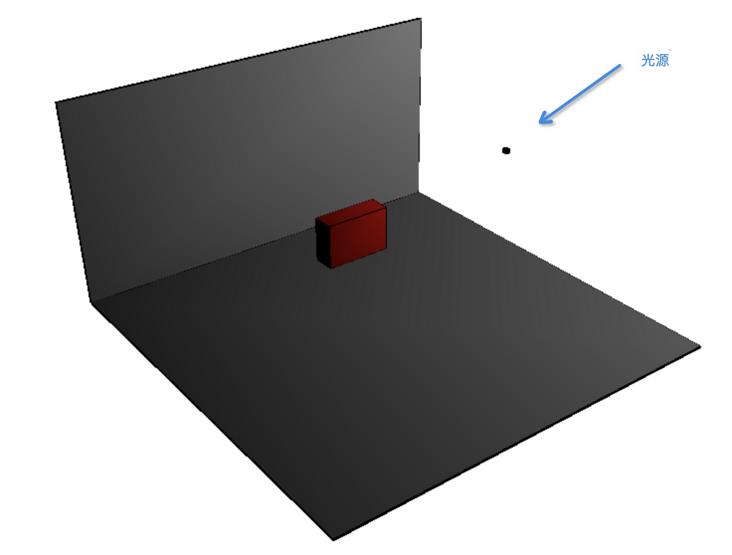
换个角度看看:
当我们把光强加大到3, 明显可以看到区别: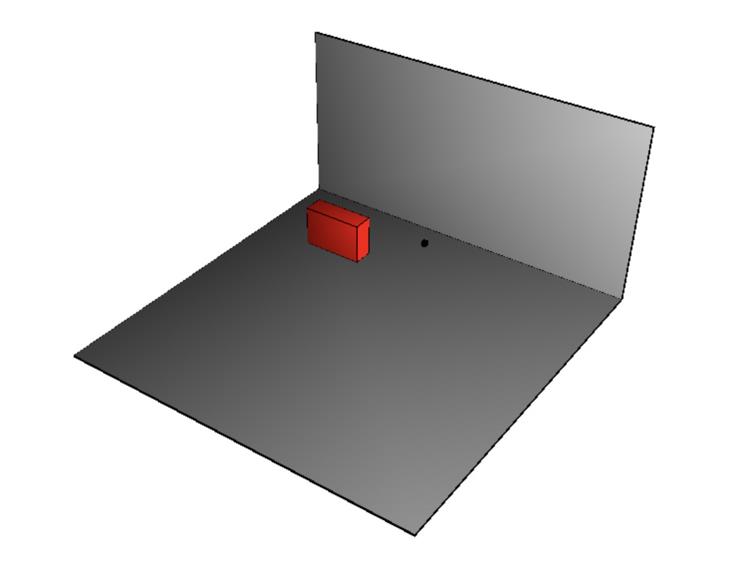
点光源照耀四面八方, 如果生成阴影的话计算量太大, 所以不建议开启阴影。
全部代码:
<html>

<body>
    <script src="https://cdn.bootcdn.net/ajax/libs/three.js/r122/three.min.js"></script>
    <script src="../utils/OrbitControls.js"></script>
    <script>
        const scene = new THREE.Scene();
        const camera = new THREE.PerspectiveCamera(35, window.innerWidth / window.innerHeight, 1, 1000);
        camera.position.z = 40;
        const renderer = new THREE.WebGLRenderer();
        renderer.setSize(window.innerWidth, window.innerHeight);
        renderer.setClearColor(0xffffff)
        orbitControls = new THREE.OrbitControls(camera, renderer.domElement);
        document.body.appendChild(renderer.domElement);

        const cube = initCube({
            color: \'red\',
            len: [1, 2, 3],
            position: [-0.5, 5, 1.5]
        })
        const wall = initCube({
            color: \'gray\',
            len: [0.1, 10, 20],
            position: [-10.1, 5, 0]
        })
        const land = initCube({
            color: \'gray\',
            len: [20, 0.1, 20],
            position: [0, 0, 0]
        })
        scene.add(cube);
        scene.add(wall);
        scene.add(land);

        const light = new THREE.PointLight(\'white\');
        light.intensity = 3; // 光强
        light.distance = 30; // 衰减距离
        light.position.set(2, 8, -5);
        scene.add(light)

        const edges = initCube({
            color: \'red\',
            len: [0.2, 0.2, 0.2],
            position: [2, 8, -5]
        })
        scene.add(edges);

        const animate = function () {
            requestAnimationFrame(animate);
            renderer.render(scene, camera);
        };
        animate();

        function initCube(options) {
            const geometry = new THREE.BoxGeometry(...options.len);
            const material = new THREE.MeshLambertMaterial({ color: options.color });
            const cube = new THREE.Mesh(geometry, material);
            cube.position.add(new THREE.Vector3(...options.position))
            scene.add(new THREE.BoxHelper(cube, 0x00000));
            return cube
        }
    </script>
</body>
</html>
5. 生成影子的定义
想要生成影子可不是那么简单的, 因为可想而知在数学方面影子的计算量必然很大的, 在three.js中物体是否可以显示影子是需要单独定义的。
第一步: 渲染器支持
如果使用的WebGLRender 渲染器, 需要如下开启渲染器支持。
const renderer = new THREE.WebGLRenderer();
renderer.shadowMap.enabled = true;
第二步: 为光设置可生成阴影属性
light.castShadow = true;第三步: 为物体设置可生成阴影属性
cube.castShadow = true;第四步: 为物体设置可接收阴影属性
cube.receiveShadow = true;这里注意了, 比如说a物体产生阴影, 阴影映在b物体上, 那么a与b都要设置上述的属性。
6. SpotLight 聚光灯(有方向的光)
这个光源是有方向的, 也就是说他可以指定照向谁, 并且可以产生阴影。
let light = new THREE.SpotLight("#ffffff");
    light.position.set(1, 1, 1);
    light.target = cube
    scene.add(light);
可配置的属性与上面的基本相似, 多了一个target:target指定照谁, target必须是一个THREE.Object3D对象, 所以我们经常会先创建一个Object3D对象, 让它不可见然后光源就可以通过照射它, 从而实现任意方向。
我们先看一下光源在上方照射, 下方物体产生阴影的效果:
7. SpotLight 模拟手电(锥形光)
开发中我们会用SpotLight模拟手电与灯光, 可以利用他的angle角度属性。
const light = new THREE.SpotLight("#ffffff");
scene.add(light);
当我们把背景颜色换成黑色的效果: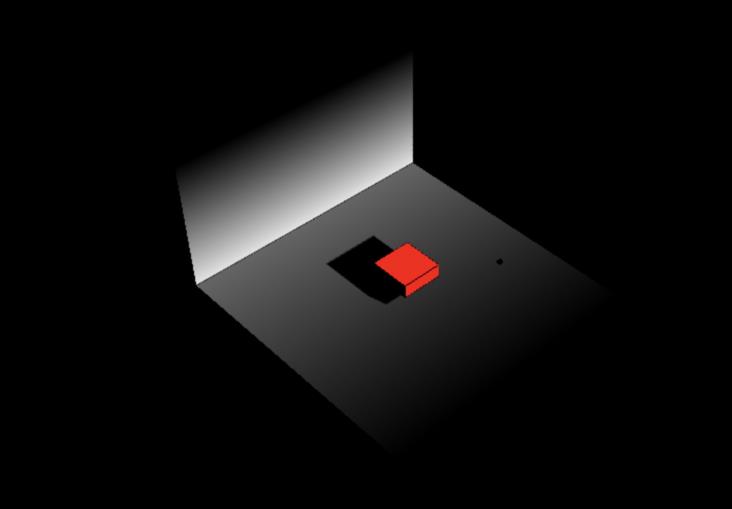
上图就如同黑夜里手电照射的效果了。
为了方便调试聚光灯,官方给了我们专属的辅助线。
const helper = new THREE.CameraHelper(light.shadow.camera);
    scene.add(helper);
下面我们标注一下都有哪些知识点:

重要的是有了这些辅助线我们就知道如何优化自己的项目了, 比如减小光源的远平面。
完整代码
<html>
<body>
    <script src="https://cdn.bootcdn.net/ajax/libs/three.js/r122/three.min.js"></script>
    <script src="../utils/OrbitControls.js"></script>
    <script>
        const scene = new THREE.Scene();
        const camera = new THREE.PerspectiveCamera(35, window.innerWidth / window.innerHeight, 1, 1000);
        camera.position.z = 40;
        const renderer = new THREE.WebGLRenderer();
        renderer.setSize(window.innerWidth, window.innerHeight);
        renderer.setClearColor(0xffffff)
        renderer.shadowMap.enabled = true;
        orbitControls = new THREE.OrbitControls(camera, renderer.domElement);
        document.body.appendChild(renderer.domElement);
        const cube = initCube({
            color: \'red\',
            len: [3, 1, 3],
            position: [0, 2, 0]
        })
        const wall = initCube({
            color: \'gray\',
            len: [0.1, 10, 20],
            position: [-10.1, 5, 0]
        })
        const land = initCube({
            color: \'gray\',
            len: [20, 0.1, 20],
            position: [0, 0, 0]
        })
        scene.add(cube);
        scene.add(wall);
        scene.add(land);
        const arr = [8, 8, 0]
        const light = new THREE.SpotLight("#ffffff", 1);
        light.intensity = 2.5;
        light.position.set(...arr);
        light.castShadow = true;
        light.target = cube
        light.decay = 2;
        light.distance = 350;
        light.angle = Math.PI / 5
        light.penumbra = 0.05;
        scene.add(light);
        // 聚光灯助手
        const helper = new THREE.CameraHelper(light.shadow.camera);
        scene.add(helper);
        const edges = initCube({
            color: \'red\',
            len: [0.2, 0.2, 0.2],
            position: [...arr]
        })
        scene.add(edges);

        const animate = function () {
            requestAnimationFrame(animate);
            renderer.render(scene, camera);
        };
        animate();

        function initCube(options) {
            const geometry = new THREE.BoxGeometry(...options.len);
            const material = new THREE.MeshLambertMaterial({ color: options.color });
            const cube = new THREE.Mesh(geometry, material);
            cube.castShadow = true;
            cube.receiveShadow = true;
            cube.position.add(new THREE.Vector3(...options.position))
            scene.add(new THREE.BoxHelper(cube, 0x00000));
            return cube
        }
    </script>
</body>
</html>
8. DirectionalLight 平型光
经常被举例子的就是太阳光, 实际上太阳光也不是平行的, 只是距离太远了几乎可以算是平行。
这个光源与其他的不同的点是, 他它所照耀的区域接收到的光强是一样的。
const light = new THREE.DirectionalLight("#ffffff");
scene.add(light);
介绍几个新属性:
light.shadow.camera.near = 5; //产生阴影的最近距离
light.shadow.camera.far = 50; //产生阴影的最远距离
light.shadow.camera.left = -3; //产生阴影距离位置的最左边位置
light.shadow.camera.right = 3; //最右边
light.shadow.camera.top = 3; //最上边
light.shadow.camera.bottom = -3; //最下面
通过上图我们可以得知, 这个光源是完全平行的。
完整代码如下:
<html
<body>
    <script src="https://cdn.bootcdn.net/ajax/libs/three.js/r122/three.min.js"></script>
    <script src="../utils/OrbitControls.js"></script>
    <script>
        const scene = new THREE.Scene();
        const camera = new THREE.PerspectiveCamera(35, window.innerWidth / window.innerHeight, 1, 1000);
        camera.position.z = 40;
        const renderer = new THREE.WebGLRenderer();
        renderer.setSize(window.innerWidth, window.innerHeight);
        renderer.setClearColor(0x000)
        renderer.shadowMap.enabled = true;
        orbitControls = new THREE.OrbitControls(camera, renderer.domElement);
        document.body.appendChild(renderer.domElement);

        const cube = initCube({
            color: \'red\',
            len: [3, 1, 3],
            position: [0, 2, 0]
        })
        const wall = initCube({
            color: \'gray\',
            len: [0.1, 10, 20],
            position: [-10.1, 5, 0]
        })
        const land = initCube({
            color: \'gray\',
            len: [20, 0.1, 20],
            position: [0, 0, 0]
        })
        scene.add(cube);
        scene.add(wall);
        scene.add(land);

        const light = new THREE.DirectionalLight("#ffffff");
        light.intensity = 1.5;
        light.position.set(8, 8, 0);
        light.castShadow = true;
        light.target = cube
        light.shadow.camera.near = 5; //产生阴影的最近距离
        light.shadow.camera.far = 50; //产生阴影的最远距离
        light.shadow.camera.left = -3; //产生阴影距离位置的最左边位置
        light.shadow.camera.right = 3; //最右边
        light.shadow.camera.top = 3; //最上边
        light.shadow.camera.bottom = -3; //最下面
        scene.add(light);
        // 聚光灯助手
        const helper = new THREE.CameraHelper(light.shadow.camera);
        scene.add(helper);

        const animate = function () {
            requestAnimationFrame(animate);
            renderer.render(scene, camera);
        };
        animate();

        function initCube(options) {
            const geometry = new THREE.BoxGeometry(...options.len);
            const material = new THREE.MeshLambertMaterial({ color: options.color });
            const cube = new THREE.Mesh(geometry, material);
            cube.castShadow = true;
            cube.receiveShadow = true;
            cube.position.add(new THREE.Vector3(...options.position))
            scene.add(new THREE.BoxHelper(cube, 0x00000));
            return cube
        }
    </script>
</body>
</html>
9. 光源要配合使用
一般情况下不会只有单一光源, 比如我们会先放一个环境光, 然后在灯的模型中放上其他光源, 一些rpg游戏会用聚光灯处理用户视角。
我们可以同时使用多个光源, 利用gui.js查看各种绚丽的效果, 比如我们可以用束平型光模拟舞台效果。
end.
下章会从绘制一个木块开始, 最后绘制一个贴图地球, 这次就是这样希望与你一起进步。
以上是关于关于从入门three.js到做出3d地球这件事(第三篇: 光与影)的主要内容,如果未能解决你的问题,请参考以下文章