初识Spring源码 -- 属性填充populateBean | 静态属性注入
Posted 做猪呢,最重要的是开森啦
tags:
篇首语:本文由小常识网(cha138.com)小编为大家整理,主要介绍了初识Spring源码 -- 属性填充populateBean | 静态属性注入相关的知识,希望对你有一定的参考价值。
0. 举个栗子:
@Component
public class SetterBean {
    @Autowired
    private BeanService beanService;

    @Autowired
    public void setBean() {
        BeanServiceImpl bean = new BeanServiceImpl();
        bean.setName("WTF");
        beanService = bean;
    }
}

@Configuration
public class ConfigurationBean {

    @Bean
    public BeanService beanService() {
        BeanServiceImpl beanService = new BeanServiceImpl();
        beanService.setName("zhangsan");
        return beanService;
    }
}
2. populateBean:
主要源码入口:org.springframework.beans.factory.support.AbstractAutowireCapableBeanFactory#doCreateBean
至此,doCreateBean经历以下步骤:
- 实例化bean
- applyMergedBeanDefinitionPostProcessors进行属性和方法的预解析
- addSingletonFactory引入三级缓存
- populateBean属性填充
protected Object doCreateBean(String beanName, RootBeanDefinition mbd, @Nullable Object[] args)
		throws BeanCreationException {
	... ... ...
	// 这块是提前暴露bean,引入三级缓存,解决循环依赖的,这里不做叙述
	boolean earlySingletonExposure = (mbd.isSingleton() && this.allowCircularReferences &&
			isSingletonCurrentlyInCreation(beanName));
	if (earlySingletonExposure) {
		if (logger.isTraceEnabled()) {
			logger.trace("Eagerly caching bean '" + beanName +
					"' to allow for resolving potential circular references");
		}
		addSingletonFactory(beanName, () -> getEarlyBeanReference(beanName, mbd, bean));
	}

	// Initialize the bean instance.
	Object exposedObject = bean;
	try {
		// 属性填充方法populateBean,进行依赖注入等
		populateBean(beanName, mbd, instanceWrapper);
		exposedObject = initializeBean(beanName, exposedObject, mbd);
	}
	... ... ...
}
以下是属性注入方法populateBean整个方法的概览,下文会逐步介绍重点代码。
	protected void populateBean(String beanName, RootBeanDefinition mbd, @Nullable BeanWrapper bw) {
		// 这块主要是成立bw == null的异常情况的,感觉没什么用,封装的实例bw不太会为null
		if (bw == null) {
			if (mbd.hasPropertyValues()) {
				throw new BeanCreationException(
						mbd.getResourceDescription(), beanName, "Cannot apply property values to null instance");
			}
			else {
				return;
			}
		}

		// mbd.isSynthetic()默认是false,也不懂什么情况是true,不必理会
		// 同时有实现InstantiationAwareBeanPostProcessor接口的Bean,则继续往下,正常这个条件都是成立的
		if (!mbd.isSynthetic() && hasInstantiationAwareBeanPostProcessors()) {
			for (BeanPostProcessor bp : getBeanPostProcessors()) {
				if (bp instanceof InstantiationAwareBeanPostProcessor) {
					InstantiationAwareBeanPostProcessor ibp = (InstantiationAwareBeanPostProcessor) bp;
					// 返回false,这个属性就不继续注入,2.1中会说明一下这里
					if (!ibp.postProcessAfterInstantiation(bw.getWrappedInstance(), beanName)) {
						return;
					}
				}
			}
		}

		// 暂时不懂什么情况hasPropertyValues有值,难道是xml配置的时候的?
		PropertyValues pvs = (mbd.hasPropertyValues() ? mbd.getPropertyValues() : null);

		// 采用注解的时候resolvedAutowireMode=0
		int resolvedAutowireMode = mbd.getResolvedAutowireMode();
		// 这里是针对xml配置的bean,下文2.2会说明
		if (resolvedAutowireMode == AUTOWIRE_BY_NAME || resolvedAutowireMode == AUTOWIRE_BY_TYPE) {
			MutablePropertyValues newPvs = new MutablePropertyValues(pvs);
			if (resolvedAutowireMode == AUTOWIRE_BY_NAME) {
				autowireByName(beanName, mbd, bw, newPvs);
			}
			if (resolvedAutowireMode == AUTOWIRE_BY_TYPE) {
				autowireByType(beanName, mbd, bw, newPvs);
			}
			pvs = newPvs;
		}

		// 是否有实现InstantiationAwareBeanPostProcessors的bean,到这都是会有的
		boolean hasInstAwareBpps = hasInstantiationAwareBeanPostProcessors();
		// 是否需要依赖检查,默认false
		boolean needsDepCheck = (mbd.getDependencyCheck() != AbstractBeanDefinition.DEPENDENCY_CHECK_NONE);

		PropertyDescriptor[] filteredPds = null;
		if (hasInstAwareBpps) {
			if (pvs == null) {
				pvs = mbd.getPropertyValues();
			}
			for (BeanPostProcessor bp : getBeanPostProcessors()) {
				if (bp instanceof InstantiationAwareBeanPostProcessor) {
					InstantiationAwareBeanPostProcessor ibp = (InstantiationAwareBeanPostProcessor) bp;
					// 这个是重点,postProcessProperties在这进行属性的注入,
					PropertyValues pvsToUse = ibp.postProcessProperties(pvs, bw.getWrappedInstance(), beanName);
					if (pvsToUse == null) {
						if (filteredPds == null) {
							filteredPds = filterPropertyDescriptorsForDependencyCheck(bw, mbd.allowCaching);
						}
						// 兼容老版本的注入
						pvsToUse = ibp.postProcessPropertyValues(pvs, filteredPds, bw.getWrappedInstance(), beanName);
						if (pvsToUse == null) {
							return;
						}
					}
					pvs = pvsToUse;
				}
			}
		}
		if (needsDepCheck) {
			if (filteredPds == null) {
				filteredPds = filterPropertyDescriptorsForDependencyCheck(bw, mbd.allowCaching);
			}
			// 依赖检查,对应depends-on属性
			checkDependencies(beanName, mbd, filteredPds, pvs);
		}

		if (pvs != null) {
			// 将所有PropertyValues中的属性填充到bean中
			applyPropertyValues(beanName, mbd, bw, pvs);
		}
	}
2.1. postProcessAfterInstantiation:
这块代码是作为扩展用的,比如有一个实现InstantiationAwareBeanPostProcessor接口的bean,重写方法
·
在实例化SetterBean后,在属性注入之前给个机会修改bean或者放弃属性注入
·
比如此处不进行属性beanService注入,返回false;此时SetterBean对象内部属性全为空
·
除非扩展,不然正常都返回true,像AutowiredAnnotationBeanPostProcessor、CommonAnnotationBeanPostProcessor
@Component
public class BeanInstantiaitionAwareImpl implements InstantiationAwareBeanPostProcessor {

    @Override
    public boolean postProcessAfterInstantiation(Object bean, String beanName) throws BeansException {
        if(beanName.equals("setterBean"){
            SetterBean setterBean = (SetterBean) bean;
            setterBean.setXXX("XXX");
            return false;
        }
        //默认返回true,什么也不做,继续下一步 初始化
        return true;
    }
2.1. resolvedAutowireMode:
这一块对resolvedAutowireMode判断逻辑代码,是针对xml配置的,可参考链接

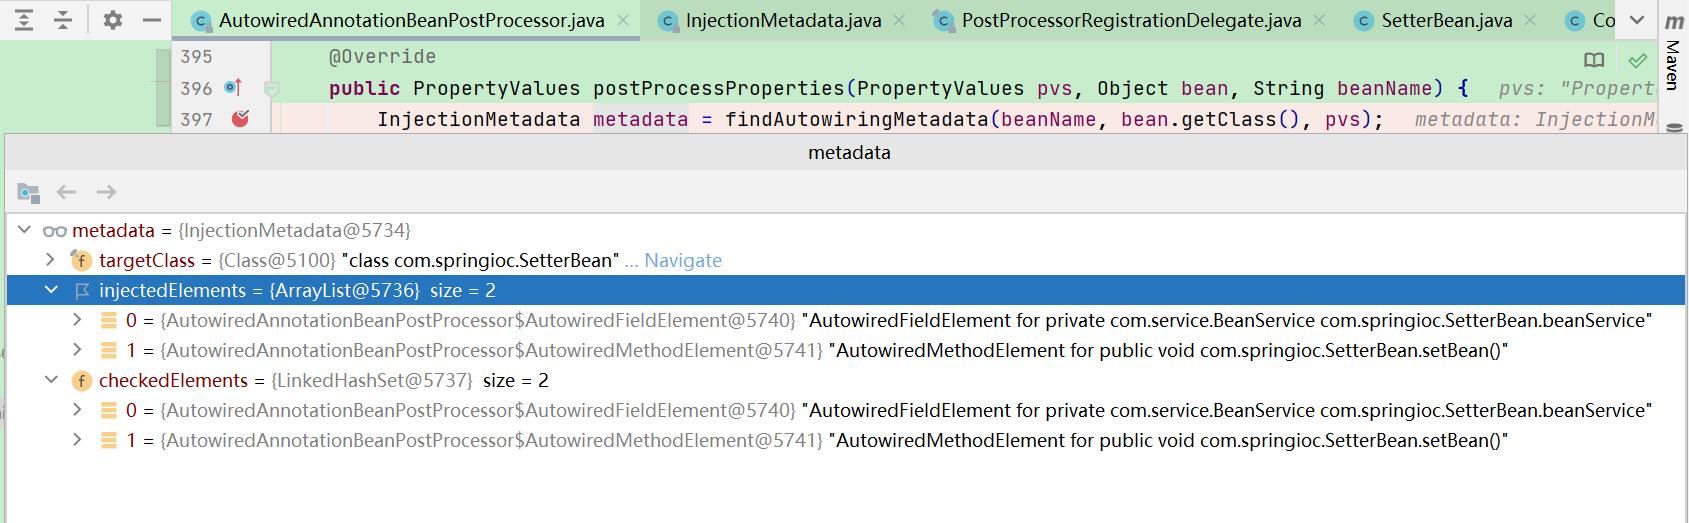
2.3. postProcessProperties:
这个是重点,对于@Autowired注入,此处调用的是AutowiredAnnotationBeanPostProcessor这个后置处理器的方法
·
findAutowiringMetadata方法中,会从缓存中获取到InjectionMetadata,可见链接
·
再根据属性方法元数据metadata,进行注入
public PropertyValues postProcessProperties(PropertyValues pvs, Object bean, String beanName) {
	InjectionMetadata metadata = findAutowiringMetadata(beanName, bean.getClass(), pvs);
	try {
		// 根据属性方法元数据metadata,进行注入
		metadata.inject(bean, beanName, pvs);
	}
	catch (BeanCreationException ex) {
		throw ex;
	}
	catch (Throwable ex) {
		throw new BeanCreationException(beanName, "Injection of autowired dependencies failed", ex);
	}
	return pvs;
}
2.4. metadata.inject:
属性元数据封装到AutowiredFieldElement,方法元数据封装到AutowiredMethodElement,最后都封装到InjectionMetadata
`
二者都是AutowiredAnnotationBeanPostProcessor的内部类,继承InjectionMetadata.InjectedElement
循环遍历属性、方法元数据进行注入;封装的对象都是继承InjectedElement的
·
会先进行属性注入,再进行方法注入,所以属性注入会存在被覆盖的可能,本栗子中,最后注入的beanService的name为WTF
·
根据这个特性,可以对static修饰的对象,进行方法注入,达到属性注入的效果
public void inject(Object target, @Nullable String beanName, @Nullable PropertyValues pvs) throws Throwable {
	Collection<InjectedElement> checkedElements = this.checkedElements;
	Collection<InjectedElement> elementsToIterate =
			(checkedElements != null ? checkedElements : this.injectedElements);
	if (!elementsToIterate.isEmpty()) {
		// 遍历属性/方法元数据
		for (InjectedElement element : elementsToIterate) {
			if (logger.isTraceEnabled()) {
				logger.trace("Processing injected element of bean '" + beanName + "': " + element);
			}
			// 进行注入
			element.inject(target, beanName, pvs);
		}
	}
}
2.5. element.inject :
resolveDependency方法来获取依赖的属性bean,这里的详细细节后面再介绍。
protected void inject(Object bean, @Nullable String beanName, @Nullable PropertyValues pvs) throws Throwable {
	// 就是类属性,反射中的field
	Field field = (Field) this.member;
	Object value;
	if (this.cached) {
		// 有缓存就通过缓存获取注入的属性bean
		value = resolvedCachedArgument(beanName, this.cachedFieldValue);
	}
	else {
		// 构建DependencyDescriptor,required除非显示指定非必须@Autowired(required = false),默认是true
		DependencyDescriptor desc = new DependencyDescriptor(field, this.required);
		desc.setContainingClass(bean.getClass());
		Set<String> autowiredBeanNames = new LinkedHashSet<>(1);
		Assert.state(beanFactory != null, "No BeanFactory available");
		TypeConverter typeConverter = beanFactory.getTypeConverter();
		try {
			// 这是重点,通过resolveDependency来解析出依赖的属性bean对象
			value = beanFactory.resolveDependency(desc, beanName, autowiredBeanNames, typeConverter);
		}
		catch (BeansException ex) {
			throw new UnsatisfiedDependencyException(null, beanName, new InjectionPoint(field), ex);
		}
		synchronized (this) {
			// 这里是添加缓存的一些逻辑
			if (!this.cached) {
				if (value != null || this.required) {
					this.cachedFieldValue = desc;
					registerDependentBeans(beanName, autowiredBeanNames);
					if (autowiredBeanNames.size() == 1) {
						String autowiredBeanName = autowiredBeanNames.iterator().next();
						if (beanFactory.containsBean(autowiredBeanName) &&
								beanFactory.isTypeMatch(autowiredBeanName, field.getType())) {
							this.cachedFieldValue = new ShortcutDependencyDescriptor(
									desc, autowiredBeanName, field.getType());
						}
					}
				}
				else {
					this.cachedFieldValue = null;
				}
				this.cached = true;
			}
		}
	}
	if (value != null) {
		// value就是依赖的属性bean,通过反射修改bean,实现属性注入
		ReflectionUtils.makeAccessible(field);
		field.set(bean, value);
	}
}
2.6. 小结:
通过postProcessAfterInstantiation方法,给后置处理器个机会在属性注入之前修改bean或者放弃属性注入,扩展用的
·
接下来会针对xml配置的bean进行byType / byName处理,注解的bean是不处理的
·
通过postProcessProperties方法进行属性注入
- 从预解析的缓存中获取封装了属性、方法元数据的对象InjectionMetadata
- 循环遍历各元数据,进行注入;先进行属性,再进行方法注入,属性注入会存在被覆盖的可能
- 通过resolveDependency来解析出依赖的属性bean对象
- 最后通过反射修改bean,实现属性注入
【参考】:
你所不知道的Spring的@Autowired实现细节
Spring源码分析衍生篇五:AutowiredAnnotationBeanPostProcessor
以上是关于初识Spring源码 -- 属性填充populateBean | 静态属性注入的主要内容,如果未能解决你的问题,请参考以下文章